1
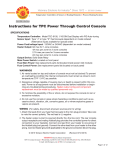
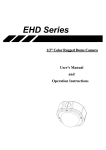
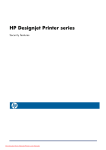
EHD KIT
USER MANUAL
Thank you for purchasing a XFP filtration system! The only filtration kit
that prolongs your oil life with no consumables!
Please contact us for additional information
and/or components (valves, fittings, etc...)
www.xfpfilters.com
Table of Contents
1)
Pre-installation Considerations ....................................................................... 2
1.1)
Filter location and orientation ....................................................................... 2
1.2)
Purifier installation ........................................................................................ 2
1.3)
Recommended Fittings and Hoses .............................................................. 2
1.4)
Order of installation ...................................................................................... 2
2)
Installing fixing clamps..................................................................................... 3
3)
Installing the filter.............................................................................................. 4
4)
Installing the purifier ......................................................................................... 5
5)
Connecting the Electric Motor ......................................................................... 6
6)
Engine Start-up.................................................................................................. 6
7)
Usage of the EHD filtration kit.......................................................................... 7
7.1)
Increasing oil lifetime.................................................................................... 7
7.2)
Purifier drain................................................................................................. 7
REV 1.1
www.xfpfilters.com
Page 1 of 7
1) Pre-installation Considerations
Prior to installing the XFP Filtration System, please follow these recommendations:
1.1)
Filter location and orientation
We recommend installing the Filter as close as possible to the engine in order to reduce hose length.
Using available mounting holes on the truck frame is also recommended.
It is recommended to install the filter with the Electric Motor downwards and/or under sump level. If
this is not possible, a check valve needs to be fitted on the Outlet (preferred) or Inlet of the Purifier
(please contact XFP for more details).
1.2)
Purifier installation
The Purifier MUST be installed with drain plug downwards.
It is recommended to install the Purifier as close as possible to the filter to reduce hose length. Using
available mounting holes on the truck frame is also recommended.
It is required to locate a suitable return to sump port. Return to sump can be made on any sump port,
the engine head or through the oil filler cap.
1.3)
Recommended Fittings and Hoses
Please use ¾” (-12) hoses and 22L (DIN Light Series) fittings to connect the Filter to the Adaptor.
Please use ¼” (-04) hoses and 06L (DIN Light Series) fittings to connect the Filter to the Purifier, and
Purifier to Engine.
1.4)
Order of installation
The preferred installation order is as follows:
Install the Filter and Purifier clamps.
Install the Filter.
Install the Purifier.
Install the Adaptor (replacing the spin-on filter).
Connect the Filter to the Adaptor.
Connect the Filter to the Purifier.
Connect the Purifier to the sump.
Connect the Electric Motor.
REV 1.1
www.xfpfilters.com
Page 2 of 7
2) Installing fixing clamps
Select Filter and Purifier locations.
Use available holes or drill clamps mounting holes on the truck frame or a separate mounting frame
and install the clamps (figures shown are for fixing clamps supplied by XFP):
REV 1.1
www.xfpfilters.com
Page 3 of 7
3) Installing the filter
Install the XFP in its fixing clamp. Electric motor may be rotated if needed.
If your kit is supplied with an adaptor, Connect only one hose on Port A (inlet) of the filter. Remove
the spin-on filter, install the adaptor on the filter head and connect the hose to Port A of the adaptor.
Warning: this procedure is highly necessary in order to properly connect the filter. Failure to
do so may result in connecting the filter in reverse flow resulting in the failure of the SelfCleaning feature of the filter and voiding the warranty (i.e. the filter would only operate as a
manual filter and would clog like a conventional filter).
Check for the A
marking on the filter
and adaptor
N.B.: it is recommended to install the filter with the electric motor downwards or under sump
level. In case these configurations are not possible, please contact XFP for the supply of a
check valve to be installed on the Purifier Outlet.
When routing hoses, please take care to respect bend radius (information can be obtained
from the Hose supplier or XFP). We recommend having hoses supplied with a protective sleeve
to keep hoses away from the engine exhaust and sharp edges.
Connect the remaining hose from the filter to the adaptor. Tighten all fittings.
REV 1.1
www.xfpfilters.com
Page 4 of 7
4) Installing the purifier
It is recommended to install the Purifier as close as possible to the XFP filter.
Install the purifier vertically with fittings on top.
Connect the filter to one of the purifier adaptors.
Connect the purifier to the oil filler cap, oil sump or camshaft cover.
Note: the purifier return line can be made by drilling a 0.43 in. hole in the oil filler cap; then introduce
the flex-hose in the oil filler cap and install the fitting.
REV 1.1
www.xfpfilters.com
Page 5 of 7
5) Connecting the Electric Motor
To connect the motor:
Locate a suitable ground to connect Green cable of Motor.
Locate a suitable +12/24V after ignition to Connect Brown cable of Motor. We
recommend the use of a 1A fuse as close as possible to the +12/24V source.
Turn the ignition key (DO NOT start the engine) and check the motor is operating. Shut-off the system.
6) Engine Start-up
During engine start-up, check the oil pressure light goes off in less than 10 seconds. If it is not the
case, immediately shut-off the engine and check installation and/or contact XFP.
Stop the engine and top-up oil level
Restart engine and check oil pressure light goes off in less than 3 seconds. If it is not the case, please
contact XFP.
ADDITIONNAL FEATURE OF THE XFP FILTER
The XFP filter is equipped with two M10x1.0 pressure ports to allow monitoring of the filter pressure
drop continuously or occasionally. Pressure drop across the filter should be below 7 psi for a hot
engine.
Filter inlet
pressure (A mark)
REV 1.1
Filter outlet
pressure
www.xfpfilters.com
Page 6 of 7
7) Usage of the EHD filtration kit
The XFP filtration kit allows an increase in oil lifetime while enabling you to monitor your
engine’s health.
7.1)
Increasing oil lifetime
It is not required to drain your oil sump when installing the XFP filtration kit. However, an oil sample
must be taken for analysis according to one of the following procedures:
Warning: use appropriate protection equipment
•
If the purifier return line is rooted to an orifice on the oil sump or camshaft cover, you may:
With the engine stopped, unplug the feed hose to the purifier (hose from filter) and install the
sampling valve in closed position. Start the engine, gently open the valve, allow some oil to
flow to an oil collecting bin (cleans the valve) and fill the sampling bottle.
•
If the purifier return line roots through the oil filler cap, while the engine is running:
a) Carefully remove the oil filler cap while maintaining the return line flow in the oil filler
gallery.
b) Carefully fill the oil sample bottle.
Result of the oil analysis will dictate when the next sample is to be taken. In general, an oil
sample is taken at drain interval.
NOTE ON OIL SAMPLING
• Fill sampling bottle to ¾ its capacity.
• For a proper analysis result:
o Complete oil sampling label as accurately as possible.
o Send sample as soon as possible to the laboratory.
7.2)
Purifier drain
Drain purifier when an oil sample is taken and, at least, once a year.
1) Place receptacle
purifier
under
the
2) Unplug one of the hoses from the
purifier.
3) Drain the purifier (capacity of
1Qt).
4) Re-install drain plug and hose;
start the engine and let it run for 5
mn; stop the engine and top-up
with fresh oil.
If purifier drain is not accessible, unplug purifier hoses and remove purifier from the clamp.
REV 1.1
www.xfpfilters.com
Page 7 of 7