1
INSTALLATION
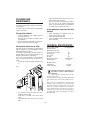
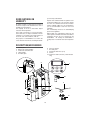
in figure 4.
4) Make sure the end of the hose is no higher than
the spout or water could remain in the tank.
Make sure there are no kinks in the hose (Fig. 5).
Position the appliance in the room to be dehumidified. A free space of at least 50 cm must be left
at the front of the dehumidifier, so as not to block
the air outlet. For efficient ventilation a space of
about 5-10 cm should be left at the back of the
appliance. The condensate can be drained in one
of the following ways:
Nota Bene: Keep the rubber bung to close
the spout.
fig. 5
A) Draining into the tank
The condensate can be drained directly into the
tank. The tank can be easily removed (fig.1).
NO
NO
YES
fig. 1
Instructions for fitting the castors
B) Continuous external draining
1) Unplug from the mains socket and empty the
tank (if full)
2) Remove the rubber caps from the bottom of
the appliance by pulling forcefully or using
pliers (see figure 6/1).
3) Fit the castors by inserting the pins into the
holes. (see figure 6/2)
If the appliance is to be operated for long periods
but you are unable to empty the tank regularly,
you are recommended to use the continuous
drain facility.
1) Remove the continuous drain cap by turning
it anticlockwise then remove the rubber bung
from the spout (fig. 2).
2) In models with continuous drain, screw on
N.B.: While fitting the castors, do not tilt the
appliance at an angle of more than 45°. After
fitting the castors, wait for at least an hour
before using the dehumidifier again.
b
a
fig. 3
fig. 4
1
2
the connector as shown in figure 3. Make sure
the gasket in the connector is positioned correctly.
3) Attach the rubber hose to the outlet as shown
fig. 6
fig. 2
13
GB