1
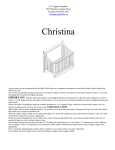
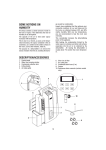
PL042EMI
ESPRESSO MACHINE WITH BUILT-IN GRINDER
COMPONENTS :
1.
2.
3.
4.
5.
6.
7.
8.
9.
10.
11.
12.
Cold water tank
Cup warmer
Steam/coffee pilot light
Steam/hot water knob
Strainer holder retaining ring
Steam/hot water tube
Removable cup rest
Strainer holder
Single cup strainer
Two cup strainer
On/off switch
Steam switch
13.
14.
15.
17.
18.
19.
20.
21.
22.
23.
24.
25.
Coffee/hot water switch
Indicator light: machine on
Coffee press
Coffee beans container
Filter for pods
Removable water drainage tray
Removable ground coffee tray
Ground coffee switch
Grinding degree scale
Grinding regulation knob
Ground coffee distributor
Manometer
USER INSTRUCTIONS
Starting the machine:
1.
Remove the machine from its packing and make sure all packing parts have been taken off (including the
protection bags).
2.
Lay the machine on a flat and steady surface far away from hot places and from the water taps.
3.
Remove the water tank cover on the back of the machine and take out the water tank (1) paying attention not
to damage the water tubes inside it.
4.
Fill the tank (1) with cold water.
5.
Replace the water tank back in the machine and check that the water tubes are not bent and that the filter is
well set on one of them.
6.
Plug in the machine in the mains. Make sure that the wall socket is of the right voltage.
7.
Place the filter holder (8) under the brewing group (5) and turn it from the left to the right. Leave it there so
that it can get warm and it gets ready for use.
8.
Switch the machine on by pressing the on/off switch (11). The built-in light (14) comes on to confirm the power
supply.
9.
Open the steam/hot water knob (4).
10. Press the steam switch (12) and the coffee/hot water switch (13).
11. When water comes out of the steam spout (6), press the coffee/hot water switch (13) and the steam switch
(12) again and close the steam/hot water knob (4).
12. After completing all these operations, leave the machine on.
Grinding adjustment:
13. As a reference for the grinding degree, a grinding degree scale (20) has been placed on the coffee beans
container (19): “7.6.5.4.3.2.1”
14. By taking as a point of reference the tally mark in the machine frame and by turning grinding regulation knob
(23), the grinding degree scale will turn accordingly.
15. Choose higher degrees to get coarse-ground coffee, or smaller degrees to get fine-ground coffee.
16. A correct grinding degree (taking into consideration the various coffee blends) is essential to get a good cup of
coffee. We suggest degree 3 to get a medium grinding.
Preparing an espresso coffee:
17. Check that the tank (1) contains water.
18. Press the on/off switch (11). The light (14) and the pilot light (3) will come on. Do this operation only if the
machine is off. If it’s on pass to the following point.
19. As soon as the pilot light (3) goes off, the machine is ready for use.
20. Place the single cup strainer (9) or the two cup strainer (10) in the strainer holder (8) as described in point 4.
21. Drop the bean coffee in the bowl (17)
22. Press the button (21) with the strainer holder (8) to activate the coffee grinder. When you have got the desired
coffee quantity, take the strainer holder (8) off.
23. Pack the coffee in the strainer against the press (15).
24. Insert the strainer holder (8) in the retaining ring (5) and turn it hard to the right; place the cups on the
removable cup rest (7).
25. Press the coffee/hot water switch (13).
26. When you have got the right quantity of coffee, press the switch coffee/hot water again (13).
27. Remove the strainer holder (8) and throw away the coffee grounds.
Preparing an espresso with the use of coffee pods:
28. Check that the water tank (1) has been filled in with water.
29. Press the on/off switch (11): the indicator light: machine on (14) and the indicator light: steam/coffee ready (3)
will come on. Do this operation only if the machine is off. If it’s on pass to the following point.
30. As soon as the indicator light: steam/coffee ready (3) goes off, the machine is ready for use.
31. Fit the pod filter (18) into the filter holder (8) that has been warmed up by leaving it attached to the brewing
group as described in point 4.
32. Open the single packed pod not damaging the pod.
33. Place the pod in its filter (18).
Pag. 2
34.
35.
36.
37.
Insert the filter holder (8) in the brewing group ring (5), turn it from left to right with force, then put the cup on
the removable water drainage tray (7).
Push the coffee/hot water switch (13).
Once you get the coffee desired quantity, push the coffee/hot water switch (13) again.
Remove the filter holder (8) and throw away the used pod.
Steam:
38. Check that the water tank (1) has been filled in with water.
39. Press the on/off switch (11): the indicator light: machine on (14) and the indicator light: steam/coffee ready (3)
will come on. Do this operation only if the machine is off. If it’s on pass to the following point.
40. Press the steam switch (12).
41. As soon as the light: steam/coffee ready (3) goes off, the machine is ready for use.
42. Open the steam/hot water knob (4). First some water will flow out and then the steam.
43. Put the cup with the desired infusion under the steam tube (6) and turn the knob completely.
44. When the drink has been suitably frothed, close the steam/hot water knob (4) and press the steam switch (12)
again.
45. Reopen the steam/hot water knob (4) and repress the steam switch (12) and the coffee/hot water switch (13)
again. When the water flows out of the steam tube (6), close the steam/hot water knob (4) again and at the
same time press the coffee/hot water switch (13) and the steam switch (12) again. Clean carefully the
steam/hot water tube (6).
Hot water:
46. Check that the water tank (1) has been filled in with water.
47. Press the on/off switch (11): the indicator light: machine on (14) and the indicator light: steam/coffee ready (3)
will come on. Do this operation only if the machine is off. If it’s on pass to the following point.
48. As soon as the light: steam/coffee ready (3) goes off, the machine is ready for use.
49. Open the steam/hot water knob (4).
50. Press the steam switch (12) and the hot coffee/hot water switch (13). Hot water will flow out from the steam
tube (6) immediately.
51. Once you have got the desired quantity of water, repress the steam switch (12) and the coffee/hot water switch
(13) again and close the steam/water knob (4).
52. After obtaining hot water from the tube, make sure that there is still water in the tank (1).
Useful Tips:
−
The strainers (9 and 10) do not need to be washed after every single use but we suggest checking that the
holes are not obstructed.
−
For a better result, we suggest keeping the cups warm on the cup-warmer (2) which only operates by machine
on.
Routine maintenance and precautions:
−
It is recommended to clean, after each use, the steam tube and the strainer holder carefully
−
For cleaning it is recommended the use of a wet damp cloth
−
Do not leave the machine outdoor. And do not immerse the machine in water.
−
The machine can be used only by adults and must be kept away from children
−
Do not wash strainer and strainer holder in dishwasher.
TECHNICAL DATA:
Voltage: 230 V - 50 Hz; 120 V – 60 Hz
Power: 1200 W
Heating time: ca. 3 min.
Pump pressure: 15 bar
Water tank: 2.7 litres
Dimensions (HxLxD): 39*33*42 cm
Weight: 12.2 kg
To be operated with ground coffee and coffee pods
LEGAL WARRANTY
This product is covered by the warranty laws valid in the country where the product has been sold; specific
information about the warranty terms can be given by the seller or by the importer in the country where the product
has been purchased. The seller or importer is completely responsible for the product.
The importer is completely responsible also for the fulfillment of the laws in force in the country where the importer
distributes the product, including the correct disposal of the product at the end of its working life.
Inside the European countries the laws in force are the national laws implementing the EC Directive 44/99/CE.
The inserted data and pictures can be subject to changes without previous notice for the improvement of the
machine’s performances.
TROUBLESHOOTING:
Dear Customer,
We thank you for buying one of our products, made in accordance with the most up-to date technological innovations.
Following carefully the simple operations of use contained in this manual, which comply with essential safety
regulations, you will get the best performances and notice the remarkable reliability of this product along the years.
You find here below an easy table describing some malfunctioning of the machine with its solutions:
Pag. 3
PROBLEM
Coffee is produced
without froth.
Coffee too cold
Coffee produced too
quickly
Coffee leaks
between the coffee
group and the filterholder
Coffee is produced in
drips
The machine does
not produce steam
No coffee produced
during the coffee
cycle
The machine does
not work and the ON
light does not turn
on
The ON light is on
but the water does
not heat
CAUSE
1. Coffee not suitable for machine
2. Improper grind
3. Too little coffee in filter
4. The filter holder has not be tightened
under the brewing group ring
1. The machine had not reached the
proper temperature
2. Filter-holder not preheated
3. Cups not preheated
4. Pressure switch malfunction.
1. Coffee too coarsely ground
2. Not enough coffee in the filter
3. Coffee not pressed enough
4. Coffee/pod old or unsuitable
1. Filter-holder not properly inserted
2. Too much coffee in the filter
3. Edge of the filter-holder not clean
4. The douche seal is worn or damaged
1. Coffee too finely ground
2. Too much coffee in the filter
3. Coffee too firmly pressed
1. Obstructed outlet hole at end of
steam pipe
2. Too little water in tank
1. Too little water in tank
2. Steam switch on
3. Coffee too finely ground
4. Too much coffee in the filter
5. Coffee too firmly pressed
6. Shower plate obstructed
1. No electricity
2. The main cable is not properly
plugged in
3. The main cables damaged
1. Thermostat malfunction,
2. Heating element malfunction
1.
2.
3.
4.
SOLUTION
Use different coffee
Adjust coffee grind
Put more coffee in the filter
Tighten better the filter holder
1. See section “Starting the Machine” and “Making
an Espresso Coffee”
2. Filter-holder must be heated together with the
water – see section “Starting the Machine”
3. Properly heat the cups on the cup-warmer
4. Contact the nearest SERVICE CENTER
1. Use a finer grind
2. Put more coffee in the filter
3. Press coffee more firmly
4. Use different coffee/pod
1. Insert the filter-holder correctly
2. Put less coffee in the filter
3. Clean the edge of the filter-holder
4. Contact the nearest SERVICE CENTER
1. Use a coarser grind
2. Put less coffee in the filter
3. Press the coffee more gently
1. Clean the outlet hole with a needle
2. See section “Starting the Machine”
1. Fill tank
2. Turn off the steam switch
3. Use a coarser grind
4. Put less coffee in the filter
5. Press the coffee more gently
6. Contact the nearest SERVICE CENTER
1. Restore electrical power
2. Plug the main cable in correctly
3. Contact the nearest SERVICE CENTER for a
replacement cable
1. Contact the nearest SERVICE CENTER
2. Contact the nearest SERVICE CENTER
IMPORTANT INFORMATION FOR CORRECT DISPOSAL OF THE PRODUCT IN
ACCORDANCE WITH EC DIRECTIVE 2002/96/EC
At the end of its working life, the product must not be disposed of as urban waste. It must be
taken to a special local authority differential waste collection centre or to a dealer providing this
service. Disposing of a household appliance separately avoids possible negative consequences
for the environment and health deriving from inappropriate disposal of enables the constituent
materials to be recovered to obtain significant savings in energy and resources. As a reminder
of the need to dispose of household appliances separately, the products is marked with a
crossed-out wheeled dustbin.
EC DECLARATION OF CONFORMITY
Gemme Italian Producers srl declares under its own responsibility that the products
PL042EMI/PL042EMIAUS, to which this declaration relates, are in accordance with the
provisions of the specific directives:
CEI EN 60335-1, CEI EN 60335-2-15
It also declares that the above mentioned products conform with the
electromagnetic
compatibility test EMC.
NB: The present declaration voids should the machine be modified without our specific
authorization.
Castegnato, 02/01/2013
Amministratore Delegato
Gemme Italian Producers srl
Via del Lavoro 45 - I - 25045 Castegnato (BS) Italy
Tel: +39 030 2141199 - Fax: +39 030 2147637
AB 01
Pag. 4
www.lelit.com - [email protected] - P.Iva 03426920173