1
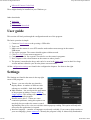
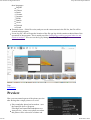
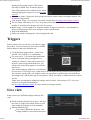
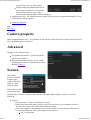
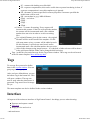
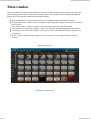
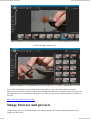
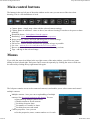
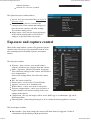
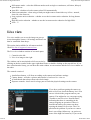
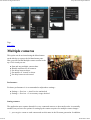
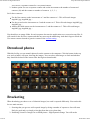
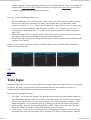
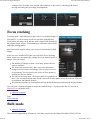
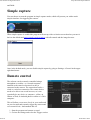
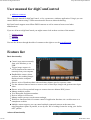
User manual for digiCamControl
1 of 24
http://dcc/book/export/html/16
User manual for digiCamControl
Add new comment
This is the user manual for digiCamControl - a free, opensource, windows application. Using it you can
control DSLR cameras using a USB connection also known as tethered shooting.
digiCamControl supports most Nikon DSLR cameras as well as cameras from several other
manufacturers.
If you are all new to digiCamControl you might want to look at these sections of the manual:
1. Getting started
2. Settings
3. Shooting
You can also browse through the table of contents on the right or use the search function.
Feature list
Basic functionality
Control your camera remotely
from your Windows pc via
USB.
Trigger image capture via
release button on the camera or
remotely from your computer.
Handhold the camera, shoot,
and have the resulting images
displayed on the computer
monitor.
Shoot a series of bracketet shots with an arbitrary shutter speed or exposure value.
Use the advanced interval meter to create a series of time-lapse images and generate time-lapse
video.
Shoot a series of focus stacked images to connect into one ultimate DOF picture.
Manage multiple profiles.
View histogram and photo metadata.
Review images in full screen.
Manage camera presets (saved camera settings).
Webserver function allows for remote control of application functions via a web browser on a
smartphone or tablet.
Multiple camera support, you can control multiple connected cameras at the same time,
triggering photo capture in parallel, or one by one. We’re looking forward to seeing your “bullet
time” photos!
Advanced functionality
08-06-2013 09:26
User manual for digiCamControl
2 of 24
http://dcc/book/export/html/16
See the image live through the camera on your
computer monitor before shooting.
Bulb mode for D800, D4, D600, D7100 adding the
possibility to define custom shutter speeds.
Automated focus stacking.
Shooting triggered by motion detection.
The advanced functionality is limited to some Nikon camera
models - see Supported cameras.
The basic functionality is theoretically supported by any
WIA capable camera such as Canon or Panasonic DSLR's
Getting started
Add new comment
1. Download and install the software and the required libraries.
2. Connect the camera to the computer with a USB cable. Set the camera transfer mode to
PTP/MTP, not mass storage. This is done in the camera menu.
3. Start the program, and make sure the camera appears in the list of attached cameras. This can
take a few seconds.
4. You are ready to shoot!
System requirements
Add new comment
DigiCamControl is a Windows program. It requires:
Microsoft Windows XP, Vista, 7 32 or 64 bit, 8 32 or 64 bit
Microsoft .NET Framework 4
Microsoft Camera Codec Pack
You will also need a compatible camera and a USB cable.
For using the remote control via your local network (wired or wireless) you will need a smartphone, a
tablet or a second computer (which can be a Mac or Unix machine) - actually any device tha has has a
browser and can access the same network as the pc connected to the camera.
Where to download
Add new comment
The latest version of digiCamControl can be downloaded here.
You will also need:
Microsoft .NET Framework 4
08-06-2013 09:26
User manual for digiCamControl
3 of 24
http://dcc/book/export/html/16
Microsoft Camera Codec Pack
These might already be installed on your Windows pc.
Other downloads:
Issues list
Source code
Older version download
User guide
This section will lead you through the configuration and use of the program.
The basic operation is simple:
1. Connect a listed camera to the pc using a USB cable.
2. Turn it on.
3. Make sure the camera is set to PTP transfer mode and not mass storage in the camera
USB-menu.
4. Fire up the program. The camera should register within seconds.
5. Click live view if your camera supports it.
6. Compose and focus. Set exposure if needed or use the camera's programs.
7. Press Capture or the release button on the camera to take a picture.
8. The picture is transfered to the pc and can be be seen in the image grid, seen in detail in a large
version and later edited in your favorite photo converter/editor.
All the configuration settings are found in the configuration chapters. See them to the right.
Settings
The Settings are found in the menu in the top right
corner of the program.
Theme - you can select the user interface
display theme. A number of different color
schemes are available - both dark and light
Main Window - lets you choose the appearance
of the program at startup. Choose default or
simple capture. This setting will not take effect
until you restart the program.
Disable native driver - if there are some
connection problems, setting this option to on
may help, but can reduce the camera control
functionality like no live view, no real time camera property reading. This option will only take
effect after the application is restarted
Interface language - a number of languages are aleready available. If you want to help translate to
your own language, please contact us. Currently the program is fully or almost fully translated to
08-06-2013 09:26
User manual for digiCamControl
4 of 24
http://dcc/book/export/html/16
these languages:
English
Chinese
Dutch
German
Japanese
Polish
Danish
Greek
Turkish
French
External viewer - if this file exists, and you use the context menu in the file list, the file will be
viewed in this program
Locate log file - this will open the location of the file app.log which contains technical data of the
operations of the program. This is mainly used for finding bugs, tracking program behavior and
technical analysis. You can reset the log by hitting the button "Reset settings".
Tags:
Translation
Preview
Here you can control aspects of the picture preview
after having shot a single picture or a series.
Play sound after photo has been taken - uses
the sound file from c:\Program
Files\digiCamControl\Data\takephoto.wav.
Auto preview - when a new photo was taken
this photo will be selected in a listbox and
08-06-2013 09:26
User manual for digiCamControl
5 of 24
http://dcc/book/export/html/16
displayed, this option requires CPU power
specially for RAW files. If transfer speed is
critical this option can be unchecked like when
shooting high speed sequences or with multiple
cameras.
Show focus points - display the focus points used by the camera when viewing the picture. Not
all cameras support this.
Low memory usage - save memory if possible. Useful when shooting with multiple cameras.
Preview image after shot in live view - keep the picture still in the live view window for a
number of seconds before going back to the live picture.
Rotate image - set the image to be rotated a number of degrees clockwise. Can be handy for
always rotating images, like when using the camera upside-down.
Don't load thumbnails
Fullscreen window background - select background color.
Triggers
In this section can be set the way you want to trigger
the camera. You can always use your mouse and the
built-in button in the top left button row.
Use keyboard to trigger photo - select a key
and Alt, Ctrl or Shift - or a combination
Use web server - if is checked the application
can be controlled using a smartphone or a
another pc, which is connected in same local
network. After having checked the box, you
will need to restart the program to actvate the
web server.
Type in the displayed address in a web browser
on your device. This will access a small web server built into the digiCameraControl program.
You can also scan the QR code with the camera in your phone to go directly to the control site.
You might need a QR scanner app for the purpose. These are widely available and most of them
are free.
Under some circumstances additional settings can be needed - like open port 5513. See your
antivirus or firewall documentation.
See the section Remote control for more details on using the facility.
Live view
In this section you will find settings related to live
view.
Small, medium and large focus steps - this sets
how fine or rough you want the focus to work
when using the program to focus manually
Motion detection type
Two Frames Difference Detector - this
setting suitable for fast motion detection
08-06-2013 09:26
User manual for digiCamControl
6 of 24
http://dcc/book/export/html/16
but not detect the very slow motion
Simple background Modeling detector this setting is suitable for slow motion
detection, but this may cause false
detection like ambient light condition changing.
Smallest block size - the smallest detected square in pixels used as comparison during live view
is 640x482 for Nikon cameras.
Add new comment
Tags:
Live view
Camera property
Don't download photos to PC - if is checked no file transfer will be done after capture, this option isn't
active if SDRam option is checked
Advanced
Settings for the advanced user
Use parallel file transfer - speeds up transfer,
but can cause failures.
Show untranslated string id's - for use when
translating the software. Translations are done
through Transifex.
Session
The session
selector is located
in upper right
corner in the main
window - right
under the menu.
You see the current
session name and
can Add, Edit or Delete sessions in the buttons to the right. When editing a session you see the
following:
General
Session name - a name to identify the session.
Base folder where the photos will be saved. You can browse your computer to find its
location and create a new folder from within the dialog.
File name template - the template for file name creation. You can use the / character to
created subfolders too. The session taga are case sensitive.
$N - session name
08-06-2013 09:26
User manual for digiCamControl
7 of 24
http://dcc/book/export/html/16
$C - counter with leading zeros like 0001
$E - exposure compensation, this can be useful when exposure bracketing is done, if
exposure compensation is zero this template tag is ignored.
$X - the name of camera specified in camera properties if no name specified the
model name will be used.
$D - current date in yyyy-MM-dd format
$Tag1 - see below...
$Tag2 $Tag3 $Tag4 Counter - a counter for naming. Every capture will
increment this counter. If the file exists with the number,
the counter will be incremented until a file with that
number does not exist in order to avoid overwriting
files.
Use original filename given by the camera - the original
filename will be used in stead of the template. If a file
with same name exists, a counter will be added to end a
file this filename. It will always start from 0 and be
incremented until a file with that number does not exist.
Allow folder changes using image browser - if is checked, a folder selector will be shown
in the grid layout and the folder can be changed while browsing.
Tags - in this tab you can define tags for the Tag selector window. These tags can be referenced
in the file name template. More about tags here.
Tags
To use tags first you need to define
them in the session window. You can
group tags in four groups.
After you have defined them, you use
the button Tag in the button bar. This
will open a window. The tags can
now be used when the photo name is
generated. Tags aren't saved in image
file yet.
The name template can also be defined in the session window.
Interface
All aspects of the main user interface of digiCameraControl - the things you use when shooting:
Exposure and capture control
Live view
Image preview and review
...and much more
08-06-2013 09:26
User manual for digiCamControl
8 of 24
http://dcc/book/export/html/16
Main window
The main window contains a large number of elements used to control and operate the camera, invoke
all the settings and not least evaluate the resulting images. The window can be configured to differnt
layouts, but will normally contain the following elements:
A top left button row - the main controls for operating the camera and take the pictures.
The top right menu - contains links to settings, menus, help (these pages) and an option to donate
to the project.
The session control - options to divide your shooting projects into separate sessions
Left vertical row with camera settings - shows you exposure and shooting data for the camera.
A central preview of the latest image - or the one you have selected from the grid. (this preview
is optional)
A grid - either a full grid with no preview or a grid under or to the right, offering a central
preview.
Full grid, no preview
Grid below, with preview
08-06-2013 09:26
User manual for digiCamControl
9 of 24
http://dcc/book/export/html/16
Grid to the right, with preview
If you have selected the layout with the grid on the right, you can vary the distribution of space
between the two sections. Click on the vertical dividing line and move it with the mouse or use the left
and right arrow keys, essentially deciding the size of the preview image and the number of columns in
the grid.
More about the grid and preview here.
Image browser and preview
On the main screen you will find the preview window and the file browser, showing thumbs of the
images you have shot.
08-06-2013 09:26
User manual for digiCamControl
10 of 24
http://dcc/book/export/html/16
Image preview
The large preview will show the image in full resolution. You can zoom and pan in the image to see
details. If you look at a RAW-file it will be quite rough, but jpeg's are detailed.
You can zoom in the image using the following controls:
Ctrl+Mouse Drag - Move image
Alt+Mouse Drag - Draw zoom area
Alt+Mouse Click - Zoom out to normal view
Shift+Mouse Scroll - Zoom in/out
Ctrl+Alt+Mouse Scroll - Zoom in/out on cursor position
Mouse double click - Open loupe window
You can open a small navigation window (View Finder) by clicking the cross in the lower righthand
side of the preview area. This will show a small version of the image with an overlay that shows which
part you are currently looking at.
You can select one or more images in the grid and right-click one one of them to get a menu that allows
you to do different operations on them:
Actions - offers different actions (see below)
Select - none or all files. Removes or sets selections on all files.
Delete - file(s). Remove the selected files from the folder.
Show - in Explorer. Opens the containing folder in WIndows normal file view.
Open - in an external viewer. Defaults to Windows' viewers, but a custom selected viewer can be
set up.
Copy - full path to clipboard.
08-06-2013 09:26
User manual for digiCamControl
11 of 24
http://dcc/book/export/html/16
Actions
Generate - focus stacked image using CombineZP. Requires the external program CombineZP.
Enfuse - images. Combine several exposures using an enfuse algorithm. Simpler than HDR.
Convert - RAW to jpg. Relies on an external converter.
Convert - RAW to exposure-bracketing jpg's. Produce jpg's for an HDR-program. Relies on an
external converter.
Loupe window
The loupe window show the whole image with a loupe overlay that shows a 100% magnification. You
can move the loupe around to inspect details for sharpness etc. Press Esc to close the window again.
08-06-2013 09:26
User manual for digiCamControl
12 of 24
http://dcc/book/export/html/16
Main control buttons
The buttons in the top left part of the main window are the ones you use most of the time when
shooting. This is a fast breakdown of each:
Capture photo - simply snap a shot with the selected camera settings.
Capture photo no autofocus - same as above, but with no focusing. Focus has to be preset or done
manually.
Download photos - fetch photos from the camera.
Bracketing - shoot a row of pictures with different exposures.
Image property - show EXIF-info and histogram for selected image.
Time lapse - set up and start a time lapse sequence.
Full screen - remove borders and show the program as large as possible.
live view - activate live view and show the live view window.
Browse sessions - show an overview over your saved shooting sessions.
Tags - add tags to the selected image.
Menus
If you click the menu item Menu in the top right corner of the main window, you will se two panes
sliding in from left and right. Each pane can be removed separately by clicking the arrow or both can
be removed by clicking the top right menu link again.
The left pane contains access to the connected camera(s) and enables you to select camera and control
multiple cameras.
Multiple cameras - here you can set up handling of multiple
cameras. See the special section on this feature. You can
Start and stop multiple camera shots
Disable autofocus for all cameras
Set deleay between shots
Set number of "rounds" to shoot
Set delay between each round
Camera properties - here you can
Set the properties, name, counter number ect. for each
08-06-2013 09:26
User manual for digiCamControl
13 of 24
http://dcc/book/export/html/16
connected camera
Activate live view for a camera
The right menu pane contains links to
Layout - here you can control the grid layout of
the main screen.
Preset - here you can save, load and edit
camera presets. These contain the settings you
have chosen for exposure and other settings.
You can have many presets.
Image export - here you can export the images
in the current session either as a Zip-file or
simply to a specified folder on your pc.
Exposure and capture control
When in the main window, you have the general exposure
controls to the left and you can expand this with an extra
pane containing more advanded exposure and capture
control.
The first pane contains
Exposure - here you have your normal camera
controls, which you can recognize from the camera:
Mode - A(perture), S(hutter), M(anual), P(rogram).
This reflects the settings on the camera, and will have
to be changed there.
Some of the settings below will reflect the camera
mode.
ISO - the sensor sensitivity.
Shutter speed - can be set in S, P and M mode.
Aperture, can be set in A, P and M mode.
White balance - can be set to Auto or any preset.
Exposure compensation - can be set to a positive or
negative number or fraction according to the basic
settings in the camera.
Compression - the way the images will be saved. RAW, Jpg or a combination. Jpg can be
different qualities.
Metering mode - when using metering in A, P or S mode the metering pattern is set here.
The second pane contains
Burst number - how many images the camera will shoot when it's triggered. Useful in
combination with bracketing or high speed action.
08-06-2013 09:26
User manual for digiCamControl
14 of 24
http://dcc/book/export/html/16
Still capture mode - select the different modes such as single or continuous, self-timer, delayed,
quiet mode etc.
Auto ISO - whether to let the camera select ISO automatically
Flash syncronization - when using a flash you might want to control the way it fires - normal,
slow rear, slow front etc.
Long exposure noise reduction - whether to use the in-camera noise reduction for long shutter
speeds.
High ISO noise reduction - whether to use the in-camera noise reduction for high ISO's.
Lock - ??
Live view
Live view enables you to see the image on your pc
screen through the camera. All settings and focus can
then be controlled from the pc.
This option isn't available for all camera models.
Check the list of supported cameras here.
The Live view window consists of two main parts:
1. Controls to the left
2. Live view image to the right
The window can be maximized to full screen size by
clicking on the bar symbol in the upper right hand corner or double clicking on the top title bar. If you
have a dual monitor setup, you can have the main window on one monitor and the live view window on
the other.
The controls consist of
Autofofocus button - will focus according to the camera and software settings
Capture button - will take a picture and transfer it, but leave live view on
A small thumb that always shows the whole image
Exposure controls - these can for a large part overrule the physical settings on the camera
If you have problems getting the camera to
turn on liveview, check the battery level. You
can see it both in the program and on your
camera. You might also see a message saying
"Unable to start Liveview! Invalid status",
indicating that there is something in the
camera stopping an operation. If there is
insufficient battery, the camera can deny
opening the shutter for liveview. The is in
particular the problem if you have a camera
that is set to Mup (Mirror-up - an option on
some of the high-end cameras). If you set the
08-06-2013 09:26
User manual for digiCamControl
15 of 24
http://dcc/book/export/html/16
drive mode to S (single shot) or C
(continous), liveview will often be possible in
spite of the battery not being completely full.
Tags:
Live view
Dual monitors
If you have a setup with two separate monitors - or a laptop with an external monitor - you can have the
main window with the preview on one monitor and the live view window on the other.
It doesn't take any special settings.
You simply drag the main window to the monitor where you want it to run, maximize it and start live
view. Now drag the live view window to the other monitor, and you will have both images fully
available during your shoot. The preview will be visible on one monitor and live view with its controls
on the other.
Live view controls
When using live view you have a large number of controls in the live view window. A few are
duplicates of the ones you have in the left bar in the main window and descriptions can be found there.
You can expand the following sections:
Manual focus - here you can focus the camera manually in the steps set in the focus step settings.
Focus stacking - this is described in a separate section.
Control - same as the camera control in the main window.
Display - control the look of the live view window, grid overlay, zoom, opacity of the window
and whether the window should always be on top of everything else on the screen.
Luminosity - a live histogram of the live view image. Useful for setting light and exposure.
Motion detection - control camera activation by motion. Covered in a separate section.
08-06-2013 09:26
User manual for digiCamControl
16 of 24
http://dcc/book/export/html/16
Tags:
Live view
Multiple cameras
This option can be activated using the Menu button
on the title bar to expose the left hand menu pane.
Here you will find the Multiple camera section in the
top. Click it and you can:
Start and stop multiple camera shots.
Disable autofocus for all cameras.
Set deleay between shots.
Set number of "rounds" to shoot.
Set delay between each round.
Performance
For better performance it is recommended to adjust these settings :
Settings -> Preview -> Auto Preview unchecked
Settings -> Preview -> Low memory usage checked
Setting counters
The application uses separate threads for every connected camera, so the transfer order is essentially
random, but you have two options for setting up the counter sequence for multiple camera images:
1. you can give a name to each camera and use this name in the file name generation. In addition
08-06-2013 09:26
User manual for digiCamControl
17 of 24
http://dcc/book/export/html/16
you can use a separate counter for every name/camera.
2. another option is to use a separate counter and set the increment to the number of connected
cameras (10) and the counter to number of cameras (1, 2, 3..)
So for three cameras:
For the first camera set the incrementer to 3 and the counter to 1. This will result images
img0001.jpg, img0004.jpg ...
For the second set the incrementer to 3 and the counter to 2. This will result images img0002.jpg,
img0005.jpg ...
And for the third camera set the incrementer to 3 and the counter to 3. This will result images
img0003.jpg, img0006.jpg ...
You should use an empty folder for each sequence because the application never overwrites any files. It
will search for the first free counter and this may mess up the numbering. And don't forget to check the
Use camera counter instead of generic counter in the session setting.
Download photos
With this facility you can transfer photos from the camera to the computer. Click the button in the top
row, and a window will open, showing the images. You can select what images to fetch and whether
they should be deleted in the camera after having been downloaded.
Bracketing
When bracketing you shoot a row of identical images, but each is exposed differently. You can do this
for two main reasons:
1. Securing that you get one well exposed image by doing a number of exposures. One will most
likely be good and you simply select that from the series when done.
2. Producing a bunch of images for an HDR-picture - High Dynamic Range. You will need a
08-06-2013 09:26
User manual for digiCamControl
18 of 24
http://dcc/book/export/html/16
separate program to merge the images and make the actual HDR-picture. There are excellent free
programs like Luminance HRD, excellent inexpensive programs like Photomatix and excellent
expensive programs like Photoshop for the purpose.
You can set up the bracketing in three ways:
1. Exposure backeting - here you choose how many images you want to shoot and what exposure
they are to be shot at by checking each setting. The program has set a simple three frame
sequence as default -1 -> 0 -> +1 stops. You can go from -5 steps (EV) to +5 in 1/3 steps giving
you up to more than 30 diffently exposed images. Usually 3, 5 or 7 images are used - one
exposed as the camera thinks and 1, 2 or three under- and overexposed a number of aperture
steps - EV's.
2. Manual brackting - here you simply decide exactly what exposure times you want to use. Same
rules apply as above, but you decide the exposure intervals manually.
3. Preset bracketing - this uses the settings from the camera, and shoots the number of frames at the
exposure set in-camera.
In all cases you want to keep focus, aperture and ISO constant, so use A-mode, manual focus and
constant ISO for bracketing.
Tags:
Bracketing
HDR
Time lapse
A time time lapse movie is a movie put together from images taken with a large interval - from seconds
to minutes. The movie will playback in fast forward and show the development in a scene in a
compressed form. digiCamControl can produce time lapse movies.
You need to go through some steps.
1. Time lapse - set up the basic settings. The interval between shots in seconds and the number of
shots. Remember that the final movie will play with many frames per second. If you want your
movie to run with 24 frames per second for a minute, you will need 60 times 24 shots = 1440
images altogether! A 10 second time lapse at 16 frames per second will require 160 pictures.
2. Movie settings - here you set the quality full HD (1920P), 720P or what you prefer. You also
decide the frame rate and the location of the final movie in AVI-format.
3. Create movie - in this section a time lapse movie can be generated using the Xvid video codec.
All marked files from current session will be included. If no files are marked all files from the
08-06-2013 09:26
User manual for digiCamControl
19 of 24
http://dcc/book/export/html/16
session will be included. You can add "fake panning" to the video by checking Add virtual
moving and setting the percentage and alignment.
Focus stacking
For some shots - especially macro shots with a very shallow depth of
field (DOF) - it can be handy to take several shots with different
focus points and merge these into one with a larger DOF than any of
the original single images. Focus stacking is sometimes also used by
landscape photographers.
digiCamControl supports taking such series of individually focused
images.
In the live view window's left pane you will find a Focus stacking
block, where you can control the settings of a focus stacked series of
images. You can control
The number of images to shoot - how many pictures do you
want to combine?
The focus step between each - here you set the amount of
change in focus between each image. This is where you have
to experiment. You can preview the series of focus points by
clicking the Preview button.
The interval between shots - for macro shots it's a good idea to
have a few seconds between shots for the camera to become stable before the next one. This can
avoid shaken and blurred pictures.
You start the sequence by clicking Start and can break the shooting underway on the Stop button.
You will need a separate program to merge the stacked images. A program like the free version of
Helicon Focus can do the trick.
Add new comment
Tags:
Focus stacking
Bulb mode
Add new comment
This mode not supported by all cameras. Currently it works just for Nikon D4, D800, D5200, D7100
08-06-2013 09:26
User manual for digiCamControl
20 of 24
http://dcc/book/export/html/16
and D600.
Simple capture
You can choose to start the program in simple capture mode, which will present you with a much
simpler interface for triggering the camera.
When simple capture is enabled the program will start up with a selection screen that lets you turn it
back to the default and more complex main window with all controls and the image browser.
Once in the default mode, you can disable simple capture by going to Settings->General in the upper
right hand menu.
Remote control
The software can be remotely controlled using a
smartphone or a tablet - or a second computer attached to the same local network as the pc
connected to the camera. The connection can be a
wired or a wireless connection. The remote device
needs to be able to run a web browser, so it can
essentially be any device or computer - a Mac, an
iPhone or iPad, an Android phone or tablet or a Unix
computer.
This will allow you to move freely in your studio and
on your location,and remotely trigger the camera and
even control focus - both manual and AF.
1. Start the program and camera as usual.
2. Go into the settings and select the Trigger section.
08-06-2013 09:26
User manual for digiCamControl
21 of 24
http://dcc/book/export/html/16
3. Check the Use web server to activate the small webserver built in to the program.
4. You might need to restart the progam to activate the facility. Once it's set, the program will
activate it avery time it starts.
5. Access the server from your external device through the web address listed in the dialog.
6. If your tablet or smartphone has a camera, you can also scan the QR-code displayed by the
program to access the server directly. You might need a QR scanner app for your device, but
these are widely available, many for free.
7. Once the browser is running the web digiCamControl web page you can control the camera via
your device.
On the initial screen you will see four buttons:
1. Take photo - this will take a photo the same way
as if you pressed the button on the camera or in
the main program.
2. Take photo no autofocus - this will take a photo
but without activating autofocus.
3. Show fullscreen - this will shift the remote screen to a new set of buttons and the main screen on
the pc to full screen review of the images.
Prev. and Next will shift between the images on the main screen.
Close will close the review screen and return to the control screen.
4. Show live view - this will let you control the live view screen
on your pc from your device.
Auto focus - focuses the camera using AF
Take Photo - as 1 above
Take photo no autofocus - as 2 above
Close - closes Liveview control
Zoom liveview 25/33/50/60/100% - zooms the live view
screen on your pc to the selecte percentage
Focus - will focus the camera manually (-/+ is fine, --/++
is medium, ---/+++ is coarse)
You can turn your phone to horizontal to get the buttons large and
easily accessible.
Once you are done, you simply leave the web page on the remote
device. You can leave the facility on. The main program will still
function as before.
Command line utility
The command line utility can be executed running CameraControlCmd.exe which is located in
installation folder by default C:\Program Files\digiCamControl
Arguments
/help
/capture
- this screen
- capture photo
08-06-2013 09:26
User manual for digiCamControl
22 of 24
http://dcc/book/export/html/16
/capturenoaf
/captureall
/captureallnoaf
/session session_name
/preset preset_name
/folder path
/filenametemplate template/filename fileName
/counter number
/wait [mseconds]
-
capture photo without autofocus
capture photo with all connected devices
capture photo without autofocus with all devices
use session [session_name]
use preset [preset_name]
set the photo save folder
set the photo save file name template
set the photo save file name
set the photo initial counter
after done wait for a keypress
or milliseconds if is specified
-------------------------------------------------------For single camera usage :
-------------------------------------------------------/iso isonumber
- set the iso number ex. 100 200 400
/aperture aperture
- set the aperture number ex. 9,5 8,0
/shutter shutter speed
- set the shutter speed ex. "1/50" "1/250" 1s 3s
/ec compensation
- set the exposure comp. -1,5 +2
Development
Source code located : Google Code can be downloaded using a SVN tool like TortoiseSVN
Can be compiled using Visual Studio 2010 or Visual Studio Express C# 2010
Used libraries
AForge.NET
DotNetZip
log4net
MahApps.Metro
WriteableBitmapEx
Portable Device Lib Partially and some code was rewritten.
FreeImage I plan to remove this library
Plugin support
Apllication functionality can be extended with custom plugins.
The plugin is written in C# language and should implement a IPlugin interface and it is located
installation folder plugins folder. For more examples please consult CameraControl.Plugins project
which is included in application source code.
Using plugin application can be extended with:
export menu IExportPlugin
tool menu IMainWindowPlugin
main window IToolPlugin
any window can be replaced from default main window
08-06-2013 09:26
User manual for digiCamControl
23 of 24
http://dcc/book/export/html/16
Tags:
development
beta-versions
Testing a camera
You can test an unsupported camera and help the
further development of the software by downloading
and installing it, and running the small support
program MTPTester that comes with the package.
After the installation has finished, go to the Windows
start menu and locate the program DigiCamControl
-> MTPTester and run it. Select the menu item File
-> New. Select you device from the list and after that
go to the menu File -> Save as and give the
XML-file a name and send that file to Duka on admin
[at] digicamcontrol [dot] com.
You can also run the main program digiCamControl
and see whether your camera registers and if any functions work. If your camera does not work or you
experience errors when trying to control it, you might want to file a bug report.
Troubleshooting
If a camera doesn't show up in digiCamControl, make sure it's set to PTP in its USB-menu and
not mass storage. Windows should report the camera brand and model number when you connect
it and not just an external drive or memory card.
If a camera isn't recognized as wpd (no live view) device in a Windows XP system you might
want to cosult this page http://stackoverflow.com/questions/2905921/alternatives-to-wpd-wia-onwindows-xp
If a camera starts to be unable to perform different operations in digiCamControl, check the
battery level. Certain functions require a full or almost full battery.
Tutorials
We have compiled a row of short tutorials on different aspects of using the software.
FAQ
Frequently Asked Questions
Q: Is the software available for Mac?
08-06-2013 09:26
User manual for digiCamControl
24 of 24
http://dcc/book/export/html/16
A: No, it's not. The software is Windows only, and there are no plans for a Mac OS version, but notice
that the software is known to be able to run on Windows 7 in Parallels or VM Fusion on a Mac.
Q: Will the software support my Pentax/Sony/Olympus/Fuji/NNN camera?
A: It might... download the software and connect the camera and see what happens. If it doesn't work
or only works partially, consider helping us implement support for your camera.
08-06-2013 09:26