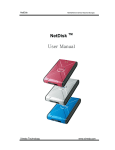
1
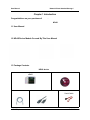
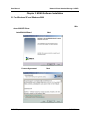
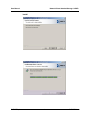
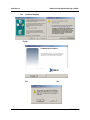
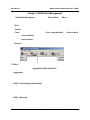
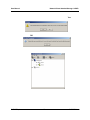
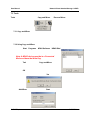
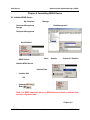
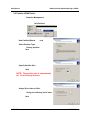
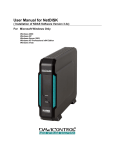
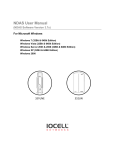
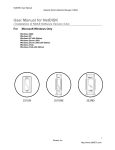
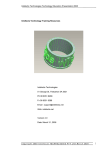
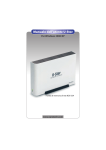
DatOptic User Manual 3.1X Software
For Windows 2000/XP
nRAID
Powered by
Technology
www.DATOPTIC.com
Network Direct Attached Storage / nRAID
User Manual
DATOPTIC, Inc.
1815 E. Wilshire Ave,. Suite 906
Santa Ana, CA 92705
United States of America
Software Release Statement
User Manual for Windows XP and Windows 2000. Software Version 3.1X, released 2004,
made in the U.S.A.
Trademark Statement
nRAID™ are trademarks of DatOptic, Inc., registered in the U.S.A
and other countries. All other trademarks are the property of their respective owners.
Copyright Statement
Copyright © 2003 – 2004 DatOptic, Inc. All rights reserved world. Reproduction, translation,
transformation or adaptation in any manner without prior written permission of DatOptic,, Inc. is
strictly prohibited.
License Statement
The software described in this document is furnished under a license agreement. The software may be used only in accordance with the terms of the license agreement
Warranty Statement
DatOptic,, Inc. reserves the right to revise this publication and to make changes to the content
hereof without the obligation of DatOptic, Inc. to notify any person of such revision or changes.
DatOptic, Inc. provides this publication “as is” without warranty of any kind, either express or
implied, including but not limited to the implied warranties of merchantability or fitness for a
particular purpose.
Product Warranty
DATOPTIC, Inc
2
www.DATOPTIC.com
Network Direct Attached Storage / nRAID
User Manual
Table of Contents
1
Introduction ············································································································································ 4
1.1
User Manual .................................................................................................................................. 4
1.2
NDAS Device Models Covered By This User Manual ................................................................... 4
1.3
Package Contents ......................................................................................................................... 4
1.4
System Requirements ................................................................................................................... 5
1.5
NDAS Device Setup Overview ..................................................................................................... 5
2
Cable Installation ··································································································································· 6
2.1
NDAS Mode .................................................................................................................................. 6
2.2
USB Mode ..................................................................................................................................... 7
3
NDAS Software Installation ·················································································································· 8
3.1
For Windows XP and Windows 2000 ............................................................................................ 8
4
NDAS Device Registration ·················································································································· 11
4.1
Add / Register a New NDAS Device Using The Registration Wizard .......................................... 11
4.2
Add / Register a New NDAS Device Without Using The Registration Wizard ............................. 13
4.3
Found New Hardware Wizard ...................................................................................................... 14
4.4
Using NDAS Device ..................................................................................................................... 15
4.5
Sharing NDAS Device .................................................................................................................. 16
5
Introduction To NDAS Device Manager ····························································································· 17
5.1
NDAS Device Status Mode ......................................................................................................... 17
5.2
NDAS Device Management ......................................................................................................... 18
6
NDAS Device Functions ······················································································································· 19
6.1
NDAS Device Management ........................................................................................................ 19
6.2
Changing from Read/Write to Read-Only Mode ........................................................................... 22
6.3
Changing from Read-Only to Read/Write Mode ........................................................................... 23
7
NDAS Bind Management ······················································································································ 24
7.1
Bind….. ........................................................................................................................................ 24
7.1.1
Requirements For Bind .................................................................................................. 25
7.1.2
Connected Mode ........................................................................................................... 25
7.1.3
Instructions For Bind....................................................................................................... 25
7.2
Unbind ........................................................................................................................................ 29
7.2.1
Unbind All ..................................................................................................................... 29
7.2.2
Unbind A Single NDAS Device ...................................................................................... 30
7.3
Tools….......................................................................................................................................... 32
7.3.1
Copy And Mirror.............................................................................................................. 32
7.3.2
Using Copy And Mirror ................................................................................................... 32
7.3.3
Recover Mirror ................................................................................................................ 33
7.3.4
Using Recover Mirror...................................................................................................... 33
8
Other NDAS Bind Management Functions ························································································· 34
8.1
Using Mirrored NDAS Device ....................................................................................................... 34
8.1.1
Upgrading the driver without braking the Mirrored NDAS device.................................... 34
8.1.2
Using bound NDAS Device among different driver versions........................................... 34
9
Formatting NDAS Device ···················································································································· 35
9.1
Initialize NDAS Device ................................................................................................................ 35
9.2
Partition NDAS Device ................................................................................................................ 36
9.2
Format NDAS Device Through My Computer ............................................................................ 38
10
Uninstall ··············································································································································· 39
11
NDAS Command Line Utility················································································································· 40
12
FAQ ······················································································································································ 41
13
Regulatory Statement ··························································································································· 47
14
Product Warranty ································································································································· 48
15
Additional Information And Assistance ······························································································ 51
DATOPTIC, Inc
3
www.DATOPTIC.com
Network Direct Attached Storage / nRAID
User Manual
Chapter 1 Introduction
Congratulations on your purchase of nRAID.
- Network storage via Ethernet made possible through NDAS technology!
1.1 User Manual
- This User Manual is intended to help you install NDAS Device quickly and easily
onto your Personal Computer or Ethernet Network and begin using it immediately.
1.2 NDAS Device Models Covered By This User Manual
This User Manual includes information on the following models: nRAID
NetDisk
NetDisk Mini
NetDisk Office
-
-
-
NDU10-80
NDU10-120
NDU10-160
NDU10-250
NDC10-80
NDC10-120
NDC10-160
NDC10-250
MNU10-40
MNU10-80
MNC10-40
MNC10-80
NOU10-120
NOC10-120
1.3 Package Contents
The following items are included in the NDAS device packages:
Software Installation CD
nRAID
Ethernet Cable
DATOPTIC, Inc
Power Cord
4
Serial Cable
www.DATOPTIC.com
Network Direct Attached Storage / nRAID
User Manual
1.4 System Requirements
Windows® 98SE / ME / 2000 / XP
- 233 MHz Pentium® II or higher
- 64 MB RAM (128 MB recommended)
- USB 1.1 Port (USB 2.0 recommended)
- CD-ROM drive for installation
- 100Base-T full duplex switch for NDAS mode
1.5 NDAS Device Setup Overview
nRAID
DATOPTIC, Inc
5
www.DATOPTIC.com
Network Direct Attached Storage / nRAID
User Manual
Chapter 2 Cable Installation
2.1 NDAS Mode
nRAID
1. If your nRAID has dip switches on the rear panel, flip both dip switches down.
2. Connect the included Ethernet cable from the Ethernet port on nRAID to a switch
(100 Base-T).
Wireless users: Connect nRAID to your wireless router or access point
with included Ethernet cable.
3. Make sure the power connector is firmly attached to the nRAID and connect the
power adapter to a power source.
4. Press the On/Off Switch to ON position.
DATOPTIC, Inc
6
www.DATOPTIC.com
Network Direct Attached Storage / nRAID
User Manual
2.2 USB Mode - N/A
Note: NDAS Device software does not need to be installed to use in USB mode.
nRAID
1. If your nRAID has dip switches on the rear panel, flip both dip switches up.
2. Connect the included USB cable from USB port on nRAID to your PC’s USB port.
3. Make sure the power connector is connected firmly to the nRAID and connect the
power adaptor to a power source.
4. Press the On/Off Switch to ON position.
DATOPTIC, Inc
7
www.DATOPTIC.com
Network Direct Attached Storage / nRAID
User Manual
Chapter 3 NDAS Software Installation
3.1 For Windows XP and Windows 2000
Installation of NDAS software is simple and easy. After downloading software, please unzip the driver and click on NDASSetup.exe to begin installation.
If you are using the Installation CD, insert the CD into your CD-ROM drive and select Windows 2000/XP Driver.
1. InstallShield Wizard will appear. Click the Next button to continue to next step.
2. Accept License Agreement and the click Next to continue installation.
.
DATOPTIC, Inc
8
www.DATOPTIC.com
Network Direct Attached Storage / nRAID
User Manual
3. Click the Install button to install drivers.
4. Please wait while installation continues.
DATOPTIC, Inc
9
www.DATOPTIC.com
Network Direct Attached Storage / nRAID
User Manual
5. Click Yes or Continue Anyway if one of these windows come up.
6. Click the Finish button to complete.
7. Click on the Yes button to restart your computer now, or No to restart later
DATOPTIC, Inc
10
www.DATOPTIC.com
Network Direct Attached Storage / nRAID
User Manual
Chapter 4 NDAS Device Registration
Note: You can register using the Registration Wizard (section 4.1) or without it
(section 4.2).
4.1 Add / Register a New NDAS device using the Registration Wizard
1. Click on the NDAS Device Management
located on the system tray.
Icon
2. Select Register A New Device.
3. NDAS Device Registration Wizard will appear.
Click Next to continue.
4. Enter a name for the NDAS device.
Click Next.
5. Add your NDAS device ID and Write Key. Write Key is needed to write to NDAS
device. Click Next to continue.
Note: NDAS device ID and
Write Key do not contain the
letter O. Please use the
number 0 for all letter 0’s.
DATOPTIC, Inc
11
www.DATOPTIC.com
User Manual
Network Direct Attached Storage / nRAID
Network Direct Attached Storage / nRAID
User Manual
4.2 Add / Register a New NDAS device without using the Registration Wizard
1. Click on the NDAS Device Management
Icon located on the system tray.
2. Select Register A New Device.
3. The Register a new NDAS Device window will appear.
4. Enter in a NDAS Device Name.
5. Type in NDAS Device ID and Write Key. Write Key is needed to write to NDAS device.
Leave the Activate this device after registration box checked to automatically enable the device after registration.
Note: NDAS device ID and Write Key do not contain the letter O. Please use
the number 0 for all letter 0’s.
DATOPTIC, inc
13
www.DATOPTIC.com
Network Direct Attached Storage / nRAID
User Manual
4.3 Found New Hardware Wizard
1. After you have registered, the Found New Hardware Wizard may appear.
●
●
If the window appears, click Next to install the new NDAS device.
It should automatically find the appropriate drivers for your NDAS Device.
Note: For Windows 2000, Upgrade Device Driver Wizard will appear instead.
2. If the Windows Logo Testing message comes up, click Yes or Continue
Anyway to finish the installation.
DATOPTIC, inc
Windows 2000
Windows XP
Click “Yes”
Click “Continue Anyway”
14
www.DATOPTIC.com
Network Direct Attached Storage / nRAID
User Manual
3. Registration is completed.
-
Click NDAS Device Management
to see the registered NDAS device.
Read/Write Mode
Read-Only Mode
Note: If you cannot see your NDAS Device, please click Refresh Status
and check again.
4.4 Using NDAS Device
Now that you have successfully installed NDAS device, it’s time to familiarize yourself
with using the NDAS device. Your NDAS device will show up as a local drive in My
Computer. Drive letter and NDAS device name may vary between Personal Computers.
You can use NDAS device like a local drive on
your PC.
-
DATOPTIC, inc
12
Drag and drop files to NDAS device.
Copy and paste data to NDAS device.
Make and delete folders.
Share files and folders.
Backup your data
www.DATOPTIC.com
Network Direct Attached Storage / nRAID
User Manual
4.5 Sharing NDAS Device
-
Once NDAS device is connected to your network, it can be accessed from any
computer on your LAN.
-
To share NDAS device, the following must occur:
Windows 2000/XP Environment:
-
All computers and NDAS device must be on the same LAN.
NDAS device must be connected via Ethernet or Wireless Router.
To share Read and Write access, all computers on the network using the
NDAS device must have the nRAID driver version 3.1.x installed.
NDAS device must be registered onto each computer.
Warning:
DO NOT perform disk operations (format, partition and chkdsk) when multiple PCs have the NDAS mounted.
NDAS device can be formatted, partitioned, chkdsk, aggregated or mirrored
ONLY when one PC is connected.
DATOPTIC, inc
12
www.DATOPTIC.com
Network Direct Attached Storage / nRAID
User Manual
Chapter 5 Introduction to NDAS Device Management
5.1 NDAS Device Status Modes
-
NDAS device provides users with six basic Modes.
-
Below is a chart describing each of the NDAS device Modes and the icons that
correspond with each Mode.
NDAS Device
Color
Green
(Mounted RO)
Blue
(Mounted RW)
White
(Connected)
Black
(Disconnected)
Red
(Deactivated)
Yellow
(Bound)
DATOPTIC, inc
Icon
NDAS Device
Icon
Mode / Meaning
Read-Only Mode
- Users can only read from NDAS device.
Read / Write Mode
- Users can read and write to NDAS device.
Connected Mode
- NDAS device is currently disabled on your computer
and is ready to be mounted (enabled).
Disconnected Mode
- NDAS device is registered but your system cannot
find the NDAS device.
- Power Cord, Ethernet Cord or USB Cord may be
unplugged.
- Make sure any Antivirus/Firewall software or
Spyware is not interfering with the connection.
Deactivated Mode
- NDAS device is registered but no longer
communicates with your system. No attempts will be
made to communicate with your NDAS device.
Bound Non-Primary Mode
- Used for bound NDAS devices only.
- All of the bound NDAS devices are displayed as
yellow except the primary NDAS device.
17
www.DATOPTIC.com
Network Direct Attached Storage / nRAID
User Manual
5.2 NDAS Device Management
Click the NDAS Device Management
located on the system tray. All registered NDAS
device(s) will be displayed on the NDAS Device Management Menu.
-
When you click on the
icon - Lists all NDAS devices that are registered.
Register a New Device - Registers a NDAS device to your computer.
Refresh Status - Updates status of your NDAS Device.
About - Displays NDAS software version information.
Check for Updates: Checks DATOPTIC website for updated drivers.
Options - Can customize NDAS Device Management features and error messages/
dialogs.
Exit - Exits NDAS Device Management.
NDAS Device Management can be restored by double clicking the icon
Desktop.
DATOPTIC, inc
18
on the
www.DATOPTIC.com
Network Direct Attached Storage / nRAID
User Manual
Chapter 6 NDAS Device Functions
6.1 NDAS Device Management
Click NDAS Device Management and place the cursor on a NDAS device to view its functions.
Below is a list of NDAS device Modes and related functions.
Note: The Yellow box is there to show the current mode status of your NDAS Device. It cannot be selected. For more information, please see the section 5.1 on
page 17.
A. NDAS device mounted in Read/Write Mode
-
Mounted (RW) - The current state of NDAS device.
Unmount - Enables users to change NDAS device mode to Connected Mode.
Properties - Displays properties of the NDAS device.
B. NDAS device mounted in Read-Only Mode
-
Mounted (RO) - The current state of NDAS device.
Unmount - Enables users to change NDAS device mode to Connected Mode.
Properties - Displays properties of the NDAS device.
DATOPTIC, inc
19
www.DATOPTIC.com
Network Direct Attached Storage / nRAID
User Manual
C. NDAS device in Disconnected Mode
-
Disconnected - The current state of NDAS device.
Unregister - Enables users to un-register NDAS device.
Properties - Displays properties of the NDAS device.
D. NDAS device in Connected Mode
-
Connected - The current state of NDAS device.
Mount (Read-Only) - NDAS device can be mounted into Read-Only Mode.
Mount (Read/Write) - NDAS device can be mounted into Read/Write Mode.
Unregister - Enables users to un-register NDAS device.
Properties - Displays properties of the NDAS device.
DATOPTIC, inc
20
www.DATOPTIC.com
Network Direct Attached Storage / nRAID
User Manual
E. NDAS device in Deactivated Mode
-
Deactivated - The current state of NDAS device.
Activate - Enables NDAS device to be activated into Connected Mode.
Once activated NDAS device will be indicated by white colored box.
Unregister - Enables users to un-register NDAS device.
Properties - Displays properties of the NDAS device.
DATOPTIC, inc
21
www.DATOPTIC.com
Network Direct Attached Storage / nRAID
User Manual
6.2 Changing from Read/Write Mode to Read-Only Mode
1. Click NDAS Device Management
and select the NDAS device you want to
change from Read/Write to Read-Only.
2. Select Unmount
3. A warning message will appear.
Click Yes.
The Blue Square will change to a White
Square indicating Connected Mode.
4. Click NDAS Device Management
just umounted.
and select the NDAS device you have
5. Select Mount (Read-Only).
The White Square will change
to a Green Square indicating
Read-Only Mode.
DATOPTIC, inc
22
www.DATOPTIC.com
Network Direct Attached Storage / nRAID
User Manual
6.3 Changing from Read-Only Mode to Read/Write Mode
1. Click NDAS Device Management
and select the NDAS device you want to
change from Read-Only to Read/Write.
2. Select Unmount
3. A warning message will appear.
Click Yes.
The Green Square will change to a White
Square indicating Connected Mode.
4. Click NDAS Device Management
just umounted.
and select the NDAS device you have
5. Select Mount (Read/Write).
The White Square will change
to a Blue Square indicating
Read/Write Mode.
DATOPTIC, inc
23
www.DATOPTIC.com
Network Direct Attached Storage / nRAID
User Manual
Chapter 7 NDAS Bind Management
Using NDAS Bind Management users can perform Bind, Unbind and Mirror.
There are 4 different buttons in the NDAS Bind Management window.
- Bind: Used for Aggregation, RAID 0, and RAID 1.
- Unbind: Used to Unbind your Bound NDAS devices.
- Tools: There are two different functions in Tools: Copy and Mirror and Recover Mirror.
-
Copy and Mirror is used to Mirror the first NDAS device to the second NDAS
device.
Recover Mirror is used to recover the data on Mirrored NDAS Devices.
- Refresh: Used to refresh status of your NDAS devices.
7.1 Bind
There are three ways to bind: Aggregation, RAID0 and RAID1.
Aggregation
- Allows any number of NDAS device units between 2 and 8 to be recognized as a
single large disk drive.
- Extremely useful when a larger storage device is needed.
- No fault tolerance. If one unit fails, all data is lost.
RAID0 - (Disk Striping without Parity)
- Allows 2, 4, or 8 NDAS device units to be recognized as a single large disk drive.
- Extremely useful when a larger storage device is needed.
- No fault tolerance. If one unit fails, all data is lost.
- Type of Aggregation method used for faster performance when writing to NDAS
devices.
RAID1 - Mirroring
- Allows 2, 4, 6 or 8 NDAS device units to be mirrored at the same time.
- Fault tolerant. If one unit fails, data is retrieved from other units.
- Can also Mirror NDAS devices that have been Aggregated.
DATOPTIC, inc
24
www.DATOPTIC.com
Network Direct Attached Storage / nRAID
User Manual
7.1.1 Requirements for Bind
-
Each NDAS device must have a Write Key.
Cannot Bind NDAS device that are already Bound.
NDAS devices that are being Bound must be in Connected Mode on all PCs,
including the PC which is performing the Bind.
Bound NDAS devices must be formatted.
Other users can Mount the Bound NDAS devices once Binding is completed.
NOTE: Aggregation, RAID0 and RAID1 can only be performed in Windows XP and
Windows 2000.
7.1.2 Connected Mode
Before NDAS devices can be Bound, they must be in Connected Mode.
1. Go to NDAS Device Management, choose a NDAS device you want to Bind.
- If the NDAS device is in Mounted Mode, select Unmount.
- If the NDAS device is in Connected Mode, leave it as it is.
- If the NDAS device is in Disconnected Mode, try to reconnect it.
- If the NDAS device is in Deactivated Mode, Activate the device.
2. A waning message may appear.
3. Click Yes.
4. Wait few seconds for changes to occur. If the color of the NDAS device does
not changed to White, click Refresh Status.
5. Repeat above steps for all NDAS device you want to Bind.
6. Make sure other PCs that are accessing the NDAS devices have also
Unmounted the NDAS devices as Connected Mode.
7.1.3 Instructions for Bind
1. Two or more NDAS devices need to be in Connected Mode.
All of the NDAS devices must have the Write Key.
2. Go to Start > Programs > NDAS Software > NDAS Bind.
3. Click the Bind button.
DATOPTIC, inc
25
www.DATOPTIC.com
Network Direct Attached Storage / nRAID
User Manual
4. Select a binding type and number of disks to be Bind.
-
Aggregation can bind any number of units between 2 and 8.
RAID0 can bind 2, 4 or 8 units.
RAID1 can bind 2, 4, 6 or 8 units.
Note: Currently RAID4 is not supported.
5. Move a NDAS device from the left window to the right window by first selecting a
NDAS device from the left window and then clicking the
button.
6. Repeat the above step for the rest for the NDAS device you want to Bind and click
Finish.
DATOPTIC, inc
26
www.DATOPTIC.com
Network Direct Attached Storage / nRAID
User Manual
7. Two warning messages will appear.
-
Once NDAS devices are bound, all of the data will be last. Click Yes to
continue.
-
The new bound NDAS devices must be mounted and formatted before it can be
used. Click OK.
-
Your NDAS Devices should now be bound.
DATOPTIC, inc
27
www.DATOPTIC.com
Network Direct Attached Storage / nRAID
User Manual
8. Go to the NDAS Device Management and Mount the Bound NDAS devices.
-
To do so, select any one of the Bound NDAS device and select Mount (ReadOnly) or Mount (Read/Write).
9. Found New Hardware Wizard may appear. Click Next and proceed in finishing
the wizard.
10. Before Bound NDAS device can be used, it must be formatted. Please go to Chapter 9 Formatting NDAS Device on page 36.
DATOPTIC, inc
28
www.DATOPTIC.com
Network Direct Attached Storage / nRAID
User Manual
7.2 Unbind
- You can unbind one or all of the NDAS Devices from a bound group.
- Section 7.2.1 shows you how to unbind all of the NDAS Devices and 7.2.2 shows you
have to unbind only one NDAS Device.
7.2.1 Unbind All
1. Go to NDAS Device Management and select a Bound NDAS device you want to
Unbind.
2. Unmount the NDAS Device by clicking on Unmount.
Note: If the bound NDAS device is in use, a warning message will appear.
Make sure that no programs are using the NDAS Device and try again.
3. After you have unmounted the NDAS Devices, go to NDAS Bind Management.
4. From the NDAS Bind Management, select the Bound NDAS device you have just
unmounted. Click the Unbind button.
5. Unbind window will appear. Make
sure these NDAS devices are ones
that needs to be unbound and click
Yes.
DATOPTIC, inc
29
www.DATOPTIC.com
Network Direct Attached Storage / nRAID
User Manual
5. Two warning messages will appear.
-
Once NDAS devices are bound, all of the data will be last. Click Yes to
continue.
-
The new bound NDAS devices must be mounted and formatted before it can be
used. Click OK.
6. Now you can go back into the NDAS Device Management and Mount each of
unbound NDAS device.
7. Before using the NDAS devices, please format each of the unbound device.
8. Please refer to Chapter 9 Formatting NDAS Device on page 36.
7.2.2 Unbind a Single NDAS Device
1. Go to NDAS Device Management and select a Bound NDAS device you want to
Unbind.
2. Unmount the NDAS Device by clicking on Unmount.
Note: If the bound NDAS device is in use, a warning message will appear.
Make sure that no programs are using the NDAS Device and try again.
3. After you have unmounted the NDAS Devices, from NDAS Bind Management
select one NDAS device you want to unbind.
4. Right click on the NDAS device and select Single.
DATOPTIC, inc
30
www.DATOPTIC.com
Network Direct Attached Storage / nRAID
User Manual
5. All data will be lost if you want to convert it to a Single disk. Click Yes if you want
to continue.
Note: Once the Binding has been broken, you cannot re-add any NDAS
Devices to the broken Bound device. You will have to recreate the Bind
and format it again.
6. For formation of the NDAS device, please refer to Chapter 9 Formatting NDAS Device.
7. When you are finished formatting, your NDAS Device should show up in My
Computer as a local drive.
DATOPTIC, inc
31
www.DATOPTIC.com
Network Direct Attached Storage / nRAID
User Manual
7.3 Tools
Tools provides two type of functions: Copy and Mirror and Recover Mirror.
7.3.1 Copy and Mirror
-
The Copy and Mirror Function is used when you have a NDAS device with data on
it and then want to copy it to another NDAS device that does not have any data.
Then have it mirror each other.
The second NDAS device must be of equal or greater capacity to use this function.
7.3.2 Using Copy and Mirror
1. Go to Start > Programs > NDAS Software > NDAS Bind
2. Select a single NDAS device.
Note: A NDAS device must be in a Connected
Mode and have the Write Key.
3. Click Tool button and select Copy and Mirror.
4. From the list, select a NDAS device you want
to mirror the first NDAS device to.
Click OK.
5. A warning message will appear. Click Yes.
6. Add Mirror window will appear. Click Start to start synchronizing.
DATOPTIC, inc
32
www.DATOPTIC.com
Network Direct Attached Storage / nRAID
User Manual
7.3.3 Recover Mirror
Recover Mirror is used when there is an error in Mirrored NDAS Devices.
7.3.4 Using Recover Mirror
1. An Emergency Mode message will appear when an error occurs in Mirrored NDAS
Devices.
2. Go to NDAS Device Management and unmount the Mirrored NDAS Devices.
Note: NDAS device must be in a Connected Mode and have the Write Key.
3. Go to Start > Programs > NDAS Software > NDAS Bind
4. Select on the Mirrored NDAS devices.
5. Click Tool button and select Recover Mirror.
4. Recover Mirror will appear. Click Start button.
5. If Mirrored NDAS Devices are not in the Connected Mode, below warning message
will appear. Please unmount the Mirrored NDAS Device and try again.
DATOPTIC, inc
33
www.DATOPTIC.com
Network Direct Attached Storage / nRAID
User Manual
Chapter 8 Other NDAS Bind Management Functions
Mirror
-
Recognizes Mirrored NDAS devices that have been Mirrored using earlier driver.
8.1 Using Mirrored NDAS Devices
Driver 3.10 does not support the Mirror feature that have been offered by our earlier driver versions. However, the driver does recognize the Mirrored NDAS device and will display them on
the NDAS Bind Management. Users can continue to use Mirrored NDAS devices as before.
But users cannot modify the Mirrored NDAS devices. If so, the Mirrored devices will break.
8.1.1 Upgrading the driver without breaking the Mirrored NDAS device
1. Disable all NDAS devices. (both single and bind devices)
2. Uninstall the driver.
3. Install the 3.10 driver.
4. Need to register NDAS devices again.
Note: When registering the bound NDAS devices, the NDAS Device Registration Wizard will only allow the bound NDAS devices to be mounted
when both of the bound NDAS devices are registered. During the registration of the first device, the Wizard will only allow the device to be registered as Connected Mode.
5. Go to NDAS Device Management and Mount the Mirrored NDAS device.
6. Now you can use the Mirrored NDAS devices.
Note: Cannot modify the Mirrored NDAS devices. If so, NDAS devices
must be re-mirrored using RAID1 and all the data will be lost.
8.1.2 Using Bound NDAS device among different driver versions
If a user upgrades his/her driver to 3.10, we recommend everyone else sharing the NDAS
devices to upgrade their driver to 3.10 as well. Once the user with 3.10 migrates the Mirrored NDAS device’s binding information, other users sharing the Mirrored NDAS device
will no longer have access to the Mirrored NDAS devices.
Here are two options:
1. We recommend all users sharing the Mirrored NDAS devices upgrade their driver to
3.10.
2. Unbind the Mirrored NDAS device and use them as two single devices that can be
shared by both users using 3.10 and earlier drivers.
DATOPTIC, inc
34
www.DATOPTIC.com
Network Direct Attached Storage / nRAID
User Manual
Chapter 9 Formatting NDAS Device
9.1 Initialize NDAS Device
1. Right click My Computer and select Manage.
2. Computer Management window will appear. Click Disk Management under
Storage.
3. Computer Management window will list all
the disks in the computer.
4. Find the NDAS device you want to initialize.
-
The NDAS device is usually indicated
by Not Initialized.
-
If the NDAS device is described as Basic or Healthy, skip to Chapter 9.2 Partition
NDAS Device. Otherwise, go to next step.
5. Initialize NDAS Device
-
Right click on the Disk # that pertains to your
NDAS device and select Initialize Disk.
-
Initialize Disk window will
appear. Select the NDAS device and
click OK.
6. NDAS device will be automatically initialized.
-
Unknown
Basic.
becomes
Note: It is VERY important that your NDAS Device is listed as a Basic Disk
and not a Dynamic one.
7. Initialization is completed.
-
Before NDAS device can be used, it must be partitioned. See Chapter 9.2.
DATOPTIC, inc
35
www.DATOPTIC.com
Network Direct Attached Storage / nRAID
User Manual
9.2 Partition NDAS Device
1. From the Computer Management window, find the NDAS device you want to format.
2. Right click and select New Partition.
3. New Partition Wizard: Click next.
4. Select Partition Type:
-
Select Primary partition.
Click Next.
5. Specify Partition Size:
-
Click Next.
NOTE: The partition size is automatically
set. Do not change the size.
6. Assign Drive Letter or Path:
-
DATOPTIC, inc
Select Assign the following driver letter.
Choose a letter for the drive from list.
Click Next.
36
www.DATOPTIC.com
Network Direct Attached Storage / nRAID
User Manual
7. Format Partition:
-
-
Select Format this partition with the
following Settings .
- File System: NTFS
- Allocation unit size: Default
- Volume Name: Enter a name for the
disk.
Select Perform a quick format
(Recommended).
Click next.
8. Partitioning is finished. Click Finish.
-
DATOPTIC, inc
You can see the partitioned disk.
37
www.DATOPTIC.com
Network Direct Attached Storage / nRAID
User Manual
9.3 Format NDAS Device Through My Computer
1. Double click on My Computer.
2. My Computer window will appear. Right Click on your NDAS Device choose
Format
3. The Format window will appear with a few options.
Check the box that says Quick Format
(Recommended)
4. A Warning will appear asking if you are sure you want to format the drive. Click on
OK.
5.
Click on OK once the format has completed.
DATOPTIC, inc
38
www.DATOPTIC.com
Network Direct Attached Storage / nRAID
User Manual
Chapter 10 Uninstall
Before you can uninstall a NDAS device, you must close all applications using the NDAS device. NDAS Disk Management, NDAS Bind Management, Windows Explorer and Internet Explorer must also be closed.
1. Close NDAS Disk Management by selecting Exit.
2. Uninstall NDAS device.
-
Go to Start > Programs > NDAS Software >
Uninstall NDAS Software
-
Windows Installer will appear. Click Yes if you want to continue. Otherwise click
No.
NOTE: A warning window may appear if any of the NDAS device is still in
mounted state. Click Cancel and unmount the NDAS devices.
3. Restart the PC once uninstall is finished.
DATOPTIC, inc
39
www.DATOPTIC.com
Network Direct Attached Storage / nRAID
User Manual
Chapter 11 NDAS Command Line Utility
Included with the 3.1 Drivers is a option to run your nRAID software from a command
line interface. *Please Note: These option are for Advanced nRAID users only*
1. Open your Command Line and type in the following command.
cd Program Files\NDAS\3.10.1216
(Folder may vary depending on driver being used)
This should bring you to the path C:\Program Files\NDAS\3.10.1216.
2. Next, type in ndascmd.exe. This will load the nRAID command line interface.
The Syntax for the interface should be as follows.
ndascmd <command> [parameters]
The command can be one of the following.
- register <name> <device id without dash> [write key]
- unregister <device number>
- list devices
- list logicaldevices
- mount <logical device number> [ro|rw]
- unplug <logical device number>
- unmount <logical device number>
- activate <device number>
- deactivate <device number>
DATOPTIC, inc
40
www.DATOPTIC.com
Network Direct Attached Storage / nRAID
User Manual
Chapter 12 FAQ
For the most recent list of FAQs, please visit http://www.datoptic.com
General
1. What can nRAID be used for?
nRAID can be used with a variety of applications. It is ideal for all users that cannot afford NAS
systems, such as small to medium businesses, SOHO (Small Office Home Office), workgroups, departments, schools and public institutions. nRAID technology’s convenience and low cost provides
the best storage solution for home / office networking.
-
Use as storage for Personal Computer and Home Networking (storing and sharing files,
backup / archiving, etc.)
Expanding storage requirements.
Business primary or secondary network storage.
Public institution’s storage for data archives, disclosed data, backups, and data conservation.
Multimedia storage device (MP3s, Digital Photos, Digital Video).
Multi-platform networking (Simultaneous use from Macintosh and Windows)
Non-PC / Non-Computing applications (security, CCTV, technograph recording, MRI,
entertainment).
2. How is nRAID different from NAS or SAN?
nRAID is a better alternative to NAS or SAN. nRAID is much more cost-effective, efficient and
easy to use. It is for users looking for lower costs and storage associated with backup / archiving.
Although both nRAID and NAS are storage devices that are implemented over a network, nRAID
takes up less space than NAS or SAN products. nRAID utilizes NDAS technology - allowing it to
connect the hard disk directly to a network without a server. In NAS, the hard disk must be connected to a storage server, which must also be connected to the network.
3. For NDAS mode, do I need drivers installed on each computer using nRAID?
Yes, the drivers need to be loaded on each computer that wants access to nRAID. However, if you
are using Windows Sharing, only one computer will need the software installed. The other computers will not need it.
Windows 2000 / XP
1. I am having trouble using Multi-write over wireless connection. What do you recommend?
Try a wired connection for our 3.X drivers and compare how it works. If you are using wireless with
other computers, we recommend enabling the hard-wired computer first, then the wireless computer.
When using wireless, we also recommend 802.11g. When using 802.11b, we highly recommend
hardwiring your computer when doing large file transfers because of the low bandwidth associated
with 802.11b.
DATOPTIC, inc
41
www.DATOPTIC.com
Network Direct Attached Storage / nRAID
User Manual
2. How should I format nRAID?
We recommend formatting nRAID via NDAS (Ethernet) mode. If using nRAID as a USB device
only, then it is OK to format via USB. It is also recommended that you format nRAID to NTFS if
using Windows 2000/XP. Our 3.X drivers are only supported on NTFS, while 2.X drivers support
FAT32.
3. How do I disconnect nRAID?
We always recommend using the Disable option from your nRAID Administrator Tool if connected
via NDAS (Ethernet). You can use the "Unplug or Eject Hardware" icon in your System Tray to stop
the nRAID before disconnecting (this applies to either USB or NDAS mode). Close all windows
that may be accessing the nRAID.
4. When I try to write to nRAID I get a "write protected" error and cannot write to the disk.
The permissions scheme may need to be reset. Try disabling the nRAID on all machines first, then
re-enable them one by one. If that doesn't help, try rebooting the machines and power cycling NetDisk.
5. When I try to write to nRAID, I get the following error message: "nRAID is being used by
non-compatible software on another PC. You can use read-access only for now." What does
this mean?
This means that there is another computer on the network that has a different version of the nRAID
software installed. All machines must have the same exact version of our software. Please make
sure that all computers have the same exact version of nRAID software installed. For instance,
3.02 is different from 3.03
6. Can I set the "My Documents" folder to point to my nRAID instead of a place on my local
hard drive?
We do not recommend doing this, as your computer will be dependent on this location during software installation and uninstallation. You may receive Windows Error Messages looking for a nonexisting location.
7. My computer is moving very slowly when my nRAID is enabled, and the ACT light on my
nRAID is solid yellow. What is going on?
This is a result of a bad connection between the computer and the nRAID. Please make sure that
you are using only network switches and routers, and that you are not using any network hubs. Also,
if you have any software firewalls installed on your computer (i.e. Norton Internet Security, McAfee
Personal Firewall, etc.), make sure to add Admin.exe and LDServ.exe into their list of programs to
Allow with full access. You can also try disabling your Antivirus software to see if that makes a difference. Please also try power cycling your nRAID and switch as well.
8. Sometimes when I transfer files to my nRAID, why is the speed so slow?
Try updating your Network T -1t' is(o)5(r)-ivuter
DATOPTIC, inc
42
www.DATOPTIC.com
Network Direct Attached Storage / nRAID
User Manual
9. I've installed my nRAID and it shows up as a Black Dot.
Note: If you are using nRAID via USB, then no software installation is required, therefore, please ignore
the Black Dot.
Please check to make sure of the following:
A.
B.
C.
D.
E.
F.
G.
H.
I.
J.
K.
L.
You are using the latest version of our software which can be found at www.datoptic.com
Power cable is plugged in tightly, and nRAID hard drive is spinning.
There is a link light on the port where it is connected to (switch), and the dip switches (if any) are
in the down position.
Please make sure that any firewall/antivirus software is disabled before installing. The latest
versions of antivirus software have a new feature called script blocking. Please also ensure that
this feature is disabled before continuing
You might also need to enable our protocol and programs to run in your Antivirus/Firewall program as well.
Even after you have done these things, it is still possible that the firewall/antivirus software is
blocking access. For troubleshooting purposes, if it still does not work, please try uninstalling the
firewall/antivirus software, reboot, then reinstall our software to see if it works. If it works, then
you can go ahead and re-install the antivirus/firewall software.
If using Wireless, then please make sure that you are connected to the wireless router and that
your signal is good. Try going to your wireless router's website and check for the latest firmware
and also check for the latest drivers for your wireless card as well.
Try plugging in via wired connection and see if it works that way.
Powercycle your switch/router.
If you are using VPN software, please try unchecking the box for Deterministic Network Enhancer or any other VPN protocol in your NIC Properties.
Check to see if you have any Spyware installed.
For further help, please contact [email protected] or call 714-558-1808 (US and Canada).
10. When adding nRAID to my computer, why does the "ADD" button stay gray?
You may not have entered all the alpha-numeric values correctly. There are no letter "O"s; please
verify that you have used the number "0" (zero) for anything resembling an "O." Also please check
your other letters as well; two V's may look like a W. Start by entering only the nRAID ID. The ADD
button should not be grayed out if the correct ID is entered. Once it is not grayed out, proceed to add
the Write Key as well.
Please also make sure that there are 20 characters for the nRAID ID, not including the Write Key.
11. Using Windows file sharing function, after reboot, share gets lost. Is there any work around ?
Create a batch file and place it in your startup folder. To create batch file:
-
Open up notepad - type in "net share sharename=DriveLetter:path" (For example net share
nRAID =F:)
Save the file as a .bat extension. For example, the file name would be called " nRAID.bat".
DATOPTIC, inc
43
www.DATOPTIC.com
Network Direct Attached Storage / nRAID
User Manual
12. I installed the nRAID key but cannot see nRAID in "My Computer." What should I do?
Click on the nRAID Admin Tool in your System tray and make sure nRAID is enabled. There
should be a dot next to your nRAID, colored either Blue (Read/Write) or Green (Read Only). If it is
a black colored dot, then please go to the FAQ: "I've installed my nRAID and it shows up as a
Black Dot."
If nRAID is enabled, open "Computer Management" by right-clicking on "My Computer." Go to
"Manage," then click on "Disk Management." Check if your nRAID is recognized. It should show up
as Disk 1 or Disk 2 or a different number depending on the number of drives that you have on your
computer. Right-click on the appropriate "Disk #" and click "Initialize." if that option exists.
Also make sure that the nRAID is partitioned and formatted. If you see something that says
"Unallocated," then right-click on the "Unallocated," create a partition, and then format the drive to
your file system preference.
To use nRAID with other Operating Systems such as Windows 98SE / ME, and Mac OS X, you will
need to format your nRAID to FAT32 for it to be recognized.
13. Why am I getting a "Data has been corrupted" message when I try to open or copy a file?
-
Open up Command Prompt and run "chkdsk" for the nRAID drive.
Go to Start - Run - type in "cmd" without the quotation marks.
Then type in "chkdsk nRAIDDriveLetter: /F" (For example, if your nRAID shows up as drive
letter E: in My Computer, you would type in the following: chkdsk E: /F)
14. Why do I keep getting this error message: “The device ‘Generic volume’ cannot be stopped
right now. Try stopping the device again later." ?
Close any windows that are displaying your nRAID and retry what you were doing earlier. If you
continue to get that error message, reboot your computer. However, if you were copying a large
amount of files, it is possible that it is still being copied in the background from its cache. You may
need to wait until it is finished before continuing.
15. I just installed nRAID; why is the nRAID showing up as a red color?
Try unplugging your nRAID's power cord, wait about 10 seconds, and plug it back in. If this does not
work, restart your computer. Please disable your firewall/antivirus software (you may need to configure
the software to allow your nRAID to run). If this does not work, plug nRAID via USB to see if it is recognized. If so, recover the data and reformat the drive. While in USB, delete the partition and bring the
nRAID back to the Ethernet and format the nRAID.
* Formatting will erase any data on the drive.
16. I keep getting “Internal Error; Update Failed." What does this mean?
Try updating to our latest drivers to see if that fixes the problem.
Before installing our nRAID software, please disable any Firewall/Antivirus software and also make
sure that Script Blocking is turned off for antivirus software. If problems still persist, please try uninstalling the Firewall/Antivirus software and reinstall nRAID software. Also try updating your NIC
drivers to the latest available from the manufacturer.
DATOPTIC, inc
44
www.DATOPTIC.com
Network Direct Attached Storage / nRAID
User Manual
17. I am getting the message “Connection closed abnormally. Try to reconnect." What does this
mean?
Check that you are using the latest version of our software. If nRAID keeps losing its connection to
your computer, check your USB or Ethernet cable connection.
We recommend using NTFS for multi-write 3.X software for Windows XP/2000. To verify this, rightclick on your nRAID drive letter from My Computer and click on Properties. Under File System it
will indicate the type of file system your nRAID is formatted to. To format nRAID to NTFS, rightclick on the nRAID drive letter from My Computer and click on Format. A drop down menu will allow you to select NTFS. Check the box next to the word Quick Format.
You may want to format through Disk Management: Right click on My Computer, then click on Manage. Computer Management will open, and click on Disk Management. Check if your nRAID is
recognized. It should show up as Disk 1 or Disk 2 or a different number depending on the number
of drives you have on your computer. Right-click on the appropriate "Disk #" and right-click on the
white area for options to format and/or delete partition.
* Formatting will erase any data on the drive. Please back up before continuing.
Make sure that nRAID is plugged into a 100mb/full duplex capable switch and that you are using a
10/100mb Network Card. nRAID is not supported on hubs. If your switch is uplinked to another one,
place nRAID and your computer on the same switch and retry.
Try setting your NIC's speed/duplex settings to 100MB/full duplex: Right-click on My Network
Places, click on Properties, right-click on Local Area Connection and click on Properties. Then click
on the Configure button next to your NIC and click on the Advanced tab. Here, you should find a
category related to "Speed & Duplex", "Media Settings", etc . where, once highlighted, you can click
on a drop down menu and select 100mb/full duplex. You can also go to your NIC (Ethernet card)
manufacturer and download the latest drivers. If using a DSL router, update the firmware.
Or, plug nRAID and your PC into a different port on the switch and check for different results.
If you are using any Antivirus/Firewall software, please try disabling it and see if that solves the issue. The latest versions of antivirus software have a new feature called Script Blocking. Try disabling that as well because disabling Antivirus may not necessarily disable that feature.
18. I keep getting Autoplay when I plug in nRAID.
Open My Computer and go to Tools menu at the top. Click on Folder Options. Click on the View
tab and go to Advanced Settings. Make sure to check the box next to the entry “Hide extensions for
known file types”. Then, create a blank text file in the root directory of your nRAID and name it
"autorun.inf". Place this in the root directory of your nRAID drive letter in "My Computer."
19. Why can’t my computer go into hibernation or standby?
You must have customer select the Allow suspend/hibernation box from the Options menu in NDAS
Device Management.
DATOPTIC, inc
45
www.DATOPTIC.com
Network Direct Attached Storage / nRAID
User Manual
20. I have clicked on the nRAID Admin Tool on my desktop and nothing happens.
The icon on the desktop is only used to launch our icon into the system tray, if for some reason it is not
already there. The icon in the system tray is used for Enabling/Disabling, Adding/Removing, and
switching modes for Read/Write on nRAID.
21. When I try to copy something to my nRAID, why does the following show up: “Cannot copy
nRAID Administrator: The disk is write-protected. Remove the write-protection or use another disk.”?
You do not have Read/Write access. Click on the nRAID Icon in your bottom-right system tray. Go to
your nRAID and then click on "Enable Read/Write."
22. Why can't I format my whole nRAID to FAT32?
Windows 2000/XP comes with a limitation of only 32GB partitions that it can create. This is a Windows limitation and the only resolution is to use a 3rd party partitioning software or use a Windows
98SE/ME computer to format the entire drive to FAT32. With our Multi-Write drivers, NTFS is recommended anyways for stability and performance purposes.
DATOPTIC, inc
46
www.DATOPTIC.com
Network Direct Attached Storage / nRAID
User Manual
Chapter 13 Regulatory Statements
United States (FCC)
The computer equipment described in this manual generates and uses radio frequency (RF) energy. If
the equipment is not installed and operated in strict accordance with the manufacturer's instructions,
interference to radio and television reception might result.
This equipment complies with Part 15 of the FCC Rules. Operation is subject to the following conditions: (1) This device may not cause harmful interference, and (2) this device must accept any interference received, including interference that may cause undesired operation.
Part 15, Class B, of the FCC Rules, is designed to provide reasonable protection against radio and television interference in a residential installation. Although the equipment has been tested and found to
comply with the allowed RF emission limits, as specified in the above cited Rules, there is no guarantee
that interference will not occur in a particular installation. Interference can be determined by turning the
equipment off and on while monitoring radio or television reception. The user may be able to eliminate
any interference by implementing one or more of the following measures:
-
Reorient the affected device and/or its receiving antenna.
Increase the distance between the affected device and the computer equipment.
Plug the computer and its peripherals into a different branch circuit from that used by the
affected device.
If necessary, consult an experienced radio/television technician for additional suggestions.
DATOPTIC, inc
47
www.DATOPTIC.com
Network Direct Attached Storage / nRAID
User Manual
Chapter 15 Additional Information and Assistance
For additional information, frequently asked questions or troubleshooting help, please refer to
the User Manual.
Assistance is also available by contacting DATOPTIC, Inc. Whenever you contact DATOPTIC, Inc.
for technical support, please have the following information available:
-
Product Name
Model
Serial Number
Software Version
How to Contact DATOPTIC, Inc.:
Telephone
Fax
Email support for North America
: 1-714-558-1808
: 1-714-558-3229
: [email protected]
Technical Support on the Internet:
For the latest information on nRaid, visit our website at
www.DATOPTIC.com.
DATOPTIC, inc
48
www.DATOPTIC.com