1
The Orocos User's Manual
Open RObot COntrol Software
1.2.2
The Orocos User's Manual : Open RObot COntrol Software
: 1.2.2
Copyright © 2002,2003,2004,2005,2006 Herman Bruyninckx, Peter Soetens
Abstract
This document gives an introduction to the Orocos [http://www.orocos.org] ( Open RObot COntrol
Software ) project. It contains a high-level overview of what Orocos (aims to) offer and the installation manual.
Orocos Version 1.2.2.
Permission is granted to copy, distribute and/or modify this document under the terms of the GNU Free Documentation License, Version 1.1 or any later version published by the Free Software Foundation, with no Invariant Sections, with no FrontCover Texts, and with no Back-Cover Texts. A copy of this license can be found at http://www.fsf.org/copyleft/fdl.html.
Table of Contents
1. Orocos Overview .........................................................................................1
1. What is Orocos? ...................................................................................1
2. Target audience ....................................................................................2
3. Building Orocos Applications ..............................................................3
3.1. Application Templates ..............................................................4
3.2. Control Components .................................................................5
4. Related 'Orocos' Projects .....................................................................6
2. Installing Orocos ..........................................................................................8
1. Setting up your first Orocos source tree ..............................................8
1.1. Introduction ...............................................................................8
1.2. Basic Real-Time Toolkit Installation ........................................9
1.3. Installing an Orocos Build ......................................................11
2. Detailed Configuration using 'CMake' ...............................................12
2.1. Configuring the target Operating System ...............................12
2.2. Setting Build Compiler Flags .................................................12
2.3. Building for RTAI / LXRT .....................................................13
2.4. Building for Xenomai (version 2.2.0 or newer) ......................14
2.5. Configuring for CORBA .........................................................15
3. Getting Started with the Code ............................................................17
3.1. A quick test .............................................................................17
3.2. What about main() ? ................................................................17
3.3. Header Files Overview ...........................................................18
4. Cross Compiling Orocos ....................................................................19
iv
List of Figures
1.1. Orocos Libraries ........................................................................................1
1.2. Orocos Real-Time Toolkit ........................................................................4
1.3. Orocos Control Component Interface .......................................................5
1.4. Orocos Control Component State Machines. ............................................6
v
List of Tables
2.1. Build Requirements ..................................................................................8
2.2. Header Files ............................................................................................18
vi
List of Examples
2.1. A Makefile for an Orocos Application ...................................................17
vii
Chapter 1. Orocos Overview
This document gives an application oriented overview of Orocos [http://www.orocos.org], the Open RObot COntrol Software project.
1. What is Orocos?
“Orocos” is the acronym of the Open Robot Control Software [http://www.orocos.org] project. The project's aim is to develop a general-purpose,
free software, and modular framework for robotand machine control. The Orocos
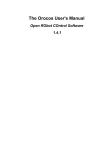
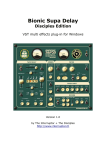
project supports 4 C++ libraries: the Real-Time Toolkit, the Kinematics and Dynamics Library, the Bayesian Filtering Library and the Orocos Component Library.
Figure 1.1. Orocos Libraries
• The Orocos Real-Time Toolkit (RTT) is not an application in itself, but it
provides the infrastructure and the functionalities to build robotics applications
in C++. The emphasis is on real-time, on-line interactive and component based
applications.
• The Orocos Components Library (OCL) provides some ready to use control
components. Both Component management and Components for control and
hardware access are available.
• The Orocos Kinematics and Dynamics Library (KDL) is a C++ library which allows to calculate kinematic chains in real-time.
1
Orocos Overview
• The Orocos Bayesian Filtering Library (BFL) provides an application independent framework for inference in Dynamic Bayesian Networks, i.e., recursive information processing and estimation algorithms based on Bayes' rule, such as
(Extended) Kalman Filters, Particle Filters (Sequential Monte methods), etc.
Orocos is a free software project, hence its code and documentation are released
under Free Software licenses.
Your feedback and suggestions are greatly appreciated. Please, use the project's
mailing list [http://lists.mech.kuleuven.be/mailman/listinfo/orocos] for this purpose.
2. Target audience
Robotics or machine control in general is a very broad field, and many roboticists
are pursuing quite different goals, dealing with different levels of complexity, realtime control constraints, application areas, user interaction, etc. So, because the robotics community is not homogeneous, Orocos targets four different categories of
“Users” (or, in the first place, “Developers”):
1. Framework Builders.
These developers do not work on any specific application, but they provide the
infrastructure code to support applications. This level of supporting code is most
often neglected in robot software projects, because in the (rather limited) scope
of each individual project, putting a lot of effort in a generic support platform is
often considered to be “overkill”, or even not taken into consideration at all.
However, because of the large scope of the Orocos project, the supporting code
(the “Framework”) gets a lot of attention. The hope is, of course, that this work
will pay of by facilitating the developments for the other “Builders”. The RTT,
KDL and BFL are created by Framework builders
2. Component Builders.
2
Orocos Overview
Components provide a “service” within an application. Using the infrastructure
of the framework, a Component Builder describes the interface of a service and
provides one or more implementations. For example a Kinematics Component
may be designed as such that it can “serve” different kinematic architectures.
Other examples are Components to hardware devices, Components for diagnostics, safety or simulation. The OCL is created by Component Builders.
3. Application Builders.
These developers use the Orocos' Framework and Components, and integrate
them into one particular application. That means that they create a specific, application-dependent architecture: Components are connected and configured as
such that they form an application.
4. End Users.
These people use the products of the Application Builders to program and run
their particular tasks.
End Users do not directly belong to the target audience of the Orocos project, because Orocos concentrates on the common framework, independent of any application architecture. Serving the needs of the End Users is left to (commercial and
non-commercial) Application Builders.
3. Building Orocos Applications
Orocos applications are composed of software components, which form an application specific network. When using Orocos, you can choose to use predefined components, contributed by the community, or build your own component, using the
Orocos Real-Time Toolkit. This section introduces both ways of building applications.
3
Orocos Overview
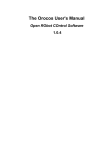
Figure 1.2. Orocos Real-Time Toolkit
3.1. Application Templates
An "Application Template" is a set of components that work well together. For example, the application template for motion control contains components for path
planning, position control, hardware access and data reporting. The components are
chosen as such that their interfaces are compatible.
An application template should be so simple that any Orocos user can pick one and
modify it, hence it is the first thing a new user will encounter. An application template should be explainable on one page with one figure explaining the architecture.
Note
An application template has no relation to 'C++' templates.
4
Orocos Overview
3.2. Control Components
Applications are constructed using the Orocos "Control Component". A distributable entity which has a control oriented interface.
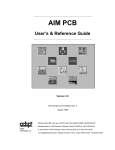
Figure 1.3. Orocos Control Component Interface
A single component may be well capable of controlling a whole machine, or is just
a 'small' part in a whole network of components, for example an interpolator or kinematic component. The components are built with the "Real-Time Toolkit" and optionally make use of any other library (like a vision or kinematics toolkit). Most
users will interface components through their (XML) properties or command/method interface in order to configure their applications.
There are five distinct ways in which an Orocos component can be interfaced:
through its properties, events, methods, commands and data flow ports (Figure 1.3,
“ Orocos Control Component Interface ”). These are all optional interfaces. The
purpose and use of these interface 'types' is documented in the Orocos Component
Builder's Manual. Each component documents its interface as well. To get a grip on
what these interfaces mean, here are some fictitious component interfaces for a 'Robot' Component:
• Data-Flow Ports: Are a thread-safe data transport mechanism to communicate
buffered or un-buffered data between components. For example: "JointSet5
Orocos Overview
points", "EndEffectorFrame", "FeedForward",...
• Properties: Are run-time modifiable parameters, stored in XML files. For example: "Kinematic Algorithm", "Control Parameters", "Homing Position", "ToolType",...
• Methods: Are callable by other components to 'calculate' a result immediately,
just like a 'C' function. For example: "getTrackingError()", "openGripper()",
"writeData("filename")", "isMoving()", ...
• Commands: Are 'sent' by other components to instruct the receiver to 'reach a
goal' For example: "moveTo(pos, velocity)", "home()",... A command cannot, in
general, be completely executed instantaneously, so the caller should not block
and wait for its completion. But the Command object offers all functionalities to
let the caller know about the progress in the execution of the command.
• Events: Allows functions to be executed when a change in the system occurs. For
example: "Position Reached", "Emergency Stop", "Object Grasped",...
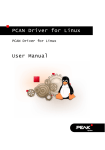
Besides defining the above component communication mechanisms, Orocos allows
the Component or Application Builder to write hierarchical state machines which
use these primitives. This is the Orocos way of defining your application specific
logic. State machines can be (un-)loaded at run-time in any component.
Figure 1.4. Orocos Control Component State Machines.
4. Related 'Orocos' Projects
The Orocos project spawned a couple of largely independent software projects. The
documentation you are reading is about the Real-Time Control Software located on
6
Orocos Overview
the Orocos.org web page. The other not real-time projects are :
• At KTH Stockholm, several releases have been made for component-based robotic systems, and the project has been renamed to Orca [http://orca-robotics.sourceforge.net/].
• Although not a project funded partner, the FH Ulm maintains Free CORBA communication patterns for modular robotics : Orocos::SmartSoft [http://www.rz.fh-ulm.de/~cschlege/orocos/].
This documentation is targeted at industrial robotics and real-time control.
7
Chapter 2. Installing Orocos
This document explains how the Real-Time Toolkit of Orocos [http://www.orocos.org], the Open RObot COntrol Software project must be installed
and configured.
1. Setting up your first Orocos
source tree
1.1. Introduction
This sections explains the supported Orocos targets and the Orocos versioning
scheme.
1.1.1. Supported platforms (targets)
Orocos was designed with portability in mind. Currently, we support RTAI/LXRT
(http://www.rtai.org), GNU/Linux userspace, Xenomai (Xenomai.org [http://www.xenomai.org]). So, you can first write your software as a normal Linux
program, using the framework for testing and debugging purposes in plain userspace Linux and recompile later to another real-time target.
1.1.2. The versioning scheme
Orocos uses the even/stable uneven/unstable version numbering scheme, just as the
Linux kernel. A particular version is represented by three numbers separated by
dots. An even middle number indicates a stable version. For example :
• 1.1.4 : Release 1, unstable (1), revision 4.
• 1.2.1 : Release 1, stable (2), revision 1.
This numbering allows to develop and release two kinds of versions, where the unstable version is mainly for testing new features and designs and the stable version
is for users wanting to run a reliable system.
1.1.3. Dependencies on other Libraries
Before you install Orocos, verify that you have the following software installed on
your platform :
Table 2.1. Build Requirements
Program / Library
Boost C++ Libraries
Minimum Version
Description
0.32.0 (0.33.0 or newer Boost.org
8
[ht-
Installing Orocos
Program / Library
Minimum Version
Recommended!)
GNU gcc / g++ Compilers 3.3.0
Xerces C++ Parser
2.1 (Optional)
CppUnit Library
1.9.6 (Optional)
Description
tp://www.boost.org] Version 0.33.0 has a very efficient (time/space) lockfree smart pointer implementation which is used
by Orocos.
gcc.gnu.org
[http://gcc.gnu.org] Orocos
builds with the GCC 4.x
series as well.
Xerces
website
[http://xml.apache.org/xerces
-c/] Versions 2.1 until 2.6
are known to work. If not
found, an internal XML
parser is used.
CppUnit website. [http://cppunit.sourceforge.ne
t/cgi-bin/moin.cgi] Only
needed if you want to run
the Orocos tests.
All these packages are provided by most Linux distributions. Take also a look on
the Orocos.org download page for the latest information.
1.2. Basic Real-Time Toolkit Installation
The RTT uses the CMake [http://www.cmake.org] build system for configuring
and building the library.
1.2.1. Orocos Build and Configuration Tools
The tool you will need is cmake In Debian, you can use the official Debian version
using
apt-get install cmake
If this does not work for you, you can download cmake from the CMake homepage.
1.2.2. Quick Installation Instructions
Download the orocos-rtt-1.2.2-src.tar.bz2 package from the Orocos webpage.
Extract it using :
tar -xvjf orocos-rtt-1.2.2-src.tar.bz2
Then proceed as in:
9
Installing Orocos
mkdir orocos-rtt-1.2.2/build
cd orocos-rtt-1.2.2/build
../configure --with-<target> [--prefix=/usr/local][--with-linux=/usr/src/linux]
make
make check
make install
Where
• <target> is one of listed in ../configure --help. ( currently 'gnulinux', 'lxrt' or
'xenomai' ). When none is specified, 'gnulinux' is used.
• --prefix specifies where to install the RTT.
• --with-linux is required for RTAI/LXRT and older Xenomai version (<2.2.0). It
points to the source location of the RTAI/Xenomai patched Linux kernel.
See configure --help for a full list of options.
Note
The configure script is a wrapper around the 'cmake' command and
must be rerun after you installed missing libraries (like Boost, ...) before
you can build the RTT.
1.2.3. Real-Time Toolkit Flavours
The RTT can be compiled in three flavours: the 'standard', 'embedded' or 'CORBA'
version. The embedded version is standard without scripting, the CORBA version
is standard with CORBA interfaces. In order to select your flavour, you need to invoke the ccmake command:
cd orocos-rtt-1.2.2/build
cmake ..
from your build directory. It will offer a configuration screen. The keys to use are
'arrows'/'enter' to modify a setting, 'c' to run a configuration check (may be required
multiple times), 'g' to generate the makefiles. If an additional configuration check is
required, the 'g' key can not be used and you must press again 'c' and examine the
output.
RTT with CORBA flavour
In order to enable CORBA a valid installation of TAO must be detected on your
system and you must turn the ENABLE_CORBA option on (using ccmake). Enabling CORBA almost doubles the size of the RTT library and slows down link and
compile times.
10
Installing Orocos
Alternatively, when you use the configure wrapper, you can specify:
../configure --enable-corba
Embedded RTT flavour
In order to run Orocos applications on embedded systems, one can turn the
OS_EMBEDDED option on. Next press 'c' again and additional options will be
presented which allow you to select what part of the RTT is used. By default, the
OS_EMBEDDED option already disables some 'fat' features. One can also choose
to build the RTT as a static library (BUILD_STATIC).
Alternatively, when you use the configure wrapper, you can specify:
../configure --embedded
1.2.4. Build results
The make command will have created a liborocos-rtt.so library, and if CORBA is
enabled a liborocos-rtt-corba.so library.
The make docapi and make docpdf dochtml (both in 'build') commands build API
documentation and PDF/HTML documentation in the build/doc directory.
1.2.5. Building Orocos for multiple targets
When you want to build for another target, create a new build-<target> directory
and simply re-invoke ../configure --with-<target> from that build directory.
If this step fails, it means that you have not everything installed which is needed for
a basic Orocos build. Most users don't have the Boost library (libboost-dev or libboost-devel) installed. Install this package from the binary or source package repository of your Linux distribution, or download and install it from the Boost project.
[http://www.boost.org] As soon as the configure step succeeds, all the rest will succeed too. Use the mailinglist at <[email protected]> for support
questions.
1.3. Installing an Orocos Build
Orocos can optionally ( but recommended) be installed on your system with
make install
The default directory is /usr/local, but can be changed with the --with-prefix option
:
../configure --with-prefix=/opt/other/
11
Installing Orocos
If you choose not to install Orocos, you can find the build's result in the build/rtt
directory.
2. Detailed Configuration using
'CMake'
In order to start cmake configuration, in your build directory, run ccmake .. . Press
'c' (from 'c'onfigure), watch the output, press 'e' (from 'e'xit) and modify the new
options. Repeat these steps until no errors are reported and the 'g' (from 'g'enerate)
key can be pressed. This causes the makefiles to be generated which allow the library to be built.
2.1. Configuring the target Operating System
Move to the OROCOS_TARGET, press enter and type on of the following supported targets (all in lowercase):
• gnulinux
• xenomai
• lxrt
The xenomai and lxrt targets require the presence of the LINUX_SOURCE_DIR
option since these targets require Linux headers during the Orocos build. To use the
LibC Kernel headers in /usr/include/linux, specify /usr. Inspect the output to find
any errors.
Note
From Xenomai version 2.2.0 on, Xenomai configuration does no longer
require the --with-linux option.
2.2. Setting Build Compiler Flags
You can set the compiler flags using the CMAKE_BUILD_TYPE option. You may
edit this field to contain:
• RTT (default)
• Release
• Debug
• RelWithDebInfo
12
Installing Orocos
2.3. Building for RTAI / LXRT
Read first the 'Getting Started' section from this page [http://people.mech.kuleuven.be/~psoetens/portingtolxrt.html] if you are not familiar
with RTAI installation
Orocos has been tested with RTAI 3.0, 3.1, 3.2, 3.3, 3.4 and 3.5. You can obtain it
from the RTAI home page [http://www.aero.polimi.it/projects/rtai/]. Read The
README.* files in the rtai directory for detailed build instructions, as these depend on the RTAI version.
2.3.1. RTAI settings
RTAI comes with documentation for configuration and installation. During 'make
menuconfig', make sure that you enable the following options (in addition to options you feel you need for your application) :
• General -> 'Enable extended configuration mode'
• Core System -> Native RTAI schedulers > Scheduler options -> 'Number of
LXRT slots' ('1000')
• Machine -> 'Enable FPU support'
• Core System -> Native RTAI schedulers > IPC support -> Semaphores, Fifos,
Bits (or Events) and Mailboxes
• Add-ons -> 'Comedi Support over LXRT' (if you intend to use the Orocos
Comedi Drivers)
• Core System -> Native RTAI schedulers > 'LXRT scheduler (kernel and userspace tasks)'
After configuring you must run 'make' and 'make install' in your RTAI directory:
make sudo make install
After installation, RTAI can be found in /usr/realtime. You'll have to specify this
directory in the RTAI_INSTALL_DIR option during 'ccmake'.
2.3.2. Loading RTAI with LXRT
LXRT is a all-in-one scheduler that works for kernel and userspace. So if you use
this, you can still run kernel programs but have the ability to run realtime programs
in userspace. Orocos provides you the libraries to build these programs. Make sure
that the following RTAI kernel modules are loaded
• rtai_sem
• rtai_lxrt
13
Installing Orocos
• rtai_hal
• adeos (depends on RTAI version)
For example, by executing as root: modprobe rtai_lxrt; modprobe rtai_sem.
2.3.3. Compiling Applications with LXRT
Application which use LXRT as a target need special flags when being compiled
and linked. Especially :
• Compiling : -I/usr/realtime/include
This is the RTAI headers installation directory.
• Linking : -L/usr/realtime/lib -llxrt for dynamic (.so) linking OR add /
usr/realtime/liblxrt.a for static (.a) linking.
Important
You might also need to add /usr/realtime/lib to the /etc/ld.so.conf file
and rerun ldconfig, such that liblxrt.so can be found. This option is
not needed if you configured RTAI with LXRT-static-inlining.
2.4. Building for Xenomai (version 2.2.0 or
newer)
Note
For older Xenomai versions, consult the Xenomai README of that
version.
Xenomai provides a real-time scheduler for Linux applications. See the Xenomai
home page [http://www.xenomai.org]. Xenomai requires a patch one needs to apply
upon the Linux kernel, using the scripts/prepare-kernel.sh script. See the
Xenomai installation manual. When applied, one needs to enable the General Setup
-> Interrupt Pipeline option during Linux kernel configuration and next the RealTime Sub-system -> , Xenomai and Nucleus. Enable the Native skin, Semaphores,
Mutexes and Memory Heap. Finally enable the Posix skin as well.
When the Linux kernel is built, do in the Xenomai directory: ./configure ; make;
make install.
You'll have to specify the install directory in the XENOMAI_INSTALL_DIR option during 'ccmake'.
14
Installing Orocos
2.4.1. Loading Xenomai
The RTT uses the native Xenomai API to address the real-time scheduler. The
Xenomai kernel modules can be found in /usr/xenomai/modules. Only the following kernel modules need to be loaded:
• xeno_hal.ko
• xeno_nucleus.ko
• xeno_native.ko
in that order. For example, by executing as root: insmod xeno_hal.ko; insmod
xeno_nucleus.ko; insmod xeno_native.ko.
2.4.2. Compiling Applications with Xenomai
Application which use Xenomai as a target need special flags when being compiled
and linked. Especially :
• Compiling : -I/usr/xenomai/include
This is the Xenomai headers installation directory.
• Linking : -L/usr/xenomai/lib -lnative for dynamic (.so) linking OR add /
usr/xenomai/libnative.a for static (.a) linking.
Important
You might also need to add /usr/xenomai/lib to the /etc/ld.so.conf file
and rerun ldconfig, such that libnative.so can be found automatically.
2.5. Configuring for CORBA
In case your application benefits from remote access over a network, the RTT can
be used with 'The Ace Orb' or TAO version prepared by OCI (Object Computing
Inc.). You can find the latest TAO version on OCI's TAO website [http://www.theaceorb.com]. The RTT was tested with OCI's TAO 1.3 and 1.4. The
OCI version is prefered above the versions provided by the DOC group on the
Real-time CORBA with TAO (The ACE ORB) website [http://www.cs.wustl.edu/~schmidt/TAO.html].
Note
Orocos requires the ACE, TAO and TAO-orbsvcs libraries and header
files to be installed on your workstation and that the ACE_ROOT and
TAO_ROOT variables are set.
15
Installing Orocos
2.5.1. TAO installation (Optional)
Note
If your distribution does not provide the TAO libraries, or you want to
use the OCI version, you need to build manually. These instructions are
for building on Linux. See the ACE and TAO installation manuals for
building on your platform.
You need to make an ACE/TAO build on your workstation. Download the package
here: OCI Download [http://www.theaceorb.com/downloads/1.4a/index.html]. Unpack the tar-ball, and enter ACE_wrappers. Then do: export ACE_ROOT=$(pwd)
export TAO_ROOT=$(pwd)/TAO Configure ACE for Linux by doing: ln -s ace/
config-linux.h ace/config.h ln -s include/makeinclude/platform_linux.GNU include/makeinclude/platform_macros.GNU Finally, type: make cd TAO make
cd orbsvcs make This finishes your TAO build.
2.5.2. Configuring the RTT for TAO
Orocos will first try to detect your location of ACE and TAO using the
ACE_ROOT and TAO_ROOT variables. If these are set, you can enable CORBA
support (ENABLE_CORBA) within CMake.
Alternatively, when you use the configure wrapper, you can specify:
../configure --enable-corba
2.5.3. Application Development with TAO
Once you compile and link your application with Orocos and with the CORBA
functionality enabled, you must provide the correct include and link flags in your
own Makefile if TAO and ACE are not installed in the default path. Then you must
add:
• Compiling : -I/path/to/ACE_wrappers -I/path/to/ACE_wrappers/TAO
This is the ACE build directory in case you use OCI's TAO packages. This option is not needed if you used your distribution's TAO installation, in that case,
TAO is in the standard include path.
• Linking : -L/path/to/ACE_wrappers/lib -lTAO -lACE -lTAO_IDL_BE lTAO_PortableServer -lTAO_CosNaming
This is again the ACE build directory in case you use OCI's TAO packages. The
first option is not needed if you used your distribution's TAO installation, in that
case, TAO is in the standard library path.
16
Installing Orocos
Important
You also need to add /path/to/ACE_wrappers/lib to the /etc/ld.so.conf
file and rerun ldconfig, such that these libraries can be found. Or you
can before you start your application type
export LD_LIBRARY_PATH=/path/to/ACE_wrappers/lib
.
3. Getting Started with the Code
This Section provides a short overview of how to proceed next using the Orocos
Real-Time Toolkit.
3.1. A quick test
You can issue a make check in the Orocos build directory, but this stresses your
system heavily. make check for the gnulinux target should successfuly complete.
To quickly test an Orocos application, you can download the examples from the
webpage.
3.2. What about main() ?
The first question asked by many users is : How do I write a test program to see
how it works?
Some care must be taken in initialising the realtime environment. First of all, you
need to provide a function int ORO_main(int argc, char** argv) {...}, defined in
<rtt/os/main.h> which contains your program :
#include <rtt/os/main.h>
int ORO_main(int argc, char** argv)
{
// Your code, do not use 'exit()', use 'return' to
// allow Orocos to cleanup system resources.
}
If you link with the liborocos-rtt.so library, this function will be called after the
run-time environment is set up. To put in other words, the Orocos library already
contains a main() function which will call the user-defined ORO_main() function.
Example 2.1. A Makefile for an Orocos Application
17
Installing Orocos
You can then simply compile your program with a Makefile resembling this one :
OROPATH=/usr/local
CXXFLAGS=`PKG_CONFIG_PATH=${OROPATH}/lib/pkgconfig pkg-config
orocos-rtt --cflags`
LDFLAGS=`PKG_CONFIG_PATH=${OROPATH}/lib/pkgconfig pkg-config orocos-rtt
--libs`
all: myprogram.cpp
g++ myprogram.cpp ${CXXFLAGS} ${LDFLAGS} -o myprogram
The flags must be extended with compile and link options for your particular application.
Important
The LDFLAGS option must be placed after the .cpp or .o files in the gcc
command.
Note
Make sure you have read Section 2, “Detailed Configuration using
'CMake'” for your target if you application has compilation or link errors ( for example when using LXRT ).
3.3. Header Files Overview
Table 2.2. Header Files
Header
rtt/*.hpp
Summary
The `Real-Time Toolkit' directory contains the headers which describe the
public API.
Not intended for normal users. The os
headers describe a limited set of OS
primitives, like locking a mutex or creating a thread. Read the OS manual carefully before using these headers, they are
mostly used internally by the RTT.
C++ Headers for accessing hardware interfaces.
C++ Headers for CORBA support.
C++ Headers for real-time scripting. Do
not include these directly as they are
mainly for internal use.
rtt/os/*.h, rtt/os/*.hpp
rtt/dev/*.hpp
rtt/corba/*.hpp
rtt/scripting/*.hpp
18
Installing Orocos
Header
rtt/marsh/*.hpp
Summary
C++ Headers for XML configuration
and converting data to text and vice
versa.
C++ Headers for the experimental Distribution Library which allows embedded systems to use some RTT primitives
over a network. This directory does not
contain such a library but only interface
headers.
C++ Headers for internal use.
rtt/dlib/*.hpp
rtt/impl/*.hpp
4. Cross Compiling Orocos
This section lists some points of attention when cross-compiling Orocos.
Run plain "cmake" or "ccmake" with the following options:
CC=cross-gcc CXX=cross-g++ cmake .. -DCROSS_COMPILE=cross-
and substitute the 'cross-' prefix with your target tripplet, for example with 'powerpc-linux-gnu-'.
19