1
The 4th Age of Wireless™
ZG2100S-03 ZEROG SYSTEM DEVELOPMENT KIT FOR WI-FI®
PICTAIL™ USING PICDEM.NET 2 AND EXPLORER 16
GSG-1023
REVISION 3.0
Zero
Wireless · 255 San Geronimo Way · Sunnyvale · CA · 94085 · 408 738 7600 · 408 738 7601 fax
www.zerogwireless.com
th
The 4 Age of Wireless™
Connecting the Internet of Things
Table of Contents
Getting Started Guide................................................................................................................................ 2
Overview ............................................................................................................................................... 2
Features ................................................................................................................................................. 2
Hardware ............................................................................................................................................... 2
Software ................................................................................................................................................ 3
Getting Started With Microchip Software ................................................................................................ 4
Software Items to Install ....................................................................................................................... 4
Installing the Microchip MPLAB IDE v.8.15 or Later ......................................................................... 4
Installing the Microchip MPLAB C Compiler ..................................................................................... 4
Installing the Microchip In-Circuit Debugger Driver ........................................................................... 5
Installing the Microchip TCPIP Stack .................................................................................................. 6
Special Install: Updating Code Drops ................................................................................................... 6
Hardware Setup and Configuration........................................................................................................... 7
Cable Connection .................................................................................................................................. 7
Out-of-Box Demo ..................................................................................................................................... 8
AP Setup for Demo ............................................................................................................................... 9
Example Application Code Development ............................................................................................... 10
HTTP2.h (located under “Header Files\TCPIP Stack”) ...................................................................... 10
Modifying the TCPIPConfig.h file ..................................................................................................... 10
Configuring the MAC Address ........................................................................................................... 10
Configuring for Security ......................................................................................................................11
·
Disable Security ........................................................................................................................... 12
·
Using WEP ................................................................................................................................... 12
·
Using WPA/WPA2 PSK............................................................................................................... 13
·
Using Passphrase for ZeroG Chip to Create WPA/WPA2 Key ................................................... 13
Modifying the HTTP2.h file ............................................................................................................... 14
Compiling Project Code .......................................................................................................................... 15
Preparing and Using the Web Server Application................................................................................... 17
Loading the web page onto the board .............................................................................................. 17
Observe the board web page from the PC. ...................................................................................... 17
Debug Port .............................................................................................................................................. 17
Microchip Development Board Specifics ............................................................................................... 21
PICDEM.NET 2 Usage ....................................................................................................................... 21
Explorer 16 Usage ............................................................................................................................... 21
Erasing EEPROM ............................................................................................................................... 21
Other Info ................................................................................................................................................ 23
Federal Communication Commission Interference Statement ............................................................... 24
FCC Radiation Exposure Statement: .................................................................................................. 24
End Product Labeling.......................................................................................................................... 25
Manual Information That Must be Included ....................................................................................... 25
1
Zero
Wireless · 255 San Geronimo Way · Sunnyvale · CA · 94085 · 408 738 7600 · 408 738 7601 fax
www.zerogwireless.com
th
The 4 Age of Wireless™
Connecting the Internet of Things
Getting Started Guide
Overview
The Wi-Fi® PICtailTM/PICtailTM+ Daughtercard Board is an 802.11B demonstration
board for evaluating the ZeroG Wireless ZG2100 Wi-Fi® controller on a Microchip
Technology’s processing platform. It is an expansion board compatible with the
Explorer 16 and PICDEMTM.NET 2 development boards.
Features
ZG2100 Wi-Fi controller fully integrating 802.11B MAC and RF PHY requirements
Power regulator to enable use on 3.3V or 5V development boards
PICtail and PICtail+ Daughter Board connection interface
Hardware
The following items are required for development or evaluation of the Microchip based ZeroG 802.11
solution. WARNING: The boards in this kit are highly sensitive to electrostatic discharge
(ESD). Please ground yourself at all times while in contact with the boards.
1. ZG2100PCB Wi-Fi® PICtail
2. Microchip Hardware Development board (one of the following)
1. Explorer16 (PIC24, dsPIC, or PIC32 depending on personality module)
2. PICDEM.Net2 (PIC18)
3. Microchip ZeroG Software driver and integrated Microchip stack (available on disk) [v4.52 or
later]
4. Power supply (9v, 300mA)
5. C compiler (downloadable from Microchip website, see link listings at end of this document)
1. MPLAB C Compiler for PIC24 v3.11(b) (60day free trial available, see link listings)
2. MPLAB C Compiler for PIC18 v3.20 upgrade
6. Microchip development environment
1. Microchip MPLAB IDE v8.15 or later (see link listings for download information)
7. 802.11 access point (B, BG, or BGn)
1. Linksys WRT54G or WRT54G2 is recommended
Microchip hardware may be acquired from http://www.microchipdirect.com/
2
Zero
Wireless · 255 San Geronimo Way · Sunnyvale · CA · 94085 · 408 738 7600 · 408 738 7601 fax
www.zerogwireless.com
th
The 4 Age of Wireless™
Connecting the Internet of Things
Software
This guide has sections on installing the Microchip SDK and TCP/IP stack, the Microchip
MPLAB IDE, and the necessary changes to configure the demo software for networks with
different characteristics than the default settings. Please check on http://www.microchip.com
for the latest information on installation of Microchip tools. Also, any Microchip documentation
that comes with the tools takes precedence over this guide.
The ZGS2101 software has three ways of configuring for networks. This guide documents
the most basic method which is to hard code the data into the source code. The software
uses C calls to modify the values in variables used to keep the configurations. The customers
application code can thus create a user interface that allows scanning for networks and then
configuring based on the end users selection. As an example of using the variables, the
projects have a number of source files to allow run time configuration of the networks (select
adhoc vs infrastructure, change SSID, change security methods and keys). These files are
located in the “ZG2100” project directory (viewed from within MPLAB IDE); and are
ZGConsole.c, ZGConsoleIfconfig.c, ZGConsoleIwconfig.c, ZGConsoleIwpriv.c,
ZGConsoleMsgHandler.c, and ZGConsoleMsgs.c. This example code creates a very
powerful run time command line interface for modifying all attributes of the wireless network.
The interface is accessed via a terminal connected to the RS232 port of the Microchip
development board. The use of these tools are not detailed in this document but can be
found in the “ZGS2101 CLI Usage Document”.
3
Zero
Wireless · 255 San Geronimo Way · Sunnyvale · CA · 94085 · 408 738 7600 · 408 738 7601 fax
www.zerogwireless.com
th
The 4 Age of Wireless™
Connecting the Internet of Things
Getting Started With Microchip Software
Software Items to Install
The list of software items to install includes the following:
1. Microchip MPLAB Integrated Development Environment v.8.15 or later
2. Microchip MPLAB C Compiler
3. Microchip In-Circuit Debugger (ICD 2 or ICD 3) Driver
4. Microchip TCPIP Stack Installer
Installing the Microchip MPLAB IDE v.8.15 or Later
Open web browser and go to:
http://www.microchip.com/stellent/idcplg?IdcService=SS_GET_PAGE&nodeId=1406&dDocName=en019469&part=SW007002
· Go to the bottom of the page for the software download link
· Click “OK” to save the file.
· Extract the .zip file. Open the folder containing the
extracted files and click on the “setup file” to install.
· Follow default settings for the installation. Restart the computer once the installation is
complete.
Installing the Microchip MPLAB C Compiler
The C Compiler you need to install depends on whether you are using a Microchip PIC18
or a PIC24. If you are using a PICDEM.net 2 board, then you have a PIC18. If you are
using an Explorer 16 board, then you have a PIC24. Please install the appropriate
compiler.
To download the PIC18 MPLAB C Compiler, open a web browser and go to:
http://www.microchip.com/stellent/idcplg?IdcService=SS_GET_PAGE&nodeId=1406&dDocName=en010014
4
Zero
Wireless · 255 San Geronimo Way · Sunnyvale · CA · 94085 · 408 738 7600 · 408 738 7601 fax
www.zerogwireless.com
th
The 4 Age of Wireless™
Connecting the Internet of Things
· Click on the student version of the compiler link (e.g. “MPLAB C Compiler for PIC18
v3.22 - Student Edition”)
· Click on “Save File”.
· To download the PIC24 MPLAB C Compiler, open a web browser and go to:
http://www.microchip.com/stellent/idcplg?IdcService=SS_GET_PAGE&nodeId=1406&dDocName=en535364
· Click on the student version of the compiler (e.g. “MPLAB C Compiler for PIC24 v3.11(b)
Student Edition”)
· Install the C Compiler. Use all default settings for the installation process.
Installing the Microchip In-Circuit Debugger Driver
· Setup the hardware as described in the “Hardware Setup” section.
· Plug in the USB cable from the ICD to your
PC.
· When attaching the USB cable, the OS
should automatically detect the new
hardware and issue a pop up a screen
asking you to install the driver.
DO
NOT
USE
THE
RECOMMENDED DRIVER.
WINDOWS
Follow the instructions provided by Microchip
in their “ICD Getting Started Guide”.
5
Zero
Wireless · 255 San Geronimo Way · Sunnyvale · CA · 94085 · 408 738 7600 · 408 738 7601 fax
www.zerogwireless.com
th
The 4 Age of Wireless™
Connecting the Internet of Things
Installing the Microchip TCPIP Stack
· Open the ZeroG CD that came with your System Development Kit.
· Click on Microchip TCPIP Stack Installer.
This will install the “Microchip Solutions” folder, containing several
projects, on the PC’s “C:\ drive”.
Special Install: Updating Code Drops
If you are installing an update to a previous install and do not have an installer program ensure you
follow the following instructions:
•
Install the “Microchip” folder into “C:\Microchip Solutions\” rewriting the previous folder
•
Install any new or updated project files directly into “C:\Microchip Solutions\”
6
Zero
Wireless · 255 San Geronimo Way · Sunnyvale · CA · 94085 · 408 738 7600 · 408 738 7601 fax
www.zerogwireless.com
th
The 4 Age of Wireless™
Connecting the Internet of Things
Hardware Setup and Configuration
The list of hardware items to setup includes the following:
Wi-Fi® PICtail™ Power Jumper J3
· Cable connection
· Wi-Fi® PICtail™ Power Jumper
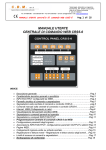
The Explorer16 has a PICtail™ connector and the
PICDEM.net 2 board has a PICtail+™ connector. The WiFi® PICtailTM/PICtailTM+ Daughtercard should be inserted
into either the top most socket of J5 on the Explorer16
board, or the PICDEM.NET 2 board. The jumper J3 on the
Wi-Fi® PICtail™ is the power jumper and it must be
configured appropriately, depending on which platform is
selected as shown in Figure 1. For the PICDEM.net 2
board, place the jumper across pins 2 and 3. For the
Explorer 16 board, place the jumper across pins 1 and 2.
Figure 1: Configuring the J3 jumper on the Wi-Fi® PICtail™
Cable Connection
WARNING: The boards in this kit are highly sensitive to electrostatic discharge (ESD).
Please ground yourself at all times while in contact with the boards.
· Plug the PICtail™ into the Microchip development board (Explorer 16 or PICDEM.net 2) making
sure that the ZeroG Wi-Fi® module is facing the microcontroller.
· Connect the RJ25 cable (grey phone cable) to the RJ25 port on the development board to the
ICD.
· Connect the serial cable to the serial port (UART port) of the development board and to the serial
port (COM port) on the PC. (Typically, the default port on the PC is COM 1, but this default
number may differ from PC to PC.)
· Connect the USB cable from the ICD to the PC.
· Power on the router, WRT54G2, and connect to the Ethernet port of the PC to the Ethernet port of
the router.
7
Zero
Wireless · 255 San Geronimo Way · Sunnyvale · CA · 94085 · 408 738 7600 · 408 738 7601 fax
www.zerogwireless.com
th
The 4 Age of Wireless™
Connecting the Internet of Things
Out-of-Box Demo
Now that you have all the required hardware and software, you are now ready to see a
ZeroG demonstration.
Open MPLAB IDE.
Open a project by going to
“Project>Open…”
The files displayed are located in:
C:\Microchip Solutions\TCPIP WiFi
Demo App\
There are 3 project files:
TCPIP WiFi Demo App-C18
Open this file if your Microchip board is using a PIC18 microcontroller
TCPIP WiFi Demo App-C30
Open this file if your Microchip board is using a PIC24 or the dsPIC microcontroller
TCPIP WiFi Demo App-C32
Open this file if your Microchip board is using a PIC32 microcontroller
Select the TCPIP WiFi Demo App appropriate for your development board. Set your AP
to the following configuration (not required with ZeroG purchased AP):
8
Zero
Wireless · 255 San Geronimo Way · Sunnyvale · CA · 94085 · 408 738 7600 · 408 738 7601 fax
www.zerogwireless.com
th
The 4 Age of Wireless™
Connecting the Internet of Things
AP Setup for Demo
The demonstration will work with an access point configured as follows:
SSID: MicrochipDemoAP
Security: none
Channel: 1
DHCP: on
Advanced settings (if having difficulty):
Basic rate: Default
1&2Mbps (if having trouble with default)
Router starting address: 192.168.1.1
DHCP starting address: 192.168.1.100
DHCP leases: 20
For out of box demo, go to “Compiling Project Code”. You do not need to change any
settings in the code if you use the AP settings above.
9
Zero
Wireless · 255 San Geronimo Way · Sunnyvale · CA · 94085 · 408 738 7600 · 408 738 7601 fax
www.zerogwireless.com
th
The 4 Age of Wireless™
Connecting the Internet of Things
Example Application Code Development
There are 2 files that need to modify in order to change the SSID, RF channel, MAC
address, security and certain services (DHCP, DNS, PORT and ICMP). These files are:
TCPIPConfig.h (located under “Header Files”)
HTTP2.h (located under “Header Files\TCPIP Stack”)
Modifying the TCPIPConfig.h file
· Click on the TCPIPConfig.h file.
· Make sure that the SSID on the file matches the SSID on the router. The default SSID
is the “MicrochipDemoAP”. Modify the red text in order to change the SSID:
#define MY_DEFAULT_SSID_NAME “MicrochipDemoAP”
· If the AP has DHCP enabled, make sure the following line is commented out, as shown
below (normally you want to use DHCP from the AP):
// #define STACK_USE_DHCP_SERVER
· Optional: By default, any other device on the local network can ping the Microchip
development board. Comment the line out to disable pinging:
#define STACK_USE_ICMP_CLIENT
Configuring the MAC Address
There are three different sources for the MAC address. There is a built-in MAC address
on the ZeroG module that is preprogrammed from the factory with the ZeroG OUI. The
second source is from the programmed code image. The third source is from a value
that’s stored in EEPROM.
At runtime, a data structure (APP_CONFIG) is created in RAM, which stores the valid
MAC address to be used for that session. The code will check to see if there is a valid
EEPROM APP_CONFIG data structure. If so, the EEPROM MAC address will be used.
10
Zero
Wireless · 255 San Geronimo Way · Sunnyvale · CA · 94085 · 408 738 7600 · 408 738 7601 fax
www.zerogwireless.com
th
The 4 Age of Wireless™
Connecting the Internet of Things
If there is no valid APP_CONFIG information in EEPROM, then the value programmed in
TCPIPConfig.h will be used. If the value in the source code is 00-04-A3-00-00-00, then
this will instruct the code to fetch the MAC address stored inside the ZeroG module, and
use that pre-programmed value. Otherwise, the actual value programmed in the source
code will be used.
Note that when there is no valid information stored in EEPROM, the code will
automatically save either the ZeroG preprogrammed value or the value defined in the
source code. These values will be used for runs.
Also, be very cautious when changing the MAC address when there is already a valid
MAC address saved in EEPROM. The EEPROM has highest priority, and will always
trump values stored in source code. You will need to either erase the EEPROM
completely, or program a different value through the Wi-Fi demo configuration page. If
you need to completely erase the EEPROM, please see the section Erasing EEPROM
on page 21 at the end of the guide.
· Optional: Change the MAC address. The default MAC address shown is “00-1E-C0-0000-FF”. Modify the parameters in red if you wish to change the MAC address to a
specific value. NOTE: each ZeroG radio module comes with a pre-programmed unique
MAC address (it is not the default value in the code). In order
#define MY_DEFAULT_MAC_BYTE1
(0x00)
#define MY_DEFAULT_MAC_BYTE2
(0x1E)
#define MY_DEFAULT_MAC_BYTE3
(0xC0)
#define MY_DEFAULT_MAC_BYTE4
(0x00)
#define MY_DEFAULT_MAC_BYTE5
(0x00)
#define MY_DEFAULT_MAC_BYTE6
(0xFF)
Configuring for Security
· Select security. Modify the #define statement in kKeyType in TCPIPConig.h to match
the AP security configuration that is in use. Choices include none, WEP, WPA/WPA2
PSK or to have the ZeroG chip calculate the (WPA/WPA2)key from a passphrase.
11
Zero
Wireless · 255 San Geronimo Way · Sunnyvale · CA · 94085 · 408 738 7600 · 408 738 7601 fax
www.zerogwireless.com
th
The 4 Age of Wireless™
Connecting the Internet of Things
·
Disable Security
#define MY_DEFAULT_ENCRYPTION_TYPE kKeyTypeNone
use a security key*/
·
/*if you don’t want to
Using WEP
#define MY_DEFAULT_ENCRYPTION_TYPE kKeyTypeWep
/*if you want to use
WEP*/
#define MY_DEFAULT_WEP_KEY_INDEX (0u)
#define MY_DEFAULT_WEP_KEY_LEN kZGWEPKeyLenShort
/*kZGWEPKeyLenLong*/
This is filled out for a short key of 5 bytes. For a long key, each key should be 13 bytes.
The active or default key (1 of 4) is selected with the kWepKeyID and is selected as one
of [0,1,2,3].
· Modify the red text in either of the following defines (depending on the WEP key length
above) to change the key:
#define MY_DEFAULT_WEP_KEYS_SHORT
{{{0x00,0x01,0x02,0x03,0x04}},\
{{0x10,0x11,0x12,0x13,0x14}},\
{{0x20,0x21,0x22,0x23,0x24}},\
{{0x30,0x31,0x32,0x33,0x34}},\
}
#define MY_DEFAULT_WEP_KEYS_LONG
{
{{0x00,0x01,0x02,0x03,0x04,0x05,0x06,0x07,0x08,0x09,0x0A,0x0B,0x0C}},\
{{0x10,0x11,0x12,0x13,0x14,0x15,0x16,0x17,0x18,0x19,0x1A,0x1B,0x1C}},\
{{0x20,0x21,0x22,0x23,0x24,0x25,0x26,0x27,0x28,0x29,0x2A,0x2B,0x2C}},\
{{0x30,0x31,0x32,0x33,0x34,0x35,0x36,0x37,0x38,0x39,0x3A,0x3B,0x3C}},\
}
Note, often a passphrase is used with WEP. A router will convert the passphrase
into Hexidecimal format for the first key (denoted “1” or default in the router, and
selected as kWepKeyID “0”. The router will use an algorithm for the second
through fourth keys that may not be consistent between routers of different makes.
The ZeroG code requires the explicit entry of the Hex keys. If you only know the
passphrase you can get the default or first key by converting the ASCII passphrase
to Hex. Sites like http://www.speedguide.net have tools to do this (see appendix of
12
Zero
Wireless · 255 San Geronimo Way · Sunnyvale · CA · 94085 · 408 738 7600 · 408 738 7601 fax
www.zerogwireless.com
th
The 4 Age of Wireless™
Connecting the Internet of Things
this document). For keys other than the first, you must copy them from the router
entry table.
·
Using WPA/WPA2 PSK
#define MY_DEFAULT_ENCRYPTION_TYPE kKeyTypePsk
WPA or WPA2 PSK */
/*if you want to use
#define MY_DEFAULT_PSK_PHRASE "Microchip 802.11 Secret PSK Password"
The default WPA/WPA2 PSK key is “Microchip 802.11 Secret PSK Password”. Note that
the passphrase is case-sensitive and spacing is important. To translate this text into the
appropriate hex key, please go to this link: http://www.wireshark.org/tools/wpapsk.html
Modify the red text to change the key (the default PSK key in TCPIPConfig.h will match
the passphrase given above:
#define MY_DEFAULT_PSK {0x86, 0xC5, 0x1D, 0x71, 0xD9, 0x1A, 0xAA, 0x49, \
0x40, 0xC8, 0x88, 0xC6, 0xE9, 0x7A, 0x4A, 0xD5, \
0xE5, 0x6D, 0xDA, 0x44, 0x8E, 0xFB, 0x9C, 0x0A, \
0xE1, 0x47, 0x81, 0x52, 0x31, 0x1C, 0x13, 0x7C, \
}
·
Using Passphrase for ZeroG Chip to Create WPA/WPA2 Key
If you are using WPA or WPA2 type security, you may use the ZG210x radio to
calculate the security key. This process involves combining the paraphrase with
the SSID to create a unique key of which a portion is actually used as the initial key
for authentication. This is a complicated process, but can be offloaded to the
ZeroG if connection time is not a concern.
#define MY_DEFAULT_ENCRYPTION_TYPE kKeyTypeCalcPsk
/*if you want to ask the ZeroG chip to calculate the key from a passphrase*/
If you use the calculate key option in kKeyType, then you must specify the desired
paraphrase in
#define MY_DEFAULT_PSK_PHRASE "Microchip 802.11 Secret PSK Password";
Note: it will take about 30 to 45 seconds for the calculation to occur, so allow more time to
connect to the access point using this mechanism.
13
Zero
Wireless · 255 San Geronimo Way · Sunnyvale · CA · 94085 · 408 738 7600 · 408 738 7601 fax
www.zerogwireless.com
th
The 4 Age of Wireless™
Connecting the Internet of Things
Modifying the HTTP2.h file
· To modify the HTTP2.h file, click on the file
Program accordingly to allow you to either get to the board from the AP via your local
LAN, or from the Internet. Modify the #define HTTP_PORT line according to the
following:
To access board via the Internet, use port 65000
#define HTTP_PORT
// #define HTTP_PORT
(65000u) // Listening port for HTTP server
(80u) //Listening port for HTTP server
Note: this also requires the AP to be programmed to use port forwarding to the board.
This will require knowledge of the IP address provided to the board. Please see
instructions for the AP.
To access board directly via access point and PC (not going out to internet) use port 80
// #define HTTP_PORT
#define HTTP_PORT
(65000u) // Listening port for HTTP server
(80u)
// Listening port for HTTP server
14
Zero
Wireless · 255 San Geronimo Way · Sunnyvale · CA · 94085 · 408 738 7600 · 408 738 7601 fax
www.zerogwireless.com
th
The 4 Age of Wireless™
Connecting the Internet of Things
Compiling Project Code
· Select the
appropriate ICD tool
(MPLAB ICD 2
shown):
· Compile the code by selecting “Build All”,
as shown:
· If the build is successful, you will receive a message “BUILD SUCCEEDED”,
similar to the one below:
15
Zero
Wireless · 255 San Geronimo Way · Sunnyvale · CA · 94085 · 408 738 7600 · 408 738 7601 fax
www.zerogwireless.com
th
The 4 Age of Wireless™
Connecting the Internet of Things
· To program the code to your
device, click on the “Program
Target Device” icon as shown:
· If successful, you will receive the following message:
· Click on “Reset” as shown
below inside the blue circle:
· Click on “Run” as circled below:
16
Zero
Wireless · 255 San Geronimo Way · Sunnyvale · CA · 94085 · 408 738 7600 · 408 738 7601 fax
www.zerogwireless.com
th
The 4 Age of Wireless™
Connecting the Internet of Things
Preparing and Using the Web Server Application
Loading the web page onto the board
The first time the application is running on the Microchip board, and particularly if the
served page has not been programmed into the project, the following will be required.
The HTML pages are compiled into a file called MPFSImg2.bin This file needs to be
programmed into the board.
Once the Microchip board is up and running with the WiFi PICtail, open a browser on
a machine on the same LAN and enter the following (assumes DNS is used):
http://mchpboard/mpfsupload
If DNS is not used, then enter the URL directly as noted below:
http://xxx.xxx.xxx.xxx/mpfsupload
If port 65000 is used, then enter the URL as noted below:
http://xxx.xxx.xxx.xxx:65000/mpfsupload
xxx.xxx.xxx.xxx represents the board IP address assigned by the AP DHCP
server (this is displayed on the development board LCD screen).
When requested for the download file, point to
C:\Microchip Solutions\TCPIP WiFi Demo App\MPFSImg2.bin
Observe the board web page from the PC.
Use the following URL to view the demonstration web page from a PC browser:
http://mchpboard (requires the use of DNS)
Or
http://xxx.xxx.xxx.xxx:65000 (if using port 65000)
Or
http://xxx.xxx.xxx.xxx (if using port 80)
Debug Port
To assist in bring up, serial data is output on the RS232 port on the Microchip
17
Zero
Wireless · 255 San Geronimo Way · Sunnyvale · CA · 94085 · 408 738 7600 · 408 738 7601 fax
www.zerogwireless.com
th
The 4 Age of Wireless™
Connecting the Internet of Things
development board during power up. The following describes how to utilize this
function, and what to look for during proper operation.
Listening Using Hyperterminal
· Open HyperTerminal using “Run”
· Enter a name for the
connection and click “OK”
new
18
Zero
Wireless · 255 San Geronimo Way · Sunnyvale · CA · 94085 · 408 738 7600 · 408 738 7601 fax
www.zerogwireless.com
th
The 4 Age of Wireless™
Connecting the Internet of Things
· Select COM1 as the listening port. Note
that this port may by different on your
PC. Verify the appropriate RS232 port
name for your setup.
· Follow settings and click “OK”
19
Zero
Wireless · 255 San Geronimo Way · Sunnyvale · CA · 94085 · 408 738 7600 · 408 738 7601 fax
www.zerogwireless.com
th
The 4 Age of Wireless™
Connecting the Internet of Things
· When the Wi-Fi® device is running successfully, you will see the following screen
on HyperTerminal.
In the display above, 192.168.1.65 is the default static IP address that the ZeroG
radio starts with, and 192.168.1.103 is the DHCP IP address provided by the router
once connection was made. The IP address of the radio is now 192.168.103 for this
connection.
20
Zero
Wireless · 255 San Geronimo Way · Sunnyvale · CA · 94085 · 408 738 7600 · 408 738 7601 fax
www.zerogwireless.com
th
The 4 Age of Wireless™
Connecting the Internet of Things
Microchip Development Board Specifics
PICDEM.NET 2 Usage
If you have a PICDEM.NET 2 board, please follow the instructions here. If you are using
an Explorer16 board, please skip this section.
Signal Connection:
PICtail (note connector J1 on PICTail)
Function
CSN
SCK
SDO
SDI
INT_NX
RST_N
CE_N
VDD
I/O
I
I
O
I
O
I
I
I
Pin
J1-24/RC2
J1-12/RC3
J1-10/RC4
J1-8/RC5
J1-27
J1-25/RB1
J1-23/RB2
J1-26
Description
SPI Chip Select (asserted low)
SPI Clock
SPI Data Out from ZG2100M
SPI Data In to ZG2100M
Interrupt signal from ZG2100M (asserted low)
Master reset (asserted low)
ZG2100M disable (asserted low)
5V power input
Explorer 16 Usage
If you have an Explorer16 board, please follow the instructions here. If you are using a
PICDEM.NET 2 board, please skip this section.
Explorer 16 Connection
PICtail Plus (note male connector J2 on PICtail, is female connector J5 on Explorer 16)
Function
CSN
SCK
SDO
SDI
I/O
I
I
O
I
INT_NX
RST_N
CE_N
VDD
O
I
I
I
Pin
J2-1/RB2
J2-3/RF6/SCK1
J2-5/RF7/SDI1_E
J27/RF8/SDO1_E
J2-18/RE8/INT1
J2-28/RF0
J2-30/RF1
J2-21 & J2-22
Description
SPI Chip Select (asserted low)
SPI Clock
SPI Data Out from ZG2100M
SPI Data In to ZG2100M
Interrupt signal from ZG2100M (asserted low)
Master reset (asserted low)
ZG2100M disable (asserted low)
3.3V power input
Erasing EEPROM
While doing debug, if you notice that settings in code (especially related to SSID name, MAC
21
Zero
Wireless · 255 San Geronimo Way · Sunnyvale · CA · 94085 · 408 738 7600 · 408 738 7601 fax
www.zerogwireless.com
th
The 4 Age of Wireless™
Connecting the Internet of Things
address and the like) are not taking effect, then you may need to erase the EEPROM. The
value in EEPROM takes precedence over values that are defined in source code (i.e.
TCPIPConfig.h). To erase the EEPROM, perform the following:
1. Make sure the development board is programmed and not in debug mode.
2. Disconnect the MPLAB® ICD2 or MPLAB REAL ICE™ from the board.
3. Press and hold BUTTON0 (RD13/S4 on Explorer 16 and RB3/S5 on PICDEM.net™ 2).
4. Press and release the MCLR button.
5. Continue holding BUTTON0 until several LEDs flash indicating the EEPROM has been
cleared. This takes about 4 seconds. Alternatively, if you have UART connected to the
development board, you should see the following output:
BUTTON0 held for more than 4 seconds. Default settings
restored.
6. Release BUTTON0.
7. Press and release the MCLR button again to reset the software.
22
Zero
Wireless · 255 San Geronimo Way · Sunnyvale · CA · 94085 · 408 738 7600 · 408 738 7601 fax
www.zerogwireless.com
th
The 4 Age of Wireless™
Connecting the Internet of Things
Other Info
Please refer to the web sites:
http://www.microchip.com/tcpip
http://www.microchip.com/Ethernet
http://www.zerogwireless.com
Microchip IDE v8.15 or later
http://www.microchip.com/stellent/idcplg?IdcService=SS_GET_PAGE&nodeId=1406&dDoc
Name=en019469&part=SW007002
MPLAB C Compiler for PIC24 v3.11(b) Student edition w/60day free trial
http://www.microchip.com/stellent/idcplg?IdcService=SS_GET_PAGE&nodeId=1406&dDoc
Name=en535364
MPLAB C Compiler for PIC18 v3.20
http://www.microchip.com/stellent/idcplg?IdcService=SS_GET_PAGE&nodeId=1406&dDoc
Name=en010014
HEX keys can be converted from ASCII paraphrases in advance using various on-line
calculators. Example:
http://www.speedguide.net/
Look under broadband tools
WPA/WPA2 Keys can be created from your SSID and paraphrase using on-line calculators.
Example:
http://www.wireshark.org/tools/wpa-psk.html
Note: The Microchip name, logo, PICtail, and PICDEM are registered trademarks of
Microchip Technology Incorporated.
23
Zero
Wireless · 255 San Geronimo Way · Sunnyvale · CA · 94085 · 408 738 7600 · 408 738 7601 fax
www.zerogwireless.com
th
The 4 Age of Wireless™
Connecting the Internet of Things
Federal Communication Commission Interference
Statement
This equipment has been tested and found to comply with the limits for a Class B digital device,
pursuant to Part 15 of the FCC Rules. These limits are designed to provide reasonable protection
against harmful interference in a residential installation. This equipment generates uses and can
radiate radio frequency energy and, if not installed and used in accordance with the instructions, may
cause harmful interference to radio communications. However, there is no guarantee that interference
will not occur in a particular installation. If this equipment does cause harmful interference to radio or
television reception, which can be determined by turning the equipment off and on, the user is
encouraged to try to correct the interference by one of the following measures:
- Reorient or relocate the receiving antenna.
- Increase the separation between the equipment and receiver.
- Connect the equipment into an outlet on a circuit different from that to which the receiver is
connected.
- Consult the dealer or an experienced radio/TV technician for help.
FCC Caution: To assure continued compliance, (example - use only shielded interface cables when
connecting to computer or peripheral devices). Any changes or modifications not expressly approved
by the party responsible for compliance could void the user's authority to operate this equipment.
This device complies with Part 15 of the FCC Rules. Operation is subject to the following two
conditions: (1) This device may not cause harmful interference, and (2) this device must accept any
interference received, including interference that may cause undesired operation.
FCC Radiation Exposure Statement:
This equipment complies with FCC radiation exposure limits set forth for an uncontrolled environment.
This equipment should be installed and operated with minimum distance 20cm between the radiator &
your body.
This transmitter must not be co-located or operating in conjunction with any other antenna or
transmitter.
This device is intended only for OEM integrators under the following conditions:
1) The antenna must be installed such that 20 cm is maintained between the antenna and users, and
2) The transmitter module may not be co-located with any other transmitter or antenna.
As long as 2 conditions above are met, further transmitter test will not be required. However, the OEM
integrator is still responsible for testing their end-product for any additional compliance requirements
required with this module installed (for example, digital device emissions, PC peripheral requirements,
etc.).
IMPORTANT NOTE: In the event that these conditions cannot be met (for example certain laptop
configurations or co-location with another transmitter), then the FCC authorization is no longer
considered valid and the FCC ID cannot be used on the final product. In these circumstances, the
OEM integrator will be responsible for re-evaluating the end product (including the transmitter) and
obtaining a separate FCC authorization.
24
Zero
Wireless · 255 San Geronimo Way · Sunnyvale · CA · 94085 · 408 738 7600 · 408 738 7601 fax
www.zerogwireless.com
th
The 4 Age of Wireless™
Connecting the Internet of Things
End Product Labeling
This transmitter module is authorized only for use in device where the antenna may be installed such
that 20 cm may be maintained between the antenna and users (for example access points, routers,
wireless ADSL modems, and similar equipment). The final end product must be labeled in a visible
area with the following: “Contains FCCID: W7OZG2100-ZG2101”.
Manual Information That Must be Included
The user’s manual for end users must include the following in-formation in a prominent location.
IMPORTANT NOTE: To comply with FCC RF exposure compliance requirements, the antenna used
for this transmitter must be installed to provide a separation distance of at least 20 cm from all persons
and must not be co-located or operating in conjunction with any other antenna or transmitter.
25
Zero
Wireless · 255 San Geronimo Way · Sunnyvale · CA · 94085 · 408 738 7600 · 408 738 7601 fax
www.zerogwireless.com
th
The 4 Age of Wireless™
Connecting the Internet of Things
Revision History
Document ID
GSG-102.03
Title
ZGS2101 ZeroG System Development Kit for Wi-Fi® PICtail™ using
PICDEM.net 2 and Explorer 16
Revision History
1.01
Initial Revision
2.02
Revised for General release code.
2.03
Updated MAC address default settings. Added Erasing
EEPROM section on Microchip development boards.
2.1
Match defines to latest v4.0 of Microchip TCP/IP stack
3.01
Initial match to latest v5.0 of Microchip TCP/IP Stack
26
Zero
Wireless · 255 San Geronimo Way · Sunnyvale · CA · 94085 · 408 738 7600 · 408 738 7601 fax
www.zerogwireless.com