1
Advanced Settings
The SET function is used to accomplish the following:
•
Format the SD memory card
•
Set the date and time
•
Set the sampling time
•
Set the beeper sound ON/OFF
•
Set the SD card Decimal character
•
Select the Temperature units
•
Set the RS232 data output ON/OFF
1.
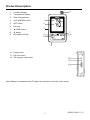
Press and Hold the SET button for >2 seconds to enter the setting mode. The first function (Sd
F) will appear in the display. Press the SET button to step through the seven functions. Use the
▲ and ▼ buttons to adjust the selected function. Use the “LOGGER” button to step through
fields within a function. In the SET mode, if no button is pressed within 5 seconds the logger
will revert to the standard mode.
2.
Sd F – Format the SD card. Press the ▲ button to select yES or no. For yES, press the Enter
button to format the card and erase all existing data.
3.
dAtE – Set the date and time. Press the ▲ or ▼ buttons to adjust the selected field. Press the
Enter button to store the value and to step through the various fields.
4.
SP-t – Set the sample rate. Press the ▲ button to select the desired sample rate and press
Enter to store the selection. The selections are: 5, 10, 30, 60, 120, 300, 600 seconds and
AUTO. In AUTO, the data will be stored every time there is a value change of >1% RH or
>1°C/F.
5.
bEEP - Set the beeper ON or OFF. Press the ▲ button to select ON or OFF and press Enter to
store the selection.
6.
dEC - Set the SD card Decimal character. Press the ▲ button to select USA (decimal) or Euro
(comma) and press Enter to store the selection.
7.
t-CF - Set the Temp. unit to °F or °C
8.
rS232 - Set the RS232 data output ON/OFF. Press the ▲ button to select ON or off and press
Enter to store the selection
9.
ESC – Exit the setting mode. Press the SET button to return to normal operation.
System RESET
If a condition appears where the CPU does not respond to keystrokes or the meter seems frozen,
press the RESET button on the side of the datalogger (use a paper clip or similar pointed object) to
return the meter to a working state.
RS232 Interface
A serial output is provided to link the meter to a PC’s serial port. Call Technical Assistance for more
information on this interface.
6
SD500-EU-EN-V1.3 7/11