1
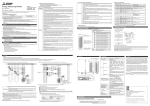
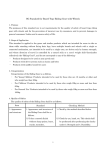
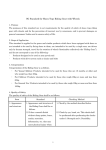
Voltage transform unit for the energy measuring unit of Mitsubishi general-purpose
sequencer MELSEC-Q series
Model QE8WH4VT
User’s Manual
• This product is a voltage transform unit specially designed for the three-phase 4-wire energy measuring
unit of the MELSEC-Q series.
• Read carefully this manual and the manual for the energy measuring unit used in combination with this
product before use, and use this product properly.
• After reading this manual, please keep it in a safe, handy place for ready reference, and read it as
necessary.
• Ensure that this manual is delivered to the end user.
Before Use
The warning signs used in this manual and their meanings are shown as follows.
The following signs are used to categorize and describe the degrees of risk associated with the improper
use of the product.
Danger
Risk that may result in death, serious
injury or other severe consequences if
the product is used improperly
Caution
Risk that may result in injury or
damage to buildings/properties if the
product is used improperly
1. Safety Precautions
1.1 Precautions concerning the operating environment and usage conditions
Do not use the product in the following places or manners. Doing so may result in a malfunction or a
reduced life of the product.
• Where the ambient temperature exceeds the
• Where the product is exposed to direct
operating temperature range (0ºC to +55ºC).
sunlight.
• Where the humidity exceeds the operating humidity • Where the product is exposed to rain fall
range (5% to 95% RH) or condensation occurs.
or water drop.
• Where dust, corrosive gas, saline, or oil smoke
• Where frequent vibration or impact
exists.
exists.
• Under strong electromagnetic field or noise.
• On other than the control board.
• Where metal pieces or conductive materials are
• Where the altitude exceeds 2000 m.
scattered.
1.2 Precautions concerning the preparation before use
Make sure that your installation site meets the requirements for the operation environment and usage
conditions.
Before supplying voltage, check that the circuit voltage you use falls within the rated primary voltage
range of the product.
1.3 Precautions for safety
For safety reasons, the product should be installed and wired by a technician who has expertise in
electric work. Read this instruction manual before installation and wiring.
• Before installation and wiring works, shut off the power source of all phases externally.
Danger
Failure to do so may cause an electric shock or product damage.
Caution
• Screws should be tightened to the specified torque. Loose screws may cause a fall,
short circuit, or malfunction. Over-tightening the screws may cause breakage of the
screws or the unit, resulting in a fall, short circuit, or malfunction.
• Do not touch directly the conductive parts and electric parts of the product. Doing so
may cause an electric shock, failure, or malfunction.
• Ground the FG terminal according to the D-type grounding (Type 3) or a higher-level
type. Otherwise, an electric shock or malfunction of the unit may be resulted.
• To comply with UL/c-UL standards, use the wires meeting the following requirements
and the UL-listed solderless terminals.
Input terminals: AWG 12 to 22 (single/stranded), Output terminals: AWG 12 to 24
(single/stranded)
• The rated temperature of the copper conductor should be 60ºC/75ºC.
• Use the product within the ratings shown in this manual. When using it outside the
ratings, use a commercial instrument transformer. Use outside the ratings may result
in not only a malfunction or failure but also a fire or burnout.
• Wires to be connected to this product should be placed in a duct or secured together
by clamps. Failure to do so may cause the wires to become loose, move, or be
accidentally pulled, resulting in breakage of the product or wires or a malfunction due
to contact failures of the wires.
• Use electric wires of appropriate size. Wires of inappropriate size may cause heat
generation, resulting in a fire.
• When using stranded wires, use solderless terminals or strip off the wire tips to
prevent the thin wires from loosening. Use solderless terminals of appropriate size that
fit the wires. If an inappropriate solderless terminal is used, wire breakage or a contact
failure may occur, resulting in a device malfunction, failure, burnout, or fire.
• Upon completion of wiring, make sure to check for any missing/incomplete or incorrect
wiring. Incomplete or incorrect wiring may cause a device malfunction, fire, or electric
shock.
• When performing an insulation resistance test or a commercial frequency withstand
voltage test, ensure that the specified voltage is not exceeded.
• To protect persons who do not have adequate knowledge of electric equipment from
electric shocks, any of the following measures should be taken for the panel.
(a) To lock the panel so that only trained persons having adequate knowledge of
electric equipment can open it.
(b) To design the structure so that the power is automatically interrupted upon
opening of the panel.
The protection class of the panel should be IP2X or higher.
1.4 Precautions for maintenance
• Before cleaning or further tightening screws on the product, shut off the input power
source of all phases externally. Failure to do so may cause a failure or malfunction of
the product.
Danger
• Use a soft dry cloth to clean off dirt of the product surface. Do not leave a chemical
cloth on the surface for a long time nor wipe the surface with thinner or benzene.
1.5 Precautions for maintenance
• Make sure periodic inspection is performed with the electricity off. Failure to do so may
cause an electric shock or malfunction.
• Perform the following inspections to use the product for a longer time.
Danger
[Daily inspection]
(1) Check for any damage to this product.
(2) Check for any abnormal noise, odor, or heat generation.
[Periodic inspection] (1) Check for any loose installation or terminal connection
(every six months to one year).
1.6 Storage precautions
When storing this product, shut down the inputs, disconnect the wires, and put it in a plastic bag.
For long-time storage, avoid the following places. Failure to do so may result in a failure or a reduced
life of the product.
• Where the ambient temperature exceeds -25ºC to +75ºC (or the average daily temperature
exceeds 35ºC).
• Where the relative humidity exceeds 5% to
• Where the product is exposed to rain fall, water
95% or condensation occurs.
drop, or direct sunlight.
• Where dust, corrosive gas, saline, or oil smoke • Where metal pieces or conductive materials
exists.
are scattered.
• Where frequent vibration or impact exists.
1.7 Precautions for disposal
This product should be disposed of properly in compliance with the Wastes Disposal and Public
Cleansing Act.
2. Name and Function of Each Part
2.1 Name of each part of voltage transform unit (QE8WH4VT)
3. Installation Method
3.1 Installation on IEC rail
●Applicable IEC rail (35 mm)
●Installation
●Removal
(1) Hang
7.3 or more
(2) Push in
(2) Pull up
(1) Pull down the
stopper for IEC rail.
To install IEC rails, secure them using M4 or M5 screws at intervals of 25 to 100 mm.
When installing IEC rails in series, secure each end of the IEC rails with sideslip prevention clamps.
When reinstalling the product onto an IEC rail after removal, install it with the IEC rail stopper pushed in
upward.
3.2 Installation with screws
Tighten M3 screw accesories with a torque of 0.61 to 0.82 N•m in the two installation holes on both
sides of the product.
Left side
Right side
Signal names of the terminal blocks
(1) Voltage output
terminals
Connected to the input
terminals of the
measuring unit.
Name of terminal
Voltage
output
terminals
(2) STRIP GAUGE
Gauge for checking the
length to be stripped off
from the electric wires
that are connected to
the voltage output
terminals.
(3) Voltage input
terminals
Connected with the
voltage input lines
from the measuring
circuit.
Voltage
input
terminals
Description
PA
PB
PC
PD
Voltage output terminals
SLD
Shield connection terminal
P1
P2
P3
P0
1-phase voltage input terminal
2-phase voltage input terminal
3-phase voltage input terminal
Neutral voltage input terminal
FG
Frame GND terminal
Installation hole
Installation hole
●Screw accessories
Additional information ----------------------------------------------------------------------------------------------------------------------------------------------------------------------------------------
To measure the length to be stripped off, align the connecting wire onto the groove of the STRIP
GAUGE.
Screw
M3×16mm
×2
4. Wiring Method
4.1 Wiring
Install the wiring according to the following wiring diagram.
This product is specially designed for the three-phase 4-wire system. It does not support circuits using
any other phase wire systems.
• Input signal wires should
not be bound together
with or placed close to the
main circuit or the power
To the voltage
line. Keep the input signal
input terminals of
wires at least 300 mm
the measuring
away from them
unit
(excluding the input
Caution
terminal block).
Otherwise, noise causes
a malfunction.
• In the actual use, ground
the FG terminal.
(Type D grounding: Type
3 grounding) Connect it
directly to the ground
terminal.
● The rated voltage of the voltage transform unit is 63.5/110 to 277/480 V AC.
Do not use it for any circuits exceeding 277/480 V AC.
● Up to five energy measuring units can be connected to one voltage transform unit.
● For more information on the wiring, refer to the wiring diagrams contained in the user's manual of
the energy measuring unit used in combination with this product.
4.2 How to connect wires
● Use the electric wires and solderless terminals shown in the table below, and tighten them to the
tightening torque indicated in the table below.
● The strip length of the sheaths of the electric wires used on the output side should be 6 to 7 mm.
Measure the length of the electric wire sheaths to be stripped using the strip gauge on this product.
● After connecting wires, check to see if they are properly connected, and then install the terminal
cover of the input terminal block.
● The output signal wires drawn from the output terminal block should be shielded.
Wire
Single wire
Stranded wire
Solderless terminal
Tightening torque
Input terminal block
Output terminal block
AWG 12 to 22
AWG 12 to 24
For M4 screw having an external dimension of
8.5 mm or less
1.4 N•m
0.5 N•m
●UL/c-UL listed corresponds, use the wires according to the following conditions.
Input terminals: AWG12-22 (Single wire / Stranded wire) Output terminals: AWG12-24 (Single wire / Stranded wire)
60/75℃ copper conductor only.
5. External Dimensions
Unit: mm
6. Specifications
Item
Specification
Model
Phase wire system
Input voltage range
Frequency
Voltage output tolerance
Measurement category
Pollution degree
Maximum number of connections
Operating temperature
Operating
Operating humidity
condition
Storage temperature
Altitude
QE8WH4VT
Three-phase 4-wire
63.5/110 to 277/480 V AC (The product does not operate on the voltage below 55/95 V AC.)
50 Hz/60 Hz
±1.0% (against the rated primary voltage)
CATIII
II
5 units
0ºC to +55ºC (Average daily temperature 35ºC or below)
5% to 95% RH (without condensation)
-25ºC to +75ºC
2000 m or lower
Between voltage input terminals (P1, P2, P3, P0) and FG terminal: 2210 V AC for 3 seconds
Between voltage input terminals (P1, P2, P3, P0) and secondary output terminals (PA,
PB, PC, PD) (except for SLD terminal) 2210 V AC for 3 seconds
10 MΩ or more (500 V DC) at the same locations as above
P1-P0: 2 VA, P2-P0: 0.3 VA, P3-P0: 0.3 VA (when inputting 277/480 V AC)
30 mA
Inside the control panel
5m
Installation on IEC rails, installation with screws
0.3kg
10 years (used under the operating conditions above.)
EN 61131-2, EN 61010-1, EN 61326-1
Compliant with CE when combined with the energy measuring unit of Mitsubishi
general-purpose sequencer MELSEC-Q series.
Compliant with UL/c-UL when combined with the energy measuring unit of Mitsubishi
general-purpose sequencer MELSEC-Q series.
Commercial frequency withstand
voltage
Insulation resistance
Consumption VA
Current consumption
Installation location
Secondary wire length
Installation method
Weight
Product life expectancy
CE marking compliance
Combined device for CE marking
compliance
Combined device for UL/c-UL
compliance
8. Customer Service
Please contact us at the following locations.
1 - 8 Midori-cho, Fukuyama-shi, Hiroshima, 720 - 8647, Japan
Phone (084) 926 - 8142
When exported from Japan, this manual dose noto require application to the Ministry of
Economy, Trade and Industry for service transaction permission.
Specifications subject to change without notice.
Caution
<Usage as a CE-marked product> Follow the instructions below.
• The measurement category and pollution degree should be III and II
respectively.
• Connect the product to the secondary side of the circuit breaker.
• Be sure to install the product inside the panel.
7. After-sales Service
If you have any question or technical troubles in using the product, contact your nearest
branch of Mitsubishi Electric Corporation.
• The charge-free warranty period for the product shall be 36 months from the date of your
purchase or the date of delivery to your specified location. However, the maximum limit of
the charge-free warranty period shall be 42 months from the time of manufacture
considering that the distribution period of the product is six months at the longest after
shipment from our manufacturing factory. Also, the charge-free warranty period for the
replacement product shall not be extended exceeding the charge-free warranty period for
the original product.
• Our company shall not be liable to compensate for any loss arising from events not
attributable to us, opportunity loss and lost earning of the customer due to a failure of the
product, and loss, secondary loss, accident compensation, damage to other products
besides our products and other operations caused by a special reason regardless of our
predictability in both within and beyond the charge-free warranty period.
Caution
When the product emits abnormal noise, odor, smoke, or heat,
turn off the power immediately and stop using it.