Transcript
3.4 Precautions for Start-up and Maintenance
3.2 Matters concerning the preparation before use
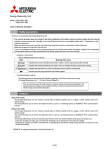
Energy Measuring Module
Mitsubishi
Programmable Controller
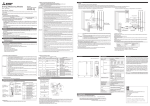
Model QE83WH4W
・Use the module in the specified usage environment and conditions.
・The setting of this module (primary voltage, primary current)is necessary before using it.
※Please refer to "User’s Manual (Details)" about each setting method.
3.3 Installation and Wiring Precautions
Danger
・Shut off the external power supply for the module in all phases before installing or wiring. Failure to do so may cause an
electric shock or damage of the module.
Caution
・Any person who is involved in the installation and the wiring of this Sequencer should be fully competent to do the work.
・Use the programmable controller in an environment that meets the general specifications in the User’s Manual for the
CPU module used. Failure to do so may result in electric shock, fire, malfunction, or damage to or deterioration of the
product.
・To mount the module, while pressing the module-mounting lever located in the lower part of the module, fully insert the
module fixing projection(s) into the hole(s) in the base unit and press the module until it snaps into place. Incorrect
mounting may cause malfunction, failure or drop of the module.
When using the Sequencer in an environment of frequent vibrations, fix the module with a screw.
・Tighten the screw within the specified torque range. Under tightening can cause drop of the screw, short circuit or
malfunction. Over tightening can damage the screw and/or module, resulting in drop, short circuit, or malfunction.
・Shut off the external power supply for the system in all phases before mounting or removing the module.
Failure to do so may result in damage to the product.
・Do not directly touch any conductive part of the module. Doing so can cause malfunction or failure of the module.
・FG terminal must be grounded according to the D-type ground (Type 3) dedicated for sequencer. Failure to do so may
result in an electric shock or a malfunction.
・When using this product, make sure to use it in combination with current sensor (EMU-CT series or EMU2-CT5-4W).
Please not to exceed the rating of this product for input of current sensor. For further details, please refer to current
sensor manual to maintain the functionality and the accuracy of this product.
・The dedicated current sensor (EMU-CT50/CT100/CT250/CT400/CT600) is used only for low voltage circuit. It cannot
be used with a high voltage circuit. Also, EMU2-CT5-4W should be used with the secondary side (5 A) of transformer
transfixed. If it is connected with a high-voltage circuit by mistake, it may cause a burnout of the device and a fire. It is
critically dangerous.
・Measurement circuit voltage cannot be input directly into the module. Please enter the output voltage of the voltage
transform unit (QE8WH4VT)
・The dedicated current sensor has a polarity (directionality). Be careful about it when installing the module.
・Take care not entering any foreign objects such as ships and wire pieces into the module. It may cause a fire, a failure or
a malfunction.
・In order to prevent the module from incoming foreign objects such as wire pieces during wiring work, a foreign-object
preventive label is placed on the module. While a wiring work is performed, keep the label on the module. Before
operating the system, peel off the label for heat release. If the foreign-object preventive label is not peeled and the
system is in use, residual heat inside the module may reduce the product life.
・The wires to be connected to the module shall be placed in a duct or fixed together by clamping. If the electric wires are
not placed in the duct or clamped together, loosen wires or their movement or careless stretch may cause a breakage
of the module or wire or a malfunction due to poor contact of electric wires.
・Use appropriate size of electric wires. If inappropriate size of electric wire is used, it may cause a fire due to generated
heat.
・Use the applicable solderless terminals (R1.25-3) for current input terminals. If inappropriate solderless terminal is
used, a wire breakage or a contact failure may occur, which may cause a device malfunction, a failure, a burnout, or a
fire.
・When using stranded wires for the voltage input terminals, strand the wire edges to prevent thin wires from loosening.
・After inserting the electric wire or a solderless terminal, make sure that no missing insertion is existing. Missing insertion
may cause a device malfunction, a fire, or an electric shock.
・If the wires connected to the module are strongly pulled off, it may cause a malfunction or a breakage to the module or
the wire.
・Ensure the wiring to the module properly, checking the rated voltage and current of the product and the terminal pin
assignment. If the input voltage exceed the rated voltage or the wiring is improper, it may cause a fire or a breakage.
(Tensile load: 22N or less)
・Do not exceed the specified voltage when doing an insulation resistance test and a commercial frequency withstand
voltage test.
・To protect persons who do not have adequate knowledge of electric equipment from electric shocks, any of the
following measures should be taken for the panel.
(a) To lock the panel so that only trained persons having adequate knowledge of electric equipment can open it.
(b) To design the structure so that the power is automatically interrupted upon opening of the panel.
The protection class of the panel should be IP2X or higher.
User’s Manual (Hardware)
・Before using this module, please read both this manual and Details carefully and pay full attention to safety to handle this module correctly.
・Make sure that the end users read this manual and then keep the manual in a safe place for future reference.
ABOUT MANUALS
The following manuals are also related to this module.
Order each manual as needed, referring to the following list.
Manual name
Energy Measuring Module User’s Manual(Details) QE83WH4W
Manual number(model code)
IB63722(19H866)
COMPLIANCE WITH THE EMC AND LOW VOLTAGE DIRECTIVES
(1) For programmable controller system
To configure a system meeting the requirements of the EMC and Low Voltage Directives when incorporating the Mitsubishi programmable
controller (EMC and Low Voltage Directives compliant) into other machinery or equipment, refer to Chapter 9
"EMC AND LOW VOLTAGE DIRECTIVES" of the QCPU User's Manual (Hardware Design, Maintenance and Inspection).
The CE mark, indicating compliance with the EMC and Low Voltage Directives, is printed on the rating plate of the programmable
controller.
(2) For this module
For the compliance of this module with the EMC and Low Voltage Directives, refer to Section 6.1 Wiring.
1. Features
(1)This Energy Measuring Module can measure three channels of various types of electric quantity.
It can measure three channels of electric energy, reactive energy, current, voltage, electric power, reactive power,
apparent power, power factor, and frequency.
Both consumption and regeneration of the electric energy can be measured.
(2)Extensive monitoring functions
In addition to memorizing the maximum and minimum values, two types of alarm monitoring for upper and lower limit
can be performed for each channel.
(3)It also can measure the electric energy for a certain period.
It can measure the electric energy for the duration of time for which the output device is on.
This feature enables to acquire the electric energy needed during device operation or energy per tact.
(4)Equipped with the current measuring mode where eight channels of current can be measured.
By selecting the current measuring mode using the intelligent function module switch, you can measure only the current
through eight channels.
Note that the input/output signals and buffer memory to be used in the current measuring mode are different from those
used in the regular operation mode. For details, refer to "User’s Manual (Details)".
2. Checking packaged contents
The following items for this device are included in the package. Check that no items are missing.
・ Energy Measuring Module x 1
・ Voltage input terminal block x 1
・ User’s Manual (Hardware) x 1
3. Safety Precautions
3.1 Precautions for Operating Environment and Conditions
Do not use this product in the places listed below. Failure to follow the instruction may cause malfunctions and a life
decrease of product.
・Places the Ambient temperature exceeds the range 0 – 55ºC.
・Places the Relative humidity exceeds the range 5 – 95% or places with dewfall.
・Altitude exceeds 2000 m.
・Places exposed to rain or water drop.
・Dust, corrosive gas, saline and oil smoke exist.
・Vibration and impact exceed the specifications.
・Installed excluding the control panel.
Caution
・Use the product within the ratings specified in this manual. If it is used outside the ratings, it may cause
not only malfunction or failure but also fire or burnout.
・Before operating the product, check that active bare wire, etc. does not exist around the product. If any
bare wire is found, stop the operation immediately, and take an appropriate action such as isolation
protection.
・Do not disassemble or modify the module. It may cause failure, malfunction, injury or fire.
・Attaching and detaching the module must be performed after the power source is shut off for all
outside phases. If all phases are not shut off, it may cause electric shock, failure or malfunction of the
module.
・Do not touch powered wires. It may cause malfunction.
・Tighten mounting screws and cleaning module must be performed after the power source is shut off
for all outside phases. If all phases are not shut off, it may cause electric shock, failure or malfunction
of the module.
・Use a soft dry cloth to clean off dirt of the module surface.
・Do not let a chemical cloth remain on the surface for an extended period of time nor wipe the surface
with thinner or benzene.
・Check for the following items to use this module properly for long time.
<Daily maintenance>
(1) No damage on this module (2) No abnormality with LED indicators (3) No abnormal noise, smell or
heat.
<Periodical maintenance (Once every 6 months to 1 year) >
(4) No looseness with installation, wire connection to terminal blocks, and connector connection.
(Check these items under the electric outage condition.)
3.5 Disposal Precautions
・When disposing of this module, treat it as industrial waste.
CH1
this
1k
1l
C 2k
H 2l
1
3k
3l
(2)Current input terminals
Connect the current wire of
the measuring circuit with the
secondary output of the
dedicated current sensor.
1k
1l
C 2k
H 2l
2
3k
3l
CH2
1k
1l
CH3
C 2k
H 2l
3
3k
3l
(3)Voltage input terminals
Connect the voltage input wire
of the measuring circuit.
Three-phase 4-wire (with the voltage transform unit / Separated type current transformer)
1k
1l
1-phase current input terminal (power source side)
1-phase current input terminal (load side)
2k
2l
2-phase current input terminal (power source side)
2-phase current input terminal (load side)
3k
3l
3-phase current input terminal (power source side)
3-phase current input terminal (load side)
1k
1l
1-phase current input terminal (power source side)
1-phase current input terminal (load side)
2k
2l
2-phase current input terminal (power source side)
2-phase current input terminal (load side)
3k
3l
3-phase current input terminal (power source side)
3-phase current input terminal (load side)
1k
1l
1-phase current input terminal (power source side)
1-phase current input terminal (load side)
2k
2l
2-phase current input terminal (power source side)
2-phase current input terminal (load side)
3k
3l
3-phase current input terminal (power source side)
3-phase current input terminal (load side)
PA, PB
PC, PD
Terminal for connecting the secondary terminal
block of the voltage transform unit
SLD
Shield connection terminal
Note: Unit of number is mm.
QE83WH4W
1
2
3
0
Load
side
QE83WH4W
Item
C 2k
H 2l
1
3k
3l
??
C 2k
H 2l
1
3k
l
3l
k
1k
1l
??
l
C 2k
H 2l
2
3k
k
3l
??
1k
l
1l
k
??
C 2k
H 2l
3
3k
l
EMU-CT***model
split current sensor
(50/100/250/400/600)
3l
k
1l
2l
3l
1l
2l
3l
1l
2l
3l
1k
2k
CH1
1k
1l
1k
C 2k
H 2l
1
3k
1l
3k
3k
3l
2k
2l
1k
2k
3l
CH2
1k
1l
C 2k
H 2l
2
3k
3k
1k
2k
Current
transformer ***/5A
CH3
3l
1k
1l
1k
C 2k
H 2l
3
3k
1l
3k
3k
3l
2k
2l
3l
2l
3l
1l
2l
3l
1l
2l
??
3l
QE8WH4VT
l
1l
98
1k
2k
3l
CH1
1k
1l
3k
1k
2k
C 2k
H 2l
3
3k
CH2
3l
3k
1k
2k
Voltage circuit
Rating
Current circuit
CH3
3k
Frequency
112
5A current sensor
EMU2-CT5-4W
PA
PB
PC
PD
SLD
1k
1l
C 2k
H 2l
2
3k
4
1l
k
5A current sensor cable
EMU2-CB-Q5B-4W
0
1
2
3
4
5
6
7
8
9
A
B
C
D
E
F
15
??
1k
l
QE8WH4VT
View A
P2
P3
P0
FG
Load 3
View A
Voltage transform unit
QE8WH4VT
Caution
●Make sure that before connecting the cable, the direction of the current sensor is correct for attachment. K to L is the
correct direction. K: power source side, L: load side.
●The available range of the voltage transform unit is from 55/95V AC to 227/480V AC. When this product is used in a
circuit more than 227/480V AC, voltage transformer is required.
●The available phase voltage of the transformer is up to 6600V. Connect the secondary side of the transformer to the
terminal (P1, P2, P3, P0) of the Voltage transform unit. Make sure that terminal symbols are correct. This product
cannot connect with the secondary side of the transformer directly.
6.2 How to connect wires
●Use appropriate electric wires and tighten a screw by appropriate torque as described right.
P1
P2
P0
Load side
View A
Voltage transformer
for gauge
Voltage transform unit
QE8WH4VT
Measurable circuit count
Operating temperature
Operating humidity
Storage temperature
Operating altitude
<Voltage input terminals>
●Insert a wire to the terminal all the way until it touches the end.
●Stripping length of the used wire in use has to be 7mm.
●When using a stranded wire, strand the wire edges to prevent thin wires from loosening.
<Current input terminals>
●Use an applicable solderless terminals. No solderless terminal with insulation sleeve can be used on the terminal
block. It is recommended to cover the solderless terminals connecting electric cables with a mark tube or insulating
tube.
Applicable solderless terminals for current input terminals
: R1.25-3 (No solderless terminal with insulation sleeve can be used).
Single wire
Stranded wire
Tightening torque [N・m]
Voltage input terminals
AWG24-16
AWG20-16
0.4-0.5
Allowable tolerance of module
(excluding the current sensor)
(Under the current measuring
mode, measures current only)
P3
FG
*For a low voltage circuit,grounding of the secondary sides of VT is not necessary.
・Input signal wire shall not be bound together with or placed close to the main circuit and power
line.
Keep 300 mm or longer distance between them.(Except for the terminal input section) It may
cause malfunction due to noise
・The input wiring of the measurement circuit uses separate cables which is different from other
signal cables, and do not be affected by serge and the instruction of the interchange side.
・In actual use, connect the SLD terminal to a shield.
PA PB PC PD SLD
PA
PB
PC
PD
SLD
PA PB PC PD SLD
PA PB PC PD SLD
Load 1
P1
27.4
View A
PA
PB
PC
PD
SLD
Current input terminals
AWG20-18
0.42-0.58
* To comply with UL/c-UL standards, use the wires meeting the following requirements.
The rated temperature of the copper conductor should be 60ºC/75ºC.
Green
Green
Green
4 LED
Green
5 LED
Green
6 LED
Green
7 LED
-
Displays CH1 measurement status of this module.
Displays CH2 measurement status of this module.
Displays CH3 measurement status of this module.
Displays CH1 1-side measurement status
(regeneration) of this module.
Displays CH2 1-side measurement status
(regeneration) of this module.
Displays CH3 1-side measurement status
(regeneration) of this module.
-
8 LED
Red
Displays errors and conditions of this module.
9 LED
Green
A LED
Green
B LED
Green
C LED
Green
D LED
Green
E LED
Green
F LED
-
Commercial
withstand voltage
frequency
Standard
Installation area
Product life expectancy
10. Customer Service
Please contact us at the following locations.
1 - 8 Midori-cho, Fukuyama-shi, Hiroshima, 720 - 8647, Japan
Indicator condition
Displays CH1 2-side measurement
(regeneration) of this module.
Displays CH2 2-side measurement
(regeneration) of this module.
Displays CH3 2-side measurement
(regeneration) of this module.
Displays CH1 3-side measurement
(regeneration) of this module.
Displays CH2 3-side measurement
(regeneration) of this module.
Displays CH3 3-side measurement
(regeneration) of this module.
-
status
status
status
ON: Normal operation
OFF: Internal power shut-off, hardware error *1
ON: Measuring electric energy (consumption)
Flashing:
Measuring
electric
energy
(regeneration)
OFF: Not measuring (No measurement)
ON: Measuring electric energy (regeneration)
on side 1
OFF: Other than the above
Always OFF.
Flashing: Out-of-range error *1
ON: Hardware error *1
OFF: Normal operation
ON: Measuring electric energy (regeneration)
on side 2
OFF: Other than the above
status
status
status
ON: Measuring electric energy (regeneration)
on side 3
OFF: Other than the above
Always OFF.
Base unit
Push the unit toward the arrow
direction, as the module-fixing
hole being a fulcrum point, until
you hear a click sound to firmly
attach it to the based module.
Check that the module is firmly
inserted to the base unit.
Phone (084) 926 - 8142
When exported from Japan, this manual dose not require application to the Ministry of
Economy, Trade and Industry for service transaction permission.
Specifications subject to change without notice.
Hook for fixing the
module(*2)
Unit connector
Base unit
Protrusion for fixing
the module (*1)
Lever for attaching
the module
Module
Hole for fixing the module
Complete
・Attach to the base unit of MELSEC-Q series.
・When attaching the module, make sure to insert the protruding portions for fixing the module into the holes on the base
unit. In doing so, insert it securely so that the protruding portion of the module does not come off of the holes. Do not
force to attach the module; otherwise the module may break.
・When installing the module at a vibrating area with strong impact, tighten the module to the base unit using screws.
Fixing-Module screw (arranged by user): M3 x 12mm
Tightening torque of the fixing-module screws: 0.36 – 0.48 N•m
9. Warranty
Specifications
Model
Phase-wire system
1l
Power
source
side
QE83WH4W
k
1 LED
2 LED
3 LED
8. Specifications
7. Dimensions
1k
Power
source
side
Displays the operation status of this module.
Insert it securely so that the
protruding portion for fixing the
module*1 does not come off of
the module-fixing hole.
Three-phase 4-wire (with the voltage transform unit / voltage transformer / current transformer)
1
2
3
0
Load
side
Role
Green
5.1 How to attach to the base unit
Name of terminal
6. How to wire
6.1 Wiring
Follow the wiring diagram for external connection of QE83WH4W.
Current sensor (EMU-CT50/CT100/CT250/CT400/CT600, EMU2-CT5-4W) is necessary for the connection of the current circuit.
Voltage transform unit (QE8WH4VT) is necessary for the connection of the voltage circuit. In addition, up to five QE83WH4W modules can be connected to one voltage transform unit.
Please refer to the User’s Manual (Details) of this module, and the installation method and the detailed specifications of the current sensor and the voltage transform unit.
Color
0 LED
5. Attaching and removing the module
Terminal
symbol
(1)LED
Operating status of
module is displayed.
Name
※1:For details, check with the list of error codes. (Refer to section 9.1)
4. Name and function of each part
4.1 Names and functions of parts of QE83WH4W are provided below.
Names of signals of terminal block
QE83WH4W
4.2 Names and functions of LEDs
The following describes names and functions of LEDs.
QE83WH4W
three-phase 4-wire
63.5/110 – 277/480V AC
( Selected from: 63.5/110V , 100/173V , 105/182V ,
110/190V,115/199V,120/208V,127/220V,200/346V,
220/380V,230/400V,240/415V,242/420V,250/430V,
254/440V,265/460V,277/480V Each value refers to
the primary voltage of voltage transform unit
(QE8WH4VT). If more than 277/480 V AC, use a
transformer (VT). Primary voltage of VT can be set up to
6600V)
50 A, 100 A, 250 A, 400 A, 600 A AC
(The dedicated split type current sensor is used. Each
value refers to the current at the primary side of the
current sensor.)
5 A AC
(The dedicated split type current sensor is used. 5 A current
sensor is used together with the current transformer (CT),
and the primary-side current is configurable up to 6000
A.)
50Hz-60Hz
Current, current demand: ±1.0% (100% of the rating)
Voltage: ±1.0% (100% of the rating)
Electric power, electric power demand
: ±1.0% (100% of the rating)
Reactive power: ±1.0% (100% of the rating)
Apparent power: ±1.0% (100% of the rating)
Frequency: ±1.0% (45 – 65 Hz range of the rating)
Power factor: ±3.0% (against the electric angle 90°)
Electric energy: ±2.0%
(5 – 100% range of the rating, power factor = 1)
Reactive energy: ±2.5%
(10 – 100% range of the rating, power factor = 0)
3 circuits under the same voltage system (3 channels), or
8 circuits (8 channels) in the current measuring mode
0 – 55°C (Average daily temperature 35°C or below)
5 – 95% RH (No condensation)
-25 – +75°C
2000 m or below
Between voltage/current input terminals - SLD terminal:
2210 V AC 5 sec
Between voltage/current input terminals
- sequencer power source and GND terminals:
2210 V AC 5 sec
EMC:EN61131-2:2007 , EN61326-1:2006
LVD:EN61131-2:2007 , EN61010-1:2010
Inside a control panel
10 years (used under the operating conditions of Section
3.1.)
・The charge-free warranty period for the product shall be 1 year from the
date of your purchase or the date the product is delivered your specified
delivery location. However, the maximum limit of the charge-free warranty
period shall be set to 18 months from the time of manufacture by defining
the longest distribution period of the product as 6 months after the product
is shipped from our manufacturing factory. Also, the charge-free warranty
period for the replacement product shall not be extended exceeding the
charge-free warranty period for the original product.
・Our company shall not be liable to compensate for any loss arising from
events not attributable to our company, opportunity loss and lost earning of
the customer due to failure of the product, and loss, secondary loss,
accident compensation, damage to other products besides our products
and other operations caused by a special reason regardless of our
company’s predictability in both within and beyond the charge-free
warranty period.
Caution
If an abnormal sound, bad-smelling smoke, fever break
out from this module, I switch it off promptly, and don’t
use it.
KCC-REI-MEK-19H013
Appllicant MITSUBISHI ELECTRIC AUTOMATION KOREA CO.Ltd
Equipment Name Energy Measuring Module
Model QE83WH4W
Made In JAPAN
Manufacturer
MITSUBISHI ELECTRIC CORPORATION FUKUYAMA WORKS
사용자안내문
A급 기기 (업무용 방송통신기자재)
이 기기는 업무용(A급) 전자파적합기기로서 판매자 또는
사용자는 이 점을 주의하시기 바라며, 가정외의 지역에서
사용하는 것을 목적으로 합니다.