1
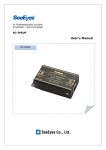
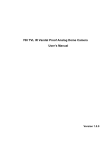
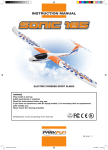
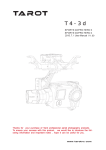
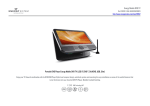
Linkage Alarm Box User Manual
I. Hardware Connection:
Linkage Alarm Box
(Side A)
Linkage Alarm Box
-
+
①DC IN : DC12V/1A Power Input
②ANT: Antenna
③WORK: Protection status indicator
④PWR: Power Light
⑤SET:
Set Key
⑥CLOSE: Connecting normally closed wired Alarm Input device(e.g.: infrared bijection)
⑦ALARM: linked with alarm whistle DC12V, please do not misconnect the correct polar
⑧RLY: Alarm Relay Output,
⑨DC OUT: DC5V
(Side B)
Note:
1, The DC 5V port of IP camera to be connected with the DC OUT port of Linkage Alarm Box.
2, The 3rd and 4th pins of IP camera to be connected with the 2 pins of “RLY”。
3, ALARM: linked with alarm whistle DC 12V, please do not misconnect the correct polar
II.
Device Configuration
1,Set the Remote Control Unit to be Recognized by Linkage Alarm Box:
First press the “Set” button of the alarm device, and then press the “Lock” button of remote control unit, a
short beep sound would be heard, and then press on the “Lock” button of remote control unit for 3 seconds, a
longer beep sound and two short bee sound would be heard, after this, please press the “Set button” of alarm
device again, and thus the remote control unit is successfully set.
To make sure, please press the “lock” button of remote control unit, then you would find a long beep sound of
the alarm device and the green light of protection status indicator “Work” is on.
2, Set the Door Magnet to be Recognized by Linkage Alarm Box:
First press the “Set” button of the alarm device, and then separate the closed door magnet until the red light of
the door magnet flash, a short beep sound would be heard, and then close the door magnet and separate it again
until the red light of the door magnet flash, a longer beep sound and two short beep sound would be heard,
after this, please press the “Set button” of alarm device again, and thus the door magnet is successfully set.
3, Set the Wireless Infrared Detector to be Recognized by the Alarm Device:
First press the “Set” button of the alarm device, and then move your Palm in front of the Wireless Infrared
Detector, a short beep sound would be heard, and then move your palm in front of the Wireless Infrared
Detector again, a longer beep sound and two short beep sound would be heard, after this, please press the “Set
button” of alarm device again, and thus the Wireless Infrared Detector is successfully set.
4, Set the Wired Infrared Bijection to be Recognized by the Alarm Device:
First Connect the two ends of Wired Infrared Bijection is to the first 2 pins of the Alarm Device(Marked as
“Close”) , then press the “Set” button of the alarm device, and then move your Palm between the two Wired
Infrared Bijection, a short beep sound would be heard, and then move your palm between the two Wired
Infrared Bijection again, a longer beep sound and two short beep sound would be heard, after this, please press
the “Set button” of alarm device again, and thus the Wireless Infrared Detector is successfully set.
5, IP Camera Setting:
4.1 Alarm Setting:
Choose the IO linkage;Choose sending emails.
4.2 Alarm Setting
After email alarm is set, when door magnetic, infrared alarm was triggered,photos would be taken and sent
to the pointed email address by the IP camera and the alarm whistle would ring .
III. Diagrams
IV. Specifications Sheet
learning code,preventing cracking, super safer
Systematic Function
Motion detection, Snapshot, video record, email photo、
alarm Whistle
Support as many as 6 wireless remote control units.
Feature
Input
Support maximum 20 wireless alarms such as door magnetic detector, Infrared、
smoke detector.
Support 1 way wired infrared bijection.
Accessories
Output
1 Alarm Whistle,1 Switching Value Output to trigger the alarm of ip camera
Remote-control Unit
2 Units
Infrared detector
1 Unit
Alarm Whistle
1 Unit
Wireless door
magnetic
Other
1 Unit
Power Supply
DC12V 1A
Packaging Size
280 x 179 x 120mm
Gross Weight
980g (Note: Actual Weight Final)