1
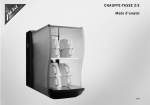
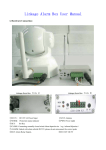
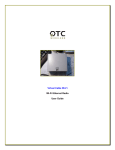
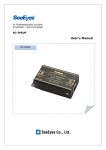
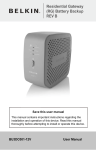
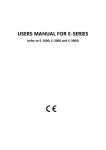
DC UPS User Manual Table of Contents 1. Introduction…………………………………………………………3-4 1.1 General Introduction …………………………………………3 1.2 Panel Introduction ……………………………………………3 1.3 The 7 Pin Terminal Connecters Introduction Table ………4 2. Safety Information…………………………………………………5 3. Package Contents…………………………………………………6 4. Installation …………………………………………………………7-9 4.1 Wire Connection ………………………………………………7-8 4.2 Wall-Mounting Instructions (Optional) ………………………9 5. Operation……………………………………………………………10 6. Available & Visual Alarms …………………………………………11 7. Battery Replacement Procedure …………………………………12 8. Specifications ………………………………………………………13 2 1. Introduction 1.1 General Introduction DC UPS is the innovative power protection solution for delicate network devices and telecom equipments. It equips with 12V/30Watts power capacity and internal long 7 amp-hour backup battery. With universal input voltage design, this UPS can be widely applied to the majority power system without AC input voltage transfer. The advantages of DC output are saving the cost and space of the additional power adapter connection. This feature further prevents the power loss while transferring between DC to AC. The thoughtful wall-mount design allows you to install DC UPS to diverse environments for maximizing your precious space. DC UPS can be applied to any other device equipped with a compatible DC input connector. Features Universal input range (80-260VAC) for global applications 12VDC (30W max.) output meets the major standard of network devices Integrated hot-swappable to easy replacement battery allows battery replacement without power interruption. Microprocessor controlled for optimized operation and maximum reliability Audible warning alarm with mute switch Outputs for remote monitoring; On Battery, Replace Battery, Battery missing and Low battery alert Wall mountable design for maximized flexibility Multiple LED for AC power and battery status indications Cold Start function capable 1.2 Panel Introduction The front view Pow er on/off Use power on/off switch to turn the DC UPS on/off. The unit will not supply powerto the networkdevices when power switch is in OFF (Not push down)position. Mute on/off Use this switch to turn the mute function on/off. Theaudiblealarmswillbe silenced when mute switch is in ON (Push down) position. Status Indicators There are three LED status lights: red, yellow and green which are from left to right. The status lights indicate specific conditions of the DC UPS. (See page X.) 3 The rear view DC output socket TheDC outputincludes12VDCpower, four dry contact signals and common return point for these signals. Please findthe definensand wire connections for DC output socket as below table. AC input socket TheAC input socket is IEC320 C14. 1.3 The 7 Pin Terminal Connecters Introduction Table Terminal Connectors Function VO+ Positive(+) Voltage output VONegative(-) Voltage output SIG RTN Signal return ON BATT Low when operation from utility line. Open when operating from battery. REPLACE BATT Low when battery is charged. Open when battery fails the self-test. BATT MISSING Low when battery is present. Open when battery is missing. LOW BATT Low when battery is near full charge capacity. Open when operating from a battery with < 20% capacity. 4 Suggested Wire Gauge At least #18AWG At least #18AWG At least #26AWG At least #26AWG At least #26AWG At least #26AWG At least #26AWG 2. Safety Information Internal battery voltage is 12V DC. Incorrect battery connection or replacement creates risk of explosion. Use only vender approved replacement batteries. The DC UPS is intended for installation and operation in a controlled environment (temperature controlled, indoor area free of conductive contaminants). Refer to specifications in this manual. No user-serviceable parts exist inside the unit. Refer repair issues only to qualified personnel. Fuses or other parts must be replaced ONLY with parts of identical types and ratings. Substitution of non-identical parts can cause fire and other safety hazards. All batteries used are sealed lead batteries. Batteries should be recycled. The battery charges when it is connected to the AC power. The battery will fully charge during the first eight hours of normal operation. Do not expect full battery run capability during this initial charge period. Connect the DC UPS to utility power for completely charging the internal battery before starting the UPS. 5 3. Package Contents The DC UPS package includes the following items. Please inspect if there are any missing parts. 1 x DC UPS Unit with 12V internal battery preinstalled 1 x User Manual 1 x 7-position connector 6 4. Installation 4.1 Wire Connection 1. Remove the wire connection cover in the rear of the DC UPS. Keep the cover will and reinstall the cover after all the wires are well-connected. 2. Plug IEC-LOCAL power cord into the AC input socket on the back of DC UPS. Do not connect the AC power cord to utility outlet prior to this process. 3. Connect DC UPS to network device. 3.1 If the telemetry cable is enclosed: (1) Plug the telemetry cable into the 7-position connector (2) Then place the cable between the two sticks for fixing the cable as the following picture 7 3.2 If the telemetry cable is not enclosed: (1) Cut and strip the self-prepared cable leads, and then attach the leads to the 7-position connector. Make sure that the correct wire gauges are used for the safety (Please refer to “1.3 The 7 Pin Terminal Connecter Intro Table”) (2) Plug the 7-conductor cable into the outlet of the DC UPS (3)Then place the cable between the two sticks for fixing the cable as the following picture 4. Close the wire connection cover 5. Connect the other end of the cable to the equipment 8 4.2 Wall-Mounting Instructions (Optional) NOTE: Required hardware not included. Refer to the wall-mount instructions for required tools and materials. STEP 1: Make a mark on the wall in the 2 screw locations. The distance between the centers of the 2 screws are 80cm. STEP 2: Use a drill to drill holes where you made the mark on the wall. If you drill into a wall stud, proceed to Step 5. If not, go to Step 4. STEP 3: Insert anchor(s) into the hole(s). STEP 4: Screw in the screw, leaving it protruding 1⁄4 inch from the wall. STEP 5: Mount the DC UPS on the screw heads. Mounting holes Mounting holes 80mm 358mm 120mm 9 5. Operation After the installation, you can start to operate the DC UPS and let your device running under uninterruptible power supply environment as the following procedure. STEP 1: Plug the AC input power cord of the DC UPS into the wall outlet (The utility power outlet) STEP 2: Push the power on/off switch and you may hear a long beep buzzer alarm for knowing the unit is properly turned on. You may turn the audible alarm off by pushing the mute switch button to ON (Push down) position. Self-test Use the self-test to verify both the operation of the DC UPS and the condition of the battery. Turn the mute switch ON then OFF, then ON and OFF again within five seconds. During the Self-test, the DC UPS operates in backup mode. The DC UPS automatically conducts a Self-test in two conditions. 1) Operate it and then the MCU detects battery voltage is higher than 13V. 2) Every 21 days while operating all the time. Note: During the self-test, the DC UPS briefly operates on battery-backup power. The green LED will flash for five minutes during the test period. If the DC UPS passes the Self-test, it returns to online operation. If the DC UPS fails the Self-test, it immediately returns to online operation and lights the red LED. The loads are not affected. Recharge the battery overnight and perform the self-test again. If the red LED is still on, the battery needs to be replaced. 10 6. Available & Visual Alarms Front-Panel Label ON A/C Testing Battery Visual Indicator Green LED lights Green LED flashes Audible Alarm None None Description The DC UPS is operating on A/C The DC UPS is conducting a self-test. This automatic procedure is normal and will occur when the unit is switched on, and periodically thereafter. This procedure will last approximately 5 minutes. ON Battery Yellow LED lights Tone every 5 The DC UPS is operating on seconds battery power. The alarm will stop when main power is returned. Low Battery Yellow LED flashes one every 1 The battery energy is running low. seconds This alarm will continue until the unit performs a forced shutdown when the battery is depleted. Replace Battery Red LED flashes one every 2 This alarm warns that the battery seconds has reached the end of its useful life. The user must replace the battery as soon as possible to ensure proper operation of the DC UPS. Fault Red LED lights Continuous A fault has occurred. Disconnect tone equipment from the DC UPS prior to checking equipment. NOTE: Audible alarm will not sound when mute switch I in ON position. 11 7. Battery Replacement Procedure The DC UPS is designed with an easy-access battery cover. STEP 1 Turn off power switch. Disconnect the DC UPS from power and any connected devices. Remove the battery door on the front of the DC UPS by pulling up the battery door. STEP 2 Remove the battery from enclosure; remove the wire connections from the battery. STEP 3 Connect the new battery (black-to-black, red-to-red); place the battery into the enclosure, and then put the wires next by the battery inside of the closure as shown bellow. WARNING: Connect the correct color wires carefully to the corresponding terminals. The battery has two color-coded terminals (red = +, black = -) as well as the two colors of the wires. Misconnect the two wires to wrong terminals might cause battery explosion. 12 8. Specifications Model Name DC UPS Nominal input voltage INPUT 230Vac Acceptable Input Voltage Range Acceptable Input frequency Range power (max) Output Normal Voltage OUTPUT Output Voltage Range Line Mode Efficiency Type/Rating Discharge Prevention Backup Time (With 1A Discharging) BATTERY Rated Charging Voltage Recharge Time (internal battery) Current Charge Hot Swappable Battery AC mode Backup mode Battery low INDICATOR Battery replace Battery missing Fault Battery self-test Backup mode Battery low AUDIBLE ALARM Battery replace Battery missing Fault Switch on MUTE FUNCTION Switch off Operating temperature OPERATING Operating humidity ENVIRONMENT Operating Elevation PHYSICAL Weight 80~260Vac 45Hz~65Hz 30W 12Vdc 10.5V~13.8V > 80% 12V/7Ah x 1pc 10.5V ± 0.5V Typical 340mins 13.7V ± 0.25V 4 hours to 90% without load after complete discharge 2.5A Maximum Yes Green LED Lighting Yellow LED Lighting Yellow LED Flashing Red LED Flashing Red LED Lighting Red LED Lighting Green LED flashing Sounding every 5 seconds Sounding every 1 second Sounding every 2 seconds Continuous sounding Continuous sounding Buzzer disable Buzzer enable 0℃ to 40℃ 0% to 90% 0 to 3000m 3.5 kgs Dimension (W x H x D) 120mm(W) x 358mm(H) x 86.5mm(D) INPUT TYPE IEC inlet OUTPUT TYPE 7pin terminal (2 pins for DC output, 5 pins for dry contact signal output) 13