1
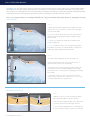
STEP 16
tighten
retract
A Insert the medial/lateral blade into the
incision and retract handle back by hand.
clip
B Snap the handle into the clip joint
and turn the knob with fingers or with
T-Handle to tighten.
A
TIP If the handle does not easily snap in,
the joint may need to be loosened first.
B
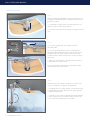
STEP 17
A To add a lateral retractor, attach the desired blade to the S-Lock Interchangeable Head. Insert the blade in to the incision and
retract towards the U-Bar.
B Snap the S-Lock Interchangeable Head on to the U-Bar. If it does not easily snap on, joint may need to be loosened with fingers or
T-Handle. To lock, use the T-Handle to tighten the joint.
C To retract the lateral blade, apply the T-handle to the U-Bar where it attaches to the L-Bar.
tighten
retract
retract
A
B
C
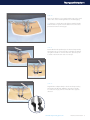
STEP 18
To angle medial/lateral blades, use fingers to rotate the knurled portion of the
handle or, if additional leverage is needed, apply the Angling Wrench to the
hexed portion of the handle.
REMOVAL:
To remove the retractor, begin by returning all blades to a straight up and down position by unangling all blades. Next, remove the
medial and lateral retractors by loosening the joints, removing handles and blades, and sliding them off of the U or L-Bar.
Carefully, return the caudal/cephlad blades to the start position by pressing the pawl so that the blades can be pushed together.
Dismount the Articulating Arm from the frame and gently pull the frame and blades up to remove from the patient.
www.thompsonsurgical.com
THOMPSON RETRACTOR 7