1
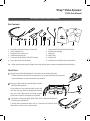
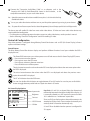
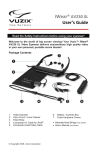
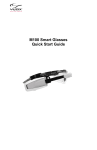
Wrap™ Video Eyewear
310XL User Manual
Wrap™ Video Eyewear
310XL User Manual
Read Safety Instructions Before Proceeding
Box Contents
rranty
tion
y & Wa
Informa
ranty
Safet
ty & War
Wra
pVid
eo
nt Safe
Importa
manua
l
+
1
1.
2.
3.
4.
5.
6.
2
3
4
5
6
7
8
Wrap Video Eyewear & Battery/Control Box
Stereo Earphones (2)
Earphone Noise Isolators (6)
Cable Management Clip
Composite Audio/Video Cable (RCA- female)
Focus Adjustment Tool & Holder
9
7.
8.
9.
10.
11.
12.
10
11
12
Composite AV Cable for iPod/iPhone/iPad
Alternate Nose Bridge
AA Battery
Tether Strap
Cloth Pouch
User Manual and Safety & Warranty Booklet
Note: Package contents may not be exactly as illustrated. Contents may be altered in responce to variations in regional demand and market inluences.
Quick Start
the back of the Wrap Battery & Control Box and insert the AA battery.
1 Open
• Pull the lid closure tab back and swing the door up to open the battery compartment.
• Insert the batteries as indicated and then close the lid.
Plug your stereo earphones into the jacks on either
2 side
of the display panels.
If you prefer to use an alternate audio source, skip
this step and plug alternate headphones directly
into your audio video device. The Wrap eyewear
works with or without its earphones connected.
the “Composite Audio/Video Cable“ (RCA) cable into the Battery/
3 Connect
Control Box port labeled “AV”.
A custom direct connection cable, such as a Composite AV Cable for iPod/
iPhone/iPad, can be used as an alternative.
Eyew
ear
User
+
-
Connect the “Composite Audio/Video Cable“ or an alternate, such as the
4 Composite
AV Cable for iPod/iPhone/iPad shown in the illustration, to the
compatible connection(s) on your audio video device.
Note: Optional direct connect custom cable solutions are available for many devices. See the Vuzix website for a listing
of available cable solutions.
5 Turn on you audio video device and then turn on your Wrap video eyewear by pressing its power button.
Note: The eyewear will turn of to conserve power if no video is detected for approximately 30 second. Turning on your AV device irst will help prevent this.
The above steps will enable 2D video from most audio video devices. 3D video and some audio video devices may
require additional coniguration.
• For information on coniguring external monitor support on audio video devices, see that product’s manual.
• See the following “Controls & Coniguration” section for enabling 3D video.
Controls & Coniguration
Wrap video eyewear is conigured through Battery/Control Box buttons and an OSD (On Screen Display) of menu
options and control settings.
Control Buttons
The Wrap Battery/Control Box buttons displays and performs diferent functions based upon whether the OSD is
displayed or not.
The Power/OSD button turns your video eyewear on or of and accesses the On Screen Display (OSD) menu.
• Press once to turn on the eyewear
• Press again to access the OSD menu
• Press again to advance to the next menu item
• Press and hold to turn of the eyewear
The plus button increases the volume when the OSD is not displayed and selects the next menu option when
the OSD is displayed.
The minus button decreases the volume when the OSD is not displayed and selects the previous menu
option when the OSD is displayed.
The “X” or Exit button closes the OSD menu.
You can also double-click this button to toggle between 2D and 3D mode. You can also press and hold this
button to toggle between parallel and cross-eyed view when in 3D mode.
On Screen Display Options
4:3 16:9 ZOOM Full
Aspect ratio
Brightness
Contrast
2D/3D Format
3D View
Aspect Ratio: 4:3 and 16:9 are Aspect Ratios; the dimensional
relationship between the height and width of the display. 4:3
is commonly referred to as the “standard” aspect ratio while
16:9 is referred to as a “widescreen” aspect ratios.
Zoom and Full are display options that enable content to be
stretched to ill the screen. Zoom stretches horizontally and
vertically while Full stretches horizontally only.
4:3 and Full are disabled when the eyewear is conigured for
3D support.
Brightness: Adjust the amount of backlight applied to the display. Increased brightness can shorten battery life.
Contrast: Adjust the video contrast.
2D/3D Format: Conigures the eyewear for display of either standard 2D video or “Side-by-Side” 3D (stereoscopic) video.
3D View: 3D images can be composed for parallel or cross-eyed view. If a 3D image appears lat or unclear, choose the
alternate 3D View and determine if the image quality improved.
Battery Indicator
A battery indicator is displayed when approximately 20 minutes of power remains. That time will vary based on a
number of factors including eyewear settings and the type, age, and condition of battery used .
Audio
Your Wrap video eyewear is equipped with removable noise isolating earphones and three sizes of noise isolator inserts.
Medium sized noise isolators are pre-installed on the earphones. These can be pulled of larger or smaller isolators
installed for a more comfortable it.
The earphones plug into the eyewear as indicated in the illustration in the Quick Start section. If you wish to use an alternate
audio system, simply unplug the Wrap noise-isolating earphones and store them away. If using an alternate audio system, use
the volume adjustment provided with that audio system - your Wrap volume adjustment works only with Wrap earphones.
Audio volume adjustment for the Wrap earphones is available whenever the OSD is not displayed. You can adjust the
volume by pressing adjustment arrow buttons on the Battery/Control Box and an onscreen indicator displays the
volume level.
Nose Bridge
For comfort and the best quality display, your video eyewear should sit on the bridge of your nose with the display
panels directly in your line of sight.
The nose bridge assembly slides in and out of the eyewear optical module and wire arms,
like those on conventional spectacles, bent to achieve a proper it.
A second nose bridge is provided to accomodate a broader range of facial structures. Pull
the nose bridge down to remove it and insert the alternate nose bridge by inserting it in
its slide tracks behind the metal clip.
The nose pad assembly is designed for a single user and its wire arms should not bent
repeatedly or at sharp angles as this may cause a weakening and eventual breakage of
the nose pad arms. If this occurs, the nose bridge assembly can be replaced.
Tether Strap
The Wrap video eyewear is light, weighing in at approximately 3 oz. or 85 grams.
For some, especially those unaccustomed to wearing glasses, have not properly
adjusted their nose bridge/pads, or involved in certain activities, may ind a tether
strap (lanyard) enhances comfort and a secure it.
Focus
Your Wrap video eyewear can be worn over many styles of prescription glasses and, as an alternative; each eye of the
display can be adjusted from +2 to -5 diopter. A focus adjustment tool is provided and can be clipped onto the eyewear
cable for storage.
To adjust the focus:
• Lift the Focus Adjuster Cover, above the display section of the eyewear.
• Adjust each eye separately using the focus adjustment tool.
• To achieve optimal focus close your right eye, while viewing a quality image on the eyewear, while you adjust the
focus for your left eye. Repeat the process, closing your left eye while adjusting the right eye’s display.
Cable Management
A cable management clip is provided to secure the left stem of your eyewear. The clip slides over the left temple arm
and the cable clips into the lower slot.
Note: Do not lift or suspend the eyewear by its cables. Although damage may not be visible, the ine wires inside the cable may be damaged, rendering your video
eyewear inoperable.
Cleaning
Your Wrap eyewear is essentually maintenance free, requiring only occasional cleaning with a soft microiber cloth. Do
not spray cleaners onto the eyewear or any of its components or immerse them in water. If required, spray an optical
lens cleaner on a microiber cloth. Never use solvents, abrasive cleaners or paper towel on your eyewear.
Troubleshooting
Nothing is displayed on my Wrap when I’m connected to my iPhone or iPad and running an application. Do I have to
conigure something?
• The iPod touch, iPhone and iPad only display video on an external monitor through a limited number of apps, such
as its Video and YouTube. This is restriction imposed by Apple and beyond our control and may change in future
iPhone/iPad operating systems.
Why does one or both earphones not work?
• The most common cause is a poor connection. Unplug the earphones and plug them back in again, ensuring they
are fully seated.
• If one earphone works and the other does not, swap them side for side, ensuring they are fully seated. If the same
earphone still fails, contact Vuzix Customer Service.
Why does my Wrap eyewear displays turn on but not play my video?
• It is not uncommon for the audio video cable to appear fully inserted in to the Battery/Control Box AV port, but not
be quite all the way in. This is a tight connection required to ensure adequate contact. When inserted correctly, none
of the gold connector will be visible.
I have a number of 2D and 3D movies on DVD. Can I watch them in 3D on my Vuzix eyewear?
• Standard 2D movies will be displayed in 2D only.
• 3D movies must be Side-by-Side format to be displayed in this model of Vuzix eyewear. Other 3D formats will not
display correctly.
Note: Side-by-Side formatted 3D movies, on DVD, are available from the Vuzix website (www.vuzix.com). These require an NTSC compatible DVD player.
Should I remove the battery from my Wrap eyewear if it will be sitting unused for an extended period of time?
• Yes. Removing the battery will prevent your eyewear from being damaged if the battery leaks.
Why am I not achieving the rated battery life?
• The power proile of batteries varies by type and brand. The battery indicator may not relect your battery’s fully
charged state accurately.
• Name brand alkaline, NiMH, or lithium batteries are recommended for this device. Diferent brands and qualities of
batteries will deliver varied levels of performance.
• Excessive time may have elapsed between when your battery was manufactured and when it was put into service.
Battery charge dissipates over time, even when the batteries are unused. Battery storage conditions can also afect
battery storage and power loss.
• Battery life may vary based upon display settings. High volume, back lighting and other settings may consume more
power.
If I encounter a problem with a Vuzix product should I take it back to where I bought it?
• If you encounter a problem that cannot be resolved by one of these troubleshooting tips or information found on
the Vuzix website, contact Vuzix Customer Service. Our experts have the latest information and likely have a solution
for you. If they are unable to resolve the problem they will advise you on your best course of action to resolve the
issue as quickly as possible.
Where is the serial number?
• The eyewear’s serial number is located on the inside of the right temple.
Where can I ind additional troubleshooting information or answers to questions not covered here?
• Additional information and answers to Frequently Asked Questions (FAQs) can be found on the Vuzix website.
Support Services
For product support and information please contact Vuzix at:
Corporate website:
www.vuzix.com
Email Customer Support:
[email protected]
Customer Helpline:
(800) 436-7838
Customer service hours:
9 AM to 6 PM EST, weekdays
When contacting support services please provide the following information:
• Serial number, complete model name, and model number of your video eyewear.
• Make and model number of the audio video device being used.
• The name of any video content related to your support needs.
• Detailed explanation of the symptoms you are experiencing your questions.
FCC Compliance
NOTE: This equipment has been tested and found to comply with the limits for a Class B digital device, pursuant to Part 15 of the FCC Rules. These limits are designed to provide reasonable
protection against harmful interference in a residential installation. This equipment generates, uses and can radiate radio frequency energy and, if not installed and used in accordance with
the instructions, may cause harmful interference to radio communications. However, there is no guarantee that interference will not occur in a particular installation. If this equipment does
cause harmful interference to radio or television reception, which can be determined by turning the equipment of and on, the user is encouraged to try to correct the interference by one
or more of the following measures: 1) Increase the separation between the equipment and receiver or 2) Connect the equipment into an outlet on a circuit diferent from that to which the
receiver is connected.
Subject to change without notice. Items may not be exactly as illustrated.
Vuzix, the Vuzix logo, View the Future and Wrap are trademarks of Vuzix Corporation registered in the U.S. and other countries.
iPod, iPod touch, iPhone and iPad are trademarks of Apple Inc., registered in the U.S. and other countries.
© 2009 / 2010 Vuzix Corporation. All rights reserved.
Designed by Vuzix in New York.
Made in USA
* P B 0 0 0 0 0 5 6 - A *