1
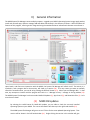
Copyright (c) Vuzix Corporation 2013-2014. All Rights Reserved.
M100 System File Manager Help
Section I) Installation of the M100
Section II) General Information
Section III) Troubleshooting
Section IV) Tools in Use
I)
Installation of the M100
When you first connect your M100 to your PC, drivers need to be installed. If you are running a 32 bit Operating System,
this will happen automatically. However, if you are running a 64 bit system, this process will need to be done manually.
Everything you’ll need to complete the process has been put on your computer by installing this program. Here is the
procedure for installing the drivers:
01) Right click the M100 in Device Manager (it may be in ‘Other Devices’)
02) Select ‘Update Driver Software…’
03) Select ‘Browse my computer for driver software’
04) Select ‘Let me pick from a list of device drivers on my computer’
05) Select ‘All devices’ at the top of the list. Click Next
06) Click on ‘Have Disk…’
07) Click on ‘Browse…’
08) Navigate to C:\Program Files (x86)\Vuzix Corporation\Vuzix M100 System File Manager\USB Driver
09) Double click ‘android_winusb.inf’
10) Click ‘OK’
11) The resulting list will have three items on it. Click ‘Next’
12) You will be shown a warning about the fact that the driver is not digitally signed. Continue with the
installation.
In the event that you have Windows 8.0 or 8.1, there is an additional step that must be followed, in order to disable
Window’s Digital Signature Enforcement. Those are as follows, for each version of the OS:
Windows 8.0
Windows 8.1
01) Swipe from the right hand edge of your screen, or
click the upper right corner, to bring up the sidebar panel
02) Select ‘Settings’
03) Select ‘PC Settings’ at the bottom
04) Select ‘General’ from the list on the left
05) Scroll to the bottom of the resulting settings, find
‘Advanced Startup,’ and click ‘Restart now’
06) When you boot back up to the blue screen, select
‘Troubleshoot’
07) Then, select ‘Advanced Options’
08) Then, select ‘Startup Settings’
09) Then, click ‘Restart’
10) Upon boot, select the 7th bullet, “Disable driver
signature enforcement.” You can do this by pressing the
number 7 on your keyboard.
11) You will now be able to install unsigned drivers, but
Windows will still put up a Security warning requesting
confirmation to install.
01) Swipe from the right hand edge of your screen, or
click the upper right corner, to bring up the sidebar panel
02) Click the ‘Settings’ icon
03) Select ‘Change PC Settings’ at the bottom of the
screen
04) Select ‘Update and Recovery’ from the left hand list
05) Click on ‘Recovery’
06) Click on ‘Restart now’ under ‘Advanced Startup’
07) Click ‘Troubleshoot’
08) Click ‘Advanced Options’
09) Click ‘Startup Settings’
10) Click ‘Restart’
11) Upon boot, select the 7th bullet, “Disable driver
signature enforcement.” You can do this by pressing the
F7 key on your keyboard.
II) General Information
The M100 System File Manager serves multiple purposes – upgrade your M100’s Operating System image, apply patches,
install and uninstall apps, and even manage add and delete files directly in the directory structure. We’ll talk about the
features of this program, referring to this image and using the numbers below to indicate each element as we discuss it.
Upon launch, and after most interaction with the M100, the System File Manager will refresh itself. The activity it is
involved in, and a progress bar for that activity, will show up in section (20). If for any reason you want to manually
refresh the communication, you can do so by pressing the ‘Refresh’ button (13). Unless you see ‘Manager Idle…’ in that
area, any attempts to interact with the program will result in a ‘...Manager is Busy…’ message in the log window (14).
The M100 System File Manager has three modes: M100 OS Updates (1), App Control (2), and Show Misc Files (3). Let’s
cover those in detail.
(1) M100 OS Updates
By selecting the radial button for M100 OS Updates, you are able to check the currently installed
Operating System on your M100. The current installation will show up in the right hand window (12).
The M100 System File Manager will go out to our FTP site for the most updated Operating System. That
version will be shown in the left hand window (11). Single clicking the version in this window will give
you information about the update. If you would like to continue, you can do so by double clicking the
update. A window will pop up with details about the changes the update introduces. It will also warn
that flashing will erase all apps currently installed. Make sure that you have backups for all apps before
running a flash.
During this process, you will see each step explained in the feedback area (20), and a live log being
generated in the log window (14). You can cancel the process at any time by clicking the ‘Abort’ button
(19), but please be aware that if this is done in the middle of an upgrade, your unit may become
unstable.
It is possible to do a flash update using a local .pkg file, as opposed to downloading one from our FTP
site. Those .pkg files would have to be obtained directly from Vuzix, and then saved on your hard drive.
To enable browsing for local files, you must click the Vuzix logo in the upper left hand corner (21), and
activate the Advanced Features. Once done, there will be a ‘Browse’ button for M100 OS Updates (4).
Click that to browse for the local file, and then double click the file to begin the update.
(2) App Control
By selecting the radial button for App Control, you will be shown a list of every app installed on your
M100 in the right hand window (12). Apps that come preinstalled as either part of the Android OS, or as
part of the M100 initial load will be prefaced with ‘System-package.’ Apps that you have installed will be
prefaced with ‘User-package.’
You can uninstall an app by double clicking it in the list. Please note that you can only uninstall ‘Userpackage’ apps. Attempts to uninstall ‘System-package’ apps will fail, due to protections on those files.
In order to install an app, click the ‘Browse’ button (5) to the right of ‘App Control.’ Then, simply browse
to the location of the .apk file on your computer, and double click it to install a single app, or hold Ctrl
and single click multiple apps to install more than one at a time. You’ll be asked to confirm the
installation. If the app has a character in the filename that is not compatible with the Android OS, it will
be converted to a dash (-). Incompatible characters are: < % > ‘ ` | ? : *
(3) Show Misc Files
By selecting the radial button for Show Misc Files, you get access to the directory structure of the M100,
shown in the right window (12). Single clicking a directory will expand it, giving access to the contained
files.
Single clicking a file in the directory structure will select it (In order to select multiple files, hold the
Control Key on your keyboard while clicking each file). Double clicking it will delete a file. There will be a
confirmation dialog to ensure that you do, in fact, want to delete the file. Right clicking a file give you
several options, including the option to delete. This is helpful if you want to delete multiple files. You
can also select ‘Properties’ to get information about the M100’s available storage space.
Select ‘Copy’ to add the file to your clipboard, and select ‘Copy To…’ to navigate to where you would like
to place the copy. After using ‘Copy To…’ to select a directory, ‘Copy’ will automatically copy files there.
If you Copy a directory (e.g. ./mnt/sdcard/Pictures), the entire directory will be copied.
There are two ways to add files to the M100 in this mode. The first is to find the file on your hard drive,
and then drag it onto the directory you would like it moved into. This will open a dialog to verify your
request. The other way is to enable the Advanced Features in the Vuzix logo menu (21), which will make
a ‘Browse’ button appear to the right of Show Misc Files (6). Then, highlight the directory you want to
copy into (e.g. ./mnt/sdcard/Pictures), and then click on the ‘Browse’ button. There will be a
confirmation dialog, and then the file will be copied into the directory you had highlighted. If the file has
a character in the filename that is not compatible with the Android OS, it will be converted to a dash (-).
Incompatible characters are: < % > ‘ ` | ? : *
When in this view, there are some System directories that are still hidden. In order to view these
directories, go into the Vuzix logo menu (21). If you have not already turned on ‘Advanced Features,’
please do so. There will be another menu item now, ‘Show System Directories.’ Selecting that will add
those directories to the view in window (12). Please be aware that those files are hidden for a reason,
and deleting, moving, or otherwise changing them could result in system instability.
It is also possible to right click anywhere in the window (12), and click on ‘Search Directories.’ This will
scan all of the directories, and then open a text document with the entire directory structure. Searching
this document for something you are looking for will allow you to find exactly where it is located in the
directory structure, making it easier to find things that are nested. Another way to find something in the
directory is to type what you are looking for. For example, if you wanted to jump to
the ./mnt/sdcard/Pictures directory, simply make sure the mouse is not in the Viewport (14), and start
typing. As you type, the selection will move automatically. Please note that you must type the ./ in
order to find a directory.
4) Other Features
There are a lot of other features in the M100 System File Manager, which I will cover now, referencing the above image
of the interface:
(7) Check for Updates: This button is used to check online for updates to the System File Manager itself.
Clicking this will compare your version to the version we have on our FTP servers. If the version is the
same, you will have the option to ‘refresh’ your installation. If the version we have is newer, you’ll be
able to update your System File Manager installation.
(8) View Logfile: Clicking this button will launch Notepad, with historical content of the log window (14).
This is an easy way to see a ‘big picture’ of what’s been done, and can be a big help in troubleshooting
problems that scrolled by too fast to see.
(9) Help: This is the Help button. It brings up this document. Hello!
(10) This area is used to communicate information about the version of ADB you have installed, the
Flash image you have currently installed on the M100, the serial number of your M100, and also
whether or not the unit is detected through USB. There is no interaction with this information.
(13) Refresh: Clicking this button will cause the System File Manager to communicate with the M100,
and get updated information, based on the mode you are in. At the same time, the System File
Manager will reconnect with the Vuzix download site, and refresh any content located there.
(15) SnapShot: Clicking this button will take a snapshot of the M100’s display, and show it in the
Viewport (18).
(16) Capture Video: Turning this on will stream the M100’s display to the Viewport, at a rate of
approximately 5 frames per second. Turning it off will leave the last frame streamed in the Viewport.
Any activity that causes the System File Manager to communicate with the M100 (clicking Refresh,
changing modes, etc) will turn off this feature.
(17) Logcat Capture: The logcat is a very powerful log that records every minute detail of the inner
working of the M100. This can be an immensely valuable troubleshooting tool, and there will be times
when Developers will need this information, or you may be asked to provide this by Technical Support, if
there is any problem with your device. Selecting the ‘On’ radial begins capturing data. You can either
turn it off by selecting ‘Off,’ or by taking any action that communicates with the M100 (clicking Refresh,
changing modes, etc). When the logcat capturing stops, the System File Manager will open Notepad
with the logcat in it. You can review the data, or save it to your hard drive in a location of your choosing.
(18) Viewport: When Advanced Features is turned on in the Vuzix Logo menu (21), it is possible to
interact with your M100 using mouse and keyboard in the Viewport. As soon as your mouse enters the
Viewport, this control is enabled. Moving the mouse out of the Viewport automatically disables it.
While the emulation is enabled, keys typed on the keyboard will be sent to the M100. The mouse is
used as follows:
-Action
- Effect
- Android Key Event
- Left Click
- Right Click
- Center Click
- Long hold Left
- Long hold Right
- Long hold Center
- Moves Menu Left
- Moves Menu Right
- Selects
- Goes Home
- Opens Menu
- Goes Back
- D-Pad Right
- D-Pad Left
- ENTER
- HOME
- MENU
- BACK
(21) System Menu: Clicking on the Vuzix logo in the upper left hand corner brings up the System Menu.
There are several things that can be done here. We’ve already discussed some of them, but here is a
complete list of what is available in that menu:
1) Flush Log File – Clears the information that is displayed in the log window (14). It does not
effect a logcat log, but it will wipe the contents of the log displayed by clicking ‘View Logfile’ (8).
2) Advanced Features – Checking this option adds ‘Browse’ buttons (4 and 6) next to the M100
OS Updates (1) and Show Misc Files (3) modes. It also activates the ‘Show System Directories’
option in the System Menu.
3) Continuous Capture – When Continuous Capture is checked, the Capture Video mode (16) will
have higher frame rates, but it will be more resource intensive.
4) Show System Directories – Checking this option adds system directories to the list displayed in
window (12) when you are in Show Misc Files (3) mode. These are hidden by default.
5) Show System APKs – when this selected, all installed APKs will be visible in ‘App Control’ (2)
mode. Clearing the checkmark will hide system APKs, and make for a less cluttered view in
window (12).
(22) Close App: This button will force any app that is running on your M100 to close. This is helpful if an
app were to stop responding.
III) Troubleshooting
The M100 System File Manager works by communicating with our FTP servers, and then acting as a pipeline between
our servers, and your M100. Like any tool that works in this way, there are potential problems with connectivity that
might arise. Here are some common errors, and steps that can be taken to clear the issue up (all possible solutions are
valid for any of the errors):
Errors:
1)
2)
3)
4)
12004 ERROR_INTERNET_INTERNAL_ERROR: An internal error has occurred.
12002 ERROR_INTERNET_TIMEOUT: The request has timed out.
12031 ERROR_INTERNET_CONNECTION_RESET: The connection with the server has been reset.
12029 ERROR_INTERNET_CONNOT_CONNECT: The attempt to connect to the server failed.
Possible Solutions:
1) UAC (User Account Control) can block the System File Manager’s communication. Please check the UAC
settings to ensure the M100 System File Manager is cleared to execute and access the internet/network.
2) Firewalls can block the System File Manager from communicating. Please make sure that an exception
has been made so that the System File Manager can connect with our FTP servers.
3) Temporarily disable your firewall, to determine if it is blocking traffic.
Beyond issues that can come up because of difficulties communicating with the internet, there are other problems that
are due to incorrect configuration of the M100 in Windows. Many connection related, or ADB communication related,
issues will result in a pop-up that will give some information regarding the problem, and possible solutions. Here are
some other issues you may run into, and their solution:
1) The System File Manager reports in area (10) that the M100 USB Device is found, but in the log window
(14), there is a message stating ‘…M100 Device not found…’
a. This is caused by our Vendor ID (0x1BAE) not being found in the adb_usb.ini file. You can find
this file in the /Users/[username]/.android folder. The Vendor ID must be on its own line, and
immediately followed by a carriage return. If there is ‘dead space’ in that file (spaces, enters on
blank lines, etc), the System File Manager won’t be able to use the Android Debugging Bridge to
communicate with the M100.
2) The M100 is showing up in Device Manager as a Portable Device, and none of the steps in Section I)
work – there’s an error message saying that there are no compatible drivers in the android_winusb.inf
file.
a. There are two reasons this could happen. One is the Vendor ID, which is covered just above.
The other reason is because USB Debugging has been turned off in the M100. To turn USB
Debugging on, go into the Settings menu in the M100, scroll to the bottom and select
‘Developer Options.’ Place a check in the box for USB Debugging using a short press on the Back
button, use a short press on the Volume Up button to highlight ‘OK,’ and use a short press on
Back to select it.
IV) Tools in Use
The M100 uses several development tools to achieve what it does. These are:
1) ADB command tool for Android supervisor commands
2) FastBoot command tool for Android flash processes.
3) Aapt command tool for Android package details.