1
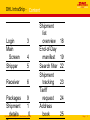
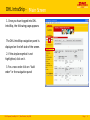
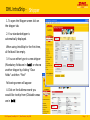
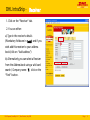
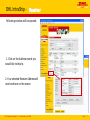
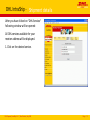
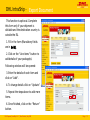
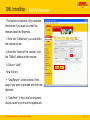
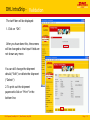
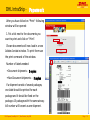
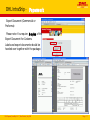
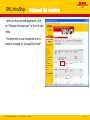
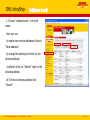
Customer Integration Management DHL IntraShip User Guide TD DHL IntraShip - Content Login Main Screen Shipper 3 Receiver 6 Packages Shipment details 9 1 0 4 5 DHL Express | IntraShip 4.4.1 | Time Definite | July 2008 Shipment list overview End-of-Day manifest Search filter Shipment tracking Tariff request Address book 18 19 22 23 24 25 Page 2 DHL IntraShip - Login 1. Open your web browser and navigate to www.intrashipeu.dhl.com 2. Type in your Username and Password and choose your language (English). 3. Click on the “Login” button DHL Express | IntraShip 4.4.1 | Time Definite | July 2008 Page 3 DHL IntraShip - Main Screen 1. Once you have logged into DHL IntraShip, the following page appears: The DHL IntraShip navigation panel is displayed on the left-side of the screen. 2. If the airplane symbol is not highlighted, click on it. 3. For a new order click on “Add order” in the navigation panel DHL Express | IntraShip 4.4.1 | Time Definite | July 2008 Page 4 DHL IntraShip - Shipper 1. To open the Shipper screen click on the shipper tab. 2. Your standard shipper is automatically displayed. When using IntraShip for the first time, all fields will be empty. 3. You can either type in a new shipper (Mandatory fields are in bold ) or choose another shipper by clicking “Clear fields” and then “Find” Following screen will appear: 4. Click on the Address record you would like to ship from (Clickable areas are in bold ) DHL Express | IntraShip 4.4.1 | Time Definite | July 2008 Page 5 DHL IntraShip - Receiver 1. Click on the “Receiver” tab. 2. You can either: a) Type in the receiver’s details (Mandatory fields are in bold ) and if you wish add this receiver to your address book (click on “Add address”) b) Alternatively you can select a Receiver from the Address book using a wild card search ( Company name: T), click on the “Find” button. DHL Express | IntraShip 4.4.1 | Time Definite | July 2008 Page 6 DHL IntraShip - Receiver Following window will be opened: 1. Click on the Address record you would like to ship to. 2. Your selected Receiver Address will now be shown on the screen. DHL Express | IntraShip 4.4.1 | Time Definite | July 2008 Page 7 DHL IntraShip - Receiver If you don’t know which ZIP or city name is correct: 1. Choose the country first (e.g. Japan) . 2. Enter the known information (e.g. City: Tokyo) . 3. Click on “Find postcode & city”. 4. Another screen will be opened: 5. Click on the correct ZIP/City combination. DHL Express | IntraShip 4.4.1 | Time Definite | July 2008 Page 8 DHL IntraShip - Packages 1. Click on the “Packages” tab 2. Type in the weight and dimensions of your package and click “Add package” 3. Repeat the step above for multiple packages going to the same address. DHL Express | IntraShip 4.4.1 | Time Definite | July 2008 Page 9 DHL IntraShip - Shipment details 1. Click on the “Shipment details” tab 2. Choose your “Shipment type” (Document for non-dutiable or -Document for dutiable shipments) Non 3. If you don’t know whether the shipment is dutiable, click on “Help me decide” (continue on page 11) 4. If the shipment is dutiable enter a “declared value” for the shipment. 5. Enter the “description of content” (always in English). 6. You can choose DHL service for your destination here (continue on page 12) DHL Express | IntraShip 4.4.1 | Time Definite | July 2008 Page 10 DHL IntraShip - Shipment details After you have clicked on “Help me decide” following window will be opened: 1. Click on appropriate description. DHL Express | IntraShip 4.4.1 | Time Definite | July 2008 Page 11 DHL IntraShip - Shipment details After you have clicked on “DHL Services” following window will be opened: All DHL services available for your receiver address will be displayed. 1. Click on the desired service. DHL Express | IntraShip 4.4.1 | Time Definite | July 2008 Page 12 DHL IntraShip - Export Document This function is optional. Complete this form only if your shipment is dutiable and the destination country is outside the EU. 1. Fill in the form (Mandatory fields are in bold). 2. Click on the “Line items” button to add details of your package(s). Following window will be opened: 3. Enter the details of each item and click on “Add”. 4. To change details click on “Update”. 5. Repeat the steps above to add more items. 6. Once finished, click on the “Return” button. DHL Express | IntraShip 4.4.1 | Time Definite | July 2008 Page 13 DHL IntraShip - Notify Receiver This function is optional. Only complete this section if you want to e-mail the receiver about the Shipment. 1.Enter the “E-Mail text” you would like the receiver to see. 2.Enter the “Name of the receiver” and the “E-Mail” address of the receiver. 3.Click on “Add”. Now click on: • “Save/Return” at the bottom of the page if you want to proceed with the next shipment. • “Save/Print” if this is the last shipment and you want to print out the paperwork. DHL Express | IntraShip 4.4.1 | Time Definite | July 2008 Page 14 DHL IntraShip - Validation The tariff der will be displayed: 1. Click on “OK”. After you have done this, the screens will be changed so that input fields are not shown any more. You can still change the shipment details (“Edit”) or delete the shipment (“Delete”) 2. To print out the shipment paperwork click on “Print” in the bottom line. DHL Express | IntraShip 4.4.1 | Time Definite | July 2008 Page 15 DHL IntraShip - Paperwork After you have clicked on “Print” following window will be opened: 1. Put a tick next to the documents you want to print and click on “Print”. Chosen documents will now load in a new Adobe Acrobat window. To print them use the print command of the window. Number of labels needed: • Document shipments - 2 copies • Non-Document shipments – 3 copies If a shipment consist of several packages, one label should be printed for each package and it should be fixed on the package. All packages with the same airwaybill number will be sent as one shipment. DHL Express | IntraShip 4.4.1 | Time Definite | July 2008 Page 16 DHL IntraShip - Paperwork Export Document (Commercial or Proforma): Please note: You require 5 copies of the Export Document for Customs. Labels and export documents should be handed over together with the package. DHL Express | IntraShip 4.4.1 | Time Definite | July 2008 Page 17 DHL IntraShip - Shipment list overview After you have printed paperwork, click on “Shipment list overview” in the left-side menu. The shipment is now completed and its status is changed to “Airwaybill printed”. DHL Express | IntraShip 4.4.1 | Time Definite | July 2008 Page 18 DHL IntraShip - End-of-Day manifest After completing the last shipment of the day you are required to run the End of Day manifest. 1 .Click on the “End of Day Manifesting” button on the main navigation menu. You can create an End-of-Day manifest and transmit data or re-create it manually. • Creation EOD-Manifest + Data Transmission – continue on the next page • Create Manual EOD-Manifest – continue on page 21 DHL Express | IntraShip 4.4.1 | Time Definite | July 2008 Page 19 DHL IntraShip - End-of-Day manifest After you have clicked “Creation EOD– Manifest + Data Transmission”, the shipment list will include all shipments with the status “Airwaybill printed”. 1. You can select/deselect certain shipments by ticking them. 2. Click “Create end-of-day manifest”. 3. The manifest report will open in a new Adobe Acrobat window. 4. Print the manifest report via the print button. Print 2 copies of the document. The DHL courier will sign both of them. • One copy you can keep for your evidence. • The other copy the courier will take along. DHL Express | IntraShip 4.4.1 | Time Definite | July 2008 Page 20 DHL IntraShip - End-of-Day manifest If you wish to reprint your end of day report click on the “End of Day Manifesting” button on the main navigation menu and then on “Creation EOD Report”. 1. Select the date range you would like to see your Manifest report for. 2. Select your origin code. 3.Click “Load”. 4. Click “Create end-of-day manifest”. 5. The manifest report will open in a new Adobe Acrobat window. 6. Print the manifest report via the print button at the top of the screen. DHL Express | IntraShip 4.4.1 | Time Definite | July 2008 Page 21 DHL IntraShip - Search filter You can search for shipments you created that satisfy certain criteria. 1. Click on the “Search filter” button on the main navigation menu at the left of the screen. 2. Enter your search criteria and click on “Load”. Following window will be opened: 3. Click on a shipment to see its details or tick it to track the shipment (next page). DHL Express | IntraShip 4.4.1 | Time Definite | July 2008 Page 22 DHL IntraShip - Shipment tracking You can either: 1. Click on “Global Track & Trace ” on the main navigation menu at the left of the screen. 2. Enter shipment No. and click “Global Track & Trace“ right in the window. Or, you can find a shipment No. by using the search filter (previous page), tick this shipment and click “Global Track & Trace“ there. The status of your shipment will be shown in a separate window: DHL Express | IntraShip 4.4.1 | Time Definite | July 2008 Page 23 DHL IntraShip - Tariff request 1. Choose "Tariff request" in the left menu. Following screen will be opened: 2. Receiver's country, shipment type and service type should be entered. 3. Click on "Tariff request". 4. You can also choose "Tariff table" instead of "Tariff request“ to see the complete list. DHL Express | IntraShip 4.4.1 | Time Definite | July 2008 Page 24 DHL IntraShip - Address book 1. Choose "Address book" in the left menu. Here you can: a) create new receiver addresses (button "New address") b) change the existing one (click on the desired address) c) delete it (click on "Delete" right to the desired address) d) To find an existing address click "Search". DHL Express | IntraShip 4.4.1 | Time Definite | July 2008 Page 25