1
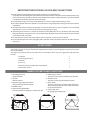
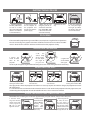
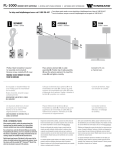
LE PLANÉTARIUM HAUTE DÉFINITION QUI PROJET TERA LE CIEL ÉTOILÉ SUR LE PLAFOND DE VOTRE MAISON. IL PLANETARIO AD ALTA DEFINIZIONE CHE PROIET TA IL CIELO STELLATO SUL SOFFIT TO DI CASA TUA. EL PLANETARIO DE ALTA DEFINICIÓN QUE PROYEC TA EL CIELO ESTRELLADO EN EL TECHO DE TU CASA. THE HIGH DEFINITION PLANETARIUM THAT PROJEC TS THE STARRY SKY ONTO THE CEILING OF YOUR HOME. MODE D’EMPLOI MANUALE DI ISTRUZIONI Pour apprécier pleinement ce produit, nous vous conseillons de lire attentivement ce manuel et de le conserver afin de vous y reporter lorsque vous en aurez besoin. Per apprezzare pienamente le potenzialità di questo prodotto, vi consigliamo di leggere attentamente il manuale di istruzioni e di conservarlo per utilizzi futuri. MANUAL DE INSTRUCCIONES INSTRUCTION MANUAL Para apreciar plenamente la potencialidad de este producto, le aconsejamos que lea atentamente este manual y que lo conserve para futuras consultas. To fully appreciate this product’s potential, we advise you to read this manual carefully and keep it for future reference. Importateur - Importatore - Importador - Importer © Selegiochi s.r.l. via Leonardo da Vinci, 19 20080 Casarile (MI) ITALY INTRODUCTION This apparatus projects an image of the stars as they really are and gives you the pleasure of observing the night sky in your own home. It has been developed with the collaboration of Takayki Ohira, who has created projectors for the world’s most advanced planetariums, including Megastar II and Cosmos, which can project 5 million stars and which has earned it a place in the Guinness Book of Records. Nowadays, the excessive use of neon lights and street lights in urban areas makes stars practically invisible. So-called “light pollution” makes it increasingly difficult to find places to observe the stars. STAR THEATRE was conceived to enable everyone to marvel at the great beauty of the night sky, in their own homes. The heavenly bodies are not exactly the same ones you can see in a real planetarium, but we are sure that our projector will encourage you to visit other planetariums and find out more about the wonders of the sky. CONTENTS • Safety precautions 19 • Accessories 21 • Names of parts and functions 21 • Instructions for use 22 • Focusing 22 •Adjusting the angle 22 • Inserting the disc 22 • Using the Shooting Stars function 22 • Using the Rotation function 23 • Timer function 23 • Problem solving 23 • Technical specifications 24 SAFETY PRECAUTIONS Read the instruction manual carefully before using: it contains important information and instructions which should be followed to ensure user safety and prevent damage to people and property. When you have finished reading it, we suggest you keep the manual for future reference. STAR THEATRE is a safe product, however, as with any electrical equipment, if it is used inappropriately it can cause fires or electric shocks. You are advised to read these guidelines carefully for your own safety and that of others and in order to fully enjoy the functions of this product. Follow these safety tips. Read the instruction manual before using. Do not use the product if it is damaged. If the functions have been changed or the product has been damaged in any way, contact the point of sale where the product was purchased. If smoke or strange noises issue from the product, or if it shows any other abnormal behaviour, do not try to repair it yourself. Turn the product off and contact the point of sale where the product was purchased. The instruction manual contains various symbols: we suggest you learn their meaning before reading the manual. SERIOUS DANGER Failure to heed this warning may result in a fatal electric shock or serious fire. DANGER Failure to heed this warning may result in an electric shock or serious damage may be caused to people and property. Forbidden Dry hands only Meaning of the symbols Do not submerge in water Do not dismantle Do not touch Meaning of the symbols Warning SERIOUS DANGER Keep out of the reach of children. re or damage do not under any circumstances dismantle or repair STAR THEATRE or its corresponding adaptor. ammable objects in the STAR THEATRE projector and do not drop the product. Special caution must be taken when young children are present. If the power supply cable is damaged (if the connection is broken or uneven), stop using the product immediately re. re. re. re do not exceed the recommended voltage. re use only the adaptor provided. re. re do not connect the product directly to a main outlet. res. re in the event of the cable covering melting, do not leave the electric cable near a heat source. re: • Do not leave the product inside a car with the windows shut, in direct sunlight or in other particularly hot places. • Do not store the product at temperatures below 10ºC. • ers or in the vicinity of steam or smoke. • Do not store in damp or dusty places. • Do not store the product in places where it may fall, or on unstable surfaces. re if smoke, strange smells or sounds are detected. Turn the immediately and remove the adaptor from the product and from the power supply. I immediately and re. from immediately and remove the adaptor from the re. If the product is going to be out of use for a prolonged period of time, remove the adaptor from the product and from the power supply. re do not touch the projector or the adaptor with wet hands. re do not use the product in the bathroom. re do not let the projector get wet, or place it or the adaptor in water. re do not touch the adaptor or the electric cable during a thunderstorm. DANGER To avoid the risk of the projector falling and being damaged, make sure it is standing on a stable surface. To avoid eye injuries do not look into the lenses and do not point the projector at another person’s face while it is turned on. While in use, STAR THEATRE may become quite hot. Prolonged contact with the product may cause slight burns. If the product becomes very hot, stop using it. To avoid possible damage, do not leave glasses or other water containers or cosmetics and other chemical substances near the projector. To avoid damaging the projector do not drop, knock or handle it roughly. To prevent accidents do not try to move the planetarium or remove the disc in a dark room. Before making changes, ensure the room is well lit. If you move the projector from a cold room to a warm one, the sudden change in temperature could cause the until the condensation has completely evaporated. If you are not planning to use the projector for a prolonged period of time, remember to remove the disc in order not to damage the product. IMPORTANT INDICATIONS ON USE AND SUGGESTIONS + To fully appreciate the projected images, make sure the room is completely dark. It may take a few minutes for your eyes to become used to the darkness. Look at the centre of the projected image and wait for your eyes to refocus: the first images projected may appear a little blurred, but as your eyes become accustomed to the darkness you will see the stars clearly. + The projected images can be seen most effectively on a white or light coloured ceiling or walls. + The ideal projection distance is between 2 and 2.30 metres. Images projected at much greater distances will be out of focus. + To protect eyes from the light, if the projector is turned on when there is no disc inserted it will turn itself off automatically. In this case, insert the disc and turn the projector on again. + Depending on how the disc is inserted, the visible part of the Milky Way will vary. To observe the centre of the Milky Way without removing the disc, activate the Rotation function to start the sky movement. This function can be deactivated at any time. + The shooting stars shower will always appear at the same point, at varying intervals of time. + To clean the projector or the disc, wipe gently with a soft cloth. Do not use solvents, petrol or any other chemical substances. ACCESSORIES If you find any parts missing or damaged on opening the box, do not use the product and contact the point of sale immediately. The appearance of some of the parts shown in this instruction manual may vary slightly from those found in the box. 1. Projector 1 2. Interchangeable discs 2 3. Adaptor 1 4. Lens cap 1 5. Brief illustrated text about the constellations 1 6. Instruction manual 1 NAMES OF PARTS AND FUNCTIONS 1. Focusing plastic ring. Adjusts the focus. 2. Disc box. Contains the disc. 3. Projector angle adjustment button. Changes the angle of the projector. 4. ON/OFF switch. 5. Projector pilot light ON/OFF. Indicates whether the projector is turned on or off. 6. Shooting Stars switch. Activates / deactivates the Shooting Stars function. 7. Rotation switch. Activates / deactivates the Rotation function. 8. Timer switch. Activates / deactivates the Timer. When the timer is deactivated the projector will turn itself off automatically after three hours. 9. Electric plug holes. For plugging the adaptor into. INSTRUCTIONS FOR USE 1. Place the projector on a flat, stable surface such as a table. (The ideal projection distance is between 2 and 2.30 metres.) 2. Connect one end of the adaptor to the projector and the other end to the power supply. 3. Open the disc box using the pull tab, insert the disc so that the logo SEGA TOYS 2005 is not reversed and close the box manually. 4. Remove the lens cap. 5. Turn the projector on. The pilot light will light up. When the room is dark, the stars will be visible. FOCUSING If the centre of the projected image is out of focus, turn the plastic ring of the focus adjustment. The stars on the edge may appear to be more out of focus than those at the centre. This difference is due to the lens structure and does not indicate that the projector is faulty. ADJUSTING THE ANGLE 1. Loosen the screws on both sides of the projector. 2. Lift the central body of the projector and adjust the angle of projection. 3. Tighten the screws on both sides again. Do not try to change the angle without loosening the screws and do not tighten them excessively. INSERTING THE DISC 1. Turn the projector off by turning the switch to OFF. 2. Open the box and remove the disc. 3. Insert the new disc and close the box. 4. Turn the projector on by turning the switch to ON. Changing the disc when the projector is turned on can cause eye injuries. To avoid this danger, the projector turns itself off automatically. It is advisable to insert and remove the disc when the room is lit and not when the projector is the only light source, one reason being that the projector must be turned off each time a disc is inserted or removed. USING THE SHOOTING STARS FUNCTION Remember that a shooting star will be seen approximately every 30 seconds, always in the same place. 1. Turn the Shooting Stars function switch on the front of the projector to ON. The SS pilot light will come on. 5. Then press the Rotation function button to ON (the Shooting Stars function only activates when the Rotation function is on). 3. As the image of the sky turns, the shooting stars appear. If you turn the Shooting Stars function button to OFF, the function will be deactivated and the pilot light will turn off. USING THE ROTATION FUNCTION xed. Northern Hemisphere Southern Hemisphere 1. Press the Rotation function switch to ON. 2. Press the button once for the images to turn anticlockwise (showing the movement of the heavens in the Northern hemisphere) and press a second time for them to turn clockwise (showing the movement of the heavens in the Southern hemisphere). When the anticlockwise movement is selected, the N pilot light will come on, and if the clockwise movement is selected, the S pilot light will come on. 3. Press the button once to deactivate the Rotation function and the stars will stop. When the function is deactivated, both pilot . TIMER FUNCTION 1. Press the button on the front of the projector to activate the timer. 2. Press the button once to set the timer for 15 minutes, twice to set it for 30 minutes and three times to set it for about 60 minutes. At the end of the period of time selected, the projector will automatically. Press the button again to deactivate the timer function. 3. automatically after about three hours. At the end of the selected time period, or after three hours if the timer is not set, the projector will automatically. The projector must be turned on again to restart the projection. PROBLEM SOLVING Q The stars are not clearly visible. Ensure the centre of the projection image is in focus. A -- Wait a while for your eyes to become used to the dark. - Make sure there is no light in the room, or on the ceiling, walls or the place where the images are projected. - Ensure there are no objects blocking the projection. - Make sure the projection distance is not too great. Q The Milky Way is not projected completely and is out of focus A - The visible sections of the Milky Way vary according to how the disc is inserted. If you can only see the outer edge of the Milky Way and you want to observe the centre, activate the Rotation function and wait for the section you want to observe to come into view. Then deactivate the Rotation function to block the rotation of the images. Q A unexpectedly. automatically to prevent eye injuries. Insert the disc and restart the projector. - automatically and must be turned on again. automatically after about three hours and must be turned on again. Q The projector is not working. Make sure the adaptor is connected correctly. A -- Ensure the disc is inserted. Q The shooting stars do not appear. Make sure the Shooting Stars function switch is ON. A -- Activate the Rotation function. 23 Q The stars do not rotate. the Rotation function. A -- Activate Make sure the disc and / or the disc box are in the correct position.