1
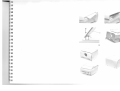
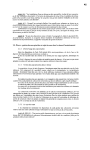
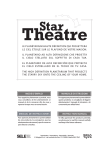
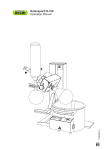
'~ Ope rating instructions
~ Mode d'emploi
~ Ma nual de instrucci ones
Index
Importan t sa feguards.
Legend .....................
.
Packaging co ntent .
.
Main parts of the projector ..
Preparing the projectio n....... ..
Use and operation of the proje ctor..
Ope rating instruction s
.
Focu sing
Replacem ent of a burnt-out lam p
Prot ection from ove rheating
Aft er cooling
Replacem ent of a blown fus e
Clea ning of projector....
Technical dat a
.
.
2
3
3
. 3
. 3
....4
4
.4
.4
.
5
5
5
5
5
Table des rnatieres
Mises en garde impo rtantes
l.eqende
.
Con tenu de I'emballage
Description de l'apparei l.,
Installation du projec teur
,
Utilisation du projecteur
Precautions d'u tillsation
Reglag e de I'imag e
Remplacement d'une lampe de projection
Extinction automat ique en cas de
risque de surchauffe
Ref roidissem ent.... ....... ...
Remplacement du fusibl e de s urete.,
Netl oyage du projecteur
Spe cifi cations techn iqu es
6
7
7
". 7
7
.. .8
..8
8
8
9
....9
....9
9
9
Indice
Importantes medidas de prevenc ion
Leyend a
,
Contenido del embalaje
..
Descrip cion de las partes principales
Preparatives para usar el proyec tor
Uso del proye ctor
Adv ertencias durant e el uso.. .....
..
Ajus te de 1a nitidez de la imagen
Carnbio de lamparas Iundidas
Prot eccion con tra el
so brecalentamiento
." ,." " " " ",
.
Enfriami ento prolonqa do ..
..
Cam bio de l fusible
.
Lirn pieza del proy ec tor
.
"'"
Datos tecnicos ..
' " "" "
10
11
11
11
11
12
12
12
12
13
13
13
13
13
IM PORTANT SAFE GUARDS
11. The use of an accessory
attach me nt no t recomm ended by the
manu factu rer may ca use a risk of fire,
elec tric shock. or injury to pe rsons.
Wh en using you r equipme nt. basic sa fety
preca utions sho uld always be followed.
including the following :
1.
Read
an d
un d ers ta n d
al l
i nstruc tions
b ef or e
u si ng.
Pay
p ar ti cul ar atte n tion to ar eas wh ere
thi s s ym b ol 0 is sh ow n.
2. Close supervi sion is necessary when
any applianco is used by or n ear
chi ldren . Do not leave app liance
unatt ended while in use.
o
o
o
o
o
a
14 . This unit is equipped with optical
lenses and should not be expose d to
direct sunlight.
16. This unit is conn ected by a special
ca ble Ihat. if il is damaged. has to be
rep laced by the same typ e of cable.
This cable ca n be ordered from your
local dealer and has to be installed by a
pro fessional.
SAVE THESE INSTRUCTIONS
Th e information contained in this man ual will
help you operate and mai ntain your
overhead proje ctor.
7. Always unp lug appliance fro m
electrical outlet be fore opening the
cover tor cleaning.
se rvicin g. lam p
changing and when not in use. Never
yenk co rd to pull plug from outlet. Grasp
plug and pull to disconnec t.
8. Let appliance cool com pletely before
pu tting away or when replacing lam p.
9. To red uce the risk of electric shock.
do not imm erse Ihis appliance in water
or other liquids.
10 . To reduce the risk o f electric shock.
do not disassemble this app liance. but
take it to a qualili ed tech nician wh en
se rvice or repair work is requ ired.
Incorrect reassembling can ca use
electric shoc k when IhA appliance is
used subsequently.
2
to
15. Ke ep ventilation openings free of
any obs tructions .
5. Posil ion til e cord so that it will not be
tripped over. pulled . or contact hot
surfac es.
6. If any extensi on cord is nec essary. a
cord with a cu rrent rating at least equa l
10 tha t of the appliance should be used .
Co rds rated for less amperage than the
appliance may overhe at.
app liance
13. Disconnect this unit from its so urce
of supply before replacing the projec tion
lam p.
3. Care mu st he taken as burns ca n
occu r from touching hot parts.
4. Do not op erate app lian ce wi th a
da maged cord or if the app liance has
been oroppeo or damaged - until it has
been
exam ined
by
a
qualified
se rviceman.
o
12. Con nect this
gro und ed outlet.
(~
Legend
1.
2.
3.
4.
5.
6.
7.
Objective lens
Focus knob
Cover
Doorscrew (3x)
Levelling-adjustm ent foot
Control panel
Override switch
8. Override warning light
9. Indication lights of burnt-out larnp
10. Tilt and sharpness correction
11. Main fuse
12. On/off switch
13. Air-intake opening (at the bo ttom)
14. Air-outlet opening
15. Projection glass
16. Blackout cloth/dust cove r (option)
lil dicil tion light s of burnt-out lam p s (9):
The projector is equipped with four
indication lights to show the co ndition of
the fou r projection lamps.
The auxiliary lamp does not hav e any
incJ ication to show its condition.
Ov er ride sw itch (7):
The override swi tch enables the user to
switch on ihe projection lamps after the
11"110'1:11 of the cover . The built-in SWi tch
can be opera ted by means of a coin.
Warning : As soon as the override switch
is turned on, the projection lamps are on.
Thus the cove r loses its disconnecting
function of the projection lamps.
As soon as the override swi tch is on the
control light turn s on and remains so for
the entire duration that the ove rride
switch is on.
Pac kaging c o ntent
- Projector
- User's Manual
- Blackout cloth/dust cov er (option)
- Floppy-disk 3.5" (in the User's Manu al)
Bl ackout cloth/du st c over:
used to cover the proj ecting area wil en
projecting thicke r objects or when the
cov er has bee n removed .
Preparing the projection
Main part s of th e proj ector
Objec tiv e le ns (1):
The objective lens enable s the user to
project an imag e onto the projection
screen.
Focus knob (2):
used to focus the picture for various
distances between the projector and the
projection screen.
Tilt and sharp ness correc t ion (10):
used to sharpen out of focus image s that
appear with an oblique projectio n on to
1I1e projection area.
Cover (3)
used to cover till ' orojecting area.
Pu t Ihe projec tor on an even and stable
surtace to obtain an optimal proje cton of
your pictu re.
o
Make sure the air-intake opening (13)
and the air-outlet opening (14) remain
unobstructed at all times!
121
Warning: Never touch til e obj ective lens
with bare hands.
121 Make sure the wall-socket is groun ded
correctly.
o
Atte ntion: Check if tile mains voltage
corresponds with the one requi red (ef.
label with the technical data).
Plug in til e projector.
Level lin g-adju stment foo t (5):
used to adjus t the projector to the
required projection angle.
On/o ff switch (12):
to switch the projec tor on and off.
3
can be lurned upside down instead of
having 10 use the special co ver.
Us e and opera ti on of th e p ro j ec to r
The projector is a device used to show
opa que objects. separate pieces o f pap er as
well as books. ma ps and thick threedimensional objects
W e recomme nd
projection.
reduc ing Ihe ligllt be fore
The pro jecto r can b e use d in di fferent
w ays:
Lifting the cove r. the projection lam ps go
out and the less bright auxiliar y lamp
lights up, allowi ng til e projec ting area to
remain visible in the dark ened room .
The cover of the projector ca n be also
removed.
Consequently
thick
3-D
objec ts put on the projection glass can
be projec ted.
The co ver of the projec tor ca n als o be
remov ed when larger surfac es. such as
map s are projecl ed.
Exampl es of pro je ct io n:
From a piece of paper to a 3-cm -boo k:
Pictur e A
Lift the cover of the projector and place
til e object to be projected on the
project ion glass. Close the cover and
switch on the projector if switched-o ff.
Check the sharpnes.
3-D objec t:
Picture B
Switc ll off the projector. Rem ove the
cover. Place the objec t on the projecti on
glass and cov er it with the blackou t cloth/
dust cover provided . Operate the
override switch by m eans o f a coin and
switch on the projector. Ch eck the
sharpnes.
To replace the objec t with ano ther one
switch off Ihe projector or rotate the
override switch .
Map o r piece of paper of larger form at:
Picture C
Procede as in the case of projectin g a
3-D objec t. However we recom mend to
use a special cover instead o f the
provid ed co ver. Til e special cover can
be purchased from your dealer.
Tip: if the describ ed way of projecti on is
not used frequently. the origina l cove r
4
Operation instructions
Th e projection glass heats up qui te in tensily
when in use! W e recommend not to touch it
during the projection phase.
The projected objects are heated to the
sam e extent. Conse quently we rl .corn rn end
not to touch project objec ts sensitive to
temperatures in exce ss of BOoC .
Pap er objects ca n buckle during a longer
pro jecting tim e as a co nsequence o f th e loss
of moisture.
Focusing
Adjusl the picture at the bottom edge by
means o f the focus knob (2). Then turn the
Tilt and sharp ness correction knob (10) to
sharpen the picture at the lop edge. At the
end opera te the toeus knob (2) ;H']ain to
co rrect the sha rpness of Ihe pictu re as a
whole.
Repl ac em ent of a burnt-out lamp
WAR NING : The interior of the projecto r is
very hot! Before the replacem ent of a lamp
til e projector must be left to cool down!
Check on the co ntrol panel which lamp has
burnt oul. Switch o ff the projector and unp lug
it [rom the mains . Wil en the proje ctor has
co oled down rem ove the door by unsc rewing
1I1e two side sc rews as well as the metalscrew (under the objective lens ). Unscr ew
the screws (4) usin g a coin. Remove the
door by pulling in the direction of the
projected picture. There is a diagram near
the lam ps to indicat e til e location o f eac h o f
the lamps. Now replace the burnt -out lamp .
To assist replacem ent there is a handle on
the neck of the lamp.
Replace the door and fasten the screws. Til e
projector is now ready for use again .
Repl acem ent o f t he au xi li ary lam p
Til e auxiliary lamp should be replaced I)y a
specialist only.
(~
Protect ion from ove rheating
Tech nical Data
W hen the equipm ent ove rhe ats til e lamps
tum off autom atically. Check if the air-inta k e
opening (13) and the air-outle t ope ning (14)
are not o bstruc ted'
Aft er the devic e has coo led down the lam ps
turn on au toma tic ally.
Wo rking area :
28 5x 285 mm
After cooling
Fo llowing pro long ed use til e cool ing s ystem
can continue to op era te al ter the p rojecto r
has been switche d o ff. Ti l e ther m ostat ic
contr olled fans will sto p 10 operat e after
some time.
3 -len s-obj ective :
2.8 / f=3 50m m
Halog en reflector lam ps:
ENX 82V 1 360 W (4x )
Aux ilia ry lam p:
15W 1 230V. socke t E14. m alt
O max 27 mm . L "',1 ' 58 mrn ,
(i. e.: Os ram T 26/57 FR15)
Enlargeme nt:
3.5x to 9.5x
Proj ecti on d istance :
1 5 m - 3.5 m
Replac em ent of a blown fuse
W hen the d ev ic e is co nnect ed to Ihe ma ins
and switched on and neither the vent ila to r.
nor any o f Ihe la mps co me on then the fuse
has blown.
WA RNING : Befo re the rep lac emen t of the
fuse yo u m ust disconnect the plug from the
wall-so cket'
Turn the fuse holde r for a qua rter o f a turn
and pull ou t the blown fuse to gether with its
hold er. Replace til e fus e with a ne w one of
the sa me ratin g (16A 250V slow) .
Sho uld it ha ppen that the just replac ed fuse
blows aga in after the d ev ic e has bee n
switc hed 0 11, tak e tile proj ecto r 10 be
serviced.
Projec ted im age wid th :
1.0 m - 2.7 m
Ma ins volla ge :
120V 1 50 -60 Hz
Powe r co ns ump tion :
1500W
Dim ensi ons of Ihe projector:
590 x480 x330 mm
18.5 kg
Cleaning of the projector
W ARi'JlNG : Be fore cl eaning disconn ec t th e
plug from the wall -socket!
Fo r cleaning use distilla ted wa ter o r a mil d
detergent so lution . Use a cl ea n and so f
cloth that will no t lea ve any sc ratches. Clea n
the projection glass ( 15) and the ob je ct iv e
lens (1) in til e same way .
(~
5