1
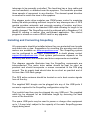
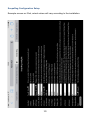
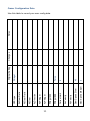
Alt-Az 'GoTo' Telescope drive and tracking system
User Manual
Important Information
User Manual Version 1.2
Copyright © 2105, ScopeDrives, All rights reserved
No part of this manual may be reproduced or transmitted in any form for any purpose other
than for the purchaser’s personal use, without the express written permission of
ScopeDrives.
ScopeDrives reserves the right to make changes to and improvements to its products
without notice.
Safety
ScopeDog is primarily designed to be powered from batteries. Any restrictions imposed by
the chosen battery supplier must be observed. This is particularly true for high capacity
Lithium types.
A suitable adapter may be used to power the system from ac mains, however due regard
must be made to electrical safety in the presence of rain, dew or split liquids.
The drive motors can deliver very high torques and care should be exercised to ensure
clothing or persons do not get caught in the drive mechanisms.
Product Care
Do not drop or otherwise treat any ScopeDog components harshly. Do not leave exposed to
the effects of direct solar heating. All components have some limited protection against dew
but none are sealed and should be protected from any excess moisture.
Warranty
ScopeDog is covered by a 12 month limited warranty. Please refer to the enclosed warranty
certificate for full details.
Technical Support
You can find the latest version of the manual and firmware in the support
section of www.scopedrives.com.
Certifications
The RF transmitting components (Nexus & Wifi dongle), Raspberry PI & USB hub of
ScopeDog are FCC certified. Full compliance of the rest of the drive system is dependent on
the installation which is under user control. The ScopeDog control box is a fully screened
aluminum enclosure and we recommend keeping the motor cables as short as practical and
using screened cable.
2
System Description
ScopeDog is an add-on drive kit for Dobsonian or AltAz telescopes
The ScopeDog system includes,
•
•
•
•
•
•
High resolution optical encoders on each axis
Encoder interface box & WiFi access point (Nexus)
Stepper motor drives engaging through a gearbox and toothed belt
ScopeDog Control Box
Joystick Hand-box
Cables
The user interface is through a pc, tablet or smartphone running
1
SkySafari or an equivalent planetarium software . This device connects to
ScopeDog via an adhoc WiFi network generated by the Nexus unit.
The ScopeDog system utilizes the Nexus unit to drive the optical
encoders, perform initial two star alignment, and calculate scope RA &
Dec. These functions are independent of the rest of the ScopeDog
system and can be used stand alone as a “push-to” configuration.
In full “GoTo” mode the ScopeDog controller receives telescope RA &
Dec from the Nexus and calculates and applies the appropriate Alt & Az
tracking rates. The drive is accomplished by micro-stepping stepper
motors with integral cyclic gearboxes. These engage through a final drive
to the telescope. The final drives have a mechanism to allow the drive to
be easily manually disengaged/engaged.
GoTo commands from the planetarium software are transferred by the
Nexus to the ScopeDog controller, which converts the commanded RA &
Dec to AltAz coordinates and drives the telescope to the required position
through a cycle of acceleration, fast slew and deceleration. At the end of
the first slew operation the controller checks the accuracy of the achieved
position and if necessary automatically makes a further small slew
motion.
The ScopeDog system includes a Joystick Hand-box to allow the
1Currently supported Apps and programmes are SkySafari (Plus & Pro), Starry Night,
Cartes du Ciel, TheSky, Megastar, Deep Sky Browser
3
telescope to be manually controlled. The hand-box has a long cable and
can be handheld, or attached near the eyepiece. The hand-box provides
three speeds of movement in any direction. The slowest speed direction
is reversed to match the view in the eyepiece.
The stepper motor drive modules use PWM power control to maximize
battery life while providing sufficient torque for any telescope size. A GPS
module provides automatic and accurate sensing of location and time.
The hand-box connects via standard USB cable allowing its length to be
readily changed. The ScopeDog control is achieved with a Raspberry Pi 2
Model B running a custom java multi-thread application. The control
program is stored on a micro SDHC card for any upgrades.
Installing and Connecting ScopeDog
All components should be installed where they are protected from knocks
and direct rain or dew. Suggestions for mounting the encoders and drive
motors are available on www.scopedrives.com. The ScopeDog system
can be configured to suit most installations, if in doubt please contact
[email protected]. Final system performance depends on the
accuracy with which the encoders and drive components are installed.
The diagram opposite illustrates how the ScopeDog components are
interconnected. The motor drive cables should be kept as short as
practical and should incorporate a screen connected to the DIN plug
ground. The dc supply lead should also be as short as practical and of
not less than 16/0.2mm gauge.
The GPS active antenna should be located so as to best receive signals
from all the sky.
The supplied WiFi dongle can be plugged into any of the USB ports if
access is required to the ScopeDog configuration setup file.
The joystick hand box may be plugged into any USB port. The supplied
cable my be changed for an alternative length by removing the back
cover of the hand box.
The spare USB ports may be used to power or charge other equipment
up to 1.5 amp total, subject to the capacity of the main ScopeDog power
supply being used.
4
ScopeDog System Interconnections
5
Initialisation
Turn on the ScopeDog control box and the Nexus. Connect to the Nexus
WiFi adhoc network.
Using the Nexus Deep Sky Browser App, follow the two star alignment
procedure described in the Nexus manual. If the telescope is well
balanced then the two star alignment can be done by mechanically
disengaging both drives and manually pushing the telescope to each
alignment star. If this is not possible then the drives can be left engaged
and the telescope can be driven to each alignment star by using the
joystick on the ScopeDog hand box.
When both alignments have been completed the ScopeDog control box
will automatically start to read the scope RA & Dec and the motors will be
driven at tracking rate. The accuracy of any 'GoTo' or position display is
critically dependent on the success of the initial Nexus two star alignment
procedure.
If the drives had been disengaged, now re-engage them and the scope
will now be tracking.
The front panel of ScopeDog has three LEDs to indicate status;
Power
Serial
Tracking
Steady when power switched on
Flashes rapidly as ScopeDog & Nexus communicate
Pulses when ScopeDog program is running
Open SkySafari (or equivalent) and connect to the telescope. The display
should now correctly depict the position of the telescope sightline.
Note: The GPS receiver in ScopeDog has an internal rechargeable battery that
speeds up initial lock. However if the battery has become drained, or the system
has been significantly re-located then a few minutes may be required to achieve
lock.
In most circumstances turning on ScopeDog before checking collimation, finder
alignment and Nexus two star alignment will give enough time to achieve lock. If
not then ScopeDog will automatically wait for lock before starting to track.
The battery will be drained after 1 month without use and takes approximately 24
hours to recharge fully.
6
Observing
Joystick Control
The hand-box has a joystick that allows the scope to be driven in any direction
at a choice of three speeds. The Planetarium software display will continually
update to show the current position of the telescope.
Speed: The two LEDs on the hand box show the selected speed. The speed is
changed by pressing the joystick paddle to sequence through the range:
Number of LEDs
None
One
Both
Slew Speed
Slow, normally used when looking through
the eyepiece for small corrections
Medium
Fast
Direction: Move the joystick in any direction, including a combination of both
axes and the motors will be commanded accordingly. If held with the cable on
the left, the telescope moves in medium or fast speeds in the direction the
joystick is moved. In slow speed, the direction is true when viewed through an
eyepiece, (ie corrected for secondary mirror fold).
The toggle switch on the hand-box has two functions –
Emergency stop: While the scope is performing a ’GOTO’, moving the switch
away form the ‘RUN’ position will cause the drives to immediately stop.
Spiral Search: (coming soon) While the scope is tracking, moving the switch
away from ‘RUN’ will cause the telescope to perform an expanding spiral
search away from the current position. Returning the switch to ‘RUN’ at a point
on the spiral will cause the motion to stop and tracking to continue from that
point.
GoTo Control
For SkySafari, any object in the display may be highlighted and then the
'GoTo' command engaged. This command may also be done from the object
search result. ScopeDog will immediately slew the telescope to the target
object. The ScopeDog controller will automatically read the actual scope
position and make any small adjustments necessary to ensure maximum
pointing accuracy.
7
Connections
Gnd
+12Vdc
Serial port
socket view
3
4
5
ScopeDog Rx
ScopeDog Tx
Gnd
81
Motor
socket view
B
C
D
Pin
A
B
C
D
A
Motor wire
Black
Green
Red
Blue
Specification
Encoder Resolution
40,000 (10,000 quadrature CPR)
32.4 arcsec
Drive Speeds
(user adjustable)
Fast
up to 10 deg/sec depending on telescope
size and mount.
typically 1/3 of fast
typically 1/40 of medium
Medium
Slow
Drive step increment
typically <0.5 arcsec depending on final drive ratio
Power supply
10 -16 Vdc
Power consumption
5-7W depending on scope size
Motor Torque (max)
(user adjustable)
30kg-cm continuous, 80kg-cm for short periods
8
Setting Configurations
Nexus
The Nexus can be delivered pre-set to work with the particular telescope
configuration. If this needs to be changed (ie change of encoder type)
then this can be done via the Deep Sky Browser App (iOS & Android) or
Nexus Configuration Utility (Windows & Mac OS X).
The Nexus website (www.astrodevices.com/Downloads) has guides for
checking the settings on the Nexus unit. Note that the ScopeDog uses
the same protocol as ServoCat.
Planetarium software
Refer to the appropriate set-up guide available from the AstroDevices
website.
ScopeDog
Access to ScopeDog configuration data is via wifi.
1. Start with ScopeDog switched off
2. Turn on the supplied TripMate wifi router
3. Plug the supplied wifi dongle into one of the ScopeDog USB
ports.
4. Turn on ScopeDog
5. Using a tablet or similar, connect to the TripMate wifi.
Its SSID will be TripMate-XXXX, password 11111111
6. Using the tablet browser, connect to the ScopeDog configuration
page at 10.10.10.2
Note, if the TripMate has been reset to factory settings, then the
configuration page address may change to 10.10.10.X, where X
will be 1,2,3, or possibly higher.
7. The configuration page will appear as shown on the next page of
this manual.
8. Make a note of the current parameters before making any
changes!
9. After making changes, save them using the button at the bottom
of the page.
10. Changes take affect after a re-start.
9
ScopeDog Configuration Setup
Example screen on iPad, actual values will vary according to the installation.
10
11
Slew Speed Medium
Slew Speed Slow
Alt Velocity
3
40
.5
Current Limit
Az Velocity
False
Phidget
Phidget 888
Phidget 222
Az Phidget
Alt Phidget
Az Direction
Alt Gear
Alt Gear Ratio
Az Gear Ratio
GPS type
Original Setting
Changes
Notes
Owner Configuration Data
Use this table to record your own config data.