1
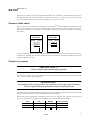
2532
Direct Access
Controller
user manual
P/N 35002502, Rev B
section 1
INTRODUCTION
Product safety information
WARNING!
This product is for professional use only. It is not for household use.
This product presents risks of lethal or severe injury due to fire and electric shock. Read this manual before powering
or installing the controller, follow the safety precautions listed below and observe all warnings in this manual and
printed on the controller. If you have questions about how to operate the controller safely, please contact your Martin
dealer, call the Martin 24-hour service hotline at +45 70 200 201, or send an e-mail message to [email protected].
To p r o t e c t y o u r s e l f a n d o t h e r s f r o m e l e c t r i c s h o c k
•
Do not open the controller or remove any cover; there are no user-serviceable parts inside.
•
Always ground (earth) the controller electrically.
•
Use only a source of AC power that complies with local building and electrical codes and has both overload and
ground-fault protection.
•
Do not expose the controller to rain or moisture.
•
Refer any service operation not described in this manual to a qualified technician.
To p r o t e c t y o u r s e l f a n d o t h e r s f r o m f i r e
•
Never modify the controller or attempt to bypass fuses.
Introduction
2
section 2
SETUP
The 2532 D.A. Controller may be used together with the Martin 3032, LightJockey, and ProSceniumDMX controllers.
The setup procedure is the same for all systems. To prepare the 2532 for use, you need to connect it to a serial (COM)
port on the controller, check the voltage setting, and plug it in to a source of AC power.
Connect data cable
The 2532 connects to your Martin 3032, LightJockey, or ProSceniumDMX controller through the included 9-pin serial
cable. If your computer has a 25-pin serial (COM) output, construct or purchase a cable or adaptor with a 25-pin
female DSUB connector on one end and a 9-pin DSUB female connector on the other end. The cable connections are
shown below.
9-pin to 25-pin
serial cable
9-pin to 9-pin
serial cable
9-pin 25-pin
female
female
2 RXD TXD 2
3
3
SG
5
7
4
5
6
9-pin 9-pin
female female
2 RXD 2
3 TXD 3
SG
5
5
If your controller does not have a serial (COM) port available, purchase and install a serial card with one or two ports,
available at any computer store. On some computers, the mouse is connected to one serial port and the 2532 controller
connects to the other serial port.
Connect to power
IMPORTANT!
Check voltage setting before applying power.
The 2532 D.A. Controller may be switched between 115 and 230 V. Make sure the switch, located on the back of the
unit, is correctly set before applying electricity.
WARNING!
For protection from electric shock, the controller must be grounded (earthed).
The AC supply shall have overload and ground-fault protection.
The fixture’s mains lead must be fitted with a grounding-type cord cap that fits your power distribution cable or outlet.
Consult a qualified electrician if you have any doubts about proper installation.
Following the cord cap manufacturer’s instructions, connect the yellow and green wire to ground (earth), the brown
wire to live, and the blue wire to neutral. The table below shows some pin identification schemes.
Wire
Pin
Marking
Screw color (US)
brown
live
“L”
yellow or brass
blue
neutral
“N”
silver
yellow/green
ground
green
Setup
3
section 3
2532 / 3032 OPERATION
Functions
When used with the 3032, the 2532 provides the following functions:
Direct latch execution of 1008 cues
Direct flash execution of 1008 sequences
Blackout all fixtures
When you latch a cue, the cue executes as if called from the host controller until another cue is called. Latch keys are pressed and released.
18 pages
lat
ch
•
•
•
fla
sh
When you flash a sequence, the sequence executes with highest priority while the flash key is held down. Flash keys are pressed and held.
Full control of the 3032 mouse and keyboard is maintained: the 2532 is
simply an add-on interface to the controller.
56 cues
56
sequences
System setup
1. Setup the 2532 as described in section 2.
2. Select SETUP from the 3032 main menu.
3. Select SYSTEM HARDWARE SETUP.
4. Select 2532 DA (V.3) from the OPTIONAL HARDWARE menu.
5. Click the SETUP button to the right of 2532 DA (V.3), which should be shown in green, to access the
2532 configuration screen.
The user keys for selecting pages are displayed on the left side of the screen; the matrix keys and virtual buttons are
displayed on the right side. The currently selected page and virtual button are shown in green.
At the bottom of the screen is a series of configuration commands. Commands are selected with the left mouse button
and de-selected with the right mouse button. Some commands take effect as soon as the left mouse button is pressed.
6. You can use the configuration screen to test the system. The on-screen buttons react when the physical keys are pressed. If you encounter problems at this point, check all connections and the 2532
COM port assignment.
7. To assign sequences to virtual buttons:
i
Select a page by clicking the mouse in the page map.
ii Select a virtual button by clicking in the matrix grid.
iii Click ASSIGN SEQ .
iv Click the sequence name from the pop-up list. The sequence number is displayed at the bottom of
the on-screen virtual button.
8. To assign cues to virtual buttons:
i
Select a page by clicking the mouse in the page map.
ii Select a virtual button by clicking in the matrix grid.
iii Click ASSIGN CUE.
iv Click the cue name from the pop-up list. The cue number is displayed at the top of the on-screen
virtual button.
9. To clear sequences and cues from virtual buttons, click the virtual button and then click CLEAR.
10. To clear all sequences and cues from a page, click the page and then click CLEAR PAGE.
11. To copy one page of sequences and cues to another page, click the page to copy from and then
click COPY PAGE. Click a red target page, or right-click to escape.
12. To save the configuration, click SAVE. Changes are saved to the controller’s hard disk.
13. To exit, click QUIT. Be sure to save your changes before quitting!
2532 / 3032 Operation
4
Operation
XVHU#NH\V
PDWUL[#NH\V
SRZHU
10
1
2
11
4
13
6
15
8
17
12
3
5
14
7
16
9
1
9
17
25
33
41
49
2
10
18
26
34
42
50
3
11
19
27
35
43
51
4
12
20
28
36
44
52
5
13
21
29
37
45
53
6
14
22
30
38
46
54
7
15
23
31
39
47
55
8
16
24
32
40
48
56
1
2
3
4
5
6
7
8
18
Select page
from 1 to 18
EODFN0RXW
Select bank
(A - G)
Latch cue
(1 - 8)
Flash sequence
(1 - 8)
Virtual buttons
(56)
The 2532 keyboard has user keys for selecting pages and matrix keys for selecting the 56 virtual buttons to which both
cues and sequences are assigned. The bank keys select a row from A to G; the latch and flash keys select a column
from 1 to 8. To flash a sequence, you press the bank and flash keys; to latch a cue, you press the bank and latch keys.
To enable 2532 operation automatically on startup, go into the System Software Setup menu and select REMOTE ON
so that it is shown in green. You can disable this feature at any time by clicking the box so that it is not highlighted.
1. Select CUE from the 3032 main menu. The 3032 must be in CUE mode to receive 2532 commands.
2. Select 2532 from the bottom right of the screen.
Operation is enabled when this box is green. To disable operation, click the box again. The box displays the number of
the currently selected page.
3. To latch cues:
i
Press a user key on the 2532 to select the page containing the cue.
ii Press the bank key for the row containing the cue.
iii Press the latch key above the virtual button containing the cue.
The cue starts running. To prepare for the next cue or sequence, you can select the next page and bank without interrupting execution: the controller output does not change until a latch of flash key is pressed.
4. To flash sequences:
i
Press a user key on the 2532 to select the page containing the sequence.
ii Press the bank key for the row containing the sequence.
iii Press and hold the flash key under the virtual button containing the sequence.
The sequence is inserted into line 10 of the current cue and starts running. The sequence stops running when the flash
button is released. Note: If there is already a sequence on Line 10 of the cue, it is temporarily overridden by the
selected sequence, but it is not permanently replaced.
5. To black out all lights:
i
Press the Black-Out button once.
This sends a DBO signal to all units and the color of the on-screen DBO button changes to show that it is active.
ii Press the Black-Out button again to restore the controller to its previous state.
2532 / 3032 Operation
5
section 4
2532 / LIGHTJOCKEY OPERATION
Functions
The 2532 D.A. Controller provides the same functions when used with the Martin LightJockey controller as it does
with the 3032: please refer to the previous section. In addition, there is a print function and the user keys can be re-configured; the following functions are available:
•
•
•
Record Latch, Record Flash, and Toggle Latch/Flash View
Trig Auto Seq, Trig Man, Trig Man Rev
Fade Out, Fade In, Blackout and Restore (from Blackout)
Fade Out and Fade In use the fade time from the Master Intensity Control, while Fade Out X Sec and Fade In X
Sec uses the fade time indicated. It is highly recommended to assign the blackout/restore functions to user keys,
and not use the Black-out button of the 2532.
The 2532 must have software version 3.0 (or higher) in order to work with LightJockey. The basics are covered here.
Full information is provided in the online LightJockey help system.
System setup
1. Choose Setup > Hardware Setup > Direct Access from the main LightJockey menu.
2. Select Martin 2532 under Direct Access Device.
3. Select the COM port (1, 2, 3, or 4) to which the 2532 is connected. Click OK.
4. Close and restart LightJockey.
5. Click the Direct Access icon on the fixture toolbar to open the 2532 Direct Access window.
6. Select Configuration from the 2532 Direct Access menu and check Enable 2532.
7. To assign cues:
i
Open the 2532 Direct Access window, if it is not already open, by clicking on the Direct Access icon.
ii Select View from the 2532 Direct Access menu and check 2532 Configuration.
iii Click on a page tab to select the page.
iv Click View Latch . There are three ways to assign cues:
•
•
•
Drag and drop a cue from the list of available cues to a virtual key.
Load the cue to assign, click Record Latch, and then press the latch key on the 2532.
Load the cue to assign, right-click a virtual key, and select Set Latch to Current Cue from the popup
menu.
8. To assign sequences:
i
Open the 2532 Direct Access window if it is not already open.
ii Click on a page tab to select the page.
iii Click View Flash. There are three ways to assign sequences:
•
•
•
Drag and drop a sequence from the list of available sequences to a virtual key.
Load the sequence to assign, click Record Flash, and then press the flash key on the 2532.
Load the sequence to assign, right-click a virtual key, and select Set Flash to Current Sequence from the
popup menu.
Operation
2532 / LightJockey operation is very similar to 2532 / 3032 operation: please refer to the previous section and the
online help.
To minimize the 2532 window, select View from the 2532 Direct Access menu and remove the check from 2532 Configuration.
2532 / LightJockey Operation
6
section 5
2532 / PROSCENIUM OPERATION
Functions
When used with the ProSceniumDMX controller - with version 8.15 or higher software installed - the 2532 D.A. Controller provides the following functions:
•
•
•
•
•
Direct access to cues 1 - 56
Step forwards and backwards through cuelist
Control the level of 8 groups
Toggle chasers 1 - 8 on/off
Blackout all lights
System setup
1. Setup the 2532 as described in section 2.
2. Choose Special Functions > Direct Access Server for remote connection... from the main menu.
3. Select Mode > Serial receiver of a Martin 2532 D.A. keyboard in the popup window.
4. Type in the number of the COM port (1, 2, 3, or 4) to which the 2532 is connected and click OK or
press Enter.
Operation
SRZHU
1
1
2
2
4
4
6
6
8
8
3
3
5
5
7
7
Increase level of
groups 1 - 8
Step forward and
back through
cues
Decrease level
of groups 1 - 8
1
9
17
25
33
41
49
2
10
18
26
34
42
50
3
11
19
27
35
43
51
4
12
20
28
36
44
52
5
13
21
29
37
45
53
6
14
22
30
38
46
54
7
15
23
31
39
47
55
8
16
24
32
40
48
56
1
2
3
4
5
6
7
8
Load cues
1 - 56
Toggle
chasers 1 -8
on/off
Blackout
on/off
To l o a d a c u e f r o m 1 t o 5 6
1. Press the bank key to the left of the virtual button containing the cue.
2. Press the latch key above the virtual button containing the cue.
3. To prepare for the next cue, you can select the next bank without interrupting execution: the controller
output does not change until the latch key is pressed.
2532 / ProScenium Operation
7
To s t e p t h r o u g h c u e s
1. Press the bottom-left user key to select the next cue.
2. Press the bottom-right user key to select the previous cue.
To c o n t r o l t h e d i m m e r l e v e l o f a g r o u p o f f i x t u r e s
1. Press the left user keys 1 - 8 to increase the level of groups 1 -8.
2. Press the right user keys 1 - 8 to decrease the level of groups 1 - 8.
To t o g g l e c h a s e r s 1 - 8
1. Press a flash button once to begin executing a chaser.
2. Press the flash button a second time to stop chaser execution.
To b l a c k o u t a l l l i g h t s
1. Press the black-out button once to black out all lights.
2. Press the black-out button again to resume normal operation.
2532 / ProScenium Operation
8