1
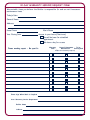
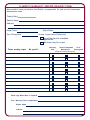
YOUR HOME
maintenance manual
Offered by Home Buyers Warranty Corporation
Your Home Maintenance Manual
Published by:
Home Buyers Warranty Corporation
www.2-10.com
Copyright 2002
All Rights Reserved
Customer Service Office
One Denver Highlands
10375 East Harvard Avenue, Suite 100
Denver, Colorado 80231
720-747-6000
www.2-10.com
1
INTRODUCTION
Congratulations on the purchase of your new home! Home
Buyers Warranty Corporation knows what an exciting and
overwhelming time this can be.
We’ve designed
“Your Home Maintenance Manual” to smoothly guide you
through some of the important details involved with
properly maintaining your new home. We’ve done the research for you. As a new home
warranty provider, we’ve heard many questions new homeowners ask like:
Î
Î
Î
Î
Î
“What should I do?”
“Why should I do it?”
“When should I do it?”
“How can I do it?” and,
“Does the warranty cover it?”
On the pages that follow, you will read answers to these questions. So take a
moment and review this manual, as we take you on a maintenance tour of your new home!
A good idea? Mark your calendar for 30 days after moving in and review this helpful
manual which includes monthly maintenance tips and suggestions.
Keep this manual, your home warranty booklet, manufacturers’ warranties
and insurance documents together for easy access and review. Please, always
remember to check your Home Buyers Warranty booklet or ask your Builder about
possible warranty coverage before hiring a contractor to perform any corrective work.
We have included some helpful forms at the end of this booklet. The maintenance outline
included in this manual is a suggested schedule only. The manufacturer's maintenance
guidelines should be followed instead of our suggestions when a discrepancy occurs.
SAFETY FIRST - Often homeowners want to “do-it-themselves” to save money.
Remember, there are many areas of home maintenance that are best left to professionals.
Electrical work, entering an attic and climbing on roofs and ladders are just a few
hazardous areas. Be safe! Call a professional.
2
CONTENT
BEFORE THE MOVE CHECKLIST
4
AFTER THE MOVE CHECKLIST
4
APPLIANCE AND SYSTEMS CATALOG
6
HOME MAINTENANCE REPAIR CONTRACTORS
7
MAINTENANCE CALENDAR
8
PERSONAL NOTES
10
OUTSIDE THE HOME
Roof and Chimney
11
Gutters and Down Spouts
11
Siding, Paint, Masonry, Stucco, EIFS & Wood Trim 12
Caulking - Windows / Doors
12
Concrete Slabs and Patios
12
Grading, Drainage & Landscaping
13
Septic Tanks & Leach Fields
13
11
INSIDE THE HOME
Attic
Floor Coverings
Wall Finishes
Cabinets and Countertops
Wood Trim
Doors & Windows
Appliances
Foundation, Basement & Crawl Space
Plumbing System
Plumbing Fixtures and Appliances
Heating & Cooling System
Electrical System
14
14
14
15
16
16
17
17
18
18
19
20
22
FORMS
3
BEFORE THE MOVE
ESTABLISH UTILITIES IN YOUR NAME:
Î
Power Company
Î
Water Service
Î
Gas Company
Î
Telephone Service
Î
Security Company
Î
Cable or Satellite Service
Î
Trash Collection Service
Î
Garage Door Opener (if applicable)
Î
Internet Service
Î
Notify the following of your new address.
Place(s) of Employment
Post Office
Insurance Companies
Credit Card Companies
Social Security Administration
Health and Benefits Plans
Investment Accounts
Magazine Subscriptions
Professional Organizations
Family
Friends
TIP: Collect all of your mail for several months prior to moving to be
sure you notify everyone who sends you important mail.
AFTER THE MOVE
Î Find a secure place to store all of the following:
4
Instruction manuals and manufacturer’s
warranties for appliances, etc.
Home warranty booklet and information
Home insurance documents
This home maintenance manual which contains important phone numbers
for home and appliance contractors
Î
Change the address on your driver’s license or apply for a new one if moving from
another state.
Î
Register your children in school. Apply for a homestead exemption with your
local county tax office, if applicable.
Î
Register your vehicles if moving from another state.
Î
Register to vote if moving to a new jurisdiction.
Î
Put all of your closing documents, warranties, and appliance operation manuals in a
common location for easy reference.
Î
Fill out and mail-in all manufacturer’s warranty information cards for all of your
new appliances.
Î
Purchase fire extinguishers for each floor of the home and a separate one for the
kitchen and garage.
Î
Store all touch-up paint in a common location (but not near your water heater
or furnace).
Î
Locate main water and gas shut-off valves.
Î
Locate electrical service panel and main shut-off switch.
Î
Familiarize yourself with the operation of all appliances and equipment. Install contact
paper in kitchen cabinets and drawers.
Î
Install floor protector pads on the bottom of all furniture legs where needed.
Î
Vacuum out heating/cooling ducts.
Î
Apply grout sealer to ceramic tile.
Î
Put together a first aid kit.
Î
Start a basic tool kit for hanging blinds, curtain rods, pictures, reassembling furniture,
installing shelves, etc.
Î
Identify any Homeowner Association property improvement deadlines.
Î
Introduce yourself to the new neighbors.
Î
Offer your old boxes to someone who’s moving.
Î
Take lots of pictures and video your new house
to show your friends, family and co-workers!
Enjoy your new home!
5
APPLIANCE AND SYSTEMS CATALOG
MANUFACTURER
SYSTEMS
Air Conditioning
Heating System
Intercom System
Security System
Septic System
Water Well Mechanical
APPLIANCES
Built-in Microwave
Clothes Dryer
Clothes Washer
Cooktop
Dishwasher
Doorbell System
Fans - Attic, Ceiling, Exhaust
Fire / Smoke Alarm
Garage Door Opener
Garbage Disposal
Oven
Plumbing Fixtures
Range
Refrigerator
Trash Compactor
Water Heater
6
MODEL TYPE
SERIAL NUMBER
HOME MAINTENANCE REPAIR CONTRACTORS
NAME
PHONE
SYSTEMS
Air Conditioning
Electrical System
Heating System
Intercom System
Plumbing System
Security System
Septic System
Water Well Mechanical
APPLIANCES
Built-in Microwave
Clothes Washer and Dryer
Dishwasher
Doorbell System
Fans - Attic, Ceiling, Exhaust
Fire / Smoke Alarm
Garage Door Opener
Garbage Disposal
Range / Oven / Cooktop
Refrigerator
Trash Compactor
Water Heater
INSIDE HOME
Cabinetry
Doors, Windows and Trim
Flooring
Carpet
Ceramic / Marble Tile
Wood Floors
Insulation
Painting
Plumbing Fixtures
OUTSIDE HOME
Brick
Driveway
Gutters and Down Spouts
Landscaping
Painting
Roof
Siding
Woodwork
7
MONTHLY MAINTENANCE
Home maintenance includes regular, seasonal and one-time tasks. The following suggested
maintenance schedule identifies some of the more common maintenance tasks that may be
performed on a weekly, monthly or on a semi-annual basis. Tailor it to fit your own situation, adding
or deleting items as required.
As a homeowner, you have normal maintenance responsibilities for your new home.
Establishing a maintenance schedule is the best way to manage your maintenance budget.
This suggested maintenance tasks and schedule should not replace the manufacturer’s
recommendations. We suggest the use of licensed contractors for any tasks you may feel
unprepared to complete. Remember, safety first! What seems like a simple plumbing or electrical
repair can cost you many times what you think you might save if you don’t do it correctly.
THE FOLLOWING IS SUGGESTED MONTHLY MAINTENANCE:
☺ Smoke Detectors - Check operation by pushing test button. Check and replace battery
if necessary.
☺ Check fire extinguishers for proper charge. Never buy units without a pressure gauge.
Be sure that you have an adequate number, located in kitchen, garage and basement.
Test Ground Fault Circuit Interrupters (GFCI) to insure proper protection.
☺ Clean garbage disposal blades by grinding ice cubes and citrus fruit rinds.
☺ Clean or replace dirty filter in range hood.
☺ Check for evidence of leaks around toilets, under sinks and around dishwasher.
☺ Clean and freshen sink drains by flushing with hot water and baking soda.
☺ Inspect furnace and air-conditioning filters, humidifier and electronic air
cleaners. Replace as required.
☺ Clean aerators on faucets regularly, depending upon water hardness. You may need to
use a rust or scale remover to return them to normal condition, or have them replaced.
Check water filters and softeners regularly. The life of the filters is dependent upon
water usage and water characteristics. Retailers can help with this analysis.
☺ Monitor and maintain floor coverings on an as required basis. Regular vacuuming will
reduce wear of carpets and other floor coverings. Repair tears and remove stains as
soon as possible.
☺ Check the Temperature Pressure Release (TPR) valve on the water heater. Water
heater should also be drained periodically. In areas with hard water drain at least 5
gallons of water from the drain valve every six months to prevent sediment build up.
8
TWICE-A-YEAR MAINTENANCE
☺ Inspect roof and chimney for broken or missing tiles or shingles, identifying
anything that might cause leaks or problems. Inspect and clean gutters and down
spouts. Follow instructions in this manual for roof and chimney and gutters and
down spouts. Do not walk on the roof as it is dangerous and may cause damage.
☺ Inspect outside of home and condition of siding, paint, masonry, stucco or Exterior
Insulated Finish System (EIFS) and wood trim following instructions in this manual.
☺ Inspect doors and windows to verify proper operation, security and weatherresistance. Clean tracks of windows and sliding glass doors before applying silicone
lubricant. See suggestions in this manual.
☺ Maintain wall finishes following suggestions in this manual.
☺ Monitor and maintain cabinets and countertops following suggestions in this manual.
☺ Inspect the foundation, basement or crawl space following instructions in this manual.
☺ Inspect main service panel, circuit breakers, all GFI outlets and breakers following
instructions in this manual.
☺ Complete seasonal maintenance on heating and air conditioning by licensed
HVAC contractor.
❏ Check general condition of compressor; remove debris as necessary.
☺ Inspect and replace as needed caulking and grout around tubs, showers and sinks.
☺ Have carpets professionally cleaned at least once a year.
ANNUAL MAINTENANCE
☺ Examine caulking around windows, doors and other areas following instructions in
this manual.
☺ Inspect condition of concrete slabs and patios following suggestions in this manual.
☺ Check condition of septic tank and leech field. Consult with septic tank
pumping service.
☺ Visually survey wood trim following suggestions in this manual. Clean all woodwork
and wax.
☺ Complete annual furnace and air conditioning maintenance by a licensed
HVAC contractor.
☺ Schedule professional inspection of major appliances especially if gas fueled.
9
PERSONAL NOTES
10
OUTSIDE THE HOME
WHAT ? EXAMINE ROOF AND CHIMNEYS
Why ? To identify anything that might cause
leaks or problems.
When ? Twice a year.
How ? For roofs, visually inspect all surfaces from the ground
if possible. Look for torn, broken, missing or cracked shingles or tiles, accumulated debris, gaps in
flashing, exposed joints, and obstructed vent pipes. Avoid walking on roof tiles – they will crack.
Shingle granule deposits found in gutters are normal and common to new roofs. Check that sealed
joints around skylight frames are not cracked and in good condition. Look in attic for water stains
on underside of roof or wet insulation. Consult with a qualified roofing contractor, as necessary, for
correction of any roofing problems. After any snow, ice, high winds and heavy rains, check for water
stains under overhang and in attic. Always call your homeowners insurance company first for any
storm-related damage. Many attics do not have floors. If you step on the insulation or ceiling,
you may be seriously injured.
For chimneys, look for open gaps between the house and chimney, cracks in mortar or stucco,
and minor settlement. Seal gaps with an appropriate caulk and repaint to match as required. Consult
with a mason to re-point or repair mortar and stucco. Never burn pressure-treated wood, Christmas
trees, plastic, or flammable liquids in the fireplace. Keep flue closed when not in use to reduce
cooling and heating losses. Clean chimney flue once a year. Clean out ashes as necessary – store in
a metal container to reduce fire risk.
With the return of cold weather, before building the first fire you should 1. Check to see if
any of the “fire clay” (mortar) has fallen out, replacing if necessary; 2. Ensure damper works
properly and closes tightly; 3. Check the flue with a flashlight for soot build-up. For heavy soot
deposits, a professional chimney cleaner should be employed.
Warranty Section ?
Roofing
Fireplaces
WHAT ? INSPECT GUTTERS AND DOWN SPOUTS
Why ? To make sure they operate as intended.
When ? Twice a year.
How ? Hire a gutter cleaning service or find a ladder and do-it-yourself. Leaves and debris will
accumulate in the gutters as the seasons change. If you do it yourself, carefully climb up to the
gutter and scoop out leaves and debris with a small hand shovel. Also, remove debris from the down
spouts. (You can sometimes clear these with a hose, but you may have to disassemble the
downspout.) After cleaning, consider installing a downspout filter device to keep out debris. Make
sure gutters are sloped to drain toward down spouts and that water drains a minimum of five (5)
feet away from the foundation as it discharges from down spouts. When on the ground, inspect
gutters from underneath and look for leaks, rust spots or holes. Caulk as necessary.
Warranty Section ?
Sheet Metal
11
WHAT ? CHECK CONDITION OF SIDING, PAINT, MASONRY, STUCCO
OR EIFS AND WOOD TRIM
Why ? To maintain its good looks and confirm adequate weather protection.
When ? Twice a year.
How ? Perform a walk-around inspection of the perimeter walls. Over time,
normal weathering and minor settlement can cause cracking, peeling, warping, and
crumbling in some or all of these materials. Look for cracks in brick, stone, and
stucco. Identify any areas where mortar has fallen out. A white powdery
substance known as efflorescence may appear from time to time and is
considered normal. Check for warped siding, gaps in wood trim, and peeling or blistering paint. Sand,
scrape, wire-brush, caulk, stain, repaint and apply wood preservatives where necessary. Consult
with a mason, as necessary, to repair cracked brick or mortar and traditional stucco problems.
Contact a qualified contractor familiar with the manufacturer’s specifications of repair for homes
clad with an Exterior Insulated Finish System (EFIS). Consult with a siding contractor, as
necessary, to repair warped siding.
Warranty Section ?
Unit Masonry
Finish Carpentry
Painting
Stucco and Cement Plaster
Exterior Siding
WHAT ? EXAMINE CAULKING AROUND WINDOWS, DOORS
AND OTHER AREAS
Why ? To keep out water, air, dust and insects.
When ? Once a year.
How ? Walk around the house and inspect each caulking joint at window and
door frames, between two different siding materials (like brick or stucco), or
around piping which enters the home. Original caulking will shrink and crack
over time due to normal weathering. Confirm that caulked joints are still properly sealed and haven’t
cracked, pulled apart, or fallen out. If necessary, clean the old joint out with warm soapy water and
a toothbrush and reapply the same caulking material to achieve a proper seal. Consult with your
local hardware store to select the right type of caulking.
Warranty Section ?
Sealants
WHAT ? INSPECT CONDITION OF CONCRETE SLABS AND PATIOS
Why ? To maintain their cosmetic appeal and intended usage.
When ? Once a year.
How ? Examine all concrete sidewalks, patios, porches, stoops, and garage
slabs for cracks, chipping, stains, scaling or settlement. Consult with your local hardware store for
products that can fill and repair cracks or chipping, or remove scaling residue. (Automotive brake
cleaning fluid works well to remove most concrete stains). Seal and caulk any large gaps
created by minor settlement.
Warranty Section ?
12
Cast In-place Concrete
Construction and Control Joints
WHAT ? MAINTAIN ORIGINAL GRADING, DRAINAGE, AND
LANDSCAPING
Why ? To reduce the possibility of water or foundation damage.
When ? At all times.
How ? Visually survey your yard and existing drainage patterns. Verify that
the ground slopes away from the foundation. Stabilize any bare areas with
grass, ground cover or landscaping materials to discourage erosion. Dig out
areas where sand has accumulated and fill in any low spots where necessary to
re-establish drainage flow. Avoid over-watering plants and shrubs which are
next to the foundation. Adjust sprinkler systems to avoid over-spraying the
house or causing puddles near the foundation. Plant trees and shrubs an adequate distance away
from foundation to allow for mature spread and root systems. Water, fertilize, mow and aerate
your grass as necessary. In areas of the country with active (expansive) soils, maintenance and
irrigation guidelines specific to your soils and foundation type should be followed. Conventional
landscape practices may be inappropriate in these areas, for example; if your home has a pier and
grade beam foundation and you live in a semi-arid climate, you may not be able to plant flowers or
shrubs closer than five (5) feet from the foundation, unless they have very low water requirements
and can be hand or drip-line watered. Sprinkler systems may not spray closer than five (5) feet
from the foundation, and trees should not be planted closer than fifteen (15) feet from the
foundation. Conversely, if your home has a post-tensioned slab foundation in a moist climate, you
may need to take steps to ensure that soils around foundation do not dry out excessively. Again,
trees should not be planted closer than fifteen (15) feet from the foundation. Consult with your
builder, nursery or landscape professional, as necessary, to correct or learn more about your local
soil and growing conditions.
Warranty Section ?
Grading
Drainage
WHAT ? CHECK OUT CONDITION OF SEPTIC TANK &
LEACH FIELD
Why ? To keep your wastewater system working as intended.
When ? Once a year.
How ? Know the location of your septic tank and drain field. Have your septic tank inspected
annually by a licensed contractor or health department official. Inspection will reveal problems
before they become serious, and tell you when tank needs to be pumped. Periodically check the
drain field for a foul odor, excessive wetness, or overly lush grass growth, which may be warning
signs of a failing system. Never drive or park over any part of the system. Do not plant anything
but grass over or near drain field, as tree and shrub roots may clog drain field.
Warranty Section ?
Septic Tank Systems
13
INSIDE THE HOME
WHAT ? INSPECT THE ATTIC
Why ? To look for any changes since construction.
When ? Twice a year.
How ? Prior to entering the attic, purchase a paper filter mask from
your local hardware store to avoid lung irritation from possible airborne
insulation fibers. Bring a flashlight. Gain access through the trap door
and check that all air vents are unobstructed and intact. Make sure there
are no animals nesting in the insulation. If you walk around, be careful not to step on the drywall
ceiling below, and watch out for nails sticking through the roof. Never store anything in the
attic unless it was designed for that purpose. Check with your builder for more information
regarding storage capacity or lack thereof.
Warranty Section ?
Insulation
Louvers and Vents
WHAT ? MONITOR AND MAINTAIN FLOOR COVERINGS
Why ? To keep them looking great and preserve
their longevity.
When ? As required.
How ? For carpet, vacuum often. Use very short, slow movements,
about 2 or 3 strokes each spot for maximum soil removal. Traffic
lanes may require more frequent cleaning, to maintain the upright
position of the nap. Spills should be wiped up and stains spot cleaned promptly. Always dab at the
stain, never rub it. Use a manufacturer-approved carpet cleaning product as needed — test spray
for color fastness in an inconspicuous location (like a closet). Use mats or rugs near outside doors
to reduce soil tracking. (Always lift furniture when moving it around – never drag it.) Have carpets
professionally cleaned once a year.
For ceramic or marble tile, sweep or vacuum often. To clean, use a dishwasher crystal and
water solution applied to a damp sponge. Check for cracks in the grout. Apply matching grout as
necessary to fill cracks. Check caulking near bathtubs and baseboards. Caulk should be
well-adhered to both surfaces – clean surface and re-caulk as necessary. Make sure all furniture
legs have floor protectors installed. (Always lift furniture when moving – never slide it across tiles.)
Use mats or rugs near outside doors to collect dirt.
For hardwood floors, sweep or vacuum often. Use non-rubber backed mats or throw rugs
to minimize exposure to sand and grit. When the floor becomes excessively soiled, floors having a
polyurethane finish may be damp mopped with a mixture of one cup vinegar to one gallon of water
— never wet-mop or wax. If occasional squeaks occur, apply some powdered graphite to the area.
The appearance of small splinters is common for new hardwood floors. Avoid exposure to prolonged
sunlight and high-heeled shoes (without their rubber heel protectors in-place). Make sure all
furniture legs have floor protectors installed. Always lift furniture when moving – never slide it
across the wood. Never allow water to sit on the surface for an extended period of time. Over
time, with normal use, polyurethane finished floors may need to be recoated. A qualified contractor
should do this. Waxing a polyurethane finish is not recommended, as new coatings will not bond to
old wax. Other oil or water-based finishes may have different care and maintenance requirements,
and you may need to contact the flooring company for the manufacturer's recommendations.
14
For vinyl or other resilient-type flooring, sweep, vacuum or damp mop often. To “wax” your
no-wax floor, use acrylic finishes recommended by the manufacturer. Excessive water near seams
can cause separation, lifting or curling. High heels will damage these floor types. Install floor
protectors on furniture legs and lift furniture when moving – don’t slide!
For slate and clay tile, seal to protect and prevent staining. Use diluted detergent or tile
cleaner to clean.
Warranty Section ?
Hard Surface Flooring
Resilient Flooring
Finished Wood Flooring
Carpeting
WHAT ? MAINTAIN WALL FINISHES
Why? To preserve their good looks and longevity.
When ? Twice a year.
How ? For drywall, check for cracks at windows, doors, corners, and
ceilings. Repair with two to three coats of joint compound, sand and
repaint when convenient. Minor cracks can be filled with a heavy coat of
matching paint. Look for any nail pops or protrusions. Reset offending
nails deeper into drywall, then repeat drywall repair. Most drywall cracks will occur after a heating
or cooling season with the change in humidity. (Air conditioners provide very dry air as they cool.)
Consult with a drywall contractor to retexture, as necessary.
For paint or stain, look for peeling, cracking, blistering, fading, or scuff marks. Scrape off
paint from any damaged areas. Flat paint can be touched-up with a small brush and matching paint.
Semi-gloss and glossy paint can be touched-up or wiped off with a damp sponge to clean. Exterior
paints can usually be used for inside areas however, the opposite is not always true. Do not use an
acrylic or latex paint over enamel or varnish, since it will not adhere. Use washable paint in the
bathroom, kitchen and utility area.
Stain can often be rejuvenated with a good quality furniture polish.
For wallpaper, look for loose or curling seams. Changes in humidity can cause seams to
separate — reattach with a compatible wallpaper seam adhesive. Keep water and condensation
away from all seams. Clean surface as necessary with a damp sponge.
For brick or stone veneer, periodically check for cracks in the mortar. Changes in humidity
can cause mortar to shrink. Consult with qualified mason, as necessary, to re-point cracks and
match existing mortar.
Cleaning walls
1. Some painted surfaces may be cleaned with a mild solution of detergent and water. If you are
not sure of the washability of the paint, try washing in an inconspicuous place.
2. Glazed brick or tile should be washed with soap and water. Use a non-abrasive household
cleaner to remove stains.
3. Wood paneling should be cleaned with a wood cleaning product and then treated with paneling
wax or with linseed oil.
Warranty Section ?
Lath and Plaster
Gypsum Wallboard
Painting
Wall Covering
15
WHAT ? MONITOR AND MAINTAIN CABINETS
AND COUNTERTOPS
Why ? To maintain their good looks, durability,
and intended usage.
When ? Twice a year.
How ? For cabinets, check out the hardware. Adjust, tighten or
lubricate knobs, hinges, latches, rollers, and drawer glides. Refresh
varnished wood cabinets with a good quality furniture polish once a
month. Never use a paraffin-based spray wax. Painted cabinets may be cleaned with a mild
non-abrasive detergent on a damp sponge. Scratches can be filled with a matching touch-up
crayon available at most hardware stores. Wood cabinets should be cleaned and waxed just like
fine furniture. Plastic-coated cabinets may be cleaned with a detergent solution.
For laminate countertops, verify that any caulking joints are in good condition and
well-adhered to both sides of the joint – water can cause underlying wood material to swell when
wetted. Clean joint and re-caulk with matching material as necessary. Avoid placing hot items such
as pots, pans, cigarettes and irons on countertop laminate – heat can liquefy the underlying glue.
Never cut on your new countertops – always use a cutting board. Clean with a mild, non-abrasive
detergent on a damp sponge or wash rag – don’t use scrubby pads. Avoid prolonged exposure of
dishwasher steam to underside of countertop – high humidity and condensation may cause wood
warping under laminate.
For ceramic tile countertops, inspect grout and tile for cracks. Replace cracked tiles and
re-grout as necessary. White grout can be refreshed by applying a diluted bleach solution with a
stiff narrow brush.
Warranty Section ?
Kitchen Cabinets and Vanities
WHAT ? VISUALLY SURVEY WOOD TRIM
Why ? To preserve its good looks.
When ? Once a year.
How ? Examine all baseboards, chair rails, crown molding, door frames
and window frames. Changing humidity levels can cause wood to shrink,
crack and warp.
Look for dust accumulation, cracks, corner
separations, or warping. Wipe off dust with a damp sponge. For stained trim, treat with a good
quality furniture polish. For cracks or corner separations, fill in gaps with a matching wood putty.
Treat with furniture polish for stained wood, or repaint with a matching color for painted wood.
Warped trim boards can be re-secured with finish nails. Set the finished nail heads slightly into
the wood with a nail set tool, then cover nail heads with matching wood putty for stained wood or
touch-up paint for painted wood.
Warranty Section ?
16
Finish Carpentry
WHAT ? MONITOR AND MAINTAIN DOORS AND WINDOWS
Why ? To ensure proper operation, security, weather
resistance and intended usage.
When ? Twice a year.
How ? Check overall door and window integrity and operation. Windows
and doors can be affected by a number of elements including minor
settlement, wear and tear, expansion and contraction, and general
weathering. Check weather-stripping at all windows and entrance doors.
Make sure a tight air seal is formed when closed. Replace any weather
stripping that becomes loose or damaged. Check door and window
hardware (hinges, knobs, pins, latches, locks, etc.). Make sure door latch
bolts and dead bolts engage properly. Adjust, tighten and lubricate where necessary. Spray
graphite into keyholes and onto hinges when lubricating – never use oil. Look for binding or rubbing
in the frames, cracked panes, difficult operation, locking problems, cracking or peeling paint or
varnish. Adjust, lubricate, clean and re-seal as necessary. Door thresholds can often be adjusted
by loosening or tightening the threshold screws. Also, don’t forget to lubricate the tracks for
sliding and pocket doors. Paint or seal top and bottom of doors to reduce moisture penetration and
wood shrinking or swelling. Don’t sand or plane a door until it has been exposed to the various
moisture changes of every season.
TIPS FOR CLEANING: To clean lightly soiled windows, use a solution of: 1 cup of vinegar
to 1 gallon of warm water. For heavily soiled windows, use a solution of: 1 tablespoon of household
ammonia, 3 tablespoons of denatured alcohol or vinegar to 1 quart of warm water.
Warranty Section ?
Doors: Interior and Exterior
Garage Doors
Wood, Plastic and Metal Windows
Hardware
Storm doors, Windows and Screens
Weather stripping and Seals
Glass and Glazing
WHAT ? TEST APPLIANCES
Why ? To ensure proper operation.
When ? As required.
How ? Take the time to read each owner’s manual. These documents contain
maintenance and normal operating procedures along with warranty information.
If appliance is not working and there is no helpful information in the owner’s
manual, check the circuit breaker in the main electrical panel. If the breaker is
tripped, switch it to “Off” then back to “On”. If this still doesn’t help, call the customer service
phone number listed in the owner’s manual for assistance. Be prepared to supply the date of
purchase (closing date), the serial and model numbers and a brief description of the problem.
Warranty Section ?
Provided by manufacturer. Check the owner’s manual for
each appliance.
17
WHAT ? INSPECT THE FOUNDATION, BASEMENT OR CRAWL SPACE
Why ? To identify any leaks or problems.
When ? Twice a year.
How ? For slab-on-grade foundations, walk the entire ground floor and look for water stains or
cracks in the concrete. Remove stains with an appropriate concrete cleaning agent. Seal cracks
that may allow water to enter with a compatible waterproof caulk. Both can be found at your local
hardware store.
For basement foundations, walk the entire floor and perimeter walls. Look for water stains
or cracks in the concrete or cinder blocks. Remove stains with an appropriate concrete cleaning
agent. Seal non-structural cracks with a compatible waterproof caulk. Both can be found at your
local hardware or building supply store. Inspect sump pit if there is one. If there is standing
water in the pit, you may verify that sump is operational by pouring additional water into the pit to
trigger pump, or install a pump if absent.
For crawl space foundations, gain access to crawl space through the trap door. Inspect
concrete or cinder block walls. Look for water stains or cracks. Seal cracks that may allow water
to enter with a compatible waterproof caulk. Check ground surface for any standing water.
Inspect sump pit if applicable.
If there is water in the pit, verify that the sump pump is operational by pouring additional
water into the pit to trigger pump, or install a pump if absent. Locate all air vents. Verify that
they’re open and unobstructed by insulation or other debris.
Warranty Section ?
Cast-in Place Concrete
Unit Masonry
Insulation
Sealants
Construction and Control Joints
Waterproofing
Louvers and Vents
WHAT ? INSPECT THE PLUMBING SYSTEM
Why ? To verify proper operation and intended usage.
When ? Twice a year.
How ? Simultaneously turn on the water at all sinks, bathtubs and
showers; operate dishwasher and washing machine; and flush all toilets.
Check on all drains first to make sure nothing overflows. Then, look for any
leaks in the water and sewer pipes. Look in cabinets, closets, on the floor,
under lower level ceilings and in the basement or crawl spaces (if
applicable). Water pipes will be copper (metal) or a gray plastic. Sewer
pipes will be white or black plastic. If freezing temperatures occur, make
sure to disconnect the outside garden hoses to keep inner water pipes from
freezing and bursting at the spigot. If any water line leaks are found, locate the shut-off valve
nearest to the leak and turn the valve to the right (clockwise) until tight. If any sewer line leaks
are found, try to trace the piping back to the area it serves and discontinue use of those fixtures
until repairs are made. Consult with a qualified plumber as necessary.
Warranty Section ?
18
Plumbing
Water Supply
WHAT ? MAINTAIN PLUMBING FIXTURES AND APPLIANCES
Why ? To ensure proper operation.
When ? Twice a year.
How ? For sinks, turn on the hot and cold water and observe for adequate
water pressure and drainage.
If water pressure is low, unscrew the piece
(aerator) at the end of the spigot and inspect the filter screen. Wash out any trapped pieces of
debris, then reinstall. If sink is slow to drain, you can try some drain cleaner to see if that helps,
but use a funnel when pouring to avoid splashing acid on the basin surface. Drain cleaners should
not be used if your home is on a septic system. Another alternative to clear a drain would be to
disassemble the trap (“U”-shaped pipe) under the sink to try and clear any obstruction. Put a bucket
under the trap first since it usually contains a small amount of water. This also works well for
fishing out small valuables that go down the drain. To clean sink surfaces, use a non-abrasive
cleanser and warm water on a damp sponge.
For bathtubs and showers, operate the cold and hot water and check for adequate water
pressure and drainage. If you notice low water pressure in the shower, unscrew the shower head
and flush it out, against the direction of normal flow, to clear any debris. A rubber plunger can
usually unclog any drain obstructions. If that doesn’t work, you can try some drain cleaner to see
if that helps, but again, use a funnel when pouring to avoid splashing acid on the tub or shower
surface. Drain cleaners should not be used if your home is on a septic system. Clean surfaces with
a non-abrasive cleanser and warm water on a damp sponge. Use brass cleaner on solid brass fixtures
- not coated brass.
For toilets, clean often using a non-abrasive cleanser. Avoid scrubbing bowl too hard with a
toilet brush – bristle rod may scratch porcelain. Avoid using drop-in type cleaners. Never mix
cleaners especially those containing bleach. If toilet clogs and begins to overflow, turn off water
supply at shut-off valve near the floor. Use a rubber plunger or something called a “coil spring
auger” to clear any clogs. If toilet runs constantly, try adjusting the float mechanism in the tank
to shut-off fill-water sooner. Never flush baby wipes, sanitary napkins, dental floss, hair, grease,
motor oil, paper towels or cups, diapers, small dead pets, etc. Condensation on the outside of the
tank is not a leak – try purchasing a tank cover if desired.
For spas or jetted tubs, see “bathtubs” above for cleaning suggestions. To avoid motor
damage, never operate jets unless outlet ports are covered by at least three inches of water. If
jets don’t work, check to see if GFI outlet switch is tripped in the tub equipment housing area.
For garbage disposals, always use cold water when operating – hot water causes food to be
cut less efficiently by the blades and causes grease to liquefy which may solidify in your trap and
cause a clog. Avoid putting fruit peels or vegetable peels down the disposer which may also clog the
trap. If disposer won’t operate, unplug unit and manually try to rotate the inner chamber from the
bottom with the included Allen wrench. If you can’t find the wrench, a broom stick used as a lever
arm from the top side may also work. After you’ve given the chamber a few turns, plug it back in
and press the reset switch on the bottom of the unit and try again. Consult with a qualified
repairman, as necessary.
For hot water heaters, take the time to read the manufacturer’s operation manual which
explains how to periodically drain and refill the tank for optimal performance. Check that
temperature setting is set on letter “B”, “Normal” or 140 degrees.
For natural gas units, there is a pilot light and a main burner which heats the water. If the
pilot light goes out, read the re-lighting instructions found on the side of the tank. Never turn on
electricity to the unit or light the pilot if it has an empty tank. Always shut off the electric or gas
supply before turning off the water supply. When away from your home for an extended
19
period of time, turn the temperature down to its lowest setting. Never store combustible materials
near a natural gas unit. Fumes are often heavier than air and can make their way to the pilot light.
Vacuum often near the base of the unit to keep dust from interfering with the flame. Avoid using
the top of the water heater as a storage shelf. Test the pressure relief valve at least once a year
by briefly pulling up on the lever and confirming water discharge. Stay away from end of discharge
pipe when performing this test – scalding danger. Condensation at bottom of inner tank and above
flame is not a leak. Water dripping from the bottom of the outer tank may be a leak. Consult with
a qualified plumber* as necessary.
TIPS FOR CLEANING FIXTURES: Regular cleaning of fixtures prevents a soap scum
build-up. Never use a harsh cleaner, but rather; 1. Use a glass cleaner for chrome or brass; 2. Use
a “soft-scrub” cleaner for marble or cultured marble; 3. Use a stiff brush to clean grout. For heavy
stain, use a commercial grout cleaner. Regrout if necessary to prevent water from seeping behind
the tile and into the walls.
Warranty Section ?
Plumbing
Water Supply
WHAT ? CHECK YOUR HEATING AND COOLING SYSTEM
Why ? To verify proper operation.
When ? Air conditioner – just before the cooling season
Heat Pump or Furnace – just before the heating season
How ? For air conditioners, turn on system only when outside air temperature is greater than 60
degrees Fahrenheit. Set thermostat to desired temperature or to a temperature slightly higher
than normal if away from home during the day. (This will allow for quicker cooling to your desired
temperature at night rather than trying to cool a hot house.) If air conditioner does not operate,
check thermostat is set to “COOL” setting. If that doesn’t help, check the circuit breakers. There
are two: one which controls the compressor and one which controls the fan. Verify that both are
in the “ON” position. If either is tripped, switch it to the “OFF” position then to the “ON” position.
If that doesn’t work, call a qualified HVAC contractor for assistance as necessary.
If the system is operating properly, ensure that the condensation drain tube is draining
water and is unobstructed. (It’s usually a clear plastic tube located next to the heat pump which
drains into a floor drain or to the outside.) Verify that the outside compressor unit operates free
and clear of any debris and don’t forget to remove any protective cover left on the unit over the
winter. In general, shield the inside of your home from direct sunlight and outside air. Radiation
from the sun will heat your walls, floors and furniture. Outside air contains heat and humidity. Both
will significantly slow the cooling process. Consider installing ceiling fans where desirable. They
help with air circulation and enable the system to operate more efficiently. Make sure all cooling
and return air vents are clean, clear and unobstructed. Set air vent vanes upward on lower floors
and slightly downward on upper floors. Air blowing from the vents should be noticeably cool. If not,
there may be a refrigerant leak somewhere. Again, consult with a qualified HVAC contractor as
necessary.
20
For a heat pump or a natural gas furnace, turn on the system. (Heat pumps should not
be operated unless outside air temperature is below 65 degrees Fahrenheit.) Set thermostat at
desired temperature. If the system does not operate, check to see that thermostat is set to
“HEAT” setting. Also check that fan panel on furnace unit is secure. (There is a switch behind
the panel which will keep the furnace from operating if the panel is loose.) If that doesn’t work,
check the circuit breakers. Verify that breakers are in the “ON” position. If any breakers
relating to the fan or compressor are tripped, switch them to the “OFF” position then to the “ON”
position. Otherwise, consult with a qualified HVAC contractor for assistance as necessary.
If the system is operating properly, confirm that noticeably warm air is blowing out of the
air vents. A mild odor is common the first time you turn on the heat and should dissipate shortly.
Also check that any auxiliary heaters are operational (heat pump). If you have natural gas heat
and smell a strong odor of gas, leave the home immediately and call the gas company from a
neighbor’s house. Do not turn on lights or use the telephone. If your furnace has a pilot light,
there will be re-lighting instructions on one of the inside panels for reference in the event it ever
goes out.
Make sure the fresh air duct near a natural gas unit is open and unobstructed. Occasionally,
heat pumps will activate a defrost cycle which will melt ice buildup on the internal coils of the
outside unit. When this occurs, steam will be seen rising from the unit. This is normal and not cause
for concern.
Allow direct sunlight in whenever possible. Radiation from the sun will heat your walls,
floors and furniture and aid the heating system. Consider installing ceiling fans where desirable.
They help with air circulation and enable the system to operate more efficiently. Make sure all
heating and return air vents are clean, clear and unobstructed. Set air vent vanes slightly
downward on lower floors and upward on upper floors.
Check the filter regularly on any heating or cooling system. Dirty filters result in
reduced efficiency and higher operating cost. If your system has a disposable filter, you should
replace it at least every other month during the heating season (all year if you have air-conditioning).
Periods of heavy use, high traffic in and out of the home, or other environmental conditions may
necessitate more frequent replacement. Verify that the filter arrow points in the direction of
air flow. Buy filters in large quantity for the sake of convenience. Permanent filters may be
vacuumed or tapped to loosen dirt, then washed with warm water or mild detergent. Have unit
serviced once a year.
Warranty Section ?
Heating and Air Conditioning
21
WHAT ? EXAMINE THE ELECTRICAL SYSTEM
Why ? To confirm system performs as intended.
When ? Twice a year.
How ? Check the main service panel. Look for rust, water stains, soot
stains, or melted wires. Check the circuit breakers. See that they are
properly labeled. Do a quick check to verify that the labeled circuit is
actually the correct circuit by switching off the breaker and trying
some of the devices connected to that circuit. If it’s not correctly labeled, re-label it and
investigate the remaining circuits. Circuit breakers have three positions: “ON”, “OFF”, and
“tripped”. They are designed to allow only a certain amount of electrical current to pass through
the wires — usually 15 to 20 Amps. Circuit breakers will trip, or shut down, if that amount of
current is exceeded. If any breakers are tripped, switch them to “OFF” then back to “ON”. If
the breaker trips again, unplug all devices on that circuit. If this corrects the problem, then there
are too many devices plugged in to this circuit or one of the devices or cords is faulty, unsafe
and leaking electrical current. If the breaker continues to trip, consult with a qualified
electrician as necessary.
Check all GFI outlets and breakers. These outlets and switches have those “TEST” and
“RESET” buttons on them and are ultra current sensitive to protect you from accidental
electrocution if you’re exposed to water and an electrical device. They can be found in kitchens,
bathrooms, garages, basements and in the main service panel. Push the “TEST” button at least
once a month to trip the circuit. If the “RESET” button doesn’t pop outward during this test,
consult with a qualified electrician*, as necessary, to replace the GFI switch. If it does pop out,
push it back in and repeat next month. Do not plug refrigerators or freezers into a GFI circuit.
These appliances experience sudden large power draws which can trip the GFI switch and spoil
the food!
In general, keep tree limbs away from any overhead power lines. Always call your electrical
utility service to locate underground power lines before digging any trenches or holes. If an
electrical outlet doesn’t work, see if it’s controlled by a switch, GFI switch, or if the breaker has
tripped, before calling an electrician. Don’t use light bulbs with a higher wattage than the fixture
allows. Avoid changing exterior light bulbs in the rain. Never overload extension cords or use too
many when bringing power to a remote device or fixture – check the label for restrictions. Plug
sensitive electronic devices such as televisions, computers, printers, VCRs, etc. into appropriate
surge protector strips. Unplug them during lightning storms. If there are small children in the
home, install outlet protector guards to keep out little fingers and paper clips!
Warranty Section ?
Electrical Conductors
Switches and Receptacles
Service and Distribution
22
PRE-CLOSING QUALITY ASSURANCE CHECKLIST
P = Item Passes
R = Item Needs to be Repaired
N/A = Item Not Applicable
LIVING AREA
I. ENTRY
a. Front Door
b. Walls
c. Ceiling
d. Floor Cov.
e. Windows
f. HVAC Sys.
g. Trim
h. Electric
1. Outlets
2. Switches
3. Fixtures
i. Closet
1. Doors
2. Walls
3. Floor Cov.
P
R
(
(
(
(
(
(
(
(
(
(
(
(
(
(
(
II. LIVING ROOM
a. Walls
b. Ceiling
c. Floor Cov.
d. Windows
e. HVAC Sys.
f. Trim
g. Electric
1. Outlets
2. Switches
3. Fixtures
h. Fireplace
i. Wood Beams
P
( )
( )
( )
( )
( )
( )
( )
( )
( )
( )
( )
( )
R
( )
( )
( )
( )
( )
( )
( )
( )
( )
( )
( )
( )
N/A
( )
( )
( )
( )
( )
( )
( )
( )
( )
( )
( )
( )
III. DEN
a. Walls
b. Ceiling
c. Floor Cov.
d. Windows
e. HVAC Sys.
f. Trim
g. Electric
1. Outlets
2. Switches
3. Fixtures
h. Fireplace
i. Closet
1. Doors
2. Walls
3. Floor Cov.
j. Door
P
( )
( )
( )
( )
( )
( )
( )
( )
( )
( )
( )
( )
( )
( )
( )
( )
R
( )
( )
( )
( )
( )
( )
( )
( )
( )
( )
( )
( )
( )
( )
( )
( )
N/A
( )
( )
( )
( )
( )
( )
( )
( )
( )
( )
( )
( )
( )
( )
( )
( )
IV. DIN/RM
a. Walls
b. Ceiling
c. Floor Cov.
P
R N/A
( ) ( ) ( )
( ) ( ) ( )
( ) ( ) ( )
)
)
)
)
)
)
)
)
)
)
)
)
)
)
)
(
(
(
(
(
(
(
(
(
(
(
(
(
(
(
)
)
)
)
)
)
)
)
)
)
)
)
)
)
)
N/A
(
(
(
(
(
(
(
(
(
(
(
(
(
(
(
)
)
)
)
)
)
)
)
)
)
)
)
)
)
)
LIVING AREA
IV. DIN/RM (CONT.)
d. Windows
e. HVAC Sys.
f. Trim
g. Electric
1. Outlets
2. Switches
3. Fixtures
h. Fireplace
i. Wood Beams
P
R
N/A
( )
( )
( )
( )
( )
( )
( )
( )
( )
(
(
(
(
(
)
)
)
)
)
(
(
(
(
(
(
(
(
(
(
V. KITCH/DIN
a. Walls
b. Ceiling
c. Floor Cov.
d. Windows
e. HVAC Sys.
f. Trim
g. Electric
1. Outlets
2. Switches
3. Fixtures
h. Fireplace
i. Closet
1. Doors
2. Walls
3. Floor Cov.
j. Door
k. Plumbing
1. Drains
2. Waterlines
l. Cabinets
m. Drawers
n. Escutcheons
(
(
(
(
(
(
(
(
(
(
(
(
(
(
(
(
(
(
(
(
(
(
)
)
)
)
)
)
)
)
)
)
)
)
)
)
)
)
)
)
)
)
)
)
R
( )
( )
( )
( )
( )
( )
( )
( )
( )
( )
( )
( )
( )
( )
( )
( )
( )
( )
( )
( )
( )
( )
VI. MAST/BDRM
a. Walls
b. Ceiling
c. Floor Cov.
d.Windows
e. HVAC Sys.
f. Trim
g. Electric
1. Outlets
2. Switches
3. Fixtures
h. Fireplace
i. Closet
1. Doors
2. Walls
3. Floor Cov.
j. Door
k. Wood Beams
(
(
(
(
(
(
(
(
(
(
(
(
(
(
(
(
(
P
P
)
)
)
)
)
)
)
)
)
)
)
)
)
)
)
)
)
(
(
(
(
(
(
(
(
(
(
(
(
(
(
(
(
(
)
)
)
)
)
)
)
)
)
)
N/A
( )
( )
( )
( )
( )
( )
( )
( )
( )
( )
( )
( )
( )
( )
( )
( )
( )
( )
( )
( )
( )
( )
R N/A
) ( )
) ( )
) ( )
) ( )
) ( )
) ( )
) ( )
) ( )
) ( )
) ( )
) ( )
) ( )
) ( )
) ( )
) ( )
) ( )
) ( )
LIVING AREA
VII. MAST/BATH
a. Walls
b. Ceiling
c. Floor Cov.
d. Windows
e. HVAC Sys.
f. Trim
g. Electric
1. Outlets n
2. Switches
3. Fixtures
h. Plumbing
1. Drains
2. Waterlines
i. Cabinets
j. Drawers
k. Doors
1. Escutcheons
m.Grout
n. Shower/Tub
o. Linen Closet
1. Doors
2. Walls
3. Floor Cov.
P
(
(
(
(
(
(
(
(
(
(
(
(
(
(
(
(
(
(
(
(
(
(
(
VIII. BDRM #2
a. Walls
b. Ceiling
c. Floor Cov.
d. Windows
e. HVAC Sys.
f. Trim
g. Electric
1. Outlets
2. Switches
3. Fixtures
h. Closet
1. Doors
2. Walls
3. Floor Cov.
i. Door
(
(
(
(
(
(
(
(
(
(
(
(
(
(
(
IX. BDRM #3
a. Walls
b. Ceiling
c. Floor Cov.
d. Windows
e. HVAC Sys.
f. Trim
g. Electric
1. Outlets
2. Switches
3. Fixtures
(
(
(
(
(
(
(
(
(
(
R
N/A
) ( ) ( )
) ( ) ( )
) ( ) ( )
) ( ) ( )
) ( ) ( )
) ( ) ( )
) ( ) ( )
) ( ) ( )
) ( ) ( )
) ( ) ( )
) ( ) ( )
) ( ) ( )
) ( ) ( )
) ( ) ( )
) ( ) ( )
) ( ) ( )
) ( ) ( )
) ( ) ( )
) ( ) ( )
) ( ) ( )
) ( ) ( )
) ( ) ( )
) ( ) ( )
P
)
)
)
)
)
)
)
)
)
)
)
)
)
)
)
R
( )
( )
( )
( )
( )
( )
( )
( )
( )
( )
( )
( )
( )
( )
( )
N/A
( )
( )
( )
( )
( )
( )
( )
( )
( )
( )
( )
( )
( )
( )
( )
R
)
)
)
)
)
)
)
)
)
)
(
(
(
(
(
(
(
(
(
(
N/A
( )
( )
( )
( )
( )
( )
( )
( )
( )
( )
P
)
)
)
)
)
)
)
)
)
)
LIVING AREA
P
IX. BDRM #3 (CONT.)
h. Closet
( )
1. Doors
( )
2. Walls
( )
3. Floor Cov.
( )
i. Door
( )
(
(
(
(
(
X. BDRM #4
a. Walls
b. Ceiling
c. Floor Cov.
d. Windows
e. HVAC Sys.
f. Trim
g. Electric
1. Outlets
2. Switches
3. Fixtures
h. Closet
1. Doors
2. Walls
3. Floor Cov.
i. Door
P
( )
( )
( )
( )
( )
( )
( )
( )
( )
( )
( )
( )
( )
( )
( )
R
( )
( )
( )
( )
( )
( )
( )
( )
( )
( )
( )
( )
( )
( )
( )
N/A
( )
( )
( )
( )
( )
( )
( )
( )
( )
( )
( )
( )
( )
( )
( )
XI. BATH #2
a. Walls
b. Ceiling
c. Floor Cov.
d. Windows
e. HVAC Sys.
f. Trim
g. Electric
1. Outlets
2. Switches
3. Fixtures
h. Plumbing
1. Drains
2. Waterlines
i. Cabinets
j. Drawers
k. Doors
1. Escutcheons
m.Grout
n. Shower/Tub
o. Linen Closet
1. Doors
2. Walls
3. Floor Cov.
P
( )
( )
( )
( )
( )
( )
( )
( )
( )
( )
( )
( )
( )
( )
( )
( )
( )
( )
( )
( )
( )
( )
( )
R
( )
( )
( )
( )
( )
( )
( )
( )
( )
( )
( )
( )
( )
( )
( )
( )
( )
( )
( )
( )
( )
( )
( )
N/A
( )
( )
( )
( )
( )
( )
( )
( )
( )
( )
( )
( )
( )
( )
( )
( )
( )
( )
( )
( )
( )
( )
( )
XII. Bath #3
a. Walls
b. Ceiling
c. Floor Cov.
d. Window
e. HVAC Sys.
f. Trim
g. Electric
1. Outlets
2. Switches
3. Fixtures
h. Plumbing
1. Drains
2. Waterlines
i. Cabinets
j. Drawers
k. Doors
1. Escutcheons
m. Grout
P
( )
( )
( )
( )
( )
( )
( )
( )
( )
( )
( )
( )
( )
( )
( )
( )
( )
( )
R
)
)
)
)
)
R
( )
( )
( )
( )
( )
( )
( )
( )
( )
( )
( )
( )
( )
( )
( )
( )
( )
( )
N/A
(
(
(
(
(
)
)
)
)
)
N/A
( )
( )
( )
( )
( )
( )
( )
( )
( )
( )
( )
( )
( )
( )
( )
( )
( )
( )
LIVING AREA
P
XII. BATH #3 (CONT.)
n. Shower/Tub
( )
o. Linen Closet
( )
1. Doors
( )
2. Walls
( )
3. Floor Cov.
( )
R
N/A
(
(
(
(
(
(
(
(
(
(
XIII. BDRM HALL
a. Walls
b. Ceiling
c. Floor Cov.
d. Windows
e. HVAC Sys.
f. Trim
g. Electric
1. Outlets
2. Switches
3. Fixtures
h. Closet
1. Doors
2. Walls
3. Floor Cov.
i. Staircase
j. Insulation
k. Furnace
P
( )
( )
( )
( )
( )
( )
( )
( )
( )
( )
( )
( )
( )
( )
( )
( )
( )
R N/A
( ) ( )
( ) ( )
( ) ( )
( ) ( )
( ) ( )
( ) ( )
( ) ( )
( ) ( )
( ) ( )
( ) ( )
( ) ( )
( ) ( )
( ) ( )
( ) ( )
( ) ( )
( ) ( )
( ) ( )
XIV. UTIL RM
a. Walls
b. Ceiling
c. Floor Cov.
d. Windows
e. HVAC Sys.
f. Trim
g. Electric
1. 110 Outlet
2. 220 Outlet
3. Switches
4. Fixtures
h. Closet
1. Doors
2. Walls
3. Floor Cov.
i. Drns. & Conn.
j. Gas
k. Doors
1. Cab. & Shelv.
m.HWH
P
R N/A
( ) ( ) ( )
( ) ( ) ( )
( ) ( ) ( )
( ) ( ) ( )
( ) ( ) ( )
( ) ( ) ( )
( ) ( ) ( )
( ) ( ) ( )
( ) ( ) ( )
( ) ( ) ( )
( ) ( ) ( )
( ) ( ) ( )
( ) ( ) ( )
( ) ( ) ( )
( ) ( ) ( )
( ) ( ) ( )
( ) ( ) ( )
( ) ( ) ( )
( ) ( ) ( )
( ) ( ) ( )
XV. GARAGE
a. Walls
b. Ceiling
c. Slab
d. Windows
e. Electric
1. 110 Outlet
2. 220 Outlet
3. Switches
4. Fixtures
f. Gas
g. Doors
h. HWH
P
( )
( )
( )
( )
( )
( )
( )
( )
( )
( )
( )
( )
R N/A
( ) ( )
( ) ( )
( ) ( )
( ) ( )
( ) ( )
( ) ( )
( ) ( )
( ) ( )
( ) ( )
( ) ( )
( ) ( )
( ) ( )
XVI. EXTERIOR
a. Elev. Correct
b. Paint
c. Cornice
d. Gutters
e. Spl Blbs
P
( )
( )
( )
( )
( )
R N/A
( ) ( )
( ) ( )
( ) ( )
( ) ( )
( ) ( )
)
)
)
)
)
)
)
)
)
)
LIVING AREA
XVI. EXTERIOR (CONT.)
f. Shingles
g. Vent Pipe
h. Roof Jacks
i. Brick
j. Planting
k. Grading
1. CleanOuts
m. SukUtLns
n. Chimney
o. Ext. Grading
p. WtrMtr
q. ElectMtr
r. GasMtr
s. TeleCond
t. O/S Door
u. Electric
1. Doorbell
2. Prch Light
3. Patio Light
4. Other Light
v. A/C Unit
w. A/C Drain
x. O/S Faucet
Quality Assured By
Immediate Supervisor/
Quality Control Manager
Sales Consultant/Presenter
Date
Homebuyer
P
(
(
(
(
(
(
(
(
(
(
(
(
(
(
(
(
(
(
(
(
(
(
(
)
)
)
)
)
)
)
)
)
)
)
)
)
)
)
)
)
)
)
)
)
)
)
R
(
(
(
(
(
(
(
(
(
(
(
(
(
(
(
(
(
(
(
(
(
(
(
N/A
)
)
)
)
)
)
)
)
)
)
)
)
)
)
)
)
)
)
)
)
)
)
)
(
(
(
(
(
(
(
(
(
(
(
(
(
(
(
(
(
(
(
(
(
(
(
)
)
)
)
)
)
)
)
)
)
)
)
)
)
)
)
)
)
)
)
)
)
)
WARRANTY ORIENTATION
Date
Lot
Block
Subdivision
Street Address
Homebuyer’s Name
My Builder or Agent has conducted a pre-closing orientation walkthrough and has
explained each of the below listed items. During the course of this review, I listed items
as noted on the pre-closing checklist. With the exception of the items listed on the
pre-closing checklist, I am satisfied with the materials and workmanship in my home, and
I consider my home to be acceptably completed.
Signed
Landscaping: Has been reviewed with me, and
is not a warrantable item.
Signed
Driveway, walks, patio and other excluded
items: Have been reviewed with me and
are not warrantable items.
Signed
Grading & Swales: Have been reviewed with me
and I understand my responsibilities under
the warranty.
Homebuyer(s):
Date:
Address:
HOMEBUYER / BUILDER PRE-CLOSING WALKTHROUGH LIST
Date
Lot
Block
Subdivision
Street Address
Homebuyer’s Name
LOCATION:
DESCRIPTION:
All of the items listed above will be addressed by my Builder prior to closing.
Homebuyer(s):
Builder:
Date:
All of the items listed above have been completed to my satisfaction.
Homebuyer(s):
Date:
30-DAY WARRANTY SERVICE REQUEST FORM
Warrantable items you believe the Builder is responsible for and are not Homeowner
maintenance items.
Today’s Date
Owner’s Name
Address
Home Phone
Your Closing Date
Work Phone
Access to your home (Check one)
You will be home for scheduled
appointment
We have a key for access
Items needing repair - Be specific
Please Sign When Work is Complete
Attn: Warranty Service Department
Builder Name
Address
Warranty
Item
Normal Homeowner
To be
Maintenance
Investigated
✔(Box to be checked by inspector)
11-MONTH WARRANTY SERVICE REQUEST FORM
Warrantable items you believe the Builder is responsible for and are not Homeowner
maintenance items.
Today’s Date
Owner’s Name
Address
Home Phone
Your Closing Date
Work Phone
Access to your home (Check one)
You will be home for scheduled
appointment
We have a key for access
Items needing repair - Be specific
Please Sign When Work is Complete
Attn: Warranty Service Department
Builder Name
Address
Warranty
Item
Normal Homeowner
To be
Maintenance
Investigated
✔(Box to be checked by inspector)
HOME BUYERS WARRANTY CORPORATION
CUSTOMER SERVICE OFFICE
One Denver Highlands
10375 East Harvard Avenue, Suite 100
Denver, Colorado 80231
720-747-6000
www.2-10.com
© 2002 Home Buyers Warranty Corporation
All Rights Reserved
HBW_470_0308