1
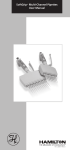
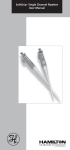
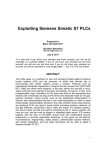
BioLevitator
Cell Culture Handbook
Trademarks
BioLevitatorTM, GEMTM, and LeviTubeTM are Trademarks of Global Cell SolutionsTM.
Important Notice
This guide may not be used or reproduced in any way whatsoever without the
express written consent of HAMILTON Bonaduz AG.
Copyright © 2010 HAMILTON Bonaduz AG, All Rights Reserved.
Contents of this manual are subject to change without prior notice. Technical
modifications reserved. Greatest possible care was used on the correctness of the
information in this manual. If errors should be discovered nevertheless, HAMILTON
is pleased to be informed about it. Regardless of this, HAMILTON cannot assume
any liability for errors in this manual or for their consequences.
Table of Contents
TABLE OF CONTENTS
TABLE OF CONTENTS ...........................................................................................3
1
INTRODUCTION ..............................................................................................4
1.1
Introducing the BioLevitator .......................................................................... 4
1.2
Introducing the GEM..................................................................................... 6
1.3
Culturing Cells in the BioLevitator................................................................. 8
1.3.1
Inoculation ............................................................................................. 8
1.3.2
Culture ................................................................................................. 10
1.3.3
Harvesting ........................................................................................... 11
2
PROTOCOLS ...............................................................................................13
2.1
2.2
2.3
2.4
2.5
2.6
3
Protocol 1: Preparation of the GEM ............................................................ 13
Protocol 2: Loading Assay in 24-Well Format ............................................. 14
Protocol 3: Inoculation and Culturing Cells on GEM in the BioLevitator...... 16
Protocol 4: Monitoring of BioLevitator Cultures........................................... 18
Protocol 5: Harvesting a Cell Suspension from a BioLevitator Culture ....... 20
Protocol 6: Preparing a GEM Suspension for Downstream Assays............ 22
TROUBLESHOOTING .................................................................................... 23
3.1
3.2
3.3
3.4
Troubleshooting the Inoculation Phase....................................................... 23
Troubleshooting the Culture Phase ............................................................ 24
Troubleshooting the Harvesting of Cells from the GEM .............................. 25
Getting Technical Assistance...................................................................... 26
BioLevitator – Cell Culture Handbook
3
Introduction
1
INTRODUCTION
1.1
Introducing the BioLevitator
The BioLevitator (Figure 1) is a bench-top incubator and bioreactor hybrid capable of
handling four independent and high density cell cultures. It eliminates peripheral
instruments such as incubators and centrifuges, and minimizes manual handling. The
BioLevitator utilizes the magnetic Global Eukaryotic Microcarrier (GEM) technology
from Global Cell Solutions and integrates the relevance of 3D cell culture with the
convenience of microcarrier culture.
Why the BioLevitator?
The BioLevitator is a scalable cell culture system that integrates 3D cell culture into a
streamlined culture process. As a walkaway bench-top device, the BioLevitator
allows the user to focus on value-added research and discovery rather than cell
culture.
Figure 1: The BioLevitator and key features
4
BioLevitator – Cell Culture Handbook
Introduction
Precise Environmental Control
The compact incubator chamber monitors and
maintains CO2 and temperature during cell expansion.
On screen graphs track temperature, CO2, and pH
(optional).
Touch & Go
Maintain four unique cultures at the touch of a button.
The touch-screen interface provides users with
intuitive and easy to program cell culture workflow. In
addition, the ergonomic click-wheel allows quick
navigation.
Data Logging
Complete culture reports, including metrics such as
temperature, CO2, and pH are generated and saved at
the end of each culture experiment. The culture
reports can be easily transferred via USB stick from
the BioLevitator to the PC.
Control of the GEM
Rotation of the LeviTube gently maintains the cells on
the GEM in suspension and ensures optimal access to
nutrients. Magnets integrated in the BioLevitator are
used to pellet the cells for media exchange and cell
harvesting.
Convection Channel
The convection channel with integrated fan is
designed to maintain a homogeneous environment
within the cell culture chamber. It is located on the left
side of the instrument and can be easily replaced to
limit contamination of the system.
CO2 Control
Integrated with a compact laboratory-grade controller,
the BioLevitator ensures proper delivery of CO2. A
sampling port on the top cover is available to monitor
the chamber environment using a laboratory CO2
analyser.
BioLevitator – Cell Culture Handbook
5
Introduction
1.2
Introducing the GEM
The Global Eukaryotic Microcarrier (GEM) is a pipette-able and paramagnetic
microcarrier for the culture of adhesion-dependent cell lines (Figure 2). Composed of
an alginate core embedded with paramagnetic particles and coated with covalently
bound adhesion molecules, the GEM is also an ideal matrix for three-dimensional
biology.
The GEM is available with 7 different coatings:
§
§
§
§
§ poly-D-lysine
§ laminin
§ basement membrane
gelatin
collagen I
collagen IV
fibronectin
Why the GEM?
The GEM is designed to provide an optimal cell culture surface for your preferred cell
line while providing a vehicle for cell transfer through the drug discovery process. The
GEM substrate supports high-density cell cultures in the BioLevitator. As a magnetic
microcarrier, the GEM can be controlled during media change, harvesting, or assay
washes.
75-150 µm in diameter
Figure 2: The GEM and key features
6
BioLevitator – Cell Culture Handbook
Introduction
Alginate Core
Alginate is an unbranched polysaccharide which gels
in the presence of divalent cations, such as calcium.
The GEM core is composed of a dense alginate
hydrogel that allows for the exchange of ions and
small molecules.
Protein Coating
A thin covalently bound coat of gelatin surrounds the
alginate core of the GEM. This gelatin coat can also
be modified with the addition of collagen I, collagen IV,
fibronectin, laminin, poly-D-lysine or reconstituted
basement membrane.
Paramagnetic Particles
Dispersed in the alginate core are small paramagnetic
particles that serve to simplify culture manipulations
and allow for automated cell culture. Cells on the GEM
are easily handled during media change, harvesting,
and assay washes.
Assay on GEM
The alginate GEM core is optically clear and nonautofluorescent. Absorbance, luminescence and
fluorescence assays are easily performed with cells
still attached to the GEM. Cells can also be
transfected and cryopreserved directly on the bead.
Easy Cell Harvesting
Although it is recommended to keep cells on the GEM
for most applications, some assays require a cell
suspension. Short incubation with Accutase simply
dissociates cells from the GEM leaving the alginate
core intact. Trypsin with EDTA solubilizes the GEM.
Pipette-able Microcarrier
The GEM has a diameter of 75 - 150 µm and is easily
pipette-able. As a pipette-able microcarrier, the GEM
enables sampling, dispensing and transfer of cells
without prior trypsinization.
BioLevitator – Cell Culture Handbook
7
Introduction
1.3
Culturing Cells in the BioLevitator
Cell culture in the BioLevitator, as with all cultures, consists of three phases: 1)
inoculation, 2) culture, and 3) harvesting (Table 1).
Phase
Symbol
Description
Inoculation
Loading of cells on the GEM substrate
Culture
Expansion of cells on the GEM substrate
Harvesting
Dissociation of the cells from the GEM
Table 1: The three phases of cell culture in the BioLevitator.
1.3.1 Inoculation
During the inoculation phase, cells attach to the GEM in three phases (Figure 3).
First, rounded cells make contact with the GEM (adsorption). Cells then flatten on the
side of contact and appear bell shaped (attachment). Finally, cells completely flatten
down on the GEM, which supports normal cellular processes including growth
(settling).
Figure 3: The three phases of cell attachment to the GEM during the inoculation phase,
illustrated with pictures of CHO cells.
A successful inoculation will produce an even distribution of adhered cells across the
entire GEM population, ensuring all the surface area available is utilized for
8
BioLevitator – Cell Culture Handbook
Introduction
expansion. Four critical variables need to be optimized to create a successful
inoculation: 1) GEM type, 2) cell to GEM ratio, 3) agitation during inoculation, and 4)
media type and volume.
GEM Type
The GEM exists with 7 different surface protein coatings. Different cells will show
specificity for attachment to particular surfaces. The surface(s) promoting most
attachment and growth can be easily identified in a binding assay, for example using
the Adhesion Assay Kit (p/n GKT-5001).
Cell to GEM Ratio
Standard protocols inoculate 0.5 - 2 mL GEM with 2 - 6 x10⁶ cells/mL GEM in 10 mL
medium. The cells used for inoculation should be in logarithmic growth to limit initial
lag phase. The inoculum should be a single cell suspension that is free of aggregates,
which will cause heterogeneity.
Agitation during Inoculation
The BioLevitator provides a precise digital control of the agitation parameters during
inoculation (Table 2). The Rotation period, Rotation pause, and Rotation speed
describe the basic movement of the LeviTube. The Agitation period and Agitation
pause are specific to the inoculation of cells requiring intermittent agitation.
Parameter
Definition
Usual range
Rotation period
Rotation time in one direction
1 - 3 sec
Rotation pause
Pause between two rotation
periods
Rotation speed during rotation
period
Agitation time for intermittent
inoculation protocols
Agitation pause for intermittent
inoculation protocols1
Time required for efficient
loading of the GEM
0 sec
Rotation speed
Agitation period
Agitation pause
Protocol duration
50 - 100 rpm
1 - 2 min
0 - 60 min
4 - 24 hours
Table 2: Inoculation parameters: definition and common range. [1] Some cells, e.g.
fibroblasts, may require a constant agitation. The agitation pause is then set at 0 min.
Agitation will ensure a homogenous inoculation and prevent clumping. Most cell
types however do not inoculate under constant agitation but require intermittent
agitation with an Agitation pause lasting 10 - 60 min. Increasing the Agitation pause
will enhance cell loading whereas decreasing the Agitation pause will prevent
clumping during inoculation. Observing the rate at which cells adhere to the GEM
and therefore the Protocol duration can be done in a multi-well plate. Ideally, this
occurs concurrently to identifying the ideal GEM type.
BioLevitator – Cell Culture Handbook
9
Introduction
Medium Type and Volume
A variety of different media can be used for culture in the BioLevitator. A good
starting point is to use a medium which supports the growth of a particular cell type in
other systems. A richer medium such as DMEM/F12 may be needed for the initial
stages of the culture, especially when cell densities are low. The use of higher serum
concentration (10 - 20% serum) can increase cell viability during inoculation and
loading to the GEM. The addition of medium supplements such as non-essential
amino acids may also improve loading and growth in the beginning of the culture.
Attachment efficiency is usually enhanced when cells are inoculated in a reduced
volume. Cells have a greater chance of coming into contact with a GEM, and the
conditioning effects on the medium are greater. Inoculation in the BioLevitator usually
takes place in a 10 mL volume.
1.3.2 Culture
Expanding the culture is easily accomplished following a successful inoculation. As
with traditional culture, the media and its components must be maintained to ensure
steady growth and good yields. Concurrently, rotation speed may be increased to
maintain the GEM in suspension and reduce clumping. A successful expansion
requires addition of medium, regular medium changes, and monitoring for clumping.
Addition of Medium
The usual procedure is to fill up medium to 50 mL, the maximal culture volume of the
LeviTube, after inoculation (Figure 4). A progressive scheme for medium addition
may be developed, if a particular cell type is sensitive to osmotic shock and tend to
fall from the GEM upon medium addition.
Replenishment scheme1
Time
6 hours
day 3
Volume
40 mL
40 mL
Type
addition
change
[1] May vary depending on the cell type or
the inoculation and culture conditions.
Figure 4: Example medium replenishment
for the culture of CHO cells. 4 million CHO
cells were inoculated on 1 mL GEM in 10
mL DMEM/F12 with 10% FCS. At the end
of the inoculation (6 hours), 40 mL
medium was added. On day 3, 40 mL
medium was changed.
10
BioLevitator – Cell Culture Handbook
Introduction
Medium Change
Careful medium replenishment can directly impact the yields achieve at the end of
the culture. Media change has 3 functions: 1) replacing nutrients depleted during the
culture, 2) removing metabolic products which inhibit growth, and 3) help control pH.
The frequency of media replenishment and the volume to be changed depend on the
cell type, the cell density, and the culture medium. A typical procedure is to start with
replenishing 50 - 80% of the medium volume every 3 days (Figure 4).
Monitoring of the Culture
During the protocol optimization phase, daily monitoring of the culture is common
practice. Monitoring includes microscopic observation of cells on the GEM (Figure 5)
and cell counting. Hoechst stain facilitates the observation of cells on the GEM.
A
B
Figure 5: Microscopic monitoring of the culture of MDBK in the BioLevitator. Cells were
observed under microscope (A) and after Hoechst staining (B).
1.3.3 Harvesting
Keeping cells on the GEM is the ideal method for most applications and assays
including viral transduction, cryopreservation, or fluorescent cell-based assays.
However, some assays (e.g. flow cytometry) may require cells in suspension. In
which case, standard harvesting methods including Trypsin with EDTA or Accutase
can be used. Since the alginate core uses calcium ions to gel, in the presence of
Trypsin with EDTA the GEM dissolves. Left behind are the cells in suspension and a
small number of para-magnetic particles which can be removed with the Cube
Magnet.
BioLevitator – Cell Culture Handbook
11
Protocols
2
PROTOCOLS
2.1
Protocol 1: Preparation of the GEM
The preparation of the GEM consists essentially in a wash step to remove the
storage buffer and allow the GEM substrate to equilibrate with the culture medium.
Omitting this step may lead to sub-optimal loading of the cells to the GEM.
Materials
§ GEM Supply Kit
§ Cube Magnet
§ Complete cell culture medium
§ Pipettor and sterile tips
Procedure
1.
Hold a 2 mL-vial of GEM over the Cube Magnet to immobilize the GEM
(Figure 6).
Figure 6: GEM immobilization using the Cube Magnet.
2.
Carefully aspirate off the storage buffer, and discard.
3.
Away from the Cube Magnet, add 1 mL of culture medium and use a
pipette to mix the slurry.
4.
Place the vial back on the Cube Magnet to sediment the GEM and aspirate
off the supernatant and add 1 mL of culture media.
Note: Store the pre-washed GEM at 4°C for up to 1 month.
BioLevitator – Cell Culture Handbook
13
Protocols
2.2
Protocol 2: Loading Assay in 24-Well Format
The loading assay described below is a qualitative analysis of the adhesion of cells to
the GEM and a useful tool to:
§ identify the optimal GEM type for loading and growth of a particular cell type
§ estimate the time required for optimal loading
§ determine the medium requirements (e.g. serum concentration) for loading of a
particular cell type to the GEM
Materials
§ GEM Supply Kit
§ Cube Magnet
§ 1 - 3 x10⁵ cells in exponential growth phase
§ Complete cell culture medium
§ Pipettor and sterile tips
§ Serological pipettes
§ Conical tubes
Procedure
1.
Determine the conditions to be tested and calculate the amount of starting
material required.
Use the Table 3 to determine the amounts of starting materials required.
Amounts per well of a 24-well plate
GEM
50 µL
Cells
1 - 3 x10⁵
Culture medium (final)
1 mL
Table 3: Suggested amounts of starting material per well of a 24-well plate.
2.
Wash the GEM once with media to remove the storage buffer (2.5 mM
CaCl2, 10 mM Hepes).
Refer to Protocol 1 for the detailed procedure.
3.
Per well of a 24-well plate, pipet 450 µL medium and add 50 µL pre-washed
GEM.
4.
Place the plate in the cell culture incubator during the preparation of the
cell suspension.
5.
Per well of a 24-well plate, prepare a single cell suspension containing
1 – 3 x 1 0 5 cells in 500 µL medium and transfer the inoculum to the
GEM / medium preparation in the plate.
Use a single cell suspension for inoculation. Cell aggregates lead to
heterogeneous loading.
14
BioLevitator – Cell Culture Handbook
Protocols
6.
Shake the plate gently and place it in the cell culture incubator.
7.
Monitor cell loading to the GEM every 2 hours and cell growth after
24 - 48 hours.
Refer to Figure 3 to identify the different stages of loading. Note the conditions
required for good attachment (settling): the GEM type, any changes to the
medium requirements as well as the time for good loading to occur.
BioLevitator – Cell Culture Handbook
15
Protocols
2.3
Protocol 3: Inoculation and Culturing Cells on GEM in the BioLevitator
Materials
§ BioLevitator One Month Supply Kit (includes GEM and LeviTubes)
§ Cube Magnet
§ BioLevitator
§ 2 – 6 x10⁶ cells in exponential growth phase
§ Complete cell culture medium
§ Pipettor and sterile tips
§ Serological pipettes
§ Conical tubes
Procedure (Figure 7)
1.
Turn the BioLevitator on and start the temperature and CO2 regulation.
2.
Wash the GEM with media to remove the storage buffer.
Refer to Protocol 1 for the detailed procedure.
3.
Pipet 3 mL medium to a LeviTube and add 1 mL pre-washed GEM.
4.
Place the LeviTube in the BioLevitator during the preparation of the cell
suspension.
5.
Prepare a single cell suspension containing 2 - 6 x10⁶ cells in 6 mL
medium and transfer the inoculum to the GEM / medium preparation in the
LeviTube.
Use a single cell suspension for inoculation. Cell aggregates lead to
heterogeneous loading.
6.
Place the LeviTube in the BioLevitator and start the desired Experiment.
Refer to the BioLevitator User Manual (p/n 624206) for further information.
7.
After inoculation, monitor cell loading to the GEM and GEM clumping.
During culture, monitor growth and GEM clumping daily.
Refer to Figure 3 to identify the different stages of loading. The monitoring of
BioLevitator cultures is described in Protocol 4.
8.
At the end of the inoculation phase or the day after, add 40 mL medium to
the LeviTube to bring the total culture volume to 50 mL.
Medium may be progressively added, if a particular cell type is sensitive to
osmotic shock and tend to fall from the GEM upon medium addition.
9.
Change up to 40 mL medium every 2 to 3 days.
The frequency and the extent of medium change will depend on the cell type,
the cell density, and the culture medium. Adjustment of the medium
replenishment scheme may be required to maximize final yields.
16
BioLevitator – Cell Culture Handbook
Protocols
Figure 7: Inoculation workflow.
BioLevitator – Cell Culture Handbook
17
Protocols
2.4
Protocol 4: Monitoring of BioLevitator Cultures
Daily monitoring of the culture is common practice, especially during the protocol
optimization phase. Procedures for microscopic observation of cells on the GEM and
cell counting are described below.
Materials
§ 1.5 mL tube
§ 96-well plate (flat bottom, optically clear)
§ Pipettor and tips
§ Ca2+ / Mg2+ free PBS
§ Accutase (or alternative harvesting solutions)
§ Hemocytometer
Procedure
1.
Mix well the content of the LeviTube by pipetting. Take a 550 µL sample
from the cell culture and place it in a 1.5 mL tube.
50 µL will be used for microscopic observation and 500 µL for cell counting.
Note: A 1 mL sample may be required for monitoring, if the amount of cells
available for counting is too low.
2.
Place 50 µL of the cell culture sample in a well of a 96-well plate and
observe under the microscope.
The objective of the microscopic observation is to verify that the culture
parameters set lead to good cell growth on the GEM while limiting clumping.
You may use Table 4 to analyze the culture.
Very low
Low
Medium
High
Very high
GEM with a least 1 cell
o
o
o
o
o
Empty GEM
o
o
o
o
o
GEM clumps
o
o
o
o
o
Single cells in suspension
o
o
o
o
o
Cell clumps in suspension
o
o
o
o
o
Table 4: Aid to the microscopic observation of BioLevitator cultures.
Note: Additional staining of the nuclei with Hoechst stain facilitates observation
of the cells on the GEM.
3.
Use the Cube Magnet to pull down the cells on GEM from the remaining
500 µL sample, aspirate the culture medium and wash with 1 mL
Ca 2 + / Mg 2 + free PBS.
4.
Add 100 µL Accutase and use a pipette to mix.
18
BioLevitator – Cell Culture Handbook
Protocols
5.
Incubate until the GEM dissolve leaving behind a single cell suspension
and partially dissolved GEM.
Visually monitor progress under the microscope to determine the time required
for a particular cell type to detach from the GEM. Short incubation with
Accutase will only partially dissolve the GEM, which limits the release of the
para-magnetic particles. Trypsin with EDTA will dissolve the GEM completely,
leaving behind a single cell suspension and the para-magnetic particles.
6.
Use the Cube Magnet to remove the GEM remnants and count the cells
with a hemocytometer.
BioLevitator – Cell Culture Handbook
19
Protocols
2.5
Protocol 5: Harvesting a Cell Suspension from a BioLevitator Culture
Materials
§ Serological pipettes
§ Ca2+ / Mg2+ free PBS
§ Accutase (or alternative harvesting solutions)
§ Hemocytometer
Procedure (Figure 8)
1.
Stop the running experiment and remove the LeviTube from the
BioLevitator.
2.
Pull the confluent GEM substrate to the bottom of the tube with the Cube
Magnet and aspirate the culture medium.
3.
Gently wash the GEM substrate with 10 mL of Ca2+ / Mg2+ free PBS.
4.
Add 10 mL Accutase and gently mix the solution with a pipette.
5.
Return the LeviTube to the BioLevitator and start the Harvesting protocol.
Visually monitor progress under the microscope to determine the time required
for a particular cell type to detach from the GEM (Protocol duration). Short
incubation with Accutase will only partially dissolve the GEM, which limits the
release of the para-magnetic particles. Trypsin with EDTA will dissolve the GEM
completely, leaving behind a single cell suspension and the para-magnetic
particles.
Parameter
Usual range
Rotation period
1 - 3 sec
Rotation pause
0 sec
Rotation speed
70 - 100 rpm
Protocol duration
5 - 30 min
Table 5: Harvesting parameters and suggested range.
6.
Pull the remnants of the GEM substrate to the bottom of the tube using
the Cube Magnet and transfer the cell suspension to a new 50 mL tube.
7.
Take an aliquot of the cell suspension for cell counting.
Cells are ready for downstream assays or other applications.
20
BioLevitator – Cell Culture Handbook
Protocols
Figure 8: Workflow describing the harvesting of a cell suspension from a BioLevitator culture
with Accutase.
BioLevitator – Cell Culture Handbook
21
Protocols
2.6
Protocol 6: Preparing a GEM Suspension for Downstream Assays
Materials
§ Serological pipettes
§ Ca2+ / Mg2+ free PBS
§ Accutase (or alternative harvesting solutions)
§ Hemocytometer
Procedure
1.
Stop the running experiment and remove the LeviTube from the
BioLevitator.
2.
Mix the content of the LeviTube by pipetting. Take a 500 µL sample from
the cell culture and count the cells (see Protocol 4).
3.
Pull the confluent GEM substrate to the bottom of the tube with the Cube
Magnet and aspirate the culture medium.
4.
Gently wash the GEM substrate with 10 mL of Ca2+ / Mg2+ free PBS. Repeat
if necessary.
The cells on GEM are ready for downstream assays or other applications.
Pipette the required volume of GEM suspension to obtain the desired number of
cells per well.
22
BioLevitator – Cell Culture Handbook
Troubleshooting
3
TROUBLESHOOTING
3.1
Troubleshooting the Inoculation Phase
Observations
Optimization alternatives
1. Poor attachment of cells to the § Only a few cells are visible on the GEM at the
GEM.
Many
cells
are
in
suspension. Some cells may form
aggregates in suspension rather
than loading on the GEM.
§
§
§
§
§
2. Loading
on
the
GEM
is
heterogeneous. Many GEM with
no cells attached are observed.
§
3. GEM with cells attached form
clumps (with at least 5 GEM per
aggregate)
§
§
§
§
BioLevitator – Cell Culture Handbook
end of the inoculation phase. GEM are usually
inoculated with only 8 - 15 cells per bead (.
Hoechst staining facilitates the observation of
cells on the GEM.
Cell may have limited affinity for the GEM
coating used. Cells have a rounded morphology
and poor flattening. A better coating may be
identified using the Adhesion Assay Kit
(p/n GKT-5001).
Increase Agitation pause and / or Inoculation
duration to provide more time for the cells to
load on the GEM.
Reduce Rotation speed. A speed of 50 rpm is
usually sufficient during inoculation.
Ensure cells have been harvested at the
optimum time and with optimized procedure.
Optimize culture medium composition and
volume. Change to a more enriched medium.
Reduce initial culture volume.
Reduce Agitation pause to increase the
frequency of homogenization during inoculation.
Use a single cell suspension for inoculation.
Check the cell to GEM ratio used for inoculation
(inoculate 4 - 6 x10⁶ cells on 1 mL GEM).
Reduce Agitation pause. Some cell types (e.g.
some fibroblast cell lines) load with continuous
homogenization, i.e. Agitation pause is 0 sec.
Reduce Inoculation duration.
23
Troubleshooting
3.2
Troubleshooting the Culture Phase
Observations
Optimization alternatives
1. Cells detach from the GEM. Many
cells are in suspension.
§ Some suspension cells (up to 10% of total cell
count) are usually observed in normal culture,
especially at the end of culture.
§ Increase Rotation period.
and / or
§ Reduce Rotation speed.
2. GEM form clumps (with at least 5 § Increase Rotation speed.
GEM per aggregate).
§ If clumping is already present at the end of the
inoculation phase, optimize inoculation to
reduce clumping.
3. Many empty GEM are observed.
§ Optimize inoculation to reduce loading
heterogeneity.
4. Growth stops before confluence is § Change culture medium.
reached.
24
BioLevitator – Cell Culture Handbook
Troubleshooting
3.3
Troubleshooting the Harvesting of Cells from the GEM
Observations
Optimisation alternatives
1. Many para-magnetic particles are Use Accutase instead of Trypsin with EDTA. This
present in the cell suspension.
will limit the dissociation of the GEM and the
release of para-magnetic particles.
2. Cells do not detach from the § Use an aliquot of the culture to optimize the
GEM.
harvesting conditions (amount of harvesting
solution, incubation time). Visually monitor cell
dissociation to determine the optimal harvesting
conditions.
§ Use bigger amounts of cell harvesting solution
or incubate longer.
§ Wash the cells on GEM with Ca2+ / Mg2+ free
PBS prior to harvesting.
§ Incubate in the BioLevitator using the
Harvesting protocol.
3. Cells
form
aggregates
in § Mix thoroughly the cell suspension during
suspension.
harvesting with a pipette to dissociate cell
aggregates.
§ Use Accumax instead of Accutase to reduce
aggregates and obtain a single cell suspension.
4. GEM do not dissolve.
§ Short incubation time with Accutase may not
dissolve the GEM. Use the Cube Magnet to pull
down the GEM remnants and collect the cell
suspension. This method limits the presence of
para-magnetic particles in the cell suspension.
§ Use Trypsin with EDTA to dissolve the GEM
completely. Pull down the para-magnetic
particles with the Cube Magnet and collect the
cell suspension.
5. Cell viability is very low.
§ Reduce the amount of harvesting solution and
the incubation time.
§ Use a milder harvesting solution such as
Accutase.
BioLevitator – Cell Culture Handbook
25
Troubleshooting
3.4
Getting Technical Assistance
If a problem persists even after you have attempted to correct it, contact your local
support team (contact information at the back of this manual).
You may also contact HAMILTON Customer Support:
HAMILTON Company
4970 Energy Way
Reno, Nevada 89502 USA
Toll-Free: +1-800-648-5950
Telephone: +1-775-858-3000
Fax: +1-775-856-7259
[email protected]
26
HAMILTON Bonaduz AG
Via Crusch 8
CH-7402 Bonaduz Switzerland
Toll-free: +800-660-660-60
Telephone: +41-(0)81-660-60-60
Fax: +41-(0)81-660-60-70
[email protected]
BioLevitator – Cell Culture Handbook
Your HAMILTON representative:
www.hamiltoncompany.com
HAMILTON Bonaduz AG
Via Crusch 8
CH-7402 Bonaduz Switzerland
Toll-free: +800-660-660-60
Telephone: +41-(0)81-660-60-60
Fax: +41-(0)81-660-60-70
[email protected]
HAMILTON Company
4970 Energy Way
Reno, Nevada 89502 USA
Toll-Free: +1-800-648-5950
Telephone: +1-775-858-3000
Fax: +1-775-856-7259
[email protected]
P/N 624339/00