1
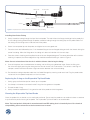
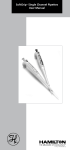
Microlab Disposable Tip Hand Probe
Instruction Sheet
®
Congratulations! You have purchased the Microlab® Disposable Tip Hand Probe (p/n 63960-01, 63960-02) from
Hamilton. We combine the highest quality materials with skilled craftsmanship to create the highest possible
performance level for every precision fluid device we manufacture. With proper care and handling, the Disposable Tip
Hand Probe will provide years of use.
The Disposable Tip Hand Probe is designed to work with Hamilton Microlab instruments and is compatible with 50 µL
and 1 mL ClickSure® tips.
Note: The Disposable Tip Hand Probe, manufactured by Hamilton Company, is intended for scientific
research and laboratory use only and is not intended for human in vivo use.
Installation of Probe for Microlab 300 (p/n 63960-01) or Microlab 600 (p/n 63960-02)
Assemble the Disposable Tip Hand Probe by prewetting the probe tube fitting using deionized water and installing it into the
output port of the valve. Insert the plug for the probe cable into the probe receptacle on the back of the pump (Microlab 300) or
on the side of the pump (Microlab 600). Configure the probe buttons for right or left-hand use within the Configuration menu of the
Microlab Controller.
Note: The Disposable Tip Hand Probe comes with the tubing pre-installed. Instructions for replacing the tubing
are located in a later section of this document.
Probe Cable
Accept Button
Probe Tubing
Scroll Wheel
Cancel Button
Tip Eject Button
Figure 1. Disposable Tip Hand Probe buttons (right-handed)
Note: The probe on the left is for use with the Microlab 600, while the probe on the right is for the Microlab 300. In
the rest of this instruction sheet we will use the Microlab 300 probe in the drawings.
Note: For left-handed operation, the Accept and Cancel buttons are reversed.
1
Operating the Disposable Tip Hand Probe
The Disposable Tip Hand Probe is held differently than a traditional pipette.
Reference Figure 2 for instructions on how to properly hold the hand probe.
Button Operation
After the probe button configuration is established and the Disposable Tip Hand
Probe is held according to Figure 2, the probe is ready for use. The button next
to the thumb is the Accept button. The button on the opposite side of the probe
is the Cancel button. The Scroll wheel located top center of the probe is used to
access method Favorites and to select items from a list box. The button located
near the index finger is the Tip Eject button.
Loading the ClickSure® Tips
Figure 2. Holding the Disposable Tip
Hand Probe (right-handed)
To load ClickSure tips onto the Disposable Tip Hand Probe, gently press the
probe tip into the appropriate ClickSure tip until an audible “click” is heard
indicating the O-ring is compressed to hold the tip. Do not jam the Disposable Tip Hand Probe into the pipette tip as this
could damage the probe. The O-ring seal has two states, decompressed and compressed. When a ClickSure tip is loaded
onto the probe the O-ring is compressed to hold the tip. If the ClickSure tip is manually removed without using the eject
button the O-ring will remain in the compressed state and the subsequent tip loading will not load properly. If the O-ring is in
a compressed state with no tip installed, simply press the eject button to return the probe to a decompressed state before
loading a new tip. Do not leave the O-ring in a compressed state for an extended period of time.
Important: To preserve tips for future use, the tip package can be resealed by pressing the adhesive lid
back onto the tip box.
Replacing the Tubing in the Disposable Tip Hand Probe
To replace the tubing on the Disposable Tip Hand Probe, the existing tubing needs
to be removed first.
Removing Old Probe Tubing
1. Unscrew the tube fitting from the valve. Unplug the probe cable from the
instrument. Remove the tubing and probe cable from the Cable Manager.
2. Unscrew the probe tip and discard.
3. Cut off the tubing end with the ferrule and stainless steel ring and unthread
the fitting.
4. Begin by pushing the tube out through the tip of the hand probe. Then pull
the remaining tubing out and discard. Reference Figure 3 for details.
O-ring
Probe Tip
Figure 3. Exploded view of the
Disposable Tip Hand Probe
2
Tubing Clip
Stainless Steel Ring
Probe Cable
1/4"-28 Fitting
Tubing
Ferrule
Strain Relief
Figure 4. Exploded view of Disposable Tip Hand Probe cable and tubing
Installing New Probe Tubing
5. Gently thread the tubing through the tip of the hand probe. The end without the flange should go into the probe first.
As the tubing is being pulled through the probe, thread the tubing through the tubing clips on the probe cable. Pull
the tubing until the flange seats inside the end of the probe.
6. Screw the new probe tip onto the probe, and tighten to ensure a good seal.
7. Place the strain relief followed by the ¼"-28 threaded fitting on the non-flanged tubing end with the threads facing the
end of the tubing. Move the fitting down the tubing so it does not interfere with the next steps.
8. Place the stainless steel ring and the yellow ferrule on the non-flanged tubing end. The correct orientation of the stainless
steel ring is important; the thinner edge of the ring should face toward the fitting as shown in Figure 4.
Note: Correct orientation of the ferrule is with the thinner side facing the fitting.
9. Once all the pieces are assembled onto the tubing, wet the fitting using deionized water. Screw the fitting into
the valve while lightly pressing the tubing into the valve to ensure a flush connection. The stainless steel ring will
compress onto the ferrule and create a tight connection between the valve and tubing.
10. Re-thread the tubing and probe cable into the Cable Manager by weaving under each tab. Plug the probe cable
into one of the two probe receptacles on the instrument.
Replacing the O-ring on the Disposable Tip Hand Probe
1. Gently grasp and hold the ejection sleeve up on the probe.
2. Use forceps or tweezers to remove the old O-ring from the groove on the probe.
3. Discard the old O-ring.
4. Gently thread the replacement O-ring onto the end of the probe and into the groove.
Cleaning the Disposable Tip Hand Probe
Clean the probe with an alcohol such as methanol or ethanol. Do not soak the probe or use acetone to clean as acetone
may dissolve the plastic housing of the probe. The Disposable Tip Hand Probe is not autoclavable.
Note: The hand probe’s fluid path is manufactured from FEP tubing that is chemically inert. For chemical
compatibility, please reference to the instrument user manual.
3
Replacement Parts
Description
Part Number
Disposable Tip Hand Probe, Microlab 300
63960-01
Disposable Tip Hand Probe, Microlab 600
63960-02
Cable Management System
65160-01
Tubing Kit
(Includes 5 ferrules, 5 stainless steel rings, 5 fittings, 5 strain reliefs, 12 gauge tubing and a probe tip)
O-ring Kit
67098-01
67103-01
(Includes 5 O-rings)
Disposable Tip Hand Probe ClickSure® Tips
Description
Part Number
50 µL, non-sterile ClickSure tips, 960 tips racked
235537
50 µL, non-sterile ClickSure tips, 960 bulk
235543
50 µL, sterile ClickSure tips, 960 tips racked
235536
50 µL, sterile, filtered ClickSure tips, 960 tips racked1
235544
1 mL, non-sterile ClickSure tips, 960 tips racked
235539
1 mL, non-sterile ClickSure tips, 960 bulk
235545
1 mL, sterile ClickSure tips, 960 tips racked
235538
1 mL, sterile, filtered ClickSure tips, 960 tips racked1
235546
1
These tips should only be used on the Microlab 300.
Warranty Statement
Hamilton Company unconditionally guarantees its products to be free of defects in materials and workmanship. Any product that
fails due to a defect will be repaired or replaced at our discretion without cost, provided the device is returned on a Return Materials
Authorization (RMA). It is the sole responsibility of the purchaser to determine product application suitability and material compatibility
based on the published product specifications.
Return of Goods
Hamilton Company’s return and repair policy is written to protect its employees from potentially hazardous materials (e.g., serum,
radioactive materials, carcinogenic chemicals, etc.) or any substance that may cause them partial or permanent disability during
the inspection or repair process. In returning a product, the customer acknowledges that the product is free from any hazardous
materials. Furthermore, the customer assumes responsibility if the returned product proves to be hazardous.
© 2013 Hamilton Company. All rights reserved.
All trademarks are owned and/or registered by Hamilton Company in the U.S. and/or other countries.
4
Part Number 67378-01 Rev B
Hamilton Americas & Pacific Rim
Web: www.hamiltoncompany.com
USA:
800-648-5950
+41-81-660-60-60
Europe:
Hamilton Company Inc.
4970 Energy Way
Reno, Nevada 89502 USA
Tel: +1-775-858-3000
Fax: +1-775-856-7259
[email protected]
Hamilton Europe, Asia, & Africa
Hamilton Bonaduz A.G.
Via Crusch 8
CH-7402 Bonaduz, Switzerland
Tel: +41-81-660-60-60
Fax: +41-81-660-60-70
[email protected]
To find a representative in your area, please visit hamiltoncompany.com/contacts.