1
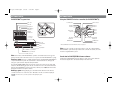
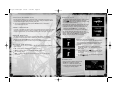
cdo ps3 final.qxd
1/7/08
5:49 PM
Page i
OUTSIDE FRONT COVER
PLACEHOLDER
cdo ps3 final.qxd
1/7/08
5:49 PM
Page ii
WARNING: PHOTOSENSITIVITY/EPILEPSY/SEIZURES
A very small percentage of individuals may experience epileptic seizures or blackouts when exposed
to certain light patterns or flashing lights. Exposure to certain patterns or backgrounds on a television
screen or when playing video games may trigger epileptic seizures or blackouts in these individuals.
These conditions may trigger previously undetected epileptic symptoms or seizures in persons who
have no history of prior seizures or epilepsy. If you, or anyone in your family, has an epileptic condition
or has had seizures of any kind, consult your physician before playing. IMMEDIATELY DISCONTINUE
use and consult your physician before resuming gameplay if you or your child experience any of the
following health problems or symptoms:
• dizziness
• eye or muscle twitches
• disorientation
• any involuntary movement
• altered vision
• loss of awareness
• seizures, or
or convulsion.
RESUME GAMEPLAY ONLY ON APPROVAL OF YOUR PHYSICIAN.
_____________________________________________________________________________
Use and handling of video games to reduce the likelihood of a seizure
• Use in a well-lit area and keep as far away as possible from the television screen.
• Avoid large screen televisions. Use the smallest television screen available.
• Avoid prolonged use of the PLAYSTATION®3 system. Take a 15-minute break during each hour of play.
• Avoid playing when you are tired or need sleep.
_____________________________________________________________________________
Stop using the system immediately if you experience any of the following symptoms: lightheadedness,
nausea, or a sensation similar to motion sickness; discomfort or pain in the eyes, ears, hands, arms, or
any other part of the body. If the condition persists, consult a doctor.
NOTICE:
Use caution when using the SIXAXIS™ wireless controller motion sensor function. When using the
SIXAXIS™ wireless controller motion sensor function, be cautious of the following points. If the
controller hits a person or object, this may cause accidental, injury or damage. Before using, check
that there is plenty of space around you. When using the controller, grip it firmly to make sure it
cannot slip out of your hand. If using a controller that is connected to the PS3™ system with a USB
cable, make sure there is enough space for the cable so that the cable will not hit a person or object.
Also, take care to avoid pulling the cable out of the PS3™ system while using the controller.
WARNING TO OWNERS OF PROJECTION TELEVISIONS:
Do not connect your PLAYSTATION®3 system to a projection TV without first consulting the user manual
for your projection TV, unless it is of the LCD type. Otherwise, it may permanently damage your TV screen.
HANDLING YOUR PLAYSTATION®3 FORMAT DISC:
• Do not bend it, crush it or submerge it in liquids. • Do not leave it in direct sunlight or near a radiator
or other source of heat. • Be sure to take an occasional rest break during extended play. • Keep this
disc clean. Always hold the disc by the edges and keep it in its protective case when not in use. Clean
the disc with a lint-free, soft, dry cloth, wiping in straight lines from center to outer edge. Never use
solvents or abrasive cleaners.
GETTING STARTED . . . . . . . . . . 2
INTRODUCTION . . . . . . . . . . . . 4
The Game . . . . . . . . . . . . . . . 4
The Force . . . . . . . . . . . . . . . 4
PERSONNEL . . . . . . . . . . . . . . . 5
Lincoln Graves . . . . . . . . . . . . 5
Reggie Lang . . . . . . . . . . . . . . 5
DEFAULT CONTROLS . . . .
Menu Controls . . . . . . . .
Basic Game Controls . . . .
Basic Weapon Controls . .
Gun Camera (Graves Only)
Gun Lean . . . . . . . . . . .
Stance . . . . . . . . . . . .
Agent Orders . . . . . . . .
Inventory . . . . . . . . . . .
Grenade Inventory . . . . .
Basic Vehicle Controls . . .
Tank/APC — Driver . . . .
Tank/APC — Gunner . . .
Hovercraft — Driver . . . .
Hovercraft — Gunner . . .
Multiplayer Only . . . . . .
.
.
.
.
.
.
.
.
.
.
.
.
.
.
.
.
.
.
.
.
.
.
.
.
.
.
.
.
.
.
.
.
.
.
.
.
.
.
.
.
.
.
.
.
.
.
.
.
.
.
.
.
.
.
.
.
.
.
.
.
.
.
.
.
. 6
. 6
. 6
. 6
. 7
. 7
. 7
. 7
. 8
. 8
. 8
. 9
. 9
. 9
10
10
GETTING INTO THE GAME . . . . 10
SINGLE PLAYER CAMPAIGN
New Campaign . . . . . . . .
Game Screen . . . . . . . . .
Objective Marker Icon
. . .
Agent Indicator
. . . . . . .
Health Monitor . . . . . . . .
Weapon Aim Reticle
. . . .
Weapon Icon . . . . . . . . . .
Stance Icon/Stance . . . . . .
.
.
.
.
.
.
.
.
.
.
.
.
.
.
.
.
.
.
.
.
.
.
.
.
.
.
.
11
11
11
12
12
12
12
13
13
Inventory . . . . . . . . . .
Grenade Inventory . . . .
Sniper Scope . . . . . . . .
Night Vision . . . . . . . .
Healing . . . . . . . . . . .
On-screen Help . . . . . .
Action Button . . . . . . .
Agent Orders . . . . . . .
Objectives Screen . . . . .
Teamwork . . . . . . . . .
Firing from Cover . . . . .
Supply Crates . . . . . . .
Support . . . . . . . . . . .
Tanks, APCs, Hovercraft
CONTINUE CAMPAIGN
.
.
.
.
.
.
.
.
.
.
.
.
.
.
.
.
.
.
.
.
.
.
.
.
.
.
.
.
.
.
.
.
.
.
.
.
.
.
.
.
.
.
.
.
.
.
.
.
.
.
.
.
.
.
.
.
.
.
.
.
.
.
.
.
.
.
.
.
.
.
13
14
14
14
14
15
15
15
16
16
16
16
16
16
. . . . . . 17
CO-OPERATIVE . . . . . . . . . . . . .17
Split Screen . . . . . . . . . . . . . 17
LAN . . . . . . . . . . . . . . . . . 17
PLAYSTATION ®3 Network . . . 17
Controls . . . . . . . . . . . . . . . . 17
MULTIPLAYER . . . . . . . . . . . . . 18
Multiplayer Game Modes . . . . . 18
Additional Multiplayer Controls . . 18
AWARDS . . .
Statistics . .
Leaderboards
Citations . .
.
.
.
.
.
.
.
.
.
.
.
.
.
.
.
.
.
.
.
.
.
.
.
.
.
.
.
.
.
.
.
.
.
.
.
.
.
.
.
.
.
.
.
.
.
.
.
.
.
.
.
.
19
19
19
19
OPTIONS . . . . . . . . . . . . . . . . 19
PAUSE MENU . . . . . . . . . . . . . 20
SAVE GAME . . . . . . . . . . . . . . 20
CREDITS
. . . . . . . . . . . . . . . . 21
cdo ps3 final.qxd
1/7/08
5:49 PM
Page 2
GETTING STARTED
GETTING STARTED
PLAYSTATION®3 system front
Using the SIXAXIS™ wireless controller (for PLAYSTATION®3)
Port indicators
Slot cover
USB connector
1
CF* slot
Eject button
L2 button
L1 button
R2 button
R1 button
Directional
buttons
button
button
button
button
Left stick/
L3 button*
Right stick/
R3 button*
SD*2 Memory
Card slot
Memory
Stick™ slot
CF
SD/miniSD
*1 CompactFlash®
*2 Secure Digital
Insert the disc with the
label side facing up.
SELECT button
Disc slot
Power button
START button
PS button
* The L3 and R3 buttons function when the sticks are pressed.
Vent
Eject button
WLAN access indicator
HDD access indicator
Note: To use the controller, you must first register or “pair” the controller with the
PLAYSTATION®3 system and assign a number to the controller. For details, refer to the
instructions supplied with the system.
USB connectors
Note: Some models of the PLAYSTATION®3
system do not include media slots. For specific
features included, refer to the instructions for use of your model of the PLAYSTATION®3 system.
Starting a game: Before use, carefully read the instructions supplied with the PLAYSTATION®3
Saved data for PLAYSTATION®3 format software
Saved data for PLAYSTATION®3 format software is saved on the system’s hard disk.
The data is displayed under “Saved Game Utility” in the Game menu.
computer entertainment system. The documentation contains information on setting up and
using your system as well as important safety information.
Check that the MAIN POWER switch (located on the system rear) is turned on. Insert the (title
name) disc with the label facing up into the disc slot. Select the icon for the software title under
[Game] in the PLAYSTATION®3 system’s home menu, and then press the S button. Refer to this
manual for information on using the software.
Quitting a game: During gameplay, press and hold down the PS button on the wireless
controller for at least 2 seconds. Then select “Quit Game” from the screen that is displayed.
Hint
To remove a disc, touch the eject button after quitting the game.
3
cdo ps3 final.qxd
1/7/08
5:49 PM
Page 4
INTRODUCTION
THE GAME
CONFLICT: DENIED OPS™ features two agents from the CIA’s Special Activities Division (SAD).
Their mission: to prevent a third-world dictatorship from gaining nuclear weapons. This
mission that will take them across three continents and pit them against the ambitious,
powerful, dangerous men who control the nuclear arms smuggling trade.
With the ability to play as either agent, you can switch between two very different
characters, maneuver them rapidly into position, and take full advantage of their
individual skills and weapons. This is the essence of the game: each agent working
with and protecting the other to create the perfect Denied Ops team.
CONFLICT: DENIED OPS also lets you take part in co-operative and competitive play
over Split Screen, LAN and the PLAYSTATION ® Network.
PERSONNEL
LINCOLN GRAVES
Sniper. Age 47. Native Alaskan. Ex-Marine.
Ex-Delta Force. Veteran of every US military
campaign from Grenada to Iraq. Played
a major role in America’s unconventional
war in Afghanistan, operating covertly
against al-Qaeda and the Taliban.
Consummate professional. In amazing
physical condition for his age. Devoted
husband with two grown daughters.
Committed Christian and patriot.
THE FORCE
The Special Activities Division
(SAD) is a clandestine unit
within the CIA, responsible for
covert paramilitary operations.
The division numbers less than
a hundred agents, pilots and
specialists — all selected from
the ranks of retired US Army
Special Forces, Delta Force
and Navy SEALS, or from civilian
organizations such as the FBI
and SWAT. All agents specialize
in advanced weaponry, guerrilla
warfare, and the use of
explosives and evasion
techniques.
REGGIE LANG
Heavy weapons specialist. 28 years old.
Hails from Miami, Florida. Sporting
prodigy. Abandoned football career
following 9/11 attacks and joined the
FBI’s Critical Incident Response Group.
Instrumental in the capture of many
high-profile al-Qaeda terrorist suspects,
including Abu Zubaydah in Pakistan.
An impetuous and fearless warrior.
This will be his first mission for SAD.
Working in small teams and
conducting covert operations deep
behind enemy lines, SAD agents
do not carry anything that would
associate them with the CIA
or the United States. If captured,
their existence will be
officially denied.
4
5
cdo ps3 final.qxd
1/7/08
5:49 PM
Page 6
D E FA U LT C O N T R O L S
MENU CONTROLS
directional button
Select/Change option
S button
A button
Confirm/Next menu
Cancel/Previous menu
BASIC GAME CONTROLS
left stick C/ V
Move forward/back
S button
Action button
right stick
Look/Move crosshairs
directional button V
Toggle Normal/Night Vision
A button
Switch characters
SELECT button
Objectives Screen
START button
Pause Menu
BASIC WEAPON CONTROLS
6
GUN CAMERA (GRAVES ONLY)
directional button C
In First Person View, toggle Gun Camera up
directional button Z/ X
In First Person View, toggle Gun Camera left/right
GUN LEAN
directional button Z/ X
Gun lean left/right
STANCE
B button
B button (press and hold)
Toggle Kneel/Stand
Toggle Prone/Stand
AGENT ORDERS
Q button (hold)
W button (hold)
W button
Open Agent Orders
Order Agent to “Follow me”
Order Agent to “Advance to position”/
Perform Context order
R button
Fire weapon
W button
Q button
Order Agent to “Give suppressive fire”
left stick Z/ X
Strafe left/right
directional button C
Order flashbang on crosshairs (set with left stick)
F button
D button
N button
Reload weapon
directional button V
Order incendiary grenade/proximity mine
on crosshairs (set with left stick)
directional button Z
Order frag grenade on crosshairs
(set with left stick)
directional button C
In Scope Aimed View, toggle Scope Zoom
directional button X
E button
Quick-throw grenade
Order smoke grenade on crosshairs
(set with left stick)
Q button (hold) + D button
Order grenade launcher/12-gauge shotgun assault
Toggle alternate fire (weapon attachment)
Aim +
In First Person View, toggle Scope Aimed View
Take out specific target
7
cdo ps3 final.qxd
1/7/08
5:49 PM
Page 8
INVENTORY
D button (press and hold)
TANK/APC — DRIVER
Open Inventory
left stick
Accelerate/Reverse/Rotate
left stick
Select weapon
Select primary weapon
B button
R button
Align turret to tank
directional button Z
directional button X
Select sidearm
directional button C
Select rocket launcher (Lang only)
right stick
Rotate turret (with second Agent
in Gunner position)
N button
Toggle Chase Camera/Close Camera
Fire main gun (with second Agent
in Gunner position)
GRENADE INVENTORY
E button (press and hold)
Open Grenade Inventory
left stick
Select grenade
directional button C
Select flashbang
directional button V
Select incendiary grenade (Lang only)/
Select proximity mine (Graves only)
directional button Z
Select frag grenade
directional button X
Select smoke grenade
E button
Throw grenade
BASIC VEHICLE CONTROLS
S button
D button
F button
8
Embark/Disembark
Switch vehicle weapons
TANK/APC — GUNNER
left stick
Accelerate/Reverse/Rotate (with second Agent
in Driver position)
R button
Fire main gun
right stick
Rotate turret
N button
Toggle Chase Camera/Close Camera
HOVERCRAFT — DRIVER
left stick
Move forward/Strafe left/right
right stick
Rotate hovercraft
R button
N button
Fire heavy machine gun
Toggle Aimed/Normal Cockpit View
Switch positions
9
cdo ps3 final.qxd
1/7/08
5:49 PM
Page 10
HOVERCRAFT — GUNNER
R
button
S I N G L E P L AY E R C A M PA I G N
Fire heavy machine gun
right stick
Rotate heavy machine gun
N button
Toggle Aimed/Normal Cockpit View
From the Main Menu, select SINGLE PLAYER CAMPAIGN . Then select NEW CAMPAIGN.
NEW CAMPAIGN
An intro movie provides a full summary of the geo-political situation behind CONFLICT: DENIED
OPS. A shorter movie then introduces the main characters: Graves and Lang. This then
leads directly to the first mission: SANTA CECELIA MONASTERY .
MULTIPLAYER ONLY
Q button (press and hold)
Team radio (game chat)
SELECT button
In-game scorecard
As the mission progresses, new objectives appear on the Objectives Screen ( see page 16).
You must complete these objectives in order to successfully finish the mission.
GAME SCREEN
GETTING INTO THE GAME
When the game starts, you are taken to the Main Menu. This screen lists the game
options (see page 19).
Once you arrive at the Main Menu, select SINGLE PLAYER CAMPAIGN to learn the game basics.
This option takes you to the first mission and guides you through the basic CONFLICT:
DENIED OPS controls as you play.
J Although most of the important controls are introduced during the first mission, keep
the Controls section of this manual nearby for quick reference while playing.
The CONFLICT: DENIED OPS game screen is left uncluttered to give you a clear view of your
surroundings. Get used to First Person View: looking around, turning and aiming your
weapon. Try switching characters (default A button).
The game has a number of on-screen icons and info panels, described here
and on the following pages. Some of these are always visible; others appear briefly
and then fade out.
10
11
cdo ps3 final.qxd
1/7/08
5:49 PM
Page 12
OBJECTIVE MARKER ICON
Use the Objective Marker Icon as a directional guide. It indicates the direction to your
next objective, and provides the distance to it in meters. Employ the Objectives Marker
to locate objectives more rapidly and avoid getting lost.
J You can open the Objectives Screen (default SELECT button) to read details
of your objective at any time.
AGENT INDICATOR
In combat, it is imperative to keep in touch with your fellow Agent at all times. The Agent
Indicator Icon is always visible; it helps you locate an Agent’s exact position. The icon
changes to indicate when you have issued a specific order to an Agent. (See page 15.)
HEALTH MONITOR
WEAPON ICON
The weapon an Agent carries is always visible on-screen
in First Person View. When a weapon is being fired
(default R button), its icon shows the weapon’s name
and number of rounds remaining.
All weapons are automatically reloaded when their ammo
runs out, but this takes valuable seconds. If you think
a firefight is coming up, check your ammo and reload
if necessary (default A button) — it could mean
the difference between a live Agent and a dead Agent.
You can earn secondary attachments for your main
weapon, such as the 40mm grenade launcher or 12-gauge
shotgun. Press the default D button to fast-switch
between your main weapon and its attachment.
If an Agent is stunned, you will see an on-screen Health Monitor. This displays
a time limit in which the Agent must be healed. Get close to the Agent and press
the Action button (default S button) to heal your teammate.
J The Health Monitor remains on-screen until you have healed the stunned Agent.
STANCE ICON/STANCE
When you alter an Agent’s stance, the stance is shown
as an on-screen icon, identified with the Agent’s name.
The stance you adopt in a particular situation is very
important.
J While standing, you can move faster across the
ground, but your fire is less accurate and you are an
easier target.
J Kneeling (default toggle B button) makes you less
of a target and gives you greater accuracy, but you
move slower.
J For maximum accuracy, go prone (default toggle press
and hold B button).
WEAPON AIM RETICLE
The crosshairs help you aim your weapon. They are color-coded to identify different
types of targets.
J RED — When targeting an enemy, the crosshairs turn red.
J YELLOW — Explosive objects such as barrels and gas canisters turn
the crosshairs yellow.
J GREEN — Targeting a friendly turns the crosshairs green. (This is your warning:
do not fire!)
INVENTORY
Open the Inventory (default press and hold
the D button) to display an Agent’s
weaponry in a radial of on-screen icons.
J Press the default directional button Z
to change your primary weapon.
12
13
cdo ps3 final.qxd
1/7/08
5:49 PM
Page 14
GRENADE INVENTORY
Open the Grenade Inventory (default press
and hold the E button) to display
a radial of on-screen icons showing
the type and number of grenades
an Agent is carrying.
Frag and smoke grenades are available
to Graves and Lang during their first mission.
You can unlock flashbangs, incendiary
grenades and proximity mines as the game
progresses.
Select the grenade (default directional
button Z for a frag grenade) and throw
when ready (default E button).
SNIPER SCOPE
The 7.62mm sniper rifle comes complete with a powerful
x10 variable scope. Select SCOPE AIMED VIEW (default
N button) to display a highly accurate x05 sniper
crosshairs, perfect for long-range stealth kills. For
extreme close-up kills, you can increase Scope Aimed
View up to x10 magnification (default directional
button C).
NIGHT VISION
Toggle Night Vision (default directional button V) when it is too dark to see clearly
in normal light. Enabling Night Vision changes the display from color to monochrome.
HEALING
No matter how good you are, an Agent will take hits during a mission. Hits are shown
graphically on-screen as red arcs (which also indicate the source direction of enemy fire).
If an Agent is hit enough times to become “stunned,” you have to revive him by going to
his side, pressing the Action button (default S button) when prompted, and administering
a shot of adrenaline.
J If you fail to heal an Agent within the on-screen time limit, you will fail the mission.
ON-SCREEN HELP
The Santa Cecilia Monastery mission includes helpful on-screen text that appears at key
moments during the action. This text is intended to introduce features that are unique
to CONFLICT: DENIED OPS , and give instructions on how to use them. Further tips appear
on loading screens throughout the game.
ACTION BUTTON
In certain situations, positioning your character close to an object brings up an on-screen
prompt. This prompt alerts you that you can perform a location-specific action. The game
offers a wide variety of these actions, such as CLIMB LADDER, VAULT, HEAL, MOUNT HMG, EMBARK
VEHICLE, etc. Press the Action button (default S button) to perform the action.
AGENT ORDERS
Rapid communication between Agents is vital to the success of a mission. It is important
to give clear and concise orders to avoid misunderstandings. When you issue an order
to an Agent, an icon appears briefly on-screen, and the Agent responds verbally. Agent
Orders will help you co-ordinate successful assaults on well-defended positions.
FOLLOW
GO THERE
SUPPRESSIVE FIRE/
AGENT ORDER
You can order an Agent to:
J Advance to a position (default W button).
J Follow you (default press and hold W button).
J Lay down suppressive fire — to pin down enemies and keep their heads down
while you advance (default Q button).
J Perform a context order such as download data or open a door (default W button).
J Take out a specific target (default aim and press W button).
J Carry out a grenade launcher/12-gauge shotgun assault (default press and hold Q
button and press D button).
Agent Orders also allow you to order an Agent to throw a grenade at a pre-defined point.
J Open Agent Orders (default press and hold Q button).
J Set your crosshairs on a target (default right stick).
J Order a frag grenade (for example) to be thrown (default directional button Z).
14
15
cdo ps3 final.qxd
1/7/08
5:49 PM
Page 16
OBJECTIVES SCREEN
Press the default SELECT button to open and close the Objectives Screen. Your mission
objectives are listed on this screen, and checked-off as they are completed. Additional
objectives are added to the list until a mission is successfully completed. Press the
Action button (default S button) to get details on an objective.
C O N T I N U E C A M PA I G N
Choose the CONTINUE CAMPAIGN option from the Main Menu to resume a previously saved
Campaign. Select a mission on the Geosphere to continue play.
TEAMWORK
Being successful in CONFLICT: DENIED OPS is all about working as a team. Plan ahead when
moving through a mission, and make the most of each Agent’s unique skills and
strengths. Graves and Lang make a formidable fighting team when used correctly: get
Lang to lay down suppressive fire while you assault a position; use Bounding Overwatch
tactics to clear out a stairwell; set up a deadly crossfire and cut enemies to ribbons.
FIRING FROM COVER
All weapons in CONFLICT: DENIED OPS provide an Agent with the ability to fire at enemies
from behind cover. Pistols, the 12-gauge shotgun, and the 5.56mm LMG can all be used
while leaning around a corner (default hold directional button Z/ X). The Gun Camera
upgrade on the 7.62mm sniper rifle gives Graves the added ability to fire over low cover
as well as around it (default directional button Z/ C/ X).
SUPPLY CRATES
SAD Agents have to move fast, so they travel light. Their explosive supplies are limited,
so be on the look-out for supply crates that are often located in out-of-the-way places.
These provide your only opportunity to re-supply with explosive ammunition (e.g.
grenades) during a mission.
SUPPORT
The Special Activities Division’s arsenal includes attack helicopters and the latest fighter
jets. AH-64D Apaches and F-22s are standing by to provide close air support throughout
the campaign. SAD also has its own fleet of Pave Low Helicopters to fast-rope Agents
into combat or extract them upon successfully completing a mission.
TANKS, APCs, HOVERCRAFT
CONFLICT: DENIED OPS allows you to commandeer a range of vehicles during a campaign.
You can choose the position of either Gunner or Driver, and even switch positions
during combat. Take the time to get used to the different controls and capabilities
offered by each vehicle.
C 0 - O P E R AT I V E
Co-operative play is an important part of CONFLICT: DENIED OPS , enabling you and a friend
to play through the entire Campaign story or individual missions. Select CO - OPERATIVE
from the Main Menu and follow the on-screen instructions.
J You can play Co-operative Mode via Split Screen, LAN or PLAYSTATION ® Network.
In a LAN or PLAYSTATION ® Network campaign, only the Host can save the progress.
SPLIT SCREEN
Play Co-operative Campaign Mode or individual missions with a friend
on a Split Screen display.
J This mode requires two SIXAXIS ™ Wireless Controllers.
J In the Split Screen lobby, only the SIXAXIS ™ Wireless Controller assigned
as controller 1 can change the game settings. Other players can join the lobby
by pressing the S button, or leave by pressing the A button.
LAN
Connect two PLAYSTATION ®3 Systems via a local area network connection to play single
missions or Campaign Mode.
J This mode requires that both players have their own displays.
PLAYSTATION ®3 NETWORK
Play individual missions or Co-operative Campaign Mode with another gamer online.
J This mode requires an Internet connection.
CONTROLS
Individual character controls in Co-operative Mode are the same as those
in Single Player Mode. There are no Agent Orders in Co-operative Mode.
16
17
cdo ps3 final.qxd
1/7/08
5:49 PM
Page 18
AWA R D S
M U LT I P L AY E R
CONFLICT: DENIED OPS offers multiplayer action for up to 16 players in three different modes
of combat. Select MULTIPLAYER from the Main Menu to begin.
Select AWARDS from the Main Menu to see a list of awards gained during the campaign
you have undertaken.
J You can play all Multiplayer Modes via via Split Screen, LAN or PLAYSTATION ® Network.
MULTIPLAYER GAME MODES
J DEATHMATCH — Play an all-against-all Deathmatch game against other players. Players
score one point per kill.
To win: score the most kills within the time limit, or reach the score limit first.
J TEAM DEATHMATCH — Compete as a team against other players. Players divide into two
teams, and teams score one point per kill.
To win: as a team, score the most kills within the time limit, or reach
the score limit first.
J CONQUEST — Play as a team against other players. Two teams compete to take and hold
five positions. Positions are marked by flags located at strategic points in the game
arena. Each player scores one point per a set time unit for each flag that player takes
and holds. Players can re-spawn near any of the flags their team holds.
To win: as a team, score the most points at the end of the time limit,
or reach the score limit first.
STATISTICS
J CAMPAIGN AGENT INFORMATION — All your Campaign and Multiplayer statistics, such as
accuracy and weapon usage, are tracked here.
LEADERBOARDS
J CAMPAIGN — View the fastest times for completing Single Player and Co-operative
Campaign missions.
J MULTIPLAYER — View Deathmatch, Team Deathmatch, and Conquest best scores from
around the world. Check your ranking against your friends’ rankings or against other
players’ rankings around the world.
CITATIONS
Citations are awarded for a variety of gameplay feats, such as rescuing an important
character or killing enemies in a certain way.
J Multiplayer Mode has its own set of citations rewarding exceptional multiplayer feats
in ranked games, such as capturing all the flags in a Conquest match or scoring
a large number of consecutive kills.
ADDITIONAL MULTIPLAYER CONTROLS
Individual character controls in Multiplayer Mode are the same as those in Single Player
Mode. There are no Agent Orders and no vehicles in the competitive game,
and the following special controls are available:
Q button (press and hold)
Team radio (game chat)
SELECT button
In-game scorecard
OPTIONS
Select OPTIONS from the Main Menu to display a list of options. Adjust these options
to adapt the game to suit your style of play.
J CONTROLS — Adjust Controller Layout, Invert Look, and Help Messages.
J SOUND — Adjust Music Volume, FX Volume, Speech Volume, Headset Volume
and Mic Level.
18
19
cdo ps3 final.qxd
1/7/08
5:49 PM
Page 20
PA U S E M E N U
CREDITS
The Pause Menu is available throughout the game (default START button). You can use
this menu to select and adjust the following options in-game:
J RESUME MISSION — Return to the game action.
THIS GAME IS DEDICATED TO THE MEMORY
OF JON BRIDGES, 1982-2006
J RESTORE CHECKPOINT — Return to the last checkpoint passed.
J LOAD GAME — Load a previously saved game.
J SAVE GAME — Save the game at your current position.
J RESTART MISSION — Start the mission from the beginning.
J PLAYERS IN GAME SESSION — Show a list of other players in a Multiplayer session.
J OPTIONS — Adjust game options (see page 19).
J QUIT — Exit the game.
PIVOTAL GAMES LIMITED
Managing Director
Jim Bambra
Technical Director
Alex McLean
Studio Manager
Louise Anderson
PRODUCTION
Senior Producer
Stuart Poole
Producer
Paul Jeal
Art Producer
Jon Kay
S AV E G A M E
You can save the game at any point by pressing the START button to open the Pause
Menu, and then selecting the SAVE GAME option.
DESIGN
Executive Designer
Marc Curtis
Senior Designers
Steve Dunning
James Nicholls
Designers
Andy Ashwin
Guy Joyner
Darren Kirby
Adam Lusby
Terry Watts
Barnaby Zoeller
Scriptwriter
Ben Jailler
PROGRAMMING
Executive Software Engineers
Tim Cannell
Paul Dunning
Annette Garnier
Pete Long
Senior Software Engineers
Mark Barton
Tim Chapman
Julian Foxall
20
Senior Software Engineers (continued)
Seb Grinke
Shaun Hewitt
Martin Hutchings
David Tetlow
Software Engineers
Charles Blair
David Chalmers
Mark Harris
Liz Hodges
Matthew Hoyle
Michael Michaelides
Michael Neve
Ed Reid
Simon Smith
Tim Threlfall
Ralph Tittensor
Dan Wheeler
Duncan Williams
ENVIRONMENT ART
Environment Art Manager
David Cullinane
Art Resources Manager
Erol Kentli
Lead Artist
Martin Severn
Senior Artists
Peter Baldwin
Maff Evans
Guy Jeffries
Alan Thomas
Artists
Pete Austin
Dai Banner
Jon Bridges
David Calvin
Simon Chapman
Eddie Garnier
Ross George
Lisa Godwin
David Hennessy
Ryan Playle-Howard
Peter Smith
21
cdo ps3 final.qxd
1/7/08
5:49 PM
Page 22
EIDOS INC.
PIVOTAL GAMES LIMITED (continued)
Artists (continued)
Paul Stonehouse
Alex Styles
Matt Trim
Raisa Tuomisto
Lead Technical Artist
Paul Truss
IT
IT Manager
Alan Clark
Support Technician
Chris Knaggs
Executive Vice President
of Sales & Marketing
Robert Lindsey
Technical Artist
Simon Evans
Richard Jacques
Vice President,
Legal & Business Affairs
Joe Cademartori
CREATIVE MEDIA
VOICE RECORDING
Vice President of Finance
Malcolm Dunne
Creative Media Manager
Ian Brindle
Recorded by
Side UK Ltd
Senior Character Artist
Tessa Aurmoogum
Studio Engineer
Ant Hales
Character Artists
Linus Lidberg
Nicholas Phillips
Voice Artists
Nonzo Alonzie
Nick Bolton
Brian Bowles
Richie Campbell
Tom Clark Hill
Chris Fairbank
Antonio Gil-Martinez
James Goode
Laurel Lefkow
Colin McFarlane
Noah Lee Margetts
Vincent Marzello
Ako Mitchell
Mark Monero
Kerry Shale
Concept Artists
David Grant
Jonathan Kay
Marcus Kielly
Video Artist
Craig Moroney
Cut-Scene Artists
Kevin Ackbar
Simon Suzuki
Senior Animator
Jamie Smith
Animators
Zsolt Avery-Tierney
Mark Bonaccorso
MUSIC
FMVS
Plastic Wax
SPECIAL THANKS
AUDIO
Head of Audio
Jon Vincent
QA
Senior QA Technician
Karl Stubbs
QA Technicians
Chris Bambra
Peter Hancock
Russell Jones
Eric Manktelow
Dan Waldron
22
CEO & President,
Eidos North America
Bill Gardner
Jon Booth
Nick Cook
Claire Cooper
Andy Davidson
Stuart Griffin
Pete Johnson
Stacey Luton
Antony Peacock
Matt Rees
Vice President
of Human Resources
Edie Dykstra
Vice President
of New Business
Development
Dave Clark
Director of Marketing
Matt Gorman
Marketing Manager
Matt Dahlgren
Director
of Public Relations
Michelle Seebach Curran
Public Relations Specialist
Stanley Phan
Senior Media, Promotion
& Partnerships Manager
Micheal Tran
Creative Director
Karl Stewart
Creative Services
Project Administrator
Julie Moretti
Graphic Designer
Connie Cheung
Junior Graphic Designer
Chris Cheng
Web Producer
Roderick van Gelder
Web Designer
John Lerma
Web Developer
Danny Jiang
National Sales Director
Joe Morici
Regional Sales Manager
Holly Robinson
Senior Sales
& Marketing Analyst
Ilana Budanitsky
Legal & Business
Affairs Manager
Clint Waasted
Channel Marketing
Manager
Leon Harmon Jr.
Channel Marketing
Specialist
Rafal Dudziec
Channel Marketing
Representative
David Bushee
Operations Manager
Gregory Wu
Director of North American
Development Relations
Nick Goldsworthy
Project Manager
Clayton Palma
Assistant Producer
Kari Hattner
Product Specialist
Supervisor
Jeff Lowe
Product Specialists
Tom Bengford
Stephen Cavoretto
Nick Cooprider
U.S. Mastering
& Submissions Supervisor
Jordan Romaidis
Event Specialist
Rudy Geronimo
23
cdo ps3 final.qxd
1/7/08
5:56 PM
Page 24
Register online at
EIDOS INC. (continued)
Senior Business
Development Manager
Tom Marx
New Media
Project Administrator
Francesca Zuleta
Manual by
Hanshaw Ink & Image
Special Thanks
Peter Stern
Ida Diep
Hang Ngo
Christopher Sutphen
Eric Reichley
www.eidosregistration.com
LIMITED WARRANTY
Eidos, Inc. warrants to the original purchaser of this product that the recording medium on which the software program(s)
are recorded (the “Recording Medium”) and the documentation that is included with this product (the “Manual”) will be free
from defects in materials and workmanship for a period of 90 days from the date of this product’s original purchase. If the
Recording Medium or Manual is determined to be defective in materials or workmanship within ninety (90) days from the
original date of purchase, Eidos, Inc. will replace to the original purchaser, free of charge, the Recording Medium or Manual
(as applicable) upon receipt thereof, together with proof of purchase, at the Customer Service returns center designated by
Eidos, Inc. (You are responsible for shipping costs to the designated returns center.) Eidos, Inc. shall have no obligation to replace
any Recording Medium or Manual with any defects that are (in the determination of Eidos, Inc.) the result of abuse,
mistreatment or neglect. This warranty is limited to the Recording Medium containing the software program(s) and the
Manual that were originally provided by Eidos with this product.
THIS LIMITED WARRANTY IS IN LIEU OF ALL OTHER WARRANTIES, WHETHER ORAL OR WRITTEN, EXPRESS OR IMPLIED,
INCLUDING ANY WARRANTY OF MERCHANTABILITY OR FITNESS FOR A PARTICULAR PURPOSE, AND NO OTHER
WARRANTIES OF ANY NATURE SHALL BE BINDING ON OR OBLIGATE EIDOS, INC. OR ANY OF ITS SUBSIDIARIES OR
AFFILIATES. IF ANY SUCH WARRANTIES ARE INCAPABLE OF EXCLUSION, THEN ANY SUCH WARRANTIES ARE LIMITED TO
THE NINETY-DAY PERIOD DESCRIBED ABOVE.
IN NO EVENT WILL EIDOS, INC. OR ANY OF ITS SUBSIDIARIES OR AFFILIATES BE LIABLE FOR ANY SPECIAL, INCIDENTAL
OR CONSEQUENTIAL DAMAGES RESULTING FROM POSSESSION, USE OR MALFUNCTION OF THIS PRODUCT, INCLUDING
DAMAGES TO PROPERTY, AND, TO THE EXTENT PERMITTED BY LAW, DAMAGES FOR PERSONAL INJURY—EVEN IF
ADVISED OF THE POSSIBILITY OF SUCH DAMAGES. SOME JURISDICTIONS DO NOT ALLOW LIMITATION AS TO HOW LONG
AN IMPLIED WARRANTY LASTS AND/OR EXCLUSION OR LIMITATION OF CERTAIN DAMAGES, SO THE ABOVE LIMITATIONS
AND/OR EXCLUSIONS MAY NOT APPLY TO YOU. IN SUCH JURISDICTIONS, THE LIABILITY OF EIDOS, INC. AND ANY OF ITS
SUBSIDIARIES OR AFFILIATES SHALL BE LIMITED TO THE FULLEST EXTENT ALLOWED BY APPLICABLE LAW. IF ANY PART
OF THIS WARRANTY OR ANY OF THE FOREGOING LIMITATIONS OR EXCLUSIONS ARE RENDERED VOID BY OPERATION
OF LAW OR OTHERWISE ARE ILLEGAL, THE REMAINDER (INCLUSIVE OR ALL OTHER PARTS, LIMITATIONS AND
EXCLUSIONS) SHALL REMAIN IN FULL FORCE AND EFFECT TO THE FULLEST EXTENT ALLOWED BY LAW.
WARRANTY CLAIMS & PRODUCT SUPPORT
For warranty claims and product support please contact our Customer Services Department at (650) 421-7670 or
[email protected] or visit our website at support.eidosinterative.com. Our Customer Services
Department personnel are available between the hours of 9:00 a.m. and 4:00 p.m. (Pacific time) Monday through Friday
(except holidays). You are responsible for all toll charges. Customer Services Department personnel do not provide game
hints, strategies or codes.
To initiate a warranty return, you will need a RMA# (“Return Merchandise Authorization”) from our Customer Services
Department. (Any materials not containing a RMA# sent to Eidos may be returned unprocessed.) In many cases, return
and replacement of a Recording Medium or Manual isn’t the best solution for the problem(s) you may be experiencing or
replacement may not be covered under the foregoing limited warranty—our Customer Services Department personnel can
help you determine if replacement is necessary and covered under warranty.
In the event the Recording Medium or Manual is confirmed to be defective and replacement is subject to the foregoing
limited warranty, you will need to return, postage prepaid, the Recording Medium/Manual (along with its packaging, unless
advised to the contrary by Eidos Customer Service Department personnel) together with a copy of your original sales receipt
(dated no earlier than 90 days preceding the date of your return), and a statement containing a brief description of the
difficulty you are experiencing, the applicable RMA# you have been issued, your first and last name, return address, email
address and phone number to Eidos Customer Service at the following address to receive warranty replacement:
Eidos, Inc.
RMA# (state your authorization number here)
1300 Seaport Boulevard, Suite 100
Redwood City, CA 94063
24
Conflict: Denied Ops © Eidos Interactive Ltd., 2007. Developed by Pivotal Games Limited. Published by Eidos, Inc., 2007. Conflict,
Denied Ops, Eidos and the Eidos logo are trademarks of Eidos Interactive Ltd. Pivotal Games and the Pivotal logo are trademarks of
Pivotal Games Limited. “PLAYSTATION” is a registered trademark and “PS3” is a trademark of Sony Computer Entertainment Inc.
The rating icon is a trademark of the Entertainment Software Association. SIXAXIS is a trademark of Sony Computer Entertainment
Inc. © 2007 Sony Computer Entertainment Inc. All rights reserved.
cdo ps3 final.qxd
1/7/08
5:49 PM
Page 26
OUTSIDE BACK COVER
PLACEHOLDER