1
CECROP CO.,LTD
TABLE of CONTENTS
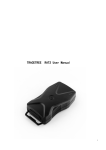
Getting Started
Check List
4
Features
5
Caution
6
Fingerprint Enrollment/ Deletion
Function button/ LED Description
8
Administrator Fingerprint Enrollment
9
User Fingerprint Enrollment
9
Deletion of All Users
9
How to Use
Unlocking with a Fingerprint
Locking and unlocking
14
15
How to exchange the battery
Unlocking with a Battery
16
17
Unlocking with a Mechanical Key
18
Maintenance Guide
Trouble Shooting
20
Warranty Guide
21
SDL 3001BA
2
Good@News
Getting Started
• Check List
• Features
• Caution
CECROP CO.,LTD
Features
Cautions
1.
Do not dismantle, re-assemble.
It may cause serious damage.
2.
For cleaning, wipe with a dry towel..
Do not use chemicals when cleaning sensor.
It may cause the sensor to malfunction
3.
Do not open with a wet finger. It may disturb
the electronic circuit. Do not touch the surface
with corrosive materials.
4.
Enroll two or three fingerprints per individual. Thumb,
forefinger and middle finger are recommended for
fingerprint template enrollment.
5.
Delete fingerprints and enroll them again seasonally.
6.
Use the system after enrolling your fingerprints and confirm
normal system operation with the door open.
SDL 3001BA
6
Good@News
CECROP CO.,LTD
Function Button/ LED Description
1. Function Button : Open the battery case
and you will see function button.
Enrollment/ Deletion
• Function button/ LED Description
• Administrator Fingerprint Enrollment
•Mode Change Button (F):
- Administrator mode on the right side
( Fingerprint Enrollment / Deletion )
- User mode on the left side
( Unlocking with a fingerprint)
•Enrollment Button (E)
•Deletion Button of All Users (D)
• User Fingerprint Enrollment
• Deletion of All Users
2. LED Description
•Power ON
( Red LED )
•Success
( Green LED )
•Error/ Failure
( Red LED Flickering/ Beeping Sound )
SDL 3001BA
8
Good@News
www.cecrop.com
CECROP CO.,LTD
Administrator Fingerprint Enrollment
? Cautions : The first 2 fingerprints are enrolled as administrators.
Use the system after enrollment and confirm the
normal operation with the door open.
1. Change of Administration Mode : .
Jog the internal sliding button on the right side to F( Red LED )
2. Press the enrollment button until the green LED goes off.
Place the fingertip center right on that of the sensor for 1st
administrator fingerprint enrollment
? Caution : After enrollment, change t he mode:
Jog the internal slidering button of the right side
to the left( Red LED flashed)
3. Success : Enrollment of 1st administrator fingerprint after
the green LED signal goes off. When the enrollment is succesful
(the Green LED flashes). After then, enroll 2nd administrator fingerprint.
* Enrollment of the 2nd administrator enrollment
after the green LED goes off
4. Enrollment Error : Start again from the administrator mode change
(Red LED flashes, Beeping sound)
* For 3seconds
5. User mode change : Jog the internal sliding button on the right side.
to the left( Red LED flashes)
• Green LED : Success
• Red LED : Failure
9
SDL 3001BA
Good@News
SDL 3001BA
10
Good@News
www.cecrop.com
CECROP CO.,LTD
User Fingerprint Enrollment
? Caution : As the two administrator fingerprints are used
as an approval keys; There should be an administrator
present when enrolling a user.
1. Administrator mode change : Jog the internal sliding button on the
right side to F (Red LED signal).
2.Administrator fingerprint authentication:
Press the enrollment button until the green LED goes off.
Place the administrator fingerprint on the sensor.
? Caution : After enrollment, change the mode:
Jog the internal slidering button of the right side
to the left (Red LED flashed)
3. After administrator fingerprint authentication (Green LED flashes),
Enrollment of a user fingerprints can be done. Place the fingertip
on that of the sensor. You can proceed with the enrollment of
other users within 10 seconds.
* Maximum99fingerprints can be enrolled.
4. Enrollment Error : Start again with he administrator mode
change to F( Red LED flashes, Beeping sound)
* For 3seconds
5. User mode change : Jog the internal sliding button on the right side
to the left( Red LED flashes)
* Green LED : Success
* Red LED : Failure
11
SDL 3001BA
Good@News
SDL 3001BA
12
Good@News
www.cecrop.com
CECROP CO.,LTD
Deletion of all users
* Cautions: Delete all user fingerprints including administrator
fingerprints. Use the system after fingerprint enrollment
? Cautions: As this is the deletion of all user fingerprints,
enroll the administrator fingerprint again.
and confirm normal operation with the door open.
1. Administrator mode change : Jog the internal sliding button.
on the right side to position (F).
3. When successful : Green LED flashes. Start from the enrollment of
administrator fingerprint
In case of failure: Start again from the administrator mode change (F).
2. Fingerprint authentication :
Press the deletion button until the green LED goes off.
Place the administrator fingerprint or any fingerprint enrolled previously
on the sensor.
* For 3seconds
4. User mode change : Jog the internal sliding button on the right side.
to the left( Red LED flashes)
•Green LED (for 2~3seconds)
: Deletion completed
* Red LED : Failure … … … …
13
SDL 3001BA
Good@News
SDL 3001BA
14
Good@News
CECROP CO.,LTD
Unlocking with a fingerprint
1. Slide up the external sliding cover.
HOW TO USE
•Unlocking with a Fingerprint
•Locking and unlocking
•How to exchange the battery
•Unlocking with a battery
2. Place your fingerprint on the sensor until the red LED or
green LED cones up and push down the door handle
•Unlocking with a mechanical Key
SDL 3001BA
16
Good@News
www.cecrop.com
CECROP CO.,LTD
Locking and Unlocking
1. Enter and Exit from inside
How to exchange the battery
When the battery runs low, the red LED flashes and beeping sounds.
Exchange the battery with an alkaline batteries within 30days.
(Energizer battery is recommended)
•Click the open/ .close button and push down
the door handle
•After jogging the emergency handle as shown,
Push down the door handle.
2. Locking : With the slide button on the right side, the function
is activated and with the left side, deactivated.
•Installation: Insert the cathode of the battery 1
and push In the anode. Then insert battery 2.
(Insert the battery starting from the side with
spring terminal)
•Removal: Remove the battery in reverse order.
•Right (Red) activated / Left (Blue) deactivated
17
SDL 3001BA
Good@News
SDL 3001BA
18
Good@News
www.cecrop.com
Opening the door with a battery in case of emergency
CECROP CO.,LTD
Opening the door with a mechanical key
1. Slide the external cover up
1. Slide up the external sliding cover and connect the battery(9V)
as shown in the picture above.
2. When the power on, place your finger on the sensor until red LED
Green LED flashes, and push down the handle to open.
19
SDL 3001BA
Good@News
2.Pull up the back panel with ‘Good@News’brand name, and open
The door by using mechanical key as seen in the picture.
SDL 3001BA
20
Good@News
CECROP CO.,LTD
Trouble- Shooting
1.
When fingerprints are not enrolled
- Check whether your fingerprint is too dry or wet
- Keep lock surface clean and dry
- Clean it with soft and dry cloth if there are any smutches
on the lock surface.
- Please try again to enroll, after removing moisture, sweat etc..
2.
When the door can not be opened with the enrolled fingerprint
- Please remove excessive moisture and place the fingerprint
on the sensor again. Check whether the completely
lock function is activated.
Maintenance Guide
Trouble Shooting
Warranty Guide
3.
When a new fingerprint is not properly enrolled after failure
In enrollment (with red LED flashes)
- Reset the mode change button and re-enroll
4.
When the administrator fingerprint is not verified and user
fingerprint is not enrolled consequently.
- Change the administrator mode by using the other
administrator fingerprint and then delete all enrolled
fingerprints . Try again to enroll.
5.
When the system does not work due to system failure or
temporary malfunction.
- Press the re-boot button or reset by sliding the mode
change button from left to the right.
SDL 3001BA
22
Good@News
www.cecrop.com
REPAIR AND WARRANTY SUPPORT SERVICE
1. WARRANTY POLICY
- Customers are warrantied for one year (12months) from date the product was
shipped from Cecrop. Original purchasers (" Customers") who purchased
through a distributor will be provided for an additional 3month warranty to
account for shelf life.
- We provide warranty support to our customers to deliver technical support
services when you need it. All warranty and repair services are provided
through our authorized distribution partners.
2. POLICY FOR RETURNS
- Cecrop must be notified within thirty days of the date a defect is discovered.
- All Cecrop products must be shipped freight and insurance prepaid, in the
original shipping container or equivalent a written description of the defect
together with a copy of the invoice must be shipped with the product
3. RETURN MERCHANSISE AUTHORIZATION
- Cecrop will issue the Return Material Authorization(RMA) number which
the Customer must include with all correspondence and display on the
outside of the shipping container when returning the product
- Any products returned later than thirty days after issuance of an RMA be
subject to review as to whether the authorization to return is still warranted
4. OUT OF WARRANTY REPAIR
- To repair the devices or product that is no longer under warranty, customer should
obtain a Return Merchandise Authorization (RMA).from Customer Service Team
- CS team will contact you with an estimate of the repair charges and payment
information. Full payment will need to be received prior to the shipping
? Customer Service Contact Information?
Telephone: +82 2 2222 2743
Fax: +82 2 501 6890
e-mail: [email protected]
Mailing address:
CECROP CO., LTD.
Customer Service Dept.
5th FL, Naray B/D719-1, Yoksam-Dong, Kangnam-gu,
Seoul, Korea (Postal code: 135-080)
Website: www.cecrop.com
23
SDL 3001BA
Good@News