1
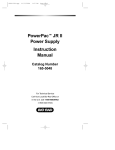
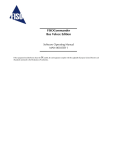
Revision 1.0 User's Manual AS-pro2 On-board Programmer DECEMBER 2011 AS-pro2 On-board Programmer AS-pro2 (On-board Programmer) Important Notice The information in this publication has been carefully checked and believed to be entirely accurate at the time of publication. SEMINIX assumes no responsibility, however, for possible errors or omissions, or for any consequences resulting from the use of the information contained herein. SEMINIX continues to improve products and upgrade specification and firmware at any time without notice. You should visit our website to get the newest information about AS-pro2. SEMINIX reserves the right to make changes in its products or product specifications with the intent to improve function or design at any time and without notice and is not required to update this documentation to reflect such changes. SEMINIX makes no warranty, representation, or guarantee regarding the suitability of its products for any particular purpose, nor does SEMINIX assume any reliability arising out of the application or use of any product or circuit and specifically disclaims any and all liability, including without limitation any consequential or incidental damages. “Typical” parameters can and do vary in different applications. All operating parameters, including “Typical” must be validated for each customer application by the customer‟s technical experts. © 2007 SEMINIX Co., Ltd. This publication contains proprietary information, which is protected by copyrights. All rights are reserved. No part of this publication may be photocopied, reproduced, transmitted in any form or translated to another language by means, electric or mechanical, by photocopying, recording, or otherwise, without the prior written consent of SEMINIX Co., Ltd. Seminix Co., Ltd. 2ndFl. EGTel Building, #835-8 Yoksam-Dong, Kangnam-Gu, Seoul, Korea (135-080) Web Address : http://www.seminix.com E-mail : [email protected] Tel : +82-2-539-7891 Fax : +82-2-539-7819 Printed in the Republic of Korea -1- AS-pro2 On-board Programmer Table of Contents 1. General description and Features 1.1 Main Features ----------------------------1.2 Packing Include --------------------------- 3 4 2. Getting Started 2.1 Device Support ---------------------------5 2.2 To install AS-pro2 USB driver ----------5 5 2.3 Hardware Setup --------------------------3. Operation Description 3.1 System map -------------------------------3.2 Stand-by Mode ---------------------------3.3 Execute ------------------------------------3.4 Function Menu ---------------------------3.5 File Select ------------------------------3.6 System Menu -----------------------------3.7 System Setting ---------------------------3.8 Program Option---------------------------3.9 File Down load ---------------------------3.10 System Upgrade -----------------------3.11 AS-pro2 Program Sequence --------- 6 7 7 8 8 8 9 11 11 11 12 4. Electrical Characteristics ----------------------- 14 5. Pin Description (20-pin side)------------------6. Pin Description (6-pin side)--------------------7. On-board writing application ------------------- 14 15 16 -2- AS-pro2 On-board Programmer 1. General description and Features 1.1 Main features AS-pro2 is a high-speed programmer for the Samsung serial MTP including Cortex-M series (Flash memory MCU) devices on board and developed as small size for portability. It can program a new firmware code into Samsung MTP MCU mount on PCB when you need to upgrade the system firmware code for A/S (After Service) without a host PC. So it is very useful to upgrade the firmware code of Samsung MCU built in the Air-conditioner, Refrigerator, Washing machine like a heavy goods which are difficult to move them to the After Service center. Main features are as follows: Portable & Stand alone Samsung OTP/MTP/FLASH MCU programmer. Supports all Samsung OTP and MTP devices with Samsung standard serial protocol format. Hex data file downloads via USB port form PC. Main functions - Chip Erase (MTP or FLASH MCU) - Program (Writing data into device) - Verify data with the data in buffer memory of AS-pro2 - Getting checksum of the Buffer data - Device checksum Very fast program and verify time - 2K byte (OTP type MCU) or 10K byte (MTP or FLASH MCU) per 1 second. Small size for the portable use. (Width : 46, Length : 82, Depth : 16 mm, weight : 50g) Internal buffer memory : 118M Byte - Can download several hex files and select one file when programming it to MTP built in application system. Power supply : External power adapter operation - Power adapter (100~220VAC to 15VDC, 500mA) - Maximum supply current to Application system: 300mA Driver software is run under Windows 98/2000NT/XT - User can easily select device type or configuration settings - Key-based menu-drive software for simple operation. System upgradeable - AS-pro2 system firmware can be upgraded at need. -3- AS-pro2 On-board Programmer 1.2 Packing Includes 1) AS-pro2 main body 2) USB Cable 3) 20pin Connection Cable 4) 20 to 9 pin Adapter Board (AB-20P9) 5) Power Adapter (15VDC) 6) User's Manual 7) USB drive files for Win98. Figure 1. AS-pro2 unit kit -4- AS-pro2 On-board Programmer 2. Getting Started 2.1 Device support AS-pro2 supports all of Samsung OTP, MTP and FLASH MCU with Samsung standard serial protocol format. 2.2 To install AS-pro2 USB driver Window ME/2000/XP or later version The USB driver will be installed automatically (No need of installation manually). 2.3 Hardware Setup (On-board programming) 1) Supply electric power to External power adapter. 2) Connect AS-pro2 to the Application System with connection cable. 3) AS-pro2 is activated and LCD screen displays basic mode. (AS-pro2 main body doesn’t have the power source for itself) Figure 2. Hardware configuration -5- AS-pro2 On-board Programmer 3. Operation descriptions 3.1 System function-map System Initial File select Func key Stand-by Sel key Execute Func Sel key (long) Func key (long) System Menu Function Menu - Program select menu - Verify System setting Program Option select menu - Chip Erase - Verification Preset - Part Number Manual set - Blank check - Type (Device) - Read Protection - Vdd - SMART Option - Vpp - End Address * Key Function - UP : „Func‟ key - Down : „Sel‟ key - Select : „Sel‟ key with long time (over 1 sec) -6- - Erase - Checksum AS-pro2 On-board Programmer 3.2 Stand-by Mode Stand-by Mode (1) Program Option : Auto Chip Erase : Auto Verify : Auto Blank Check : Auto Read Protection : SMART Option (2) Information - Device : product part number - Setting Voltage : Device operating voltage (Vdd), Programming voltage (Vpp) - End Address : length of hex file - Buffer Checksum : 2 bytes of checksum of data in buffer (3) Current Status (of AS-pro2 system operation) - Program - Verify - Erase - Checksum (4) File Name - File Name should be set in English or Arabic number. 3.3 Execute - „Current Function‟ is started by pressing „Sel‟ key at Stand-by mode. - The result and status will be displayed on LCD window. -7- AS-pro2 On-board Programmer 3.4 Function Menu - Choose a function which you want among „Program‟, „Verify‟, „Chip Erase‟, and „Check sum‟. 1) Press „Sel‟ key for a little long time in „Stand-by‟ mode to go to the main menu 2) Moving the cursor is available by using „Sel‟ key or „Func‟ key. 3) If you press „Sel‟ key for a little long time, an item with the cursor is selected and then the mode is back to „Stand-by‟ mode 3.5 File select - In this mode, you can choose a file to be programmed. *Only support files with „Intel hex format or Samsung hex format‟ Display window – File Select Mode 1) Press „Func‟ key at „Stand-by‟ mode to go to „File Select‟ mode. 2) Moving the cursor is available using „Sel‟ key or „Func‟ key. 3) If you press „Sel‟ key for a little long time, an item with the cursor is selected and then the mode is back to „Stand-by‟ mode 4) Press „Func‟ key longer, if you want to go to the upper (parent) folder. When you are in a root folder, It can enter the Stand-by mode to press “Func” key longer. 3.6 System Menu 1) Press „Func‟ key for a little long time in „Stand-by‟ mode to go to the main menu 2) Moving the cursor is available using „Sel‟ key or „Func‟ key 3) If you press „Sel‟ key for a little long time, the item with the cursor will be selected -8- AS-pro2 On-board Programmer 3.7 System Setting - System setting menu is to select „Device Type‟, „Vdd‟, „Vpp‟, and „End Address‟ for the programming devices properly. - There are two ways to do „System setting‟. One is „Preset‟ and the other is ‟ Manual set‟ mode 1) Preset mode If you select the device name (part number) on LCD window, „Device Type‟, „Vdd‟, „Vpp‟ and „End Address‟ of the selected device are set automatically by the device define file (ddf) information. - Moving the cursor is available using „Sel‟ key or „Func‟ key - If you press „Sel‟ key for a little long time, the item with the cursor is selected 2) Manual setting mode User should set „Device Type‟, „Vdd‟, „Vpp‟, and „End Address‟ manually. - Moving the cursor is available using „Sel‟ key or „Func‟ key - If you press „Sel‟ key for a little long time, the item with the cursor is selected - The value of the selected item can be changed. -9- AS-pro2 On-board Programmer A) Setting - Moving the cursor or changing value is available using „Sel‟ key or „Func‟ key - If you press „Sel‟ key for a little long time, the current value is selected a) Device Type b) System voltage c) Program voltage d) End Address - 10 - AS-pro2 On-board Programmer 3.8 Program Option This menu is to choose the programming options such as Chip Erase, Verification, Blank check, Read Protection, LDC Protection, Hard Lock, and SMART Option. (Example) If users choose the Read Protection, the read protection will be done automatically after programming. 1) Moving the cursor is available using „Sel‟ key or „Func‟ key 2) If you press „Sel‟ key for a little long time, the item with the cursor is selected 3) Selection and cancellation will be toggled whenever you press „Sel‟ key at the same item. 4) The icons are come out on the left side of the selected items, and there is no icon if you cancel item of the program options. 3.9 File Download (Hex data files) 1) Connect the AS-pro2 to the USB port of the PC using the USB cable. 2) Copy a file to removable disk. 3) Disconnect the USB connection. * File name should be made in English. * Remove 'Adapter power' or turn off 'Application System Power' when AS-pro2 connects PC via the USB cable. 3.10 System Upgrade 1) Download the upgraded file from website (http://www.seminix.com). 2) Copy the upgraded file to AS-pro2 and then disconnect USB cable after copying. 3) Connect the USB cable again (AS-pro2 and PC) for upgrading sequence. 4) AS-pro2 will be connected to PC after finishing the system upgrade successfully. * Please backup the hex data in the buffer of AS-pro2 before the upgrade because the buffer data will be formatted after finishing the upgrade * All setup data ( ‘Device Type’ ,‘Vdd’, ‘Vpp’, and ‘End Address’) of the system setting are initialized after the upgrade. - 11 - AS-pro2 On-board Programmer 3.11 AS-pro2 Operating Sequence - 12 - AS-pro2 On-board Programmer - 13 - AS-pro2 On-board Programmer 4. Electrical Characteristics Parameter Conditions Min Typ Max Unit Current Consumption (Vdd : 5V) Stand by - -40 -85 Operating -100 - -200 Programming Voltage (Vpp) Ipp=10mA 3.3 - 12.5 V Programming Current (Ipp) Vpp=12.5V 5 10 - mA mA 5. Pin Description (20-pin side, JP1 of AB-20P9) 1 3 5 7 9 11 13 15 17 19 2 4 6 8 10 12 14 16 18 20 Pin No. Name Description Pin No. Name Description 1 SCLK Serial Clock 2 GND GND 3 SCLK Serial Clock 4 GND GND 5 VPP Program Voltage 6 MODE0 Test Mode 0 7 VPP Program Voltage 8 GND GND 9 RST Reset 10 MODE1 Test Mode 1 11 RST Reset 12 MODE2 Test Mode 2 13 VDD External Operating Voltage 14 - - 15 VDD External Operating Voltage 16 GND GND 17 SDAT Serial Data 18 GND GND 19 SDAT Serial Data 20 GND GND - 14 - AS-pro2 On-board Programmer 6. Pin Description of AB-20P9 (9-Pin side) - 15 - AS-pro2 On-board Programmer Connector Name Description S_J2 For JTAG – 20pin 2.54mm pitch S_J3 For JTAG – 10pin 2.54mm pitch S_J4 For JTAG – 10pin 1.27mm pitch S_J5 For Serial Program – 9pin 2.54mm pitch S_J8 For Serial Program – 9pin 2.00mm pitch S_J6 For Samsung Electronics Co.,Ltd., – 7pin 2.00mm pitch S_J7 For Samsung Electronics Co.,Ltd., – 6pin 2.00mm pitch Pin Name Description GND GND VDD External Operating Voltage RST Reset VPP Program Voltage CLK Serial Clock DAT Serial Data MD0 Mode 0 MD1 Mode 1 MD2 Mode 2 Core SAM8 CalmRISC ARM 8051 - 16 - Cortex AS-pro2 On-board Programmer 7. On-board writing application – Samsung MCU At the Samsung MCU writing, the AS-pro2 needs only 9 signal lines that are VDD, GND, TEST, MODE0, MODE1, MODE2, RESET, SCLK, and SDAT of MCUs. When you design the PCB circuits, you should consider the usage of these lines for the onboard writing (In-system programming). In case of TEST(MODE) pin, normally test pin is connected to GND but in writing mode, the programming voltage (Vpp) power signal is input to this pin. Therefore, combining these two cases, a resistor should be inserted between the TEST(MODE) pin and GND. The Reset, SDAT and SCLK should be treated under the same consideration. Please be careful to design the related circuit of these signal pins because rising, falling timing of VPP, SCLK and SDAT are very important for proper programming. Reference Table for connection Pin name (MCU side) I/O mode in Applications Resistor (need) Recommend Value Vpp(TEST or Mode) Input Yes RTEST is 47 ㏀ CVPP is 104pF RESET Input Yes RRESET is 47 ㏀ Input Yes RSDAT is 4.7 ㏀ Output No (Note 1) Input Yes Output No (Note 1) SDAT(I/O) RSCLK is 4.7 ㏀ SCLK(I/O) Notice 1) In te on-board writing mode, very high-speed signal will be provided to SCLK and SDAT pin. And it will cause some damages to the application circuits which are connected to SCLK or SDAT port if the application circuit is designed as the high-speed response such as relay control circuit. 2) 1.5m of cable is the maximum length from AS-pro2 to a target chip 3) Power supply - Use 'External Power Adapter (15VDC)' for program to chip. 4) if ‘Reset pin’ and ‘Vpp(Test) pin’ are same, you have only to connect Vpp(Test) pin. 5) Please check Vdd, Vpp, and Checksum before programming. 6) Please check the connection line are correct(Vdd, Vpp(TEST or MODE), GND, RST, SCLK, SDAT). 7) if there is no problem of Vdd, Vpp, checksum and programming fail continuously, please try to contact SEMINIX as soon as possible. If user doesn’t follow this notice and keep using AS-pro2 even though there seem to be a problem of AS-pro2 , SEMINIX will disclaim all responsibility. - 17 - AS-pro2 On-board Programmer Application circuit for On-board writing - 18 - AS-pro2 On-board Programmer 2ndFl. EGTel Building, #835-8 Yoksam-Dong, Kangnam-Gu, Seoul, Korea (135-080) Web Address : http://www.seminix.com E-mail : [email protected] Tel : +82-2-539-7891 Fax : +82-2-539-7819 - 19 -