1
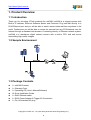
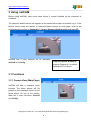
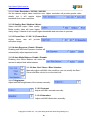
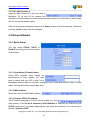
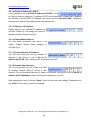
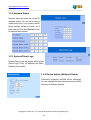
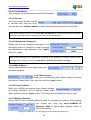
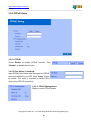
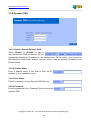
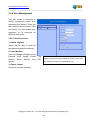
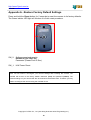
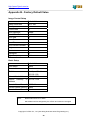
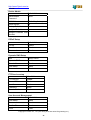
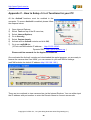
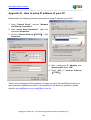
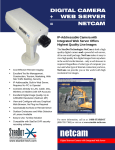
http://www.3jtech.com.tw
netCAM
netCAM
User's Guide
Report Version: 2.0.5
Date: October 12,2004
3JTech Co., Ltd.
342 Fu-Hsing N. Rd., 2F
Taipei, Taiwan
Tel: +886-2-2500 6919
e-mail: [email protected]
Copyright of 3JTech Co., Ltd. (also doing business as A3J Engineering Inc.)
1
http://www.3jtech.com.tw
netCAM
Revision History
Version
Date
Changes
2.0.1
June 17, 2004
Release netCAM User Guides / James
2.0.2
August 4,2004
Change netCAM for netCAM and some photo / Angus & James.
2.0.3
August 4,2004
Add and revise netCAM User Guides / Angus & James.
2.0.4
October 6,2004
Add and revise netCAM User Guides / Angus & James.
2.0.5
October 12, 2004
Add and revise user’s manual / Andy
Table of Content:
Revision History ..................................................................................................................................2
Table of Content:.................................................................................................................................2
1. Product Overview ............................................................................................................................4
1.1 Introduction..............................................................................................................................4
1.2 Sample Environment ...............................................................................................................4
1.3 Package Contents .....................................................................................................................4
1.4 Hardware Features ..................................................................................................................5
1.4.1 Exterior ...............................................................................................................................5
1.4.2 Image...................................................................................................................................5
1.4.3 Hardware/System ................................................................................................................5
2. netCAM Installation........................................................................................................................6
2.1 System Requirements ..............................................................................................................6
2.1.1 Local Area Network:.......................................................................................................6
2.1.2 System Requirement: ......................................................................................................6
2.2 Network Configuration............................................................................................................6
3 Using netCAM..................................................................................................................................8
3.1 Functions...................................................................................................................................8
3.1.1 Camera View (Main Page) ..................................................................................................8
3.1.1.1 ActiveX ........................................................................................................................9
3.1.1.1 Config ..........................................................................................................................9
3.1.2 Image Control .....................................................................................................................9
3.2 Network/Admin...................................................................................................................... 11
3.2.1 Basic Setup........................................................................................................................ 11
3.2.2 Network Status..................................................................................................................13
3.2.3 System/Client Logs ...........................................................................................................13
Copyright of 3JTech Co., Ltd. (also doing business as A3J Engineering Inc.)
2
http://www.3jtech.com.tw
netCAM
3.2.4 Device Admin (Multiport Setup) ......................................................................................13
3.2.5 PPPoE Setup .....................................................................................................................15
3.2.6 Dynamic DNS ...................................................................................................................16
3.2.7 FTP Service.......................................................................................................................17
3.2.8 User Management .............................................................................................................18
3.2.8.1 Security Levels:..........................................................................................................18
Appendix A - Restore Factory Default Settings.........................................................................19
Appendix B - Factory Default Value ..........................................................................................20
Appendix C - How to Setup ActiveX functions for your PC.....................................................22
Appendix D - How to setup IP address of your PC ..................................................................23
Copyright of 3JTech Co., Ltd. (also doing business as A3J Engineering Inc.)
3
http://www.3jtech.com.tw
netCAM
1. Product Overview
1.1 Introduction
Thank you for choosing 3JTech products for netCAM. netCAM is a colored camera with
Built-in IP address, Ethernet Software Stacks and Protocols. Plug netCAM directly to a
RJ45 Ethernet port and you will be able to watch camera sites real-time anywhere in the
world. Furthermore you will be able to control the camera from any PC/Notebook over the
Internet through a standard web browser. Connecting directly to Ethernet network system,
netCAM is a standalone digital network camera with a built-in CPU and web server
transmitting high quality images.
1.2 Sample Environment
1.3 Package Contents
z
z
z
z
z
z
z
1 x netCAM Camera.
1 x Warranty Card.
1 x Operating CD (User’s Manual/Software)
1X Quick Installation Guide.
1 x RJ45 Ethernet cable.
1 x RJ22 Power Adapter & Trigger I/O Connection.
1 x For US standard AC plug
Copyright of 3JTech Co., Ltd. (also doing business as A3J Engineering Inc.)
4
http://www.3jtech.com.tw
netCAM
1.4 Hardware Features
The following information contains the physical description of netCAM. This includes the
functions and the locations of each connector and indicator. The information provides
useful reference when installing the product. Please familiarize yourself with netCAM.
1.4.1 Exterior
Lens
Camera Sensor Micron VGA CMOS Sensor 1/4
Resolution 640x480
Illumination 2.0 Lux
Lens
F: 4.5 mm, F: 2.8
1.4.2 Image
Video Format
Frame Rate
15fps@VGA
Video Resolution
Light Frequency
Brightness control
Contrast control
Saturation
JPEG/MJPEG
30fps@QVGA, 20ftp,
RJ45 Plug
RJ11 Power
Plug
320x240, 640x480
50Hz, 60Hz
Yes
Yes
Yes
1.4.3 Hardware/System
SW_2
CPU
ARM7 32bit RISC CPU
SDRAM
16 MB
Flash ROM 2 MB
OS Linux
2.4 kernel
Image Processor TOPRO TP6800
Ethernet RJ-45, 10/100 Base-T auto-sensed
SW_1
Note: User will be able to update and download the
latest firmwares via internet.
SW_2:
Software reset and reset to
default IP (192.168.1.99 )
SW_1:
Please hold for 5 seconds )
H/W Power Reset
Copyright of 3JTech Co., Ltd. (also doing business as A3J Engineering Inc.)
5
http://www.3jtech.com.tw
netCAM
2. netCAM Installation
2.1 System Requirements
2.1.1 Local Area Network:
10Base-T Ethernet or 100BaseTX Fast Ethernet
2.1.2 System Requirement:
ActiveX Enabled and Compliant Web Browser (e.g. Microsoft Internet Explore 5.0 or later)
CPU: Pentium III, 450MHz or above
Memory Size: 128MB recommended
VGA card resolution: 800x600 or above (e.g. support Overlay function VGA card)
OS (Operating System): Windows XP, 2000
Other suggestion requirement: CD-ROM.
2.2 Network Configuration
You will require to download ActiveX
applets in order to view your camera.
Before you connect to the camera,
please open your web browser and
enter http://61.56.193.43 to obtain the
applet.
To begin configuring netCAM, please enter the default IP address (192.168.1.99) in your
web browser. administrator user’s name and password when netCAM is accessed.
netCAM can be manually configured if you
cannot connect to the netCAM. You will have to
modify your local network settings. For more
detail please see Appendix D - How to setup IP
address of your PC.
Default
Use’s name: root
Password: admin
Copyright of 3JTech Co., Ltd. (also doing business as A3J Engineering Inc.)
6
http://www.3jtech.com.tw
netCAM
netCAM requires an IP address for users to access. There are three different IP
configurations; PPPoE, DHCP and Fixed IP.
If you are using dial up ADSL connecting to the Internet, it is recommended to select
PPPoE as default connection. If your network supports DHCP, simply select DHCP.
Otherwise, you might have to assign a fixed IP for netCAM. The factory default is on fixed
IP mode. Connect your netCAM to the network by plugging a RJ-45 Ethernet wire between
the device and your local network socket.
The factory defaults of your netCAM are listed below:
IP Address
Netmask
Gateway
DNS
You will need a client
192.168.1.99
255.255.255.0
disabled
disabled
PC to configure the netCAM via network. It is recommended to use
the following settings on your PC. (more details in Appendix D - How to setup IP address
of your PC)
IP Address
192.168.1.11
Subnet mask
255.255.255.0
Gateway
disabled
DNS
disabled
Launch your web browser (e.g. IE or NETSCAPE) and type the IP address
http://192.168.1.99/ on the address bar of the browser and press “Enter”. Once successfully
connect to netCAM, you will be able to see login pages.
Note: ActiveX functions need to be activated on your computer to setup netCAM. (more details in
Appendix C -How to Setup ActiveX functions of your PC.)
Copyright of 3JTech Co., Ltd. (also doing business as A3J Engineering Inc.)
7
http://www.3jtech.com.tw
netCAM
3 Using netCAM
Before using netCAM, users must have Active X control installed on the computer or
notebook.
The camera’s default screen will appear as the shown below upon successful log in. If the
picture screen does not appear or Internet Explore shows an error page, refer to the
troubleshooting section in Appendix C - How to Setup ActiveX functions of your PC.
netCAM has 2 main sections for its operation;
Supporting Web Browsers:
Internet Explorer 5.0 or above
Netscape 6.0 or above
ActiveX and Config.
3.1 Functions
3.1.1 Camera View (Main Page)
netCAM will take a snapshot when
initiated. The taken picture will be
pasted on the webpage shown as the
figure below. On top of the screen,
there are 2 main functions; ActiveX
and Config.
Copyright of 3JTech Co., Ltd. (also doing business as A3J Engineering Inc.)
8
http://www.3jtech.com.tw
netCAM
3.1.1.1 ActiveX
Click on ActiveX will enable the live
stream camera image. You will be able
to view live feeding images through the
website. If you wish to terminate the
Live Video, click “netCAM” to return
the netCAM main page.
3.1.1.1 Config
You will be able to setup the camera though Config function.
3.1.2 Image Control
Image Control will change image’s color and illumination. You can regulate “Video
Resolution” , “Frame Rate”, “Light Frequency “and “Color Control”.
Copyright of 3JTech Co., Ltd. (also doing business as A3J Engineering Inc.)
9
http://www.3jtech.com.tw
netCAM
3.1.2.1 Video Resolution: 320*240 / 640*480:
Set the camera output video resolution size. Higher resolution will provide greater video
details, but it will require higher
bandwidth then lower resolution.
3.1.2.2 Quality: Best / Medium / Worst:
Select netCAM output Video quality.
Better quality video will have higher
clarity image. Likewise it will require higher bandwidth and more time to process.
3.1.2.3 Frame Rate: 15 / 20 / 30 (Frames/Sec):
Higher frame rate will provide
smoother image.
3.1.2.4 Auto Exposure: Enable / Disable:
Enabling netCAM Auto Exposure function will
automatically adjust exposure levels.
3.1.2.5 Auto White Balance: Enable / Disable:
Enabling Auto White Balance will allow the
camera to adjust ideal white balance.
3.1.2.6 Hue: Red / Green / Blue / Number:
Manually adjust netCAM’s Hue condition; you can modify the Red /
Green and Blue color’s hue or the total hue.
3.1.2.7 Brightness:
Adjust netCAM’s brightness of the camera manually.
3.1.2.8 Contrast:
Adjust netCAM’s contrast manually.
3.1.2.9 Saturation:
Adjust netCAM’s Saturation manually.
Copyright of 3JTech Co., Ltd. (also doing business as A3J Engineering Inc.)
10
http://www.3jtech.com.tw
netCAM
3.1.2.10 Light Frequency:
Adjust the light frequency to suit your area of
operation. 50 Hz and 60 Hz variants are
available to accommodate the different light frequencies found in USA (60 Hz) and Europe
(50 Hz) for optimal image quality.
After the changes are complete, please click “Apply” button to store the settings. Otherwise
click the “Undo” button undo the changes.
3.2 Network/Admin
3.2.1 Basic Setup
You can select PPPoE, DHCP or
Fixed IP according to the local network
environment.
3.2.1.1 Host Name & Domain Name:
Some ISPs required these names as
identifications to their network. You may
have to check with your ISP to see if your
Broadband Internet Service has been configured with a host and domain name. In most
cases, leaving fields blank should also work.
3.2.1.2 MAC Address:
Show the current netCAM MAC address.
3.2.1.3 Acquire PPPoE IP address:
The IP address assigned by PPPoE may be outside your local
area network. If the Get an IP Address by PPPoE/Modem is selected, you must set up the
PPPoE configuration. It includes assigning the user name and password. You can set up to
allocate “Dynamic DNS”.
Copyright of 3JTech Co., Ltd. (also doing business as A3J Engineering Inc.)
11
http://www.3jtech.com.tw
netCAM
3.2.1.4 Get an IP address by DHCP:
If your camera is set as Get an IP address by DHCP. Then
you do not need to assign an IP address. DHCP will automatically release the IP address
for netCAM. To avoid DHCP IP changed, you need to set the “Dynamic DNS”. Otherwise
changes of IP address will cause camera accessing error.
3.2.1.5 Specify an IP address:
Please specify your netCAM IP address by
yourself. Please do not assign the same IP
address as other Network devices.
3.2.1.6 Subnet Mask Address:
Set only when necessary, else leave it as
default. Default Subnet Mask Address is
255.255.255.0
3.2.1.7 Default Gateway IP Address:
Your ISP will provide you with the Gateway IP
Address. If the camera is set to Get an IP
Address by PPPoE, these values will be assigned by your ISP.
3.2.1.8 Domain Name Servers:
Your ISP will provide you with at least one DNS
IP Address. Multiple DNS IP setting is also
common. The first available DNS entry is used in most cases. If the device is set to Get an IP
Address by PPPoE/Modem, these values will be assigned by your ISP.
After changes are done, click the “Apply” button to store the new settings. Otherwise click
the “Undo” button return to previous settings.
Copyright of 3JTech Co., Ltd. (also doing business as A3J Engineering Inc.)
12
http://www.3jtech.com.tw
netCAM
3.2.2 Network Status
Network status will show the current IP
address details. You will not be able to
modify them here. If you wish to modify
these settings, please set them up at
basic setting. Click the “Reload” button
to load the latest details.
3.2.3 System/Client Logs
System/Client Logs will display detail of the
[Client Login Time], [IP address] and [MAC
Address] information.
3.2.4 Device Admin (Multiport Setup)
Information regarding netCAM will be displayed.
You can change the administrator password, MAC
Address or Multiport defaults.
Copyright of 3JTech Co., Ltd. (also doing business as A3J Engineering Inc.)
13
http://www.3jtech.com.tw
netCAM
3.2.4.1 Product Name:
This is registry the products name in netCAM’s firmware.
3.2.4.2 Version:
This is the current firmware version
in netCAM (with date and time).
You can also click “software update” to upload the latest firmware onto your netCAM.
Note: When updating firmware, it is important NOT TO UNPLUG the camera’s power source or Ethernet
connection. Interrupting firmware uploading may cause permanent damages.
3.2.4.3 Administrator Password:
Please type the new password and again at the
confirming section to reconfirm in order to change
the Administrator’s login password,. Click “Apply”
button for update.
Note: Please remember your Administrator password. If the password is forgotten, please restore
netCAM’s Factory setting by referring to Appendix A - Restore Factory Default Settings)
3.2.4.4 MAC Address:
Camera Mac Address is given upon factory and
cannot be modified.
3.2.4.5 Reset Device:
Reset your netCAM and restart without losing any stored
information. Please select “Yes”, and then click the “Apply” button.
3.2.4.6 Factory Defaults:
Reset your netCAM and restore factory default settings.
All storage information will be cleared. Please select
“Yes”, and then click the “Apply” button. This will function as hardware’s factory reset.
3.2.4.7 Multiport Defaults:
Check “Yes” to allow opening additional ports for accessing the camera. After enabling
new access port, enter eg. http://<CAMERA IP
Address>: 8080 on web browser address column to
access the camera.
Copyright of 3JTech Co., Ltd. (also doing business as A3J Engineering Inc.)
14
http://www.3jtech.com.tw
netCAM
3.2.5 PPPoE Setup
3.2.5.1 PPPoE:
Check Enable to enable PPPoE function. Click
“Disable” to disable this function.
3.2.5.2 User Name / Password:
Input PPPoE User Name and Password for PPPoE
account provided by your ISP. Click “Apply” button
to update. This entry is required by certain ISPs
when using PPPoE connection.
3.2.5.3. PPPoE Management:
Display current PPPoE status.
Copyright of 3JTech Co., Ltd. (also doing business as A3J Engineering Inc.)
15
http://www.3jtech.com.tw
netCAM
3.2.6 Dynamic DNS
3.2.6.1 Enable / Disable Dynamic DNS:
Select “Enable” or “Disable” to start or
stop the Dynamic DNS mechanism. ISP will
dynamically allocate an IP address for the camera/router. Do the setup, if you connect to
the Internet by ADSL/Cable modem, and you wish to map the dynamic IP address to a
Domain Name.
3.2.6.2 Domain Name:
Enter a domain name in this field to map the IP
address of your broadband router.
3.2.6.3 User Name:
Enter the username of your Dynamic DNS Service
3.2.6.4 Password:
Enter the password in the “Password” field to access the
dynamic DNS.
Copyright of 3JTech Co., Ltd. (also doing business as A3J Engineering Inc.)
16
http://www.3jtech.com.tw
netCAM
3.2.7 FTP Service
3.2.7.1 FTP service:
netCAM is able to upload images/video captures
at the rate of 1 picture per second to FTP site
specified by the user. Select “Enable” or “Disable” use the FTP service.
3.2.7.2 Server URL:
Define Upload FTP URL address. (Without the path of the
FTP server)
3.2.7.3 User & Password:
Input the the user name and the password required to
login the FTP server.
3.2.7.4 Remote Path:
Please enter the remote FTP path which the images will be
stored.
Copyright of 3JTech Co., Ltd. (also doing business as A3J Engineering Inc.)
17
http://www.3jtech.com.tw
netCAM
3.2.8 User Management
You can create a accounts to
restrict anonymous users from
accessing the camera. There are
three security levels; Admin, User
and Guest. You can create up to
maximum of 16 accounts for
different level users.
3.2.8.1 Security Levels:
1. Admin: Highest
Admin will be able to enter all
setups and change the settings.
2. User: Medium
User can change settings such as
Camera View, Image Control, Ftp
Service, Email Service, and NTP
service.
Admin accounts cannot be changed to Guest or User level.
The maximum account is 16 (excluding root).
3. Guest: Lowest
Guest can only do viewings.
Copyright of 3JTech Co., Ltd. (also doing business as A3J Engineering Inc.)
18
http://www.3jtech.com.tw
netCAM
Appendix A - Restore Factory Default Settings
Press and hold the Reset button for 5 seconds to reset the camera to its factory defaults.
The Green indictor LED light will lid when it is finish reset procedure.
SW_2
SW_1
SW_2:
Software reset and reset to
Default IP (192.168.1.99)
Parameter (Please Push 5 /Sec)
SW_1:
H/W Power Reset
Note: You will need to reconfigure your camera settings after resetting the camera. The
netCAM will recover to the factory default username (root) and password (admin). The
network settings on your camera will also be restored to the default value. Therefore you may
need to reconfigure the camera using the netCAM IP Lite.
Copyright of 3JTech Co., Ltd. (also doing business as A3J Engineering Inc.)
19
http://www.3jtech.com.tw
netCAM
Appendix B - Factory Default Value
Image Control Setup
Item
Default Value
Video Resolution
640 x 480
Quality
Best
Frame Rate
15
Auto Exposure
Enable
Auto White Balance
Enable
Hue: Red
50
Hue: Green
50
Hue: Blue
50
Hue:General Number
50
Brightness
30
Contrast
40
Saturation
40
Light Frequency
60 Hz
Basic Setup
Item
Default Value
Host Name
*Blank
Domain Name
*Blank
IP Address
Specify an IP address
192.168.1.99
Subnet Mask Address 255.255.255.0
Default Gateway
address
IP 192.168.1.254
Domain Name Server 1 168.95.1.1
Domain Name Server 2 *Blank
Domain Name Server 3 *Blank
Note:
Blank means there is no Value.
Mac address will be assigned by the 3JTech and cannot be changed
Copyright of 3JTech Co., Ltd. (also doing business as A3J Engineering Inc.)
20
http://www.3jtech.com.tw
netCAM
Device Admin
Item
Default Value
Administrator
Password
admin
MAC Address
*Default by factory
Reset Device
No
Factory Defaults
No
Multiport Defaults
No
Multiport Defaults Port 0
Number
PPPoE Setup
Item
Default Value
PPPoE
Disable
User Name
*Blank
Password
*Blank
Dynamic DNS Setup
Item
Default Value
Dynamic DNS
Disable
Domain Name
*Blank
User Name
*Blank
Password
*Blank
FTP Service setup
Item
Default Value
FTP Service
Disable
Server URL
*Blank
User Name
*Blank
Password
*Blank
Remote Path
*Blank
User Account Management
Item
Default Value
User Name
*Blank
Password
*Blank
Confirm Password
*Blank
Level
Guest
Copyright of 3JTech Co., Ltd. (also doing business as A3J Engineering Inc.)
21
http://www.3jtech.com.tw
netCAM
Appendix C - How to Setup ActiveX functions for your PC
All the ActiveX functions must be enabled in the
computer. To ensure ActiveX is enabled, please follow
the steps as below:
1)
Open Internet Explorer,
2)
3)
4)
5)
6)
7)
Select Tools on top of the IE menu bar,
Select Internet Options,
Go to Security,
Select Custom Levels,
Activate all the ActiveX controls and click OK,
Go to our netCAM site.
(3JTech netCAM website IP address: http://61.56.193.43
Dynamic DNS:http://3jtech.dyndns.org. )
Please wait few seconds for the Applet to download.
Once activated the ActiveX controls and downloaded the applet program, you are ready to
browse the camera sites! And NOW, you can connect to your netCAM for settings.
(netCAM website the default IP address http://192.168.1.99/ .)
There are two methods to view camera sites via the Internet Explorer. You can either input
the IP address with port number or enter the Domain Name to connect camera site.
Copyright of 3JTech Co., Ltd. (also doing business as A3J Engineering Inc.)
22
http://www.3jtech.com.tw
netCAM
Appendix D - How to setup IP address of your PC
Please follow the following illustration procedure to setup IP address on your PC.
1. Open “Control Panel”, execute “Network
and Dial-up connection”.
2. Click “Local Area Connection”, right click
and select Properties.
3. Choose “Internet Protocol(TCP/IP)”, click
Properties.
4. After configuring IP Address and
Subnet mask, press “OK”.
5. Press “OK” in “Internet Protocol
(TCP/IP)”.
Thank you for choosing 3JTech products; we hope you enjoy this netCAM and keep your
eyes opened for additional functions to our products! If you have any questions, please
email us at [email protected] or [email protected].
Copyright of 3JTech Co., Ltd. (also doing business as A3J Engineering Inc.)
23