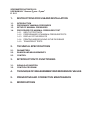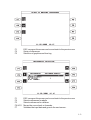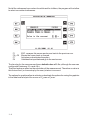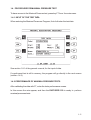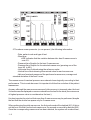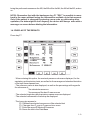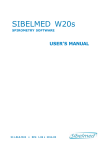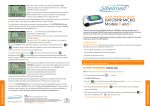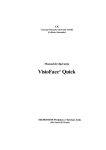
1
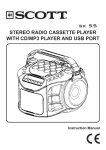
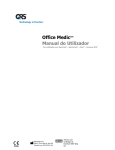
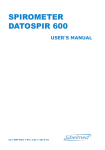
" Annexe P Emax - P Imax "
SPIROMETER
D A T O S P I R - 120
511-8D0-MU2
* USER'S MANUAL *
2012-05 • Rev.: 2.01
SPIROMETER DATOSPIR-120
USE MANUAL "Annexe PEmax - PImax"
E. 1.
INSTRUCTIONS FOR USE AND INSTALLATION
1.1.
1.2.
1.3.
1.4.
INTRODUCTION
PROGRAM OF MAXIMAL PRESSURES
SETUP OF MAXIMAL PRESSURES
PROCEDURE FOR MAXIMAL PRESSURES TEST
1.4.1. INPUT OF TEST DATA
1.4.2. PERFORMANCE OF MAXIMAL PRESSURE TESTS
1.4.3. DISPLAY OF THE RESULTS
1.4.4. PRINTING AND/OR SAVING IN THE DATA BASE
1.4.5. TRANSFER OF TESTS
2.
TECHNICAL SPECIFICATIONS
2.1.
2.2.
2.3.
PARAMETERS
RANGES AND MEASUREMENTS
CONTROL
3.
INTRODUCTION TO FUNCTIONING
3.1.
3.2.
SIGNALS ACQUISITION
CONTROL PROGRAM
4.
TECHNIQUE OF MEASUREMENTAND REFERENCE VALUES
5.
PREVENTIVE AND CORRECTIVE MAINTENANCE
6.
MODIFICATIONS
1. INSTRUCTIONS FOR USEAND INSTALLATION
1.1. INTRODUCTION
This manual is an annexe to the Spirometer DATOSPIR-120 User's Manual, exclusively
dedicated to the functioning of the maximal pressures. For consults and observations
referred to the device as a whole, see chapter 1 of the general manual.
The maximal pressures module has been designed in collaboration with the "Pulmonary
Function Laboratory" of the Hospital de la Santa Creu i Sant Pau of Barcelona. It is
based on the criteria expressed by J.L. Clausen in the Thoracic Society of California.
It allows a measurement range of 300 cmH2O in both inspiratory and espiratory tests,
and has several reference available values to be setup by the user.
1-1
1.2. PROGRAM OF MAXIMAL PRESSURES
Next the different options of the maximal pressures program are shown:
Data of the test
Patient
Code
Age, height, weight and sex
Name and surname
Change of patient
Start of the manoeuvre
Change from PEmax to PImax or vice versa
Display of the test data
Display of all the manoeuvres
Selection of the curve to be printed or memorized
Save in the Data Base
Performance of the Report
Performance of the Report
Display and selection of the manoeuvres
Display of the manoeuvre in progress
Display of the 3 best manoeuvres.
Display of one manoeuvre
1.3. SETUP OF THE MAXIMAL PRESSURES
The Maximal Pressures module is an option included in the DATOSPIR-120. It is
advisable for the user to set it up according to his/her needs.
To enter the Maximal Pressures setup menu, press key F2 in the main menu and next,
press F8.
1-2
F1
F2
F3
ESC, escapes this screen and moves back to the previous one
Setup of references
Selection of graphics and time lag
F1
F2
F3
F5 & F6
F7
ESC, escapes this screen and moves back to the previous one
Selects references for adults
Selects references for children
Moves the cursor back or forwards.
Validates the input data and goes to the next screen.
1-3
Not all the references have values for adults and for children; the program will not allow
to select non existent references.
F1
F5 y F6
F7
F8
ESC, escapes this screen and moves back to the previous one.
Moves the cursor back or forward .
Activates or deactivates the option.
Validates the input data and go to the next screen.
The time lag for the measurement has a default value of 1.0 s ,although the user can
configurate it between 0.1s and 4.9 s.
This time lag has an effect on the calculation of the measurement. Therefore no value in
this first second ( or time setup by the user) is taken in account.
The options for graphics allow to activate or deactivate the options for saving the graphics
in the data base and print the curves of PEmax or PImax.
1-4
1.4. PROCEDURE FOR MAXIMAL PRESSURE TEST
To have access to the Maximal Pressure test, press key F7 from the main menu.
1.4.1. INPUT OF THE TEST DATA
When entering the Maximal Pressures Program, first of all enter the test data.
See section 1.8.1 of the general manual, for the input of data.
If a performed test is still in memory, the program will go directly to the next screen
(section 1.4.2).
1.4.2. PERFORMANCE OF MAXIMAL PRESSURE TESTS
After validating the data with F7, enter the tests performance screen.
In this screen the axis appear, and then the DATOSPIR 120 is ready to perform
maximal pressures tests.
1-5
F1
F4
F5
F6
(F7)
(F8)
ESC, escapes this screen and goes back to the previous one
Enables to modify the Patient data
Starts the manoeuvre
Changes the test: from PEmax to PImax or vice versa
Has access to the Data screen (If there are performed manoeuvres)
Performs the Report (If there are performed manoeuvres)
It is convenient for the technician to know the usual procedure required for the
patient to perform the test correctly. If not, it is advisable to see some bibliography
on this ( See also chapter 4).
In the performance of the test, bear in mind the following steps:
1 Connect the module in the connector no. 9. The device detects automatically that
the module is connected. If the module is not connected, the device will show it on
screen and it will not allow to enter the screen of tests performance.
Make sure that the shutter Valve is connected to the module.
2 Train the patient about the test performance, as his/her collaboration is essential
for the correct execution. Put him/her the nose clip.
3 Press key F5 and wait until an intermittent arrow appears on the screen.
1-6
The shutter valve must be in open position, in order to allow the patient to breath normally.
Once the patient has reached the position of Total Pulmonary Capacity, move the cursor
to the closed position and perform the manoeuvre.
4 Once the manoeuvre is finished, repeat step 3 in order to perform more
manoeuvres.
It is advisable a minimum of 3 manoeuvres. The best 3 manoeuvres should not
differ more than 5 % between them, and the last manoeuvre should not be the best.
1-7
5 The above screen presents (or can present ) the following information:
- Date, patient code and type of test.
- Warnings:
>5%: indicates that the variation between the best 3 manoeuvres is
over 5%.
- Pressure/time Graphic for the best 3 manoeuvres.
- Pressure/time Graphic for the selected manoeuvre (pressing one of the
keys M1 to M5).
- Horizontal line of dots showing the reference value
- Vertical line of dots showing the maximal value for each manoeuvre.
- Values of maximal pressure of the performed manoeuvres, average and
standard deviation of the best 3 ones.
The manoeuvres of maximal pressure are ordered chronologically according to their
performance. This is made because it is important to follow the evolution of the patient
manoeuvres.
Anyway, although the manoeuvres are saved in the memory in temporal order, the best
3 manoeuvres are displayed on screen ordered from the best to the worst (the manoeuvre
of highest pressure value is considered as the best ).
It is also important to point out that more than 5 manoeuvres may be performed, despite
the fact that the device has space only for 5 manoeuvres.
When performing the sixth manoeuvre, the first performed will be deleted (M1), if this is
not the best. Should it be the best manoeuvre, the second one would be deleted (M2).
Once the corresponding manoeuvre has been deleted, the system will reorder them,
1-8
being the performed manoeuvre the M5, the M5 will be the M4, the M4 will be M3, and so
on.
NOTA: Remember that with the backspace key F1 "ESC" is possible to move
back in the menu without losing the information available up to that moment.
Only if the patient is changed by entering a new code, or performing other
operation, the data might be lost. Anyway, the device will always warn with a
message on screen before deleting the information.
1.4.3 DISPLAY OF THE RESULTS
Press key F7.
- When entering this option, the maximal pressure values are displayed, for the
espiratory and inspiratory tests, as well as for the average and standard deviation
of the best three manoeuvres.
- The reference value is also displayed, as well as the percentage with regard to
the reference of:
* the selected manoeuvre
* the average of the best 3 manoeuvres
- The selected inspiratory and espiratory manoeuvres are displayed
- The selected references in the setup are displayed
-The Icons give access to:
F2: Deletes the selected manoeuvre of the selected test
F3: Changes from PEmax to PImax and vice versa
F7: Prints the report of Maximal Pressures
F8: Saves the test in the Data Base
1-9
WARNING:
The system displays, saves or prints the values for all the manoeuvres, but only
one curve for each manoeuvre is saved or printed in the data base.
Default, the system selects the curve of the best manoeuvre ( unlike the spirometry
,
it may not be number 1 ). If the specialist prefers, he/she can select another
curve, as it is explained next.
To select a manoeuvre different to the one selected default by the system, press the
corresponding memory key (M1 to M5).
The upper right part of the screen indicates which test is selected, the espiratory (TEST
PEmax) or the inspiratory (TEST PImax).
To change from PEmax to PImax and vice versa, press key F3.
1.4.4. PRINTING AND/OR SAVING IN THE DATA BASE
After performing the wanted manoeuvres, of both espiratory and inspiratory pressure,
the following operations can be peformed:
A.- Printing the results
A report displaying the same information of the data screen will be made, along with the
patients data and the curves of the selected manoeuvres.
1 - 10
1 - 11
B.- Saving in the internal data base
The test is saved in the device internal data base, in order to display it afterwards, print
it and/or transfer it to a computer.
1.4.5. TRANSFER OF TESTS
Like the spirometric tests, the maximal pressure tests saved in the data base can be
transferred to a computer (See section 1.16.1 of the general manual).
1 - 12
2. TECHNICAL SPECIFICATIONS
2.1 PARAMETERS
In both espiratory and inspiratory test, the next values are measured:
* Maximal pressure of the 5 manoeuvres.
* Average of the best 3.
* Standard deviation of the best 3
2.2 RANGES AND MEASUREMENTS
Range of Measurement (cmH2O)
Resolution (cmH2O)
Accuracy
Sample Rate (Hz)
0 - 300
1
3%
100
2.3 CONTROL
- Number of manoeuvres.
Up to 5 manoeuvres for each type can be performed (PEmax and PImax)
- Duration of the manoeuvres.
The maximum duration is 8 seconds
- Start of Manoeuvre.
When the threshold of 3 cmH2O is surpassed
-End of Manoeuvre.
Variation lower than 1 cmH2O in the last 2 seconds.
-Delay in the calculation of the maximum pressure value.
Selectable in the setup between 0.1 and 4.9 seconds. 1 second as a default.
- Internal Data Base
The Spirometer shares the internal data base for all test types.
If only Maximal Pressure tests are saved, counting a duration of 4 seconds for the curves,
it is possible to save:
With Graphics
Without Graphics
Data Base "L"
Data Base "H"
1 curve
2 curves
150
400
150
200
150
1100
In this case, Data Base "H"for spirometry is reduced taking into account the next table
(compare with table of 1.14):
With Graphics
Fleisch/Des
Data Base "H"
300
Without Graphics
Turbina
540
900
2-1
3. INTRODUCTION TO FUNCTIONING
The DATOSPIR-120 optionally has an external Module of Maximal Respiratory Pressures.
This module is connected to the DATOSPIR through a phone connector.
3.1 SIGNAL ACQUISITION
The module of maximal pressures includes basically a pressure sensor, a differential
amplifier and a filter.
The pressure sensor covers the range from 0 to 300 cmH2O. The output of this sensor
is amplified and filtered so that the analogical signal has the intended range and bandwidth.
Then, this signal is transformed into digital with a A/D converter. The converter used is
the same as the one used in the spirometry. (See section 3.7 of the general manual).
3.2 CONTROL PROGRAM
The control program performs the processing of the acquired signal.
Among the important calculations, we must point out :
-Start and end of the manoeuvre:
The start of a manoeuvre is considered when the level of 3 cmH2O is surpassed. The end
of the manoeuvre is considered when there is a pressure variation lower than 1 cmH2O
for 2 s.
-Delay for the calculation:
For the calculation of the maximal pressure, to avoid artefacts, a initial period of time is
discarded. This period is set to 1 s as a default but it can be set up between 0.1 anf 4.9
s.
-Order of the manoeuvres:
The manoeuvres are saved in the memory in the same order as they have been performed.
-Automatic deleting of a remaining manoeuvre:
When the 5 memories are full, and a new manoeuvre is performed, the first manoeuvre
is always deleted, if this is not the best. If the first is the best, then the second one is deleted.
3-1
4. TECHNIQUE OF MEASUREMENTAND REFERENCE VALUES
The maximal inspiratory pressure (PImax) depends directly on the strength developed by
the inspiratory muscles. Its measurement is very useful in the diagnosis and follow up of
patients with neuro-muscular illnesses, specific alterations of the respiratory muscles,
different processes of the thoracic area, air trapping or modifications produced by breath
depressive medicines, among other clinic situations The maximal espiratory pressure
(PEmax) also informs about the cough efficacy and the drainage of the bronchial
secretions. In both cases, they are measures easy to performe and comfortable for the
patient. They can be obtained near the patient and allow to follow his/her evolution.
The procedure to obtain the PImax and the PEmax must complete the following aspects:
- Correct collaboration of the patient to get a maximum effort in the manoeuvres. The patient
must keep his/her hands against the cheeks and leave them flaccid to attenuate the
pressure generated by the facial muscles.
- To measure the PImax, the patient must perform a deep inspiration from the position of
Residual Volume and maintain the effort for at least 3 seconds.
- To measure the PEmax, the patient has to inspire previously up to the position of Total
Pulmonary Capacity and from there blow with the maximum effort.
- It is advisable a minimum of three satisfactory manoeuvres for each pressure.
If measuring errors are suspected, we must make sure that there are no leaks in the system
and the correct collaboration of the patient in the maximum effort manoeuvres.
The Module of Maximal Pressures is useful for Pneumology , Anaesthesiology, ICU and
Neurology units, for isolated determinationsor for the follow up of interned patients.
The device includes 4 different references, to be selected by the user. Next, the
bibliographic reference is detailed.
A-) P. MORALES
Presiones respiratorias estáticas máximas en adultos. Valores de referencia de
una población caucasiana mediterránea.
P. Morales, J. Sanchís, P.J. Cordero y J.L. Díez.
ARCHIVOS DE BRONCONEUMOLOGÍA. Vol 33, num 5, 1997.
B-) SH WILSON
Predicted normal values for maximal respiratory pressures in caucasian adults
and children
4-1
SH Wilson, NT Cooke, RHT Edwards, SG Spiro.
THORAX 1984; 39:535-538.
C-) BLACK & HYATT
Maximal Respiratory Pressures: Normal values and relationship to age and sex
Black LF, Hyatt RE
AM REV RESPIR DIS. 99:696-702, 1969
D-) MR CHARFI
Les pressions ventilatoires maximales à la bouche chez l'adulte: valeurs
normales et variables explicatives
MR Charfi, R Matran, J Regnard, MO Richard, J Champeau, J Dall'ava, A Lockhart
REV MAL RESP, 1991, 8, 367-374.
4-2
5. MAINTENANCE, PREVENTIVE AND CORRECTIVE MAINTENANCE
5.1 MAINTENANCE
The maintenance is the action directed to keep the device in correct functioning. The
person in charge does not require any technical qualification, except the knowledge of
the functions and handling of the device. Usually the user of the device must do it. The
operations to be performed are the following:
5.1.1 MODULE
The manometer is cleaned softly with a dry or slightly wet with water cloth , drying the
rests of humidity. Take care that no liquid goes into the inner space or in the connectors
o connections.
Do not use abrasive or solvent substances.
5.1.2 CLEANING OF THE SHUTTER PROBE
The shutter probe, and specially the reusable mouthpiece, must be washed with soap or
some disinfectant liquid which does not chemically attack the methacrylate or Teflon of
the composition.
After the rinse and drying of the probe, lubricate the friction space between the probe
and the cursor with Vaseline. Finally check that the components are not obstructed and
that it works correctly.
5.2 PREVENTIVE MAINTENANCE
The preventive maintenance consists of all the actions directed to keep the device in a good
status of use.
There are two types of preventive maintenance:
1 The first type, that can be performed by the user, consists of a periodical supervision
of the aspect of the different interconnections and the other external elements of the device.
It will be verified that all the interconnections are perfectly connected, that the cables and/
or connectors and the rest of elements do not have breakage or external damage.
In case of detecting any anomaly which the user cannot solve, inform the aftersales service
of SIBEL S.A. or your Distributor, to proceed with the checking or repair.
2 The second type consist of a general technical verification of the safety systems,
5-1
adjustments, functions, etc, which configurate the device.
THESE CHECK UPS WILL BE PERFORMED WITH ANNUAL PERIODICITY
according
to the Verification and Adjustment Procedure of the MAXIMAL PRESSURES MODULE,
available by the manufacturer. This type of operation must be performed by the qualified
technical staff of the maintenance department or the technical service in the distributor
or manufacturer.
In any case, SIBEL S.A. as manufacturer, must give a written authorization to the
corresponding technical service , at least during the warranty period , so that they are
able to perform such maintenance. Sibel is not responsible for any damage, misfunction
etc. which can come as a consequence of a faulty maintenance made by persons not
belonging to SIBEL S.A.
5.3 CORRECTIVE MAINTENANCE
The corrective maintenance consists of leaving the device in a good state of use, which
has failed in its correct functioning by bad functioning or misuse and has to be repaired.
In the case of detecting a failure in the device, which prevents its normal utilization,
disconnect the device from the mains and contact with the Aftersales Service of SIBEL
S.A., specifying with detail the type of anomaly produced.
5-2
6. MODIFICATIONS
6-1