1
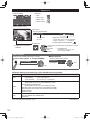
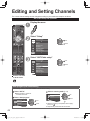
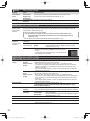
Configure Network settings
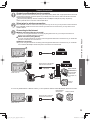
Select the Network type
Network settings
Step 6 of 7
Select Ethernet cable of wireless network.
Ethernet cable
Wireless(Wifi)
Set later
Set later:
Go to
You can set in “Setup” menu later.
Wireless (WiFi): Start “Wireless network” (p. 16)
OK
Select
Return
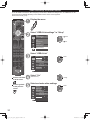
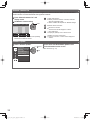
Select the setting mode
Network settings
Step 6 of 7
Checks for proper network connection, settings and
communication to the Internet and server
automatically.
Automatic
Manual
Automatic: Press OK to start setup automatically.
Error screen is displayed when
Network connection has failed.
Manual:
Go to Manual setting.
Getting started
OK
Select
Manual
RETURN
Automatic
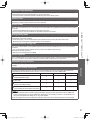
■ Manual setting
Start connection test
Network settings
Step 6 of 7
Connection test
Network settings
Connection test
Connection
error
Select
Change
RETURN
Complete “Network settings”
Manual
Helpful information is displayed when you
successfully complete “Network settings”.
Network settings
First Time Setup
IP setting mode
Automatic
IP address
192.168.0.4
255.255.255.0
Subnet mask
Default gateway
192.168.0.1
Automatic
DNS setting mode
DNS
192.168.0.1
Proxy address
Proxy port
Connect test
Mac address
00-00-aa-cc-33-ab
Test in progress...
RETURN
Step 6 of 7
Configure settings of the network connection.
Check Ethernet cable connection
Validate IP address
Check for IP address duplication
Check connection to the Internet
Check communication with EASY IPTV server.
■ Error screen
Step 6 of 7
Network settings
Step 6 of 7
Connection test
Network settings are complete.
You can use EASY IPTV.
EASY IPTV lets you enjoy Internet contents on
your VIERA TV.
Check Ethernet cable connection
Validate IP address
Check for IP address duplication
Check connection to the Internet
Check communication with EASY IPTV server.
Connection to local network (router) failed.
Ensure wireless network availability
Retry
OK
Manual
Set later
OK
Select
Return
RETURN
Retry: Go to “Start connection test”
Set later: Go to
Press to exit from
a menu screen
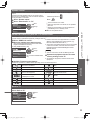
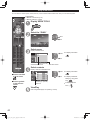
Adjust the Clock (Set clock)
When done, select NEXT and press OK to go to the next step.
■ Manual setting
Set clock
■ Press to go back to
Step 7 of 7
Adjust the TV's date and time
Mode
Year
Month
Day
Hour
Minute
Time zone
DST
Next
the previous screen
Select
Change
Edit
Manual
------- - ---
DST
Minutes
select
set
or
OK
10
0
9
RETURN
Follow the instructions on
screen to complete the
following operations.
0 - 9
RETURN
■ Auto setting
Set clock
Step 7 of 7
Adjust the TV's date and time
2011/4/5 6:00 AM
Mode
Year
Month
Day
Hour
Minute
Time zone
DST
Next
Select
Change
Auto
EST
Off
RETURN
Manual: Adjust the clock manually (Year/Month/Day/Hour/Minute)
Auto: The clock is adjusted automatically via Internet service. Only
available when the TV is on a network. -->Set “Network settings” first.
Time zone Select your time zone. (EST/CST/MST/PST/AKST/HST/NST/AST)
Mode
DST
tc_p42_46_50_x3_eng_0597-1.indb 15
Set DST (Daylight Saving Time) setting. (On/Off)
On: Advances the clock one hour from the time it is set according to the
time zone.
15
2011/01/13 18:47:26