1
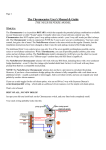
The Chromacaster User's Manual & Guide
What it is:
The Chromacaster is a six-position ROTARY switch that expands the potential pickup
combinations available in your Stratocaster or other "S-type" guitar. It installs where one of your
old tone controls was. The Chromacaster does NOT replace your 5-way pickup selector switch
- your 5-way still works just like it always did. The Chromacaster works in conjunction WITH
the 5-way to give you new combinations. You lose a tone control, but gain a lot of tones!
The traditional Strat 5-way selector gives you only five of the seven parallel combinations
possible, and no series or out-of-phase connections. With the Chromacaster, you can get all
seven parallel combinations, PLUS two series settings with variations, PLUS two out-of-phase
settings with variations, for a total of SIXTEEN different pickup combinations.
That's a lot of tones!
BEST OF ALL, NO NEW HOLES!
Just put your old tone knob back on the Chromacaster switch, and your Strat looks completely
stock!
INSTALLATION:
Take off your pickguard.
To wire your lower tone as a "master" tone, like a Telecaster (see drawing):
1. Move the lower tone control’s lead from the center lug of the tone control side of the
five-way over to the common (first) lug on the pickups' side of the 5-way (see drawings).
2. Remove the lead to the center tone control from the 5-way.
3. Remove the grounds from the center tone pot, and clip any jumpers between the center
and lower tone pots. Remove the center pot from the pickguard.
4. Remove the capacitor from the center tone pot and wire it to your new MASTER TONE
pot, with one leg on the center lug and one leg grounded to the back of the pot.
5. Run an insulated ground wire from the back of the volume pot to the back of your new
master tone pot, with enough slack to go around the Chromacaster.
Mount the Chromacaster switch in the place of the center tone pot.
You will notice that the switch is NOT perfectly round, more egg-shaped - align it so that it's
widest parts "point" to the other two controls. If your control cavity is shielded, be sure that the
lugs on the switch DO NOT touch/short out on the shielding.
Your stock Strat probably looks like this…
Remove the center pot and wire the lower tone pot like this for a
MASTER TONE CONTROL:
Wiring the bridge pickup to the Chromacaster Switch:
Unsolder the bridge pup leads from where they are currently in your guitar and solder them to
the center lugs on the Chromacaster Switch. Be sure you get the "+" (positive, hot) side - usually
white, it is the lead soldered to the five-way pickup selector - on lug “1,” the lug with the string
through it, and the "-" (negative, ground), usually soldered to the back of the volume pot, on lug
"2" (see drawing). Now your bridge pup goes through the Chromacaster Switch.
NOTE: Sometimes there is not enough wire on the leads to make it to the Chromie, so just add
on a little "tail" to the lead to get there. Be sure you insulate the solder joint on this "tail" to
prevent contact with the pots or any other grounded surface in the control cavity - black electrical
tape or heat shrink tubing will do the trick.
What about THREE-wire pickups?
Some guitars and many after-market pickups are wired with THREE conductors:
The coil's "+" lead, the coil's "-" lead, and the shield/ground lead.
In these cases, remember that the shield/ground STAYS on the guitar's ground, and you will be
lifting the coil's "-" lead - which is often "twisted" with the shield/ground lead - to move it over to
the rotary switch. How to tell which is the coil's "-" and which is the ground lead? IF you don't
have any "paperwork" color-code indicating which is which, a simple test is to use your
multimeter. With the two leads/conductors unsoldered from ground (typically the back of the
volume pot) and separated, set your multimeter in the 20k ohm range. With one probe on the
lead that you know is the coil's "+" lead (it's the one on the pup selector switch), one of the other
two leads will show you a 5k -10k reading when touched with the other probe. That's the
resistance number for your pup, and that's the coil's "-" lead. It is the lead you will move over to
the rotary switch - the other one is soldered back to ground. The same idea works if you have a
four-conductor pickup in your bridge spot, like a Hot Rails or single-coil sized humbucker – the
hot and negative leads go to the Chromie, the “series-pair” stay soldered together, and the bare
wire stays soldered to ground on the back of the volume pot.
The Chromacaster’s pre-wired leads
The WHITE lead from the Chromacaster Switch goes to the bridge pup’s spot on the 5-way where you just removed its "positive" (hot) lead.
The RED lead is soldered to the 5-way switch. It goes on the bridge lug (the third lug) on the
“tone” side of the 5-way, the side that was used to connect the tone pots (see drawing). Run a
jumper from this lug to the first lug of the “tone” side of the selector switch (the lug where the
neck's tone pot was connected).
The BLACK lead is added to the neck pup's lug on the 5-way. It's the wire that will route the
"negative" lead of the bridge pup back through the neck pup for "series" settings.
The GREEN lead is added to the middle pup's lug on the 5-way. It's the wire that will route the
"negative" lead of the bridge pup back through the middle pup for "series" settings.
The BARE wire is soldered to (any) ground.
NOTE: Do not remove the jumper that goes between the common lugs of your 5-way.Put your
pickguard back on, and you're ready to rip!
Move the bridge pup leads to the CHROMACASTER
and hook up its prewired colored leads like this:
The wire colors on the stock stuff might not be the same as the drawing, but
the CHROMACASTER LEAD COLORS ARE CORRECT.
Here are a few more Strat 5-ways:
The 5-way from Stewart-Macdonald and others.
Note that the common lugs are at the opposite end
of the switch from the stock Fender 5-way:
The Mega–S switch’s lugs are in a completely different configuration:
If NONE of these 5-ways matches yours, e-mail me at [email protected]
and we’ll figure out a scheme & drawing to git-r-done!
How it works:
To reference the rest of these instructions,
we'll say that the pickup selections on the 5-way are numbered like this:
(1) = neck; (2) = neck and middle; (3) = middle; (4) = middle and bridge; (5) = bridge.
Basically, the Chromacaster re-routes the hot and ground leads of the BRIDGE pickup to various
places in the guitar's circuitry. Each of the switch's six "clicks" connects the pickup's leads to a
specific point in the guitar's wiring to get the desired combination of pickups, phasing and
series/parallel wiring. These "clicks" - I call them "NOTCHES" - are named for how they route
the bridge pickup into the circuit.
The NOTCHES:
NOTCH ONE (tone knob on "10")
… is "NORMAL"
With the Chromacaster turned completely clockwise, it routes the Bridge pup's hot to the 5-way
switch (where it would be, stock), and its ground to the guitar's ground. Plain ol' Strat tones. The
ONLY difference is that now you have a master tone control.
NOTCH TWO (tone knob on "9")
… is "BRIDGE on with NECK PICKUP"
It is the first "click" as you turn the knob COUNTER-CLOCKWISE. This re-routes the bridge
pup's hot lead to the neck's end of the 5-way, so that when you play the neck pup, you get the
bridge pup, too. As you work the your Strat's 5-way pup selector switch, from neck to bridge,
here's what you will hear at each 5-way throw: #1 Neck and Bridge pups; #2 Neck, Middle
and Bridge pups; #3 Middle; #4 Middle and Bridge; #5 Bridge.
Those first two tones are the tones EVERY Strat player sez they wish they had!
NOTCH THREE (tone knob on "8")
… is "BRIDGE SERIES with NECK PICKUP"
At the next click counter-clockwise, when you select throw #5, Bridge pickup (or #4, Bridge and
Middle) on the 5-way, instead of just the Bridge pup you will get the Bridge and Neck pup in
series. As you throw the 5-way back from the Bridge position, you will get: #5 Bridge and Neck
in SERIES; #4 The Bridge and Neck in series, PLUS the Middle parallel; #3 Middle; #2
Middle and Neck; #1 Neck. Notice that ONLY the 5-way throws #5 and #4 are affected in this
Chromacaster setting. The others are "unaffected" - meaning, they are "stock"-sounding.
NOTE: Pickups wired in series make the current flow through first one coil and then the other,
effectively doubling the resistance/impedance of the circuit. In a very real way, the Neck and
Bridge coils become rather like a single big humbucker! This is usually characterized as a
"fatter" sound than that produced by a single-coil pickup - though on your Strat, still plenty
bright. It's a good way to add some "ooomph" that Bridge pickup's "lead" tone.
NOTCH FOUR (tone control at "7")
… is "BRIDGE SERIES with MIDDLE PICKUP, & ON with NECK"
At the next click counter-clockwise, when you select throw #5, Bridge pickup, on the 5-way,
instead of just the Bridge pup you will get the Bridge and Middle pup in series. Again, the
Middle and Bridge coils become rather like a single big humbucker, but this setting still has a
little "Strat Quack" rather than being so Gibson-y (to my ears). As you throw the 5-way back
from the Bridge position, you will get: #5 Bridge and Middle in SERIES; #4 Middle ONLY;
#3 Middle (again); #2 Middle and Neck; #1 <Bridge and Middle in series> parallel to Neck.
Notice that ONLY the 5-way throws #5 and #1 are affected in this Chromacaster setting.
NOTCH FIVE (tone knob at "6")
… is "BRIDGE SERIES with NECK PICKUP, OUT-OF-PHASE"
Here, the Bridge pup is again wired in series with the Neck pup, but out-of-phase. When the 5way is at throw #5, Bridge pup only, you will hear the Bridge and Neck in series, but out of
phase. This tone is actually a very Gibson-y out of phase, not as thin as you'd expect... think of
the '70's! Throw #4 is that, PLUS the Middle pup parallel, which fattens it back up a bit.
Throws #3, #2, and #1 are unaffected "stock" tones.
NOTCH SIX (tone knob at "5")
… is "BRIDGE OUT-OF-PHASE, ON with NECK"
Here, the bridge pup is wired out-of-phase with the other pickups and on with the neck pup.
When the 5-way is at throw #5 Bridge pup only, and throw #3 mid pup only, the sound is "stock"
and unaffected. BUT! At the other three throws on the 5-way, you get the Bridge pup out of
phase and parallel with the other pickup(s).
When one pickup is out of phase with another, a lot of frequencies are "cancelled out" - the
positive voltage one pickup creates is negated by the negative voltage the other creates. Usually,
lots of the "fundamental" is cancelled out, and the only tones that "escape" to be heard are the
tones that are harmonically different between the two pickups - so you usually get very thin and
"nasally" tones.
That is true here as well, but I think you will find that with the Bridge out of phase and the 5-way
at throw #1 and #2, there are a couple of interesting and usable tones. I'll admit that the tone at
throw #4 on the 5-way, which gives you the Bridge and Middle out of phase, is one that only a
mother could love... but my thrash-playing nephew sez they're all great for punk...
Hey, e-mail me with any questions, comments, or suggestions! [email protected]
Chromacaster TONE CHART
NOTCH NAME
(across)
5-way (down)
(1) neck
(2) middle+neck
(3) middle
(4) bridge+middle
(5) bridge
Normal
Tone knob
(10)
n
m+n
m
b+m
b
On with
Neck
Series with
Neck
Series-Middle/
on with Neck
Series-Neck/
out of phase
Out of phase/
on with Neck
(9)
(8)
(7)
(6)
(5)
B+N
B+M+N
m
b+m
b
n
m+n
m
B*N+M
B*N
B*M+N
m+n
m
m
B*M
n
m+n
m
-B*N+M
-B*N
-B+N
-B+M+N
m
-B+M
b
The Chromacaster changes the way the bridge pickup is wired into the circuit.
The NAMES of the NOTCHES describe HOW the bridge pickup is wired...
KEY:
+ = wired parallel
* = wired in series
- = wired out of phase
lower case letters = "stock" strat tones
UPPER CASE BOLD = new Chromacaster tones