1
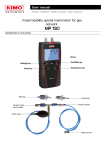
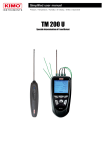
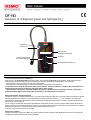
DF 110
Detector of refrigerant gases and hydrogen (H2)
DESCRIPTION OF THE DEVICE
Batteries led
Autozero led
Leds of graphic
visualisation of thresholds
Activation / deactivation
key for the audible signal
On/Off key
Sensitivity/Manual autozero key
PERFORM A MEASUREMENT
Turn on the detector pressing the “On/Off” key.
When it turns on, the pre-heating phase of the sensor begins. This phase lasts 60 seconds. During this phase, all the visualisation leds of
thresholds light one after the other. A few second before the end of the pre-heating phase, all the leds blinks at the same time.
➢ Place the probe as close as possible to the site of the suspected leak.
➢ Slowly move the probe (approximately 2 cm/second) in the direction to the possible source of the leak.
It is important to move the probe past the leak and to go back toward it. The device responds to changes in gas concentration in the
air. Moving the probe allows to the device to respond properly to these changes.
➢ If gas is detected, the frequency of the beep repetition will increase as the detected gas concentration increases and the leds of
graphic visualisation lights from the left (low gas concentration) to the right (high gas concentration).
➢
Manual and automatic autozero functioning
The detector performs an automatic autozero every 2 s to set its minimum threshold of detection. This autozero allows to guarantee an optimum
gas detection whatever the conditions of use (contaminated environment, temperature variations,...). In case of detection, according to the
amplitude of gas measurement, the automatic autozero will deactivate to guarantee a better location of the leak. It will automatically reactivate
after a return to normal conditions.
In case of high gas concentration with a wide contaminated area, the automatic autozero can be not enough to detect precisely the location of
the leak, there will be a measurement saturation. In this case, it is possible to perform a manual autozero into the contaminated area to reset the
detection and to get back to a progressive sensitivity when getting close to the leak source.
To perform a manual autozero, please see next page.
Setting of the sensitivity
If the gas concentration is high, press “Sens” key to set the sensitivity and like this to get a better identification of the leak source. Please see
next page for the details about the three different sensitivities.
ADJUST THE DEVICE
Adjust the sensitivity
Press the “Sensitivity/Autozero” key to adjust the sensitivity of the device.
Mode
Indicative measuring range (g/an)
Visual alarm
Low sensitivity ( “B” on the device)
From 0 to 300 g/an
All the leds (8) for 300 g/an
Normal sensitivity (“Norm” on the device)
From 0 to 30 g/an
All the leds (8) for 30 g/an
High sensitivity (“H” on the device)
From 0 to 3 g/an
All the leds (8) for 3 g/an
Activate/deactivate the audible signal
By default, when starting the device, the audible signal is always active.
➢
➢
The device is turned on.
Press
key to activate the audible signal.
Press this same key to deactivate it.
Perform an autozero
➢
The device is turned on.
Press at least 3 s the
key to perform an autozero.
The “Autozero” led turn on.
CHANGE THE BATTERIES
Remove the front part at the back of the device.
Change the old batteries by AAA LR03 1.5V batteries.
➢ Replace the front part.
➢
➢
Once returned to KIMO, required waste collection will be assured in the respect of the environment in accordance to 2002/96/CE guidelines relating to WEEE
NTang – portable-DF110 – 26/06/14 – RCS (24) Périgueux 349 282 095 Non-contractual document – We reserve the right to modify the characteristics of our products without prior notice.
➢