1
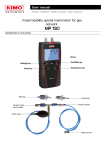
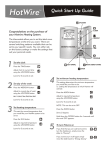
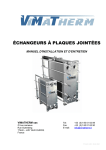
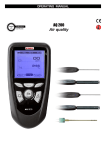
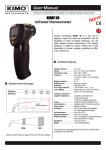
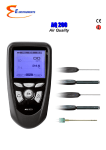
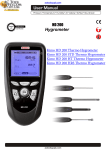
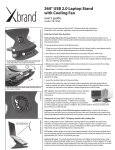
Hotwire thermo-anemometer
VT110 - VT115
DESCRIPTION OF THE DEVICE
OK key
Backlight key
On/Off/Esc key
Select key
Hold/min/max key
PERFORM A MEASUREMENT
➢
➢
Turn on the device by pressing on « On/Off/Esc ».
The device displays its name « VT110 » or « VT115 » then the measured values.
Put the probe to the required location.
The device displays the measurements of velocity or airflow and of temperature.
Sensitive element
(temperature)
Sensitive element (velocity)
Sensitive element
(temperature)
Sensitive element (velocity)
Airflow direction
Airflow direction
Protective tube of the
sensitive element (1)
Red point :
landmark
Tube de protection de
l'élément sensible (1)
Bottom of the
hotwire probe
VT110 : Standard hotwire probe
●
●
●
White point :
landmark
Bottom of the telescopic
hotwire probe
VT115 : Telescopic hotwire probe
Before any device usage with the standard or telescopic hotwire probe standard, please lower the protective tube (1)
of the sensitive element.
Always use the hotwire probe with the red point in front of the flow.
Always use the telescopic hotwire probe with the white point in front of the flow.
PERFORM AN AVERAGE IN VELOCITY
During a measurement :
➢
Press on « OK », « Start » displays on screen.
➢
Press again on « OK », the average calculation is launched, « End » displays on screen and « AVG » blinks.
➢
Press on « OK » to end the average calculation, the average displays.
➢
Press again on « OK » to display the maximum and minimum values measured during the average calculation.
➢
Press on « On/Off/Esc » to exit the average function and return to the measurements display.
MEASURE AND DISPLAY THE AIRFLOW
It's possible to measure and display the airflow in place of the velocity.
The device is on and displays the velocity and temperature measurements.
➢
Press on « Select ».
« MODE » blinks.
➢
Press on « OK », the mode currently used blinks at the bottom of the screen.
➢
Press on « Select » to select the « FLOW » mode.
➢
Press on « OK ».
➢
« CONE » blinks on screen, press on « Select » to make appear « RECT », then « CIRC ».
➢
Press on « OK » to select « RECT » or « CIRC » according to the type of sheath or cone « CONE » for a measurement with an airflow
cone.
If « RECT » or « CIRC » is selected, the measuring unit of the type of sheath displays.
Press on « Select » to select the unit : mm or inch then press on OK to adjust the section size :
●
If the type of selected sheath is circular : « DIAM » displays and the first digit blinks.
Press on « Select » to select its value then press on « OK » to validate. Perform the same procedure to select the value of the
following digits (to return to the previous digit press on « On/Off/Esc »). When the last digit is adjusted, press on « OK » to validate.
The device returns to the display of airflow and temperature measurements.
●
If the type of selected sheath is rectangular : « LENGT » displays and the first digit blinks.
● Press on « Select » to select its value then press on « OK » to validate. Perform the same procedure to select the value of the
following digits (to return to the previous digit press on « On/Off/Esc »). When the last digit is adjusted, press on « OK ». « WIDTH »
to adjust the width also displays on screen, perform the same procedure to select the digits value, when the last digit is adjusted,
press on « OK » to validate. The device returns to the display of airflow and temperature measurements.
●
➢
If « CONE » is selected: « CONE » displays on screen and the type of cone blinks : K35, K75, K120, K150.
Press on « Select » to select the type de cone, then press on « OK » to validate. The device returns to the display of airflow and
temperature measurements.
●
➢
The length, the width and the diameter of the section are adjustable from 1 to 3000 mm.
FREEZE THE MEASUREMENT
During a measurement :
➢
Press on « Hold/min/max » to freeze the measurement.
« Hold » displays on screen and the measurements of velocity or airflow and of temperature are frozen.
➢
Press on « On/Off/Esc » to return to the measurements display.
DISPLAY THE MINIMUM AND THE MAXIMUM
Once the measurement is frozen :
➢
Press on « Hold/min/max » :
The device displays the maximum value of velocity or airflow measured since the last questioning at the top of the screen and the
minimum value of velocity or airflow measured since the last questioning at the bottom of the screen.
➢
Press on « Hold/min/max » :
The device displays the maximum value of temperature measured since the last questioning at the top of the screen and the
minimum value of temperature since the last questioning at the bottom of the screen.
➢
Press on « On/Off/Esc » to return to the measurements display.
.
ADJUST THE DEVICE
Device drop-down menu
●
SEL.
1x
MODE
Select
SEL.
SEL.
2x
UNIT
Select
VIT
3x
UNIT
Select
SEL.
4x
AUTO
OFF
OFF
Select
°C
Km/h
SEL.
P_ATM
1009
hPa
5x
Select
Select the measuring unit in velocity :
The device is on and in velocity mode.
➢
Press on « Select ».
« MODE » blinks on screen.
➢
Press again on « Select ».
« UNIT » blinks on screen.
➢
Press on « OK », the measuring unit currently used blinks at the bottom of the screen, then press on « Select » to select the
required measuring unit : fpm, km/h, m/s.
➢
Press on « OK » to validate.
« UNIT » blinks on screen.
➢
Press on « On/Off/Esc » to return to the measurement display.
SEL.
UNIT
OK
UNIT
SEL.
Select
Km/h
Km/h
UNIT
SEL.
Km/h, m/s...
SEL.
UNIT
OK
On/Off/
Esc
0,00
m/s
25,4
°C
On/Off/
Esc
0
L/s
25,4
°C
m/s
Select the measuring unit in airflow :
The device is on and in airflow mode.
➢
Press on « Select » until « UNIT » blinks on screen with the airflow unit displayed below.
➢
Press on « OK ».
The unit currently used blinks on screen.
➢
Press on « Select » to select the required measuring unit : m3/h, L/s, fcm or m3/s.
➢
Press on « OK » to validate.
« UNIT » blinks on screen.
➢
Press on « On/Off/Esc » to return to the measurement display.
SEL.
UNIT
OK
UNIT
SEL.
m3/h
Select
m3/h
UNIT
SEL.
m3/h, L/s...
SEL.
UNIT
OK
L/s
Select the measuring unit in temperature :
The device is on and displays the measurements.
➢
Press on « Select » until « UNIT » blinks on screen with the temperature unit displayed below.
➢
Press on « OK ».
The unit currently used blinks on screen.
➢
Press on « Select » pour choisir l'unité de mesure souhaitée : °C, °F.
➢
Appuyer sur la touche « OK » pour valider.
« UNITE » clignote à l'écran.
➢
Appuyer sur la touche « On/Off/Esc » pour revenir à la mesure.
SEL.
UNIT
°C
OK
UNIT
SEL.
°C
Select
UNIT
SEL.
°C ou °F
SEL.
OK
UNIT
°F
On/Off/
Esc
0,00
m/s
77,3
°C
Adjust the auto shut-off :
SEL.
SEL.
AUTO
OFF
OFF
AUTO
OFF
OFF
OK
Select
AUTO
OFF
15, 30mn...
AUTO
OFF
30mn
OK
On/Off/
Esc
0,00
m/s
25,4
°C
Activate or deactivate the keys beep :
The device is on and displays the measurements.
➢
Press on « Select » until « BEEP » blinsk on screen.
➢
Press on « OK ».
« OFF » or « ON » blinks on screen.
➢
Press on « Select » to activate the keys beep « ON » or deactivate the keys beep « OFF ».
➢
Press on « OK » to validate.
➢
Press on « On/Off/Esc » to return to the measurement display.
SEL.
SEL.
BEEP
OK
ON
BEEP
SEL.
Select
ON
BEEP
SEL.
OFF / ON
OK
ACTIVATE THE BACKLIGHT
The device is on and displays the measurements.
➢
Press on « Backlight » :
to activate the device backlight.
➢
To deactivate the backlight press again on « Backlight ».
CHANGE THE BATTERIES
➢
➢
➢
Remove the front part at the back of the device.
Change the old batterers by AAA LR03 1.5 V batteries.
Replace the front.
Once returned to KIMO, required waste collection will be assured in the respect of the environment in accordance to 2002/96/CE guidelines relating to WEEE
BEEP
OFF
On/Off/
Esc
0,00
m/s
25,4
°C
NTang – portable-VT110-VT115 – 10/06/14 – RCS (24) Périgueux 349 282 095 Non-contractual document – We reserve the right to modify the characteristics of our products without prior notice.
The device is on and displays the measurements.
➢
Press on « Select » until « AUTO OFF » blinks on screen.
➢
Press on « OK ».
The time before device auto shut-off blinks on screen.
➢
Press on « Select » to select the time before device auto shut-off : 15, 30, 45, 60, 75, 90, 105, 120 minutes or OFF.
➢
Press on « OK » to validate.
➢
Press on « On/Off/Esc » to return to the measurement display.