1
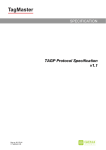
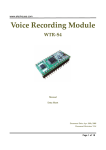
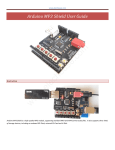
www.elechouse.com Voice Recognition Module V2 Speak to control (Arduino Compatible) Introduction The module could recognize your voice. It receives configuration commands or responds through serial port interface. With this module, we can control the car or other electrical devices by voice. This module can store up to 15 pieces of voice instruction. Those 15 pieces are divided into 3 groups, with 5 in each group. First we should train the module with voice instructions group by group. After that, we should import one group before it could recognize the 5 voice instructions within that group. If we need to implement instructions in other groups, we should import the group first. This module is speaker dependent. If you trained the module, your friend might not be able to make it work. What’s new in V2 We’ve updated this module to V2. We made V2 easy to control. Except only serial input or output of V1, V2 has other useful ways to control and output the result. You could find a new GOPI row on V2. GCH and GCL are used to import the voice group. And O1~O5 are pins which output the result of voice recognition. For example, if the first voice instruction in the working group is recognized, O1 could output HIGH signal. This output sometimes is very useful, such as while controlling the relay. The O1~O5 output could be set as many type. You could set it by sending command to it through serial interface. Those setting will be recorded in memory. It will not lose even with power off. You could find the commands in later content. www.elechouse.com V1 is black and V2 is red. Technical Parameters Voltage: 4.5-5.5V Current: <40mA Digital Interface: 5V TTL level UART interface and GPIO Analog Interface: 3.5mm mono-channel microphone connector + microphone pin interface Size: 30mm x 47.5mm Recognition accuracy: 99% (under ideal environment) Serial Command This module can be configured by sending commands via serial port. Configuration will be not erased after powered off. Its interface is 5V TTL. The serial data format: 8 data bits, no parity, 1 stop bit. The default baud rate is 9600 and baud rate can be changed. Command format is "Head + Key". "Head" is a 0xaa, and "Key" is as follows: Key (HEX format) Description 0x00 Enter into “Waiting” state 0x01 Delete the instructions of group 1 Delete the instructions of group 2 Delete the instructions of group 3 Delete the instructions of all the 3 groups Begin to record instructions of group 1 0x02 0x03 0x04 0x11 Respond in Common Mode Respond in Compact Mode "Waiting! \ n" : successful "ERROR! \ n" : Instruction error "Group1 Deleted ! \ n" : successful "ERROR! \ n" : Instruction error "Group2 Deleted ! \ n" : successful "ERROR! \ n" : Instruction error "Group3 Deleted ! \ n" : successful "ERROR! \ n" : Instruction error " All Groups Deleted !\n " : successful "ERROR! \ n" : Instruction error "ERROR! \ n" : Instruction error "START \ n" : Ready for recording, you can speak 0xcc : successful 0xe0 : Instruction error 0xcc : successful 0xe0 : Instruction error 0xcc : successful 0xe0 : Instruction error 0xcc : successful 0xe0 : Instruction error 0xcc : successful 0xe0 : Instruction error 0xe0 : Instruction error 0x40 : Ready for recording, you www.elechouse.com now "No voice \ n" : no voice detected "Again \ n" : Speak the voice instruction again. Do not speak until getting the START message "Too loud \ n" : Too loud to record "Different \ n" : voice instruction confirming failed. Voice for the second chance is different with the first one. "Finish one \ n" : recording one voice instruction successfully "Group1 finished! \ n" : finish recording group 1 Begin to record instructions of group 2 "ERROR! \ n" : Instruction error "START \ n" : Ready for recording, you can speak now "No voice \ n" : no voice detected "Again \ n" : Speak the voice instruction again. Do not speak until getting the START message "Too loud \ n" : Too loud to record "Different \ n" : voice instruction confirming failed. Voice for the second chance is different with the first one. "Finish one \ n" : recording one voice instruction successfully "Group2 finished! \ n" : finish recording group 2 0x13 Begin to record instructions of group 3 "ERROR! \ n" : Instruction error "START \ n" : Ready for recording, you can speak now "No voice \ n" : no voice detected "Again \ n" : Speak the voice instruction again. Do not speak until getting the START message "Too loud \ n" : Too loud to record "Different \ n" : voice instruction confirming failed. Voice for the second chance is different with the first one. "Finish one \ n" : recording one voice instruction successfully "Group3 finished! \ n" : finish recording group 3 0x21 Import group 1 and be ready for voice instruction "Group1 Imported !\n" : Successful "ERROR! \ n" : Instruction error "Import failed !\n" : Importing voice group failed 0x22 Import group 2 and be ready for voice instruction "Group2 Imported !\n" : Successful "ERROR! \ n" : Instruction error "Import failed !\n" : Importing voice group failed 0x23 Import group 3 and be ready for voice instruction "Group3 Imported !\n" : Successful "ERROR! \ n" : Instruction error "Import failed !\n" : Importing voice group failed 0x12 can speak now 0x41 : no voice detected 0x42 : Speak the voice instruction again. Do not speak until getting the START message 0x43 : Too loud to record 0x44 : voice instruction confirming failed. Voice for the second chance is different with the first one. 0x45 : recording one voice instruction successfully 0x46 : finish recording group 1 0xe0 : Instruction error 0x40 : Ready for recording, you can speak now 0x41 : no voice detected 0x42 : Speak the voice instruction again. Do not speak until getting the START message 0x43 : Too loud to record 0x44 : voice instruction confirming failed. Voice for the second chance is different with the first one. 0x45 : recording one voice instruction successfully 0x47 : finish recording group 2 0xe0 : Instruction error 0x40 : Ready for recording, you can speak now 0x41 : no voice detected 0x42 : Speak the voice instruction again. Do not speak until getting the START message 0x43 : Too loud to record 0x44 : voice instruction confirming failed. Voice for the second chance is different with the first one. 0x45 : recording one voice instruction successfully 0x48 : finish recording group 3 0xcc : Successful 0xe0 : Instruction error 0xe1 : Importing voice group failed 0xcc : Successful 0xe0 : Instruction error 0xe1 : Importing voice group failed 0xcc : Successful 0xe0 : Instruction error 0xe1 : Importing voice group failed www.elechouse.com 0x24 Query the recorded group 0x31 Change the baud rate to 2400bps Change the baud rate to 4800bps Change the baud rate to 9600bps Change the baud rate to 19200bps Change the baud rate to 38400bps 0x32 0x33 0x34 0x35 0x36 Switch to Common Mode 0x37 Switch to Compact Mode 0x41 0x42 0x43 0x44 0x45 0x46 Reset output of O1 Reset output of O2 Reset output of O3 Reset output of O4 Reset output of O5 Reset output of O1~O5 Set O1~O5 to Pulse Mode (negative pulse) Set O1~O5 to Flip Mode Set O1~O5 to Down Mode Set O1~O5 to Up Mode 0x50 0x51 0x52 0x53 0x60 0x61 0x62 0x63 0x64 0x65 0x66 0x67 0x68 Set the output duty of O1~O5 in Pulse Mode 0x60 -- 10ms 0x61 -- 15ms 0x62 -- 20ms 0x63 -- 25ms 0x64 -- 30ms 0x65 -- 50ms 0x66 -- 60ms 0x67 -- 70ms 0x68 -- 80ms 0x69 -- 90ms 0x6A -- 100ms 0x6B -- 200ms 0x6C -- 300ms "Used group:0\n" : No group is recorded "Used group:1\n" : Group 1 is recorded "Used group:2\n" : Group 2 is recorded "Used group:3\n" : Group 3 is recorded "Used group:12\n" : Group 1 and Group 2 are recorded "Used group:13\n" : Group 1 and Group 3 are recorded "Used group:23\n" : Group 2 and Group 3 are recorded "Used group:123\n" : All the 3 groups are recorded "ERROR! \ n" : Instruction error "Baud: 2400\n" : Successful "ERROR! \ n" : Instruction error "Baud: 4800\n" : Successful "ERROR! \ n" : Instruction error "Baud: 9600\n" : Successful "ERROR! \ n" : Instruction error "Baud: 19200\n" : Successful "ERROR! \ n" : Instruction error "Baud: 38400\n" : Successful "ERROR! \ n" : Instruction error "Common Mode\n" : Successful "ERROR! \ n" : Instruction error "Compact Mode\n" : Successful "ERROR! \ n" : Instruction error 0x00 : No group is recorded 0x01 : Group 1 is recorded 0x02 : Group 2 is recorded 0x04 : Group 3 is recorded 0x03 : Group 1 and Group 2 are recorded 0x05 : Group 1 and Group 3 are recorded 0x06 : Group 2 and Group 3 are recorded 0x07 : All the 3 groups are recorded 0xe0 : Instruction error "Ok\n" : Successful "ERROR! \ n" : Instruction error 0xcc : successful 0xe0 : Instruction error "Ok\n" : Successful "ERROR! \ n" : Instruction error 0xcc : successful 0xe0 : Instruction error "Ok\n" : Successful "ERROR! \ n" : Instruction error 0xcc : successful 0xe0 : Instruction error 0xcc : successful 0xe0 : Instruction error www.elechouse.com 0x69 0x6A 0x6D -- 400ms 0x6E -- 500ms 0x6F -- 1s Ox6B 0x6C 0x6D 0x6E 0x6F 0x70 0xbb Reset Serial Port to: 9600 baud rate, 8 data bits, no parity, 1 stop bit Query version information "Ok\n" : Successful "ERROR! \ n" : Instruction error 0xcc : successful 0xe0 : Instruction error Version information No respond If you want to modify the serial baud rate to 38400, you need to send command: 0xaa35. If successful, it will return "Baud: 38400 \ n"(in Common Mode) or 0xcc (in Compact Mode). The baud rate is set to 38400. The main difference between Compact Mode and Common Mode is the returning message. Common Mode response is long string but Compact Mode response is a byte. For example, after sending 0xaa04 to delete all the contents of the 3 groups, in Common Mode it will return "All Groups Deleted! \ n", but in Compact Mode it will return a concise bytes such as 0xcc which means a successful operation. Here we will introduce more about the output of O1~O5: Pulse Mode: Output is negative pulse. The pulse duration time (pulse duty) could be set by command 0x60 ~ 0x6F Flip Mode: each time while the module recognizes voice command, it will change the state of the output pin. Down Mode: The output will become LOW from HIGH once it detects voice command. It will never come back to HIGH again until the module receives output reset command 0x41 ~ 0x46 Up Mode: The output will become HIGH from LOW once it detects voice command. It will never come back to LOW again until the module receives output reset command 0x41 ~ 0x46 There will be an example: A: Starting point while you import the voice group. st B: The 1 time it recognizes voice command. nd C: The 2 time it recognizes voice command. rd D: The 3 time it recognizes voice command. E: The time while output reset command is received (0x41 ~ 0x46). The back wire is output wave shape. www.elechouse.com D duty Pulse Duty Pulse duty Pulse Mode C E E D C Pulse Pulse Mode B B A A Pulse Duty Mode Mode Down Flip Flip Mode Mode Up Down Mode Up Mode For the first-time use, we need to do some configuration: 1. 2. 3. 4. Select the serial baud rate (default 9600) Select the communication mode: Common Mode or Compact Mode Recording five instructions of the first group( or 2nd or 3rd as required) Import the group you need to use (only recognize 5 instructions within one group at the same time) After all the setting above, you can speak or send voice instruction to it. If identified successfully, result will be returned via serial port in the format: group number + command number. For example, return Result: 11 (Compact mode returns 0x11) means identified the first command of group 1. If voice instruction is recorded, each time after you power it on, you need to import the group before letting it identify voice instructions. LED Recording stage: www.elechouse.com 1. Record indication: D1 (RED) flashes 3 times within the 600ms, then off for400ms, and then flashes quickly for 4 times within 600ms. Now the recording indication is over. 2. Begin to speak: D1 (RED) is off for 400ms, and then is on. Voice during the time while D1 (RED) is on will be recorded by this module. 3. Recording a voice instruction successfully for the first time: D1 (RED) off, D2 (ORANGE) on for 300ms. 4. Recording a voice instruction successfully for the first time: D1 (RED) off, D2 (ORANGE) on for 700ms. 5. Recording failure: D2 (ORANGE) flashes 4 times within the 600ms. In cases that voice instructions detected twice don’t match, or the sound is too large, or there is no sound, recording will fail. You need to start over the recording process for that instruction. Waiting mode: In waiting mode, D2 (ORANGE) is off, and D1 (RED) is on for 80ms every other 200ms, fast flashing. In this mode, it doesn’t recognize voice command, only waiting for serial commands. Recognition stage: In identification stage, D2 (ORANGE) is off, and D1 (RED) is on for 100ms every other 1500ms, slow flashing. In this stage, this module is processing received voice signal, and if matching, it will send the result immediately via serial port. Recording Before using it, we have train it by recording voice instructions. Each voice instruction has the maximum length of 1300ms, which ensures that most words can be recorded. Once you start recording, you can’t stop the recording process until you finish all the 5 voice instructions recording of one group. Also, once you start recording, the previous voice instructions in that group will be erased. In training state, this module doesn’t reply to any other serial commands. LED will flash to indicate state. Please refer to the LED part. First, you need a serial tool. Here we use AccessPort (Download page). www.elechouse.com 1. 2. Serial port setting: Baud rate: 9600 Parity bit: None Data bit: 8 Stop bit: 1 Send format: Hex Receive format: Char Send commands Send: 0xaa11 Receive (in Common Mode): www.elechouse.com START No voice // I did not make any sound. So it replied such message START Speak now Again START Speak again now Different // I spoke another words for the second time. So it replied such message START Speak now Again START Speak again now Finish one // recording one instruction successfully START Again START Finish one START Again START Finish one START Again START Finish one START Again www.elechouse.com START Finish one Group1 finished! // recording group 1 successfully By now, you’ve finished instruction recording for group 1. Recognition We added another way to import the voice instruction group on V2. For V1, the only way is to send command to it through serial port, for example: Send command 0xAA21 to import group 1. Send command 0xAA22 to import group 2. Send command 0xAA23 to import group 3. On V2, we added an easy way to import the group: Look at the following picture, you could control GCH and GCL pins. Those two pins are all 5V TTL. GCH GCL Working State LOW LOW No Change LOW HIGH Import Group 2 HIGH LOW Import Group 1 HIGH HIGH Import Group 3 Try to connect GND to make sure they have the common ground. Once the group is important, it will output message through serial port. It could have 15 voice instructions in 3 groups. Each time you need to import the group before it could recognize instructions in that group. That means, this module could recognize 5 voice instructions at the same time. In recognition stage, this module could receive other serial commands. It will not exit the recognition stage until you send 0xAA00, or delete that group, or begin recording instructions. www.elechouse.com Output Video: http://www.youtube.com/watch?v=0Zjdu_HSr00 There are some tricks to improve the recognition rate. Try to record and use it in the same environment. And noise could greatly reduce the recognition rate. MIC plays very important role. As for the MIC wire connection to this module, the shorter, the better. In this test, I recorded 5 voice instructions: white, red, green, blue, off. First time I use a simple MIC as follows: www.elechouse.com I found occasionally this module could not distinguish “red” and “green”. Then I changed the MIC as follows: Then the recognition rate is greatly improved. Also I find that it is a little hard for this module to distinguish “of” and “off”. To distinguish those two similar pronunciations, highsensitive MIC is required and speaking must be very clear, as well as in quiet environment. All those limitation makes low practicality. But there are simple ways to solve it. Make your voice instructions distinctive. Do not use voice instructions of similar pronunciation. Reset the Serial Port On V2, we added a way to reset the serial port since many customers would forget the serial parameter some time later after they changed it. Before powering on the module, bridge the TX and RX pins Then Power the module on. www.elechouse.com Contact information Web: www.elechouse.com Email: [email protected] Disclaimer and Revisions The information in this document may change without notice. Revision History Rev. Date A B th Sep. 29 , 2011 th Mar. 4 , 2013 Author Description Wilson Shen Wilson Shen Initial version V2