1
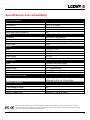
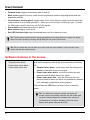
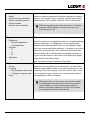
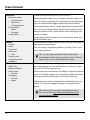
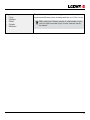
User manual
Thank you for choosing Kinotehnik LCDVFE
We hope that the device lives up to your expectations... and beyond that.
This booklet contains necessary information on how to make most out of your LCDVFE and its
capabilities, also on how to take proper care of the unit. Please take a moment to read through it.
We keep this manual constantly updated. The latest version of it can be found at our webpage
www.kinotehnik.com/lcdvfe. If you feel that something is missing from the manual, please let us
know.
Also, we update the LCDVFE firmware and PC/Mac LCDVFE Manager application as we add new
features on the go - so you might occasionally want to check for new versions on our webpage.
In case of any questions please write to [email protected]. We try our best to get back to
you in no time. Also, we value your feedback - if you have any ideas on how to make things better,
do let us know and we’ll try to make it happen.
By the way, many of your further questions might have already been covered in the
FAQ section of our webpage.
Good luck & happy shooting!
Tõnis Liivamägi
Cameraman, founder of Kinotehnik
[email protected]
2
Specifications and compatibility
Physical properties
Weight
Dimensions
Diopter range
Additional diopter lens option
Removable flip-up eyepiece
Power
On-board
Runtime on batteries
External power
Power drain
Screen
Size
Resolution
Pixel count
Pixel density
Color depth
Connectors
Input
Output
Loop through
PC/Mac connection
Dedicated remote connection
Supported video formats
HDMI
Software capabilities
Boot-up time
Auto-scaling for 480p
Blackout while switching resolution
Latency (display lag)
350 gr (12.3 oz.)
168 x 86 x 64 mm
-2 … +2 with quick dial
Yes, with standard 46 mm thread
Yes
Universal 4x AA batteries
~6 hours (on 2600mAH batteries)
4-17V, reverse polarity protected
1.9W
3-inch TFT LED
800x480
1.2 million
311 PPI
24bit 16.7 million colors
Full-size heavy-duty HDMI
Full-size heavy-duty HDMI
Yes, including audio
Mini-USB
Mini-USB
480i, 480p, 576p, 720p, 1080i
1080p @ 23.976, 24, 25 and 30fps
< 1.5 seconds
Yes
< 0.5 seconds
Maximum 1 frame @ 30fps
This device complies with part 15 of the FCC Rules. Operation is subject to the following two conditions: (1) This device may not cause
harmful interference, and (2) this device must accept any interference received, including interference that may cause undesired operation.
The device is in accordance with 89/336 ECC-ENC Directive.
3
User manual
Precautions and warnings
• Avoid direct sunlight through lens!
Please avoid direct strong sunlight coming through the
viewfinder lens as this might damage the LCD screen.
There are three easy safety precautions that you can apply
while the unit is not in use to avoid potential damage:
•Open the flip
•Friction-tilt the viewfinder to down position
•Dial off the diopter from the top (0-diopter) position
TIP: Any of those settings are very easy to apply and easy to revert - probably even quicker than
to attach and take off a lens-cap.
• Do not disassemble or physically modify your LCDVFE as this may damage the product
and void the warranty. As any electronic device the unit is prone to damage inflicted by dropping it or receiving heavy blows. Please avoid testing its limits and your LCDVFE will serve you
long and well.
• Avoid water and other elements. Please do not try to burn or drown your device unless you
have a spare unit ready. If you just couldn’t resist dropping it in water, do not turn the device
on and return it to your dealer - there is a chance it can be brought back to life so you can do it
again.
• Cleaning the screen. Please use caution when cleaning the screen. Do not spray any cleaning agents directly to screen but to soft cotton cloth. Please avoid pressure to the screen when
cleaning it or otherwise.
• Misuse voids the warranty. Physical misuse or unauthorized disassembly of the product by
its owner voids the warranty. No surprises there.
Warranty information
Kinotehnik offers one-year limited warranty to hardware and software of our products. Our warranty covers any defects in the workmanship, also in the software, preventing LCDVFE to work as
intended. Warranty excludes improper installation, physical damage and other abuse, including
improper environmental or mechanical conditions and unauthorized disassembly. Please note that
most LCD screens have dead pixels when looking at the screen with magnification. The warranty
applies when the screen shows more than 2 dead white pixels or 5 R/G/B dots in the viewable
area. The warranty excludes any HDMI cables that might be included as a free gift.
4
What’s in the box
1
2
6
3
5
4
1.
2.
3.
4.
5.
6.
LCDVFE unit
Universal 90-degree rod clamp
15mm rod to 1/4-20 thread adapter
15mm carbon-fiber rod with safety stoppers for offset mounting
2 battery cartridges
D-tap DC cable
The basics
• Rotate the eyepiece rubber
part to adjust the diopter
to desired position
• Press the lever underneath the unit to flip
the eyepiece open
• To close the lid just slide
the eyepiece down - it will lock
automatically.
5
User manual
Installing and removing batteries
The unit comes with two battery cartridges. You can use any standard or rechargeable batteries in
the cartridge.
How to remove the battery cartridge from the unit:
1. Open the door of the battery compartment
2. Slide the battery cartridge over the two knobs holding it, by pushing it in the opposite
direction
3. Lift he battery cartridge and move it outward but keep it as level as possible. Extensive
angle gets the cartridge stuck
TIP: To save your fingernails you might want to use a small coin to get the batteries off the cartridge.
How to insert the battery cartridge to the unit:
1. The cartridge goes in so that the metal power outlets of the cartridge touch the metal
power inlets of the unit first.
2. Slide the cartridge in keeping it as level as possible.
3. When the metal parts of the cartridge and LCDVFE touch, push the other end of the cartridge down so that the cartridge will go over the two plastic knobs locking the cartridge
in place.
Working with external power
The unit takes in a wide range of external power from 4 up to 17 volts. Any power source within
that voltage range can be used. As a last resort, the unit can even be powered up via USB port.
We have included a standard D-Tap cable so you can use the power off your camera/rig batteries.
Connecting the cables
There are 3 cable connections underneath the device: 2 standard-sized HDMI connections and 1
mini-USB. HDMI has a full loop trough (including audio).
The inner HDMI connection (closer to the power input on the side) is HDMI signal IN, while the
other one is OUT. HDMI OUT outputs clean signal without any image processing features seen on
the device. USB port is used for connectivity to PC/Mac LCDVFE Manager. This is for working with
presets, software updates and servicing.
TIP: To save your fingernails you might want to use a small coin to get the batteries off the cartridge
6
Make sure you insert your HDMI cables fully and firmly! You might want to use HDMI cable retainers HD EZ Lock for enhanced durability.
Generally HDMI cables can be prone to breakage and signal loss. At many cases the abnormalities in the work of the device can be caused by faulty cables. After hundreds of hours of heavy
testing we strongly recommend using Sony swivel HDMI cables as an aftermarket choice.
Setting the diopter
Setting the diopter is straightforward - rotating the dial will take you through the range of -2 to +2
diopter correction. If in excess of these numbers, you can attach an optional 46mm thread optical
lens as a replacement of the protective lens, making the range even wider. The 46mm lenses are
in stock in any good photo or video stores near you.
TIP: We take great pride in the design of our diopter adjustment system and there is a reason for
that. Namely you can dial the perfect setting is very fast, not allowing your eye to adjust to any
false setting. Perfect setting helps to avoid eye strain on longer use.
Getting accustomed to button controls
The default Function button setup is very easy to use. Play around with it for a while to get accustomed to the feel of the keypad and the features. Here are few pointers for a start:
• UP arrow (F1) toggles between the assists:
• Focus assist
• Exposure assist
• None
• Down arrow (F2) toggles between image modes:
• Black and white
• False color
• Blue
• Full color
7
User manual
• Forward arrow toggles composition aids on and off
• Back arrow toggles Economy mode (screen brightness) between high-brightness and lowbrightness settings
• Centre button (looking glass) toggles zoom in/out. Note that focus and exposure assist features continue to work while zoomed in. When you zoom during recording you get 1:1 pixels
for 1080 output and 2X zoom for sub Full HD signals.
• Power button switched the device on and off
• Menu button toggles menu on/off
• Red LED indicator light stays illuminated when unit is in stand-by mode
TIP: The Economy mode switch for dimming brightness is a handy feature to change the brightness level when opening or closing the flip with just one press of the button.
TIP: Did you know that you can also move and recall the zoom position? Just move the zoom
marker around with arrow buttons.
Software features in the menus
General
• Suspend when blank
• Power down when blank
• Power down when idle
This section deals with power options. Set things up properly
and avoid unwanted power drain and maximize your battery
life.
• Suspend when black - set the time until the unit goes to
standby mode when there is no signal
• Power down when blank - set the time when the unit
switches itself off when there is no signal
• Power down when idle - sets the time when the unit
switches itself off when you have not pressed any buttons
on it (although it might have running signal)
The red indicator LED stays on when unit is in stand-by
mode.
TIP: The difference between standby and power-off
modes is that from standby mode the unit can wake itself
up when it detects signal (for example when camera is
turned back on). However, standby mode uses some
battery while power-off mode does not.
8
Presets
• Select
• Load from selected preset
• Save to selected present
• Preset contains
• Reset to factory defaults
Working with presets can make your life much easier. You
can set up different presets for different cameras or working
modes. You can store up to 5 presets. A preset can contain
either display, OSD, guides, functions, video or all settings.
TIP: Working with presets is fast and easy in our PC/Mac
program LCDVFE Manager. Plug the unit to your computer and give it a try.
Display
• Brightness
• (Normal) brightness
• Low brightness
• Contrast
• R
• G
• B
• Saturation
This section allows you to control your display settings.
Note that there are two brightness options - normal brightness
and low brightness. Low brightness can be toggled when
pressing the backward green button on the keypad (unless
you have customized button settings). It is handy to use when
opening or closing the flip. We recommend less brightness
when working with closed flip and more brightness when using the unit as a monitor. Also bear in mind that more brightness results more battery drain.
You can also fine-tune contrast and saturation.
Video
Under video section you can set the unit up for the exact
• Format
signal that you are getting from the camera. You can switch
• Cropping
between preset aspect ratios or you can customize your own
• One setting for all formats cropping. To set up cropping, move the X and Y axis on your
• Configure cropping area
screen using the menu arrows. You can also have different
• Zoom
crop settings for different formats.
TIP: Remember if you are using a camera that has different HDMI output resolutions for preview and record (like
Canon 5DMKII), you must configure the cropping for
different resolutions separately. LCDVFE can remember
both settings and switches automatically.
9
User manual
Functions
• Exposure assist
• Overexposure
• Mid-tones
• Underexposure
• Focus assist
• Mode
• Strength
• Image effect
Guides
• Format
• Color
• Crop lines
• Safe area
• Size
• Center cross
• Composition aids
• Configure
OSD
• OSD texts
• Battery indicator
• Audio meter
• Position
• Histogram
• Position
• Mode
These functions are the core of your LCDVFE.
Exposure assists helps you to evaluate exposure levels. You
can look out for overexposure, underexposure and mid-tones.
You can customise the trigger margins by percent ranges.
Focus assist allows you to visually highlight the elements that
are in focus, by using peaking. Peaking color options can be
changed (default is red), also intensity can be changed from
normal to strong.
Image effect options include full color, blue tones, black and
white and false colors.
Guides section contains many options to set up visual aids for
your desired compositions.
You can modify composition guides by moving X and Y axis
as in cropping setup.
TIP: You can toggle composition aids on and off with
forward button without having to go to the menu. That’s of
course when you are using default button setup.
OSD stands for On-Screen Display features. These provide
information about your unit and the shoot and let you organize your LCDVFE’s viewing area.
Audio meters are helpful when the HDMI-in signal also carries
audio. Our software allows you to precisely monitor the audio
levels by providing making sure you record it correctly.
Histograms are useful to evaluate the characteristics of your
picture. You can also toggle luminance or exposure histograms.
TIP: Want to know more about how histograms work?
Here’s a good link: http://www.cambridgeincolour.com/
tutorials/histograms1.htm
10
Keys
• F1/up
• F2/down
• F3/left
• F4/right
• OK/zoom
The software allows you to set up your own custom keys for
maximised efficiency when working with the unit. Give it a try!
TIP: Looking for Firmware version or serial number of your
unit? It’s right here under “Keys” screen. Note the text at
the bottom.
11
User manual
LCDVFE Manager software
Software Manager is a small but nifty program designed for your PC or Mac.
You can download the latest version at www.kinotehnik.com
It does two main things:
• Let’s you to easily define and maintain different presets for the LCDVFE. You can upload or
download the presets by just plugging in the unit via USB cable and clicking a button. You can
even share the preset files with your friends.
• Allows you to easily upgrade the firmware of the device. To do so, go to www.kinotehnik.com
for the latest software version, save the file and upload it to your device. If for some reason you
want to revert the software to previous version, you can do that too.
TIP: Always be sure you have the latest firmware available to have most up-to-date features.
Never unplug the USB cable while upgrading the software.
This is how LCDVFE Manager looks on your computer:
12
FAQ
Will my LCDVFE work with Red Scarlet and Epic?
Yes, but that depends on the settings of your camera. Please make sure you use 720p HDMI
output signal, while it might have 1080p@60Hz as a default setting that is not supported. Please
refer to your Red’s owner’s manual for detailed info and instructions on how to set HDMI output
signal
What can I do to make sure my panning jitter is minimal?
Make sure you use optimal shutter speeds for filming: starting from 1/48th up to 1/60th, depending
on your region and frame rate. LCDVFE performs best at 50Hz in either 25p or 50i. Also, bear in
mind that different cameras have different HDMI output performances, so the jitter can be caused
by the camera’s HDMI pipeline. We encourage to experiment with different video output settings of
your camera to make sure the LCDVFE and your camera work in the best way together.
How to make sure that direct sunlight will not damage my LCDVFE screen?
You will always have few quick and easy options - firstly, make sure you tilt the LCDVFE into the
down position when moving away from the device. As it is only one friction-controlled movement,
the initial position is extremely easy to recall and it only takes a second. Secondly, you can dial the
diopter out from the initial zero-position. That way the optics are out of focus and sunlight poses no
harm.
Where do I see my firmware version and serial number?
Look under “Keys” section under your menu - it appears on the bottom right of the screen.
Any tips for cleaning the lens?
Yes, start off removing the rubber eyecup, then take off the protective lens and then you have an
access to the main lens. Please exercise caution when cleaning the lens - only soft cloth/paper, do
not spray any cleaning agents directly to lens.
13