1
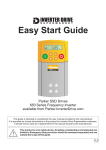
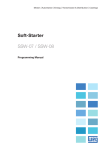
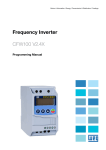
Easy Start Guide
VECTOR INVERTER
1 2 3 4 5 6 7 8 9 10 11 12
WEG
CFW-08 Frequency Inverter
available from WEG.InverterDrive.com
This guide is intended to compliment the user manual provided by the manufacturer.
It is provided as a basic introduction to the product for Inverter Drive Supermarket customers.
It should not be used as a replacement for the manual issued by the manufacturer.
This product is not a safety device. All safety considerations including but not
limited to Emergency Stop provision should be assessed separately and are
outside the scope of this guide.
Issue 2
20140223
Easy Start Guide
WEG CFW-08 Series Inverter
Contents
Page 1
Contents
Page 2
Power and Motor Connections (Single Phase)
Page 3
Power and Motor Connections (Three Phase)
Page 4
Motor Connections - Star and Delta
Page 5
Parameters - Overview
Parameters to set before use
Page 6
How to set a Parameter value
Page 7
How to Operate the Inverter from the keypad
Page 8
How to switch from Local (keypad) control to
Remote (terminal) control and back
Page 9
How to enable Sensorless Vector Mode
Page 10
How to connect and configure a Potentiometer
for remote speed control
Page 11
How to connect and configure a Run Forward or
Run Reverse switch
Page 12
How to connect and configure a Run/Stop switch
with Forward/Reverse selection
Page 13
How to configure “3-Wire” control with Run/Stop
pushbuttons and Forward/Reverse selection
Page 14
Brake Resistor Connection
Page 15
How to Reset the Inverter to Factory Defaults
This guide has been produced by The Inverter Drive Supermarket Ltd.
All content, including but not limited to graphics, text and procedures copyright © The Inverter
Drive Supermarket and must not be reproduced or altered without prior written permission.
Page 1
Easy Start Guide
WEG CFW-08 Series Inverter
1. Power and Motor Connections (Single Phase)
Before commencing, confirm that the Inverter and
all cables are completely isolated from the power
supply, have been isolated for at least 5 minutes
and that the motor is not turning.
VECTOR INVERTER
1 2 3 4 5 6 7 8 9 10 11 12
L/L1 N/L2 L3
U
V
W
Phase
Phase
Phase
Earth
Live
Neutral
Earth
Power
Motor
Notes:
Important:
The illustration above is based on the frame
size 2 rating (1.5kW). The terminal layout for
other sizes and the “Wash” model is similar.
Use screened SY cable between the Inverter
and Motor to minimise electromagnetic
interference.
The order of the three phases determines the
direction the motor turns.
Ensure the motor cable screen is earthed at
the motor end.
This guide has been produced by The Inverter Drive Supermarket Ltd.
All content, including but not limited to graphics, text and procedures copyright © The Inverter
Drive Supermarket and must not be reproduced or altered without prior written permission.
Page 2
Easy Start Guide
WEG CFW-08 Series Inverter
2. Power and Motor Connections (Three Phase)
Before commencing, confirm that the Inverter and
all cables are completely isolated from the power
supply, have been isolated for at least 5 minutes
and that the motor is not turning.
VECTOR INVERTER
1 2 3 4 5 6 7 8 9 10 11 12
L/L1 N/L2 L3
U
V
W
Phase
Phase
Phase
Earth
Power
Phase
Phase
Phase
Earth
Motor
Notes:
Important:
The illustration above is based on the frame
size 2 rating (1.5kW). The terminal layout for
other sizes and the “Wash” model is similar.
The order of the three motor phases
determines the direction the motor turns.
The order of the three power phases is
unimportant.
Use screened SY cable between the Inverter
and Motor to minimise electromagnetic
interference.
Ensure the motor cable screen is earthed at
the motor end.
This guide has been produced by The Inverter Drive Supermarket Ltd.
All content, including but not limited to graphics, text and procedures copyright © The Inverter
Drive Supermarket and must not be reproduced or altered without prior written permission.
Page 3
Easy Start Guide
WEG CFW-08 Series Inverter
3. Motor Connections - Star and Delta
Dual voltage induction motors typically include
terminal boxes with six points. The points can
be connected together with links in one of two
ways to suit one of the two rated voltages.
The two ways of connecting the links are
shown below. These are known as “Star” (the
higher voltage) or “Delta” (the lower voltage).
The selection of Star or Delta is not optional
and must match the supply voltage.
Dual voltage motor nameplates include
symbols to represent voltage and full load
current in each configuration.
Delta is represented by a triangle and star by
an inverted Y (Wye).
3.1 Motor connected in STAR (or Wye):
Link
STAR
Earth
For safety purposes, Star (shown opposite) is
the default configuration for new motors and is
sometimes known as “two at one side”.
Only two links are required for Star. Double-up
the links if changing from Delta to allow the
motor to be changed back in future.
Phase
The order of the three phases determines the
direction the motor turns.
Phase
Phase
Note that the cable screen and earth are
connected together at the earth terminal.
Screen
3.2 Motor connected in DELTA:
Link
DELTA
Earth
Phase
The Delta link configuration is shown in the
illustration opposite and is sometimes referred
to as “three-a-breast”.
The order of the three phases determines the
direction the motor turns.
Note that the cable screen and earth are
connected together at the earth terminal.
Phase
Phase
Screen
This guide has been produced by The Inverter Drive Supermarket Ltd.
All content, including but not limited to graphics, text and procedures copyright © The Inverter
Drive Supermarket and must not be reproduced or altered without prior written permission.
Page 4
Easy Start Guide
WEG CFW-08 Series Inverter
4. Parameters - overview
The Inverter contains a number of settings
which can be changed to tailor it for use with a
wide range of motor ratings and applications.
These settings are known as parameters.
Parameters are typically referred to by code or
number (eg. P401 = Rated Motor Current) with
a description available in the manual.
The parameters contain critical information
essential to the correct operation of the
Inverter. Therefore, they should at least be
checked by the installer before the Inverter is
operated for the first time.
The parameters listed in section 5 are intended
to provide a starting point to allow for basic
operation of the CFW-08 Inverter.
5. Parameters to set before use
Set the following parameters to allow the
CFW-08 to control a motor with Run, Stop and
Speed Control from the keypad.
If any of the parameters have been changed
previously, follow the procedure in section 15
to reset the Inverter to Factory Defaults.
See section 6 to learn how to set a parameter value.
5.1 Parameters to check and values to set
Parameter
Description
How to set
P000
Parameter Access
Set to 5 to allow parameters to be changed
P100
Acceleration Time (seconds)
Default is 5.0 Increase or decrease if required.
P101
Deceleration Time (seconds)
Default is 10.0 Increase or decrease if required.
P133
Minimum Frequency (Hz)
Default is 3.00. Set to 5.00 for most applications.
P134
Maximum Frequency (Hz)
Default is 55.00 or 66.00. Set to 50.00 for most applications.
P202
Control Mode
Default is 0 (linear). Can be set to 1 (quadratic) if the motor is driving a Fan or Pump.
P399
Rated Motor Efficiency
Set to match motor if known - eg. 71.00 (%)
P400
Rated Motor Voltage
Set to match motor nameplate - eg. 230
P401
Rated Motor Current
Set to match motor nameplate - eg. 3.34 (Amps)
P402
Rated Motor Speed
Set to match motor nameplate - eg. 1430 (rpm, look for min -1)
P403
Rated Motor Frequency
Set to match motor nameplate - eg. 50.00 (Hz)
P404
Rated Motor Power
Refer to P404 table in manual and set to match motor nameplate - eg. 6 (for 1.5 kW)
P407
Rated Motor Power Factor
Set to match motor if known - eg. 0.74 (look for cos φ)
Note: Although some parameters are only used in Sensorless Vector Mode (see Section 9), we recommend that all the above are set.
This guide has been produced by The Inverter Drive Supermarket Ltd.
All content, including but not limited to graphics, text and procedures copyright © The Inverter
Drive Supermarket and must not be reproduced or altered without prior written permission.
Page 5
Easy Start Guide
WEG CFW-08 Series Inverter
6. How to set a Parameter value
6.1 Find the Parameter List.
This example demonstrates the steps required to set parameter
P401 which is Rated Motor Current.
With the motor stopped, press the “PROG” button to access the
parameter list. The display will show the letter “P” followed by a
three digit number. Typically, this is P000 as shown in the illustration
opposite.
6.2 Find the Parameter to change
Use the up and down keys to find the required parameter. In this
example, P401.
Press the “PROG” key to select the parameter value.
6.3 Set the Parameter Value
Use the up and down keys to set the parameter value as required.
In this example, the motor nameplate shows a rated current of
6.47A so the value is set accordingly.
Note: If you are unable to change the value, ensure that parameter
P000 is set to 5. Some parameters may be read-only so cannot be
changed even when P000 is set to 5.
6.4 Finished.
Press “PROG” to save changes. The display will return to the
current parameter.
This guide has been produced by The Inverter Drive Supermarket Ltd.
All content, including but not limited to graphics, text and procedures copyright © The Inverter
Drive Supermarket and must not be reproduced or altered without prior written permission.
Page 6
Easy Start Guide
WEG CFW-08 Series Inverter
7. How to operate the Inverter from the keypad
7.1 Ensure the Inverter is in “Local” control mode.
Press the “Loc/Rem” button repeatedly until the green indicator lamp
next to the “Loc/Rem” button is illuminated.
See section 8 for further information on Local and Remote modes.
7.2 Set Parameter P121 to the required speed
Set parameter P121 (Keypad Reference) to the desired speed. In this
example, 25.00Hz is half the rated speed for a standard 50Hz
Induction Motor. Leave the display showing the speed in Hz.
See section 6 to learn how to set a parameter value.
7.3 Start the motor and change direction
Press the green button to start the motor. The motor will accelerate to
the required speed in the time specified by parameter P100. Use the
up and down keys to change the speed as required.
Pressing the direction button (see illustration opposite) will first
decelerate the motor to zero speed before accelerating up to the
current speed in the opposite direction. Parameters P100 and P101
control the acceleration and deceleration time in seconds. The lamps
on the left indicate direction; green = forward, red = reverse.
7.4 Stop the motor
Press the red button to stop the motor. The motor will decelerate to a
stop in the time specified by parameter P101.
Once stopped, the display will show “rdy” (ready).
This guide has been produced by The Inverter Drive Supermarket Ltd.
All content, including but not limited to graphics, text and procedures copyright © The Inverter
Drive Supermarket and must not be reproduced or altered without prior written permission.
Page 7
Easy Start Guide
WEG CFW-08 Series Inverter
8. How to switch from Local (keypad) control to
Remote (terminal) control and back
8.1 Local (keypad) control
When the green indicator lamp next to the “Loc/Rem” button is
illuminated, the Inverter is in “Local” mode.
When in “Local” mode, the motor can be controlled using the
integrated keypad. The defaults are:Start/Stop, Speed Up/Down, Forward/Reverse rotation, Jog
8.2 Remote (terminal) control
When the red indicator lamp next to the “Loc/Rem” button is
illuminated, the Inverter is in “Remote” mode.
When in “Remote” mode, the motor can be controlled using the
terminal block.
8.3 Toggle between Local and Remote control
Press the “Loc/Rem” button again to toggle from Local to Remote or
from Remote to Local.
This guide has been produced by The Inverter Drive Supermarket Ltd.
All content, including but not limited to graphics, text and procedures copyright © The Inverter
Drive Supermarket and must not be reproduced or altered without prior written permission.
Page 8
Easy Start Guide
WEG CFW-08 Series Inverter
9. How to enable Sensorless Vector Mode
The standard operating mode of the CFW-08
Inverter is VxF. This is the simplest form of
operation and controls Volts and Frequency to
vary the speed of a standard Induction Motor.
The CFW-08 can also operate in Sensorless
Vector mode. This can improve motor
performance without requiring a separate
feedback device.
In order to improve performance, Sensorless
Vector builds a “model” of the motor it is
controlling. This is achieved by a “tuning” run
during which the Inverter operates for approx.
2 minutes to gather the necessary motor data.
Note: Sensorless Vector is not suitable
where the motor rating is significantly
lower than the Inverter rating or where
more than one motor is being controlled.
Invoking a “tuning” run in these cases will
not be successful and return an E14 error.
9.1 Parameters to check and values to set
Parameter
Description
How to set
P000
Parameter Access
Set to 5 to allow parameters to be changed
P202
Control Mode
Default is 0 (linear). Set to 2 to enable Sensorless Vector Control.
P408
Run Self-Tuning
Default is 0. Ensure motor is off-load before changing to 1 to begin self-tuning.
The display will flash “auto” whilst
the CFW-08 performs it’s tuning run.
This guide has been produced by The Inverter Drive Supermarket Ltd.
All content, including but not limited to graphics, text and procedures copyright © The Inverter
Drive Supermarket and must not be reproduced or altered without prior written permission.
Page 9
Easy Start Guide
WEG CFW-08 Series Inverter
10. How to connect and configure a Potentiometer
for remote speed control
If the up/down buttons on the keypad are
unsuitable for the application, a remote
Potentiometer can be used instead.
This provides the benefit of allowing motor
speed to be controlled from a more convenient
location such as a cabinet door (if the CFW-08
is cabinet-mounted) or on the machine itself.
A Potentiometer of 10kOhm rating should be
used. The number of turns depends on the
application but both single turn and ten turn
Potentiometers are available from The Inverter
Drive Supermarket at InverterDrive.com.
Ensure the Inverter is in “Remote” mode
before continuing.
10.1 Parameters to change for remote Potentiometer speed control
Parameter
Description
How to set
P000
Parameter Access
Set to 5 to allow parameters to be changed
P221
Frequency Local Reference
Set to 0 to use the keypad up/down keys or 1 to enable the Potentiometer in Local mode
P222
Frequency Remote Reference
Set to 1 to enable the Potentiometer via AI1 in Remote mode
P133
Minimum Frequency
Set to 5 for Potentiometer lowest speed of 5Hz (or set as required)
P134
Maxmum Frequency
Set to 50 for Potentiometer highest speed of 50Hz (or set as required)
P233
Analog Input Dead Zone
Set to 0 to set 0V to min speed and 10V to max speed so full Potentiometer rotation is used
P235
Analog Input AI1 Function
Set to 0 to enable 0-10V (check S1:3 DIP switch behind keypad is off)
COM AI1 +10V
10.2 Connecting the Potentiometer
1 2 3 4 5 6 7 8 9 10 11 12
3
2
A wiring diagram is shown in the illustration
opposite. The most important connection at
the Potentiometer end is the centre terminal or
“wiper”.
1
Screened
“SY” Cable
Screen to
Earth Terminal
1
2
3
The wiper will output a variable voltage
between 0 and 10 volts and should be
connected to terminal 6 at the Inverter end. It is
this voltage which provides the speed signal
with 0V being slowest and 10V fastest.
Set the Potentiometer at its “half-way” position
before running the motor for the first time. If the
rotation of the Potentiometer is the opposite to
that required (ie. turn anti-clockwise to
10kOhm
increase speed instead of clockwise) reverse
Potentiometer
[Order Code 21302] connections +10V and COM.
Use shielded SY cable between Potentiometer
and Inverter and ensure that the cable screen
is connected to the Inverter earth terminal.
This guide has been produced by The Inverter Drive Supermarket Ltd.
All content, including but not limited to graphics, text and procedures copyright © The Inverter
Drive Supermarket and must not be reproduced or altered without prior written permission.
Page 10
Easy Start Guide
WEG CFW-08 Series Inverter
11. How to connect and configure a Run Forward or
Run Reverse switch
The parameters described in Section 5 enable
Run/Stop operation via the red and green
buttons on the Inverter.
This section explains how to enable 2-wire
control with Run Forward / Stop / Run Reverse
commands via a single selector switch.
If this is unsuitable for the application, a remote
switch can be used instead.
Ensure the Inverter is in “Remote” mode
before continuing.
11.1 Parameters to change for remote Run/Stop
Parameter
Description
How to set
P000
Parameter Access
Set to 5 to allow parameters to be changed
P230
Remote Command Selection
Set to 1 to use the Inverter terminals (as opposed to keypad)
P263
Digital input 1 (T1) function
Set to 8 for Forward Run on T1 (ignore E24 error, will clear when P264, P265, P266 are set)
P264
Digital input 2 (T2) function
Set to 8 for Reverse Run on T2
P265
Digital input 3 (T3) function
Set to 10 for reset on T3 (or set to 1, 3, 6, 11, 12, 13 or 15 as required but no other values)
P266
Digital input 4 (T4) function
Set to 3 for run Jog on T4 (or set to 1, 6, 11, 12, 13, 14 or 15 as required but no other values)
DI1 DI2
COM
11.2 Connecting the Switch
1 2 3 4 5 6 7 8 9 10 11 12
1
2
A wiring diagram is shown in the illustration
opposite.
3
Terminal 5 (COM) is a common connection for
terminals 1-4, 6 and 8 and has no other
function.
A suitable 3 position NO (Normally Open)
switch should be installed between terminals 1
(DI1), 2 (DI2) and 5 (COM). The centre position
should remain open circuit.
When a connection is made between terminals
1 (DI1) and 5 (COM), the motor will run
forward. When terminals 2 (DI2) and 5 (COM)
are connected, the motor will run in reverse.
123
R
F
Switch, 3 Position
Normally Open
“Run Forward / Stop / Run Reverse”
Care should be taken to ensure that terminals
1 (DI1) and 2 (DI2) cannot be connected to 5
(COM) at the same time or to each other.
If motor rotation is the opposite to that
required, simply swap connections 1 and 2.
This guide has been produced by The Inverter Drive Supermarket Ltd.
All content, including but not limited to graphics, text and procedures copyright © The Inverter
Drive Supermarket and must not be reproduced or altered without prior written permission.
Page 11
Easy Start Guide
WEG CFW-08 Series Inverter
12. How to connect and configure a Run/Stop switch
with Forward/Reverse selection
The parameters described in Section 5 enable
Run/Stop operation via the red and green
buttons on the Inverter.
This section explains how to enable 2-wire
control with Run/Stop and Forward/Reverse
commands via separate selector switches.
If this is unsuitable for the application, remote
switches can be used instead.
Ensure the Inverter is in “Remote” mode
before continuing.
12.1 Parameters to change for remote Run/Stop
Parameter
Description
How to set
P000
Parameter Access
Set to 5 to allow parameters to be changed
P230
Remote Command Selection
Set to 1 to use the Inverter terminals (as opposed to keypad)
P263
Digital input 1 (T1) function
Set to 0 for “General Enable” on T1
P264
Digital input 2 (T2) function
Set to 0 for Forward/Reverse on T2
P265
Digital input 3 (T3) function
Set to 10 for reset on T3 (or set to 1, 3, 6, 11, 12, 13 or 15 as required but no other values)
P266
Digital input 4 (T4) function
Set to 8 for Start/Stop on T4
DI1 DI2
DI4 COM
12.2 Connecting the Switch
1 2 3 4 5 6 7 8 9 10 11 12
2
3
A wiring diagram is shown in the illustration
opposite.
1
Terminal 5 (COM) is a common connection for
terminals 1-4, 6 and 8 and has no other
function.
General
Enable Link
Two suitable 2 position NO (Normally Open)
switches should be installed: One between
terminals 4 and 5 (Run/Stop) and the other
between terminals 2 and 5 (Forward/Reverse).
21
31
Note that the Forward/Reverse switch only
selects the direction of rotation - it will not start
or stop the motor.
R
Switch, 2 Position
Normally Open
“Forward / Reverse”
A “General Enable” link is required between
terminals 1 and 5. If this link is removed whilst
the motor is running, the motor will coast to a
stop (rather than controlled deceleration).
Switch, 2 Position
Normally Open
“Run / Stop”
If the application only requires the motor to turn
in one direction, the Forward/Reverse switch
can be omitted.
This guide has been produced by The Inverter Drive Supermarket Ltd.
All content, including but not limited to graphics, text and procedures copyright © The Inverter
Drive Supermarket and must not be reproduced or altered without prior written permission.
Page 12
Easy Start Guide
WEG CFW-08 Series Inverter
13. How to configure “3-Wire” control with Run/Stop
pushbuttons and Forward/Reverse selection
The parameters described in Section 5 enable
Run/Stop operation via the red and green
buttons on the Inverter.
This section explains how to enable 3-wire
control with Run and Stop via pushbuttons and
Forward/Reverse via a selector switch.
If this is unsuitable for the application, remote
switches can be used instead.
Ensure the Inverter is in “Remote” mode
before continuing.
13.1 Parameters to change for remote 3-wire control
Parameter
Description
How to set
P000
Parameter Access
Set to 5 to allow parameters to be changed
P230
Remote Command Selection
Set to 1 to use the Inverter terminals (as opposed to keypad)
P263
Digital input 1 (T1) function
Set to 14 for 3-wire control “Start” on T1 (ignore E24 error, will clear when P264 is set)
P264
Digital input 2 (T2) function
Set to 14 for 3-wire control “Stop” on T2
P265
Digital input 3 (T3) function
Set to 10 for reset on T3 (or set to 1, 3, 6, 11, 12, 13 or 15 as required but no other values)
P266
Digital input 4 (T4) function
Set to 0 for forward/reverse selection on T4
DI1 DI2
DI4 COM
13.2 Connecting the Switches
1 2 3 4 5 6 7 8 9 10 11 12
2
3
4
A wiring diagram is shown in the illustration
opposite. Terminal 5 (COM) is a common
connection for terminals 1-4, 6 and 8 and has
no other function.
1
For “Run” and “Stop”, two suitable
pushbuttons should be installed. The “Run”
pushbutton should include a Normally Open
contact between terminals 5 (COM) and 1
(DI1) and the “Stop” a Normally Closed contact
between terminals 5 (COM) and 2 (DI2).
For “Forward/Reverse” a suitable 2 position
NO (Normally Open) switch should be installed
between terminals 5 (COM) and 4 (DI4).
21
31
41
R
Pushbutton
Normally Open
“Run”
A momentary connection between 5 (COM)
and 1 (DI1) will start the motor. It will continue
to run until the connection between 5 (COM)
and 2 (DI2) is broken.
Note that the Forward/Reverse switch only
selects the direction of rotation - it will not start
Pushbutton
Switch, 2 Position or stop the motor. If the application only
requires the motor to turn in one direction, the
Normally Closed Normally Open
“Stop”
“Forward / Reverse” Forward/Reverse switch can be omitted.
This guide has been produced by The Inverter Drive Supermarket Ltd.
All content, including but not limited to graphics, text and procedures copyright © The Inverter
Drive Supermarket and must not be reproduced or altered without prior written permission.
Page 13
Easy Start Guide
WEG CFW-08 Series Inverter
14. Brake Resistor Connection
Before commencing, confirm that the Inverter and
all cables are completely isolated from the power
supply, have been isolated for at least 5 minutes
and that the motor is not turning.
High inertia loads can cause overvoltage trips
during deceleration and lead to “E01" error
messages. In many cases, the solution is to
increase the deceleration time to compensate.
A Brake Resistor is first installed to absorb
braking energy and dissipate it as heat. The
resistor must be correctly sized for both the
Inverter and application.
However, if the application requires it, dynamic
braking can be used to maintain or reduce
deceleration times by absorbing the energy
generated by such loads.
A “brake chopper” within the Inverter detects
excessive braking energy and redirects it to
the resistor as required.
14.1 Parameters to change for Dynamic Braking
Parameter
Description
How to set
P000
Parameter Access
Set to 5 to allow parameters to be changed
P151
DC Link Voltage Regulation Level
Set to 380 for 230V Inverter or 780V for 400V Inverter (default values).
14.2 Connecting the Resistor
A wiring diagram is shown in the illustration
opposite. Connect the brake resistor to the BR
and +UD Terminals on the Inverter. The order
of the connections is unimportant.
The braking resistor may get hot during
operation. Ensure that it is mounted in a
suitable position away from other items.
VECTOR INVERTER
It is important that a resistor of the correct
rating is used. Consult the manufacturer’s
manual or product listing on InverterDrive.com
for further information.
1 2 3 4 5 6 7 8 9 10 11 12
BR +UD
+UD
BR
Heat Resistant
Cable
This guide has been produced by The Inverter Drive Supermarket Ltd.
All content, including but not limited to graphics, text and procedures copyright © The Inverter
Drive Supermarket and must not be reproduced or altered without prior written permission.
Page 14
Easy Start Guide
WEG CFW-08 Series Inverter
15. How to reset the Inverter to Factory Defaults
15.1 Select Parameter P000
With the motor stopped, press the “PROG” button to select
parameters. The display will show the letter “P” followed by a three
digit number. Use the up and down keys to select P000 if it is not
already selected.
15.2 Set Parameter P000 to 5
Press the “PROG” button again to select the parameter value. Use
the up and down keys to set this value to 5. Press “PROG” again to
save. The display will return to P000.
Note: setting P000 to 5 allows other parameters to be changed.
15.3 Select Parameter P204
Use the up and down keys to select P204. Press the “PROG” button
to see the current value (typically “0").
15.4 Set Parameter P204 to 5
Use the up and down keys to change the value to 5. Press “PROG”
again to save. The display will flash briefly and change from 5 back
to 0. Press “the “PROG” button to return to P000.
Note: setting P204 to 5 will reset the Inverter back to factory
defaults. This will also reset P000 back to 0. Ensure that you set
P000 to 5 before attempting to change any other parameters.
This guide has been produced by The Inverter Drive Supermarket Ltd.
All content, including but not limited to graphics, text and procedures copyright © The Inverter
Drive Supermarket and must not be reproduced or altered without prior written permission.
Page 15