1
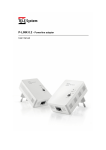
Dear Customer,
we would like to thank you for buying our product. Please read carefully this user manual before using the device.
Only by doing so the device can work in the correct way and it can meet all your needs. We reccomend you to keep
the product box in case you need to send back the device to customer care.
The Staff of TELE System
ATTENTION!
The maximum speed of the device is 200 Mbps. This speed is affected mainly by the quality of your electrical
system but also by the place in which you connect the adapter (wall socket or multiple power socket). This
device supports the following products: TELE System P-Link 0.2, TELE System P-Link 0.3, Fuba PLK200.
TELE System Electronic Srl states that, due to hardware or software changes (needed to improve the
product itself), the user could find differences between the content of this user guide and the product.
Table of Contents
1
2
3
Safety Regulation . . . . . . . . . . . . . . . . . . . . . . . . . . . . . . . . . . . . .
Installation . . . . . . . . . . . . . . . . . . . . . . . . . . . . . . . . . . . . . . . . .
2.1
Introduction to P-Link Nano . . . . . . . . . . . . . . . . . . . . . . . . . . . .
2.2
Product Description . . . . . . . . . . . . . . . . . . . . . . . . . . . . . . . .
2.3
Basic usage of P-Link Nano . . . . . . . . . . . . . . . . . . . . . . . . . . . .
2.3.1
Content of the package . . . . . . . . . . . . . . . . . . . . . . . . .
2.3.2
System requirements . . . . . . . . . . . . . . . . . . . . . . . . . .
2.3.3
Connecting P-Link Nano . . . . . . . . . . . . . . . . . . . . . . . .
2.4
Advanced usage of P-Link Nano . . . . . . . . . . . . . . . . . . . . . . . . .
2.4.1
Network encryption . . . . . . . . . . . . . . . . . . . . . . . . . . .
2.4.1.1
Protect a new network between 2 P-Link Nano . . . . . .
2.4.1.2
Expand an existent network by adding a new P-Link Nano
2.4.1.3
Remove a P-Link Nano from an existent network . . . . .
2.4.2
Factory Reset . . . . . . . . . . . . . . . . . . . . . . . . . . . . . .
2.4.3
Speed Increase . . . . . . . . . . . . . . . . . . . . . . . . . . . . .
Technical Specifications . . . . . . . . . . . . . . . . . . . . . . . . . . . . . . . . . .
.
.
.
.
.
.
.
.
.
.
.
.
.
.
.
.
.
.
.
.
.
.
.
.
.
.
.
.
.
.
.
.
.
.
.
.
.
.
.
.
.
.
.
.
.
.
.
.
.
.
.
.
.
.
.
.
.
.
.
.
.
.
.
.
.
.
.
.
.
.
.
.
.
.
.
.
.
.
.
.
.
.
.
.
.
.
.
.
.
.
.
.
.
.
.
.
.
.
.
.
.
.
.
.
.
.
.
.
.
.
.
.
.
.
.
.
.
.
.
.
.
.
.
.
.
.
.
.
.
.
.
.
.
.
.
.
.
.
.
.
.
.
.
.
.
.
.
.
.
.
.
.
.
.
.
.
.
.
.
.
.
.
.
.
.
.
.
.
.
.
.
.
.
.
.
.
.
.
.
.
.
.
.
.
.
.
.
.
.
.
.
.
.
.
.
.
.
.
.
.
.
.
.
.
.
.
.
.
.
.
.
.
.
.
.
.
.
.
.
.
.
.
.
.
.
.
.
.
.
.
.
.
.
.
.
.
.
.
.
.
.
.
.
.
.
.
.
.
.
.
.
.
.
.
.
.
.
.
.
.
.
.
.
.
.
.
.
.
.
.
.
.
.
.
.
.
.
.
.
.
.
.
.
.
.
.
.
.
.
.
.
.
.
.
.
.
.
.
.
.
.
.
.
.
.
.
.
.
.
.
.
.
.
.
.
.
.
.
.
.
.
.
.
.
.
.
.
.
.
.
.
.
.
.
.
.
.
.
.
.
.
.
.
.
.
.
.
.
.
.
.
.
.
.
.
.
.
.
.
.
.
.
.
.
.
.
.
.
.
.
.
.
.
.
.
.
.
.
.
.
.
.
.
.
.
.
.
.
.
.
.
.
.
.
.
.
.
.
.
.
.
.
.
.
.
.
.
.
.
.
.
.
.
.
.
.
.
.
.
.
.
.
.
.
.
.
.
.
.
.
.
.
2
3
3
3
4
4
4
4
5
5
5
5
5
5
5
6
1
P-Link Nano
1
Safety Regulation
We advise you to read the following advice concerning the safety regulations carefully in order to ensure safe use of
the appliance.
ELECTRICAL SUPPLY
The appliance should be supplied by using a voltage of 100-240 Volt AC, 50/60 Hz. The appliance must not be
repaired in any way by the user, in case of breakages or failures please refer to the nearest center for assistance.
Do not remove the cover. The inside of the appliance could contain higher voltages than that of the supply voltage
which could endanger the user. The device should be disconnected from the electrical supply before performing any
intervention. Non-authorised removal will mean that the warranty is no longer valid!
LIQUIDS
Keep the appliance far from any liquids. Do not place any objects containing liquids on the appliance, such as vases,
humidifiers etc. The appliance must not be installed in areas where it could come into contact with sprays or drops
of water or in an environment with a high level of humidity where condensation could occur. If the device should
accidentally come into contact with liquids, disconnect immediately from the power socket. DO NOT TOUCH the
device until it has been disconnected.
SMALL OBJECTS
Keep the receiver away from coins or other small objects. Objects which fall into the appliance via the ventilation
gaps could cause serious damage.
CLEANING
Before cleaning, disconnect the device from the power supply. To clean the outside of the reciever use a soft and
dry or slightly damp cloth. Avoid using products which contain chemicals or solvents.
VENTILATION
Make sure that the area where the appliance is to be installed has good air circulation so that the heat can be
dissipate well in order to avoid overheating. In order to allow enough ventilation it is necessary to have a distance of
at least 10 cm on either side of the appliance and 15cm above the appliance. The vents must be kept clear from any
obstructions such as newspapers, table cloths, furnature material, curtains, carpets etc. Avoid installing the receiver
close to any heat sources (i.e. radiators, stoves etc) or on top of any other appliances which omit heat (video players,
DVD etc).
WARNING!!!
Keep the appliance out of reach of children. The plastic bags used for packaging can be dangerous. To avoid
suffocating keep the bags out of reach of children. Do not expose the receiver or remote control to direct sunlight.
The appliance must be placed on a solid and stable base.
Connect the device to the power supply only after installation is complete. Dispose of the product
correctly so as to avoid damage to the environment and human health as well as to facilitate recycling
of the components/materials used in the appliance. If the product is not disposed of properly this
could be punishable according to the involved law. The manufacturers recommend that the parts are
recycled seperately and are taken to sites which conform to current regulations.
2
TELE System
2
Installation
2.1
Introduction to P-Link Nano
P-Link Nano is an high-performace powerline adapter. The data rate (up to 200 Mbps) make this device suitable
to applications that can use intensively your broadband network connection. Both at work and at home, devices
like digital receivers, set-top boxes or PCs can be connected to P-Link Nano by using ethernet interface. Moreover
the communication between 2 P-Link Nano can cover a distance up to 300 meters allowing the user to extend its
broadband connection without the need of wiring.
Which is the main function of powerline adapters? With these devices you can configure a network in a fast, secure
and cheap way without the need of wiring. The powerline adapters can reach speed comparable (often faster) than
other LAN tecnologies. The installation procedure is plug&play, without any software to be installed and, in addition,
P-Link Nano has a low-power consumption mode: it can reduce its power consumption by switching automatically to
stand-by mode if no adapter is used.
2.2
Product Description
1. LED for PWR: steady green when the device is fully operative; blinking green if the device is in stand-by mode.
2. LED for LAN network : steady green when the network connection is active, blinking green if data are
transmitted
3. LED for PLC connection: green when the connection (with another P-Link Nano) is established.
4. SECURITY button: you can start data protection by pressing this button; in order to have more information
about the usage of this button, please refer to section2.4.1.
3
P-Link Nano
NOTE
All P-Link Nano devices to be connected to your network must be connected to the same electrical
system. P-Link Nano automatically switch in stand-by mode when it cannot find another active device
in your network, such as a computer connected to its ethernet port. In stand-by mode the device
cannot be found via electrical system. Once a device (with ethernet interface) is connected to the
network, P-Link Nano automatically will come back to active mode and it can be reached via electrical
system.
5. Ethernet port(RJ45): insert here ethernet cable.
2.3
Basic usage of P-Link Nano
In this section the user can found all the necessary information for installing, using and configuring P-Link Nano.
Moreover you can find also the content of the package, minimum system requirements and main functionalities of
the device such as network protection.
2.3.1
Content of the package
Please check the content of the package before using P-Link Nano. The package consists in:
• 2 x P-Link Nano adapters;
• 2 x ethernet cables;
• 1 x quick start guide;
• 1 x warranty card.
2.3.2
System requirements
P-Link Nano does not have any particular requirement. It can work with any computer or device that has an operative
system with network support (that is a network card with ethernet port).
2.3.3
Connecting P-Link Nano
This section can help the user in connecting P-Link Nano to a computer (or other network device). In order to connect
P-Link Nano you need to follow the steps below:
1. Use the ethernet cable in the package in order to connect P-Link Nano to the ethernet port of your modem/router and plug the device to power socket.
2. Use the ethernet cable in the package in order to connect the second P-Link Nano to the ethernet port of your
PC (or network device) and plug P-Link Nano in a power socket.
NOTE
Please do not use multiple power sockets because they can interfere with data transmission. We
suggest to use wall socket in order to achieve the maximum allowed speed.
3. Once plugged in 2 P-Link Nano adapters (as described above), the network is fully configured and you can
start using it. In order to protect (encrypt) your network, please follow the procedure described in section 2.4.1.
4
TELE System
2.4
Advanced usage of P-Link Nano
Data exchange by using electrical system can be encrypted in order to protect the privacy of your network. This
section can help you in using the Security button on P-Link Nano. Data encryption can be activated by simply
pressing the Security button for 1-3 seconds on all the P-Link Nano in your network (within 2 minutes).
2.4.1
Network encryption
In order to encrypt the network among 2 or more P-Link Nano, simply press security button on each P-Link Nano for
1-3 seconds. By pressing this button the network will be encrypted with a random password.
NOTE
Powerline adapter cannot be configured in stand-by mode. All the powerlines are configured with the same
default password set by the factory process. This is done because if you want to add another P-Link Nano
in your network, you can do it automatically (by connecting the new adapter to a power socket) without the
need of pressing the security button in all the devices in your network.
Next subsections will describe some possible scenarios:
2.4.1.1 Protect a new network between 2 P-Link Nano
Once that 2 P-Link Nano are connected as explained in section 2.3.3, press on each device the security button and
held on for 1-3 seconds (within 2 minutes). Now the network is protected from any unauthorized access.
2.4.1.2 Expand an existent network by adding a new P-Link Nano
If the network is encrypted by using security button, press (for 1-3 seconds) the security button of the powerline to
add. Now the new P-Link Nano is connected to the existent network. In order to add other P-Link Nano you need to
do again the same procedure described above.
2.4.1.3 Remove a P-Link Nano from an existent network
In order to remove a P-Link Nano from your network, press for 6-10 seconds its security button. This device will
receive a random password and it will leave the previous network.
2.4.2
Factory Reset
If you want to come back to factory settings for P-Link Nano you can do it by simply press and hold the RESET/PAIR
button of the device for about 12 seconds (that is until the power led blinks).
2.4.3
Speed Increase
In order to have better performances, please follow the suggestions below for avoiding interference issues:
• Avoid multiple power sockets. Wall power socket are strongly reccommended in order to have
maximum speed.
• Put the PC and/or network device not so close to P-Link Nano in order to avoid interference.
• Do not use the same multiple power socket for 2 different powerlines.
5
P-Link Nano
3
Technical Specifications
Standard
Protocols
Speed
Modulation
Range
Encryption
LEDs
Consumption
Input Voltage
Temperature
Humidity
Weight
Size
Requirements
Security
Accessories
Certifications
6
Ethernet IEEE 802.3,IEEE 802.3U HomePlug AV
CSMA/CA via electrical system
up to 200 Mbps (PHY)
1024/256/64/16/8-QAM, QPSK, BPSK, ROBO
max 300 meters
128-bit AES via powerline, Encryption activated by pressing security button on
the device
3 LEDs: status, PLC network, ethernet LAN connection
max 2.5 W
AC 110-240 V 50/60 Hz
storage: -45 °C - 70 °C, usage: 0 °C - 45 °C
10 - 90 % (non condensing)
63 g
53 x 53 x 27 mm ( HxWxD)
Ethernet interface, any O.S. with TCP/IP support
FEC (Forward Error Correction) e Re-Trasmission
Security button (in order to pair the powerlines)
2 Ethernet cables, quick start guide, warranty card
2004/108/CE (EMC), 2006/95/CE (LVD), RoHS
Product Code
Powerline Adapter
23500064
TELE System P-Link Nano
CE conformity declaration
TELE System Electronic states that this product meets the basic European
requirements of 1999/5/EC, including 2004/108/EC (EMC - Electromagnetic
Compatibility) and 2006/95/EC (LVD - Low Voltage Directive), 2009/125/CE
(Eup/Erp) and 2002/95/UE (RoHS).
Flavio De Poli, Chairman
ITALY
Rev. 00, 24/03/2014
TELE System Electronic Srl
Via Dell’Artigianato, 35
36050, Bressanvido (VI), Italy
Web: www.telesystem-world.com
(Italy only) Tel. Assistenza Guasti: 199 214 455