1
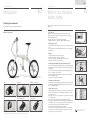
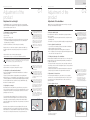
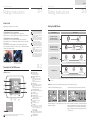
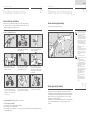
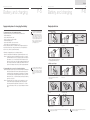
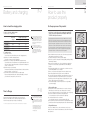
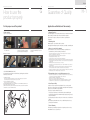
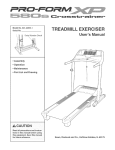
Contents
A. Introduction
A-1 Mando Footloose parts identification… ……………… 0 3
A-2 Checking the components… ……………………………… 0 4
B. Items to be checked before riding… …… 0 5
C. Adjustment of the product
C-1 Adjustment of seat height…
C-2 Adjustment of handlebar…………………………………… 0 7
………………………………
06
“ Welcome!
You are the owner of
‘Mando Footloose’,
the city’s latest
transport system that will
change your lifestyle.”
D. Riding instructions
D-1 How to ride………………………………………………………… 0 8
D-2 Description of HMI display… ……………………………… 0 8
D-3 Setting the HMI modes… …………………………………… 0 9
E. Folding Instructions
How to fold / tips for folding……………………………………… 1 0
F. Batterie und Aufladen
F-1 About battery maintenance………………………………… 1 1
F-2 About replacing the battery………………………………… 1 1
F-3 Description of the battery… ………………………………… 1 2
F-4 Before charging the battery………………………………… 1 3
F-5 Appropriate places for charging… ……………………… 1 4
F-6 Charging Instructions…
F-7 How to check the charging status……………………… 1 6
F-8 Duration of charging…………………………………………… 1 6
………………………………………
15
G. How to use the product properly
This manual is prepared for you to use Mando Footloose properly
and give helpful tips for adjusting and maintaining the product.
It is very important to read this manual before using
Mando Footloose, so you can fully understand the product.
For the proper use of the product…
…………………………
17
H. Guarantee of quality
H-1 Application and limitation of the warranty…
H-2 Registration of a genuine product …
………
20
…………………
21
Please notice the safety information and warnings shown
throughout the manual. This will prevent injury or problems during
the operation of Mando Footloose.
If you need more information or have any additional inquiry, please
contact the store.
Thank you for purchasing Mando Footloose and congratulations on
your wise choice.
If there is any discrepancy between this manual and “parts
information from the manufacturer”, it is recommended to follow
“parts information from the manufacturer”.
I. Accessories
H-1 Light ………………………………………………………………… 2 3
H-2 Bell …
H-3 Reflector…
24
Advantages of Mando Footloose
25
• Compact and refined design
H-4 Anti folding strap………………………………………………… 2 6
• New generation of transport
…………………………………………………………………
…………………………………………………………
J. Specification……………………………………………………… 2 7
• Comfortable ride
English
03
A new way of moving
Symbol Description
A-1
Introduction
Mando Footloose parts identification
15
16
Safety: It represents safety warnings that may affect safety.
17
Warning: It represents cases which may cause death or serious injury
/ injury due to inappropriate handling.
18
Caution: It represents cases which may cause damage to the product due
to inappropriate handling.
Point: It represents key points for proper operation and maintenance.
Don’t: It represents actions that should be avoided for safety.
19
1
2
3
4
5
6
Seat
Seatpost
Seatpost clamp
Rear frame
Folding lever
Alternator
7
8
9
10
11
12
13
Motor
Pedal
Rear wheel
Front frame
Center frame
HMI(Information Display)
Throttle lever
14
15
16
17
18
19
Handle grip
Handlepost height clamp
Handlepost
Handlepost folding clamp
Fork
Front wheel
English
04
Mando Footloose user manual
Introduction
A-2
Checking the components
05
A new way of moving
B
Items to be checked
before riding
Before riding, check the components included in the box.
Before every ride, it is important to carry out a safety checks to avoid any
problems
Mando Footloose body
1. Tire pressure
MAX 70psi / Use a proper pump when pumping air into the tires. (The
number is based on the original tire installed to the product. Air pressure
may vary with the type of tire)
- Excessive air pressure -> Uncomfortable riding quality
- Insufficient air pressure -> May cause a flat tire, inflexible handling.
2. Battery energy check
HMI-battery
- The remaining amount of energy in the battery can be checked on the HMI
screen.
(For more information about charging the battery, please refer to ‘F. Battery
and Charging’)
3. Brakes
- Check that front and rear brakes work properly.
(Front brake -> left lever, rear brake -> right lever)
- Practice using the brakes by gripping the brake levers gently.
(Abrupt use of the brakes may cause injuries)
Manipulating the brake lever
4. Seat height and handle height / adjustment and locking
- Incorrect seat height and handle height may cause uncomfortable riding and
handling and reduce a rider’s coordination of the bike which may potentially
cause injuries.
(For more information about adjusting seat height and handle height, please
refer to ‘C. Adjustment of the Product’)
- When the handlepost clamp / handlepost folding lever is not fixed tightly
the steering might be affected.
(The rider may lose balance and get injured.)
Handlepost clamp
5. Changing operating modes
Light
Rear reflector
HMI (Information display)
- To understand: Practice changing operating modes before riding. (For more
information about HMI setting including switching operating modes, please
refer to ‘D. Riding Instructions’)
Handlepost folding lever
6. Other safety checklist
Bell
General battery charger
*A user manual and warranty are included.
*Components of this product may be changed, without prior notice, to improve the function of the product.
High speed battery charger
(sold separately)
- During night riding, ensure that the front / rear reflectors are fixed, clean and
work properly for identification and safety. Additional lighting is essential in
most countries by law.
- Ensure that shoe laces are secure. (Untied shoe laces may be caught up by
a pedal or crankshaft)
- Ensure that each part of the bike is fastened properly for operation.
(Check tightness and operation of all parts including the brake cable and pedals)
Loosely fixed screws or bolts may cause injury and excessively tight screws
or bolts may affect operation and cause damage to the product.
- Ensure that the front / rear wheels are correctly aligned.
-> Bounce the front / rear wheels by lifting it up 2~3 inches off the ground.
-> Rock the front / rear wheels side to side. If any movement or wobbles
are detected, do not operate the product.
HMI-Operatingmode
If any defect listed in the checklist is
found, please contact the store.
English
06
Mando Footloose user manual
C-1
Adjustment of the
product
07
A new way of moving
Adjustment of seat height
Adjustment of the handlebar
For riding Mando Footloose, it is important to place the seat properly and
adjust the height. When adjusting the seat, adjust (1) the height first and then
(2) the front and back part of the seat.
Mando Footloose has a foldable handle system for which you can adjust
the angle of the handlebar and its height.
1. Adjusting the seat up and down
How to check the seat height
1) Sit on the seat.
2) Put one heel on the pedal.
3) Adjust the seat height so that your heel is parallel to the axis of pedal and
you can almost straighten your leg (However, it is not recommended to
straighten your leg completely).
4) Get into and off from the seat when the product is standing.
Enquire at the store to learn how to adjust the optimum seat height. If you
would like to adjust the seat height by yourself, you have to ensure the following.
The first point to consider before a ride
is to adjust Mando Footloose to your
body. Proper adjustment allows comfortable riding and safety. Should you have
any difficulty with the adjustment, please
contact the store. Even though you
have completed the fitting (adjustment
of Mando Footloose to yourbody) with
proper skills and tools, it is encouraged to
confirm your adjustment with the store.
If Mando Footloose is improperly fitted,
you may lose control or get injured such
as joint injury during a ride.
5) Ensure that the seatpost clamp is tightened properly.
6) Ensure that the seat post is not above the ‘minimum insertion’ line
If you pull the seat post too far out of the seat tube, then the clamp can no longer secure the seat post
sufficiently. The seat post could come loose or break during the riding. There is a risk of accident and
injury. Do not pull out the seat post beyond the minimum insertion depth.
7) Ensure that the seat is not twisted to one side.
8) Ensure that the seat is properly clamped to the seatpost
2. Adjusting the seat forward and backward
As the seat is adjustable in forward and backward directions, it enables an
optimal seat position.
For proper operation and better charging efficiency when pedaling with
Mando Footloose, it is recommended to set the pedal position so it can rotate
continuously. Adjust the seat forward and backward by aligning the imaginary
line vertically drawn from knee cap with the axis of pedal.Within this range,
find the most comfortable position.
3. Adjusting the seat angle
Most riders prefer the seat parallel to the ground. However, some prefer to
raise or lower the front part of the seat. If you have pain while sitting on a seat,
lowering the front part of the seat may help reduce it (however, the center of
gravity may move to the front).
The seat fastening clamp of Mando Footloose is in the form of 2 bolts, 1
at the front and 1 at the back. Adjust the seat to ensure that the seat lies
horizontally or at a preferred angle by screwing the front and back bolts in
turns. A little difference gives a large effect on the performance and comfort of
Mando Footloose.
Nevertheless the seat height has been properly adjusted, if the slope and
front/back position of the seat is not balanced, you may feel uncomfortable
while riding. Also, the seat provided with the product may not fit to your body.
In this case, it is encouraged to ask assistance of a specialist at the store.
C-2
Adjustment of the
product
1.Setting the handle height
The height at which a rider feels comfortable when going up and down a
slope or cornering
- If the handle is too low you may experience backache, neck pain or wrist
pain during a ride.
- If the handle is too high you may find the handling is unsteady during a ride.
If you pull the handle post too far out of the
head tube, then the clamp can no longer secure the handle post sufficiently. The handle
post could come loose or break during the
riding. There is a risk of accident and injury.
Do not pull out the handle post beyond the
minimum insertion depth.
2. How to adjust the handle height
-
Loosen the lever of the handlepost clamp located under the handlebar.
Adjust the handle to the desired height.
After ensuring the alignment of the handle, tighten the clamp lever
Note : the tightness of the lever may be adjusted with the adjustment screw
on the other side of the clamp to the lever
Minimum insertion line
3. Finding the right angle of the handlebars
Adjustment of the seat
Tighten clamp bolts properly. Loosely
screwed bolts may cause wobbling and
fatigue during a ride, or may cause you to
fall off from the bike.
After seat adjustment ensure that it is
secured properly before riding.Losely placed seat clamp or seatpost clamp
may cause damage to the seatpost. Due
to this damage, you may lose control and
fall off the bike.
The seat is designed for general sizes;
therefore, it does not correspond to every
rider’s pelvic shape and sitting habits. If
you are unable to find a comfortable position, and it causes consistent pain even
after seat adjustment, it is encouraged to
replace it with another type of seat.
In some cases, riding with a improperly
positioned seat may cause minor or severe injury (e.g. It may chafe skin and
cause prostate pain/numbness, knee
pain, etc) Should you feel uncomfortable
or have pain, stop riding and visit the
store for specialist assistance.
While holding the handlebars, with the clamp bolts loose set the angle of the
handle at which you can perform throttling and braking comfortably. Then
re-tighten the clamp bolts.
- If the angle of handle is not properly set, it may cause finger or wrist pain.
- Place fingers on the brake levers and adjust the angles so they lie parallel to
the extension line of the arm.
- Setting the angle of brake lever: adjust it with the brake lever clamp bolts.
- Setting the angle of the throttle lever: adjust it with the throttle bolts.
4.Adjustment of the brake lever
If it is hard to grab the handle due to your hand size, it is encouraged to
contact the store or a specialist to adjust the lever reach. There is a small
screw inside of the lever, but adjustment also needs the cable end stop
adjusting to match
Warning: it is important to adjust the
brake properly so you can easily reach
the brake lever. It is recommended to
set the brake at which produces the
best braking power within the adjustment
range of the brake lever reach.
• If the brake lever reach is too short:
you may find it too stiff orhand pain.
• If the brake lever reach is too long:
it may not produce the best braking power.
5. How to adjust seat post
Note
1) There is a clamp below
the seat.
2) Open the seat clamp lever
completely.
3) Grab the fore part of the seat
to measure adquate height.
1) Check whether the sit front is on
the straight line with the handle post.
Minimum insertion line
4) Adjust to the heithgt that fits
the user.
(Do not pull out seat post beyond
the minimum insertion depth.)
5) Close the lever.
2) If the sit moves or goes down with the
lever closed, turn the nut beside the
clamp to clockwise
English
08
Mando Footloose user manual
D-1
Riding instructions
09
A new way of moving
D-3
Riding instructions
How to ride
Setting the HMI Modes
Mando Footloose allows two ways of riding.
1. Riding Mando Footloose by pedaling
Start Mando Footloose off by pedaling as if so for general bikes.
Mando Footloose accelerates proportionally to the number of pedal rotations.
2. Riding Mando Footloose by throttling
Start Mando Footloose off by pushing the throttle lever slowly with your
thumb. Mando Footloose accelerates proportionally to the degree of pushing
the throttle lever.
(Each country has a different regulation for the maximum speed in electric
mode. It is limited to 6 km/h in some of EU countries, 32 km/h in the USA and
25 km/h in the Republic of Korea.)
Ensure that the number of pedal rotations
does not exceed 90 rpm (rotations per minute). Excessive number of rotations may reduce the lifetime and cause breakdown of the
product due to overload.
The optimal range of the number of pedal
rotations is 30~60 rpm (charging information
appears on the screen when the number of
pedal rotations is more than 30 rpm).
Check the degree of acceleration force by
operating the throttle lever. In judicious operation of the throttle may cause an accident.
Do not operate the throttle in situations other
than riding (e.g.when rolling Mando Footloose
or standing).
The maximum speed does not exceed the
maximum speed regulated by each country
even when the throttle lever is pushed to its
deepest point (when it is accelerating to its
maximum, the maximum speed may vary
with slope of the road, a head wind, the body
weight of a rider and/or charging status.
1) Insert HMI to HMI mount
2) Push HMI down completely
until to hear “click” sound.
Description of the HMI screen
‘Select’ button
‘Mode’ button
Transmission setting 1
(Manual transmission
-> Automatic transmission)
Automatic transmission
Transmission setting 2
(Automatic transmission
-> Manual transmission)
Manual transmission
Low speed / high torque
Ridingsettings
(Riding by pedaling only)
if under the same rpm (number of pedal rotations)
D-2
Smooth pedaling
/ low power generation
Transmission settings
Auto: automatic transmission
Manual: manual transmission
Riding settings (applicable only when
pedaling)
Eco: slow acceleration / low battery use
Normal: average acceleration / average
battery use
Hard: fast acceleration / high battery use
Pedaling settings
Soft: smooth pedaling / low power generation
Medium: normal pedaling / normal power
generation
Hard: heavy pedaling / high power generation
Fast acceleration
/ high battery use
Slow acceleration
/ low battery use
Pedalingsettings
HMI Main Screen
High speed / low torque
Heavy pedaling
/ high power generation
if under the same rpm (number of pedal rotations)
- When the product is turned on, it is automatically set to ‘Auto’ for transmission setting, ‘Normal’ for riding settings and ‘Soft’ for pedaling settings.
- The ‘Auto’ mode of the transmission setting allows for automatic transmission, and it is automatically set to Auto 2 when turned on and as Auto 1 when going
down a slope.
Alarm: Mando Footloose has an alarm function that shows a critical status of the product.
1.Alarm for the remaining battery capacity.
2. When the product has a problem (may be self-detected)
Independent power generation
Power generated from the alternator by pedaling
Current speed
Current riding speed (km/h)
MODE
SELECT
Trip distance Mileage (km)
*Initializing the mileage: Push the ‘Select’ button for more than 2 seconds.
Low Battery
Please charge
the battery
HMI
Remaining amount of battery
Current remaining amount of battery
‘Mode’button
Use to change between modes
‘Select’button
Search the menu to select one of the following:
Automatic transmission set 1 -> auto transmission set 2 -> setting Riding mode -> Pedaling mode (repeated)
00368
the function of the automatic transmission may be affected by the body weight of
a rider, road condition, slope of the road and / or wind.
‘Power On / Off’button
Power On / Off (turning the bike on/off). Push the
button for more than a second to turn it on / off.
Total cumulative mileage
Total cumulative mileage
Charge the battery as soon as possible if the screen in the
picture above appears.
When the product has a problem, a red warning sign will
appear in the top right area as shown in the picture above.
If the warning sign does not disappear after turning the
HMI on / off (more than once), stop using the product and
contact the store.
English
10
Mando Footloose user manual
Folding instructions
E
A new way of moving
Battery and charging
11
F-1
How to fold/ tips for folding
About maintaining the battery
Mando Footloose is designed to be foldable so the volume of the product can
be reduced to allow easier storage and transport. Folding can be done by
operating the folding lever located in the center.
The battery is located inside the rear frame.
1. How to fold Mando Footloose
① If you find any unusual circumstance
such as a smell or deformation of
the frame around the battery, stop
operating the product.
- If the product is operated under such
conditions, it may generate heat,
cause a rupture or a fire. If you find
any such problems, do not operate
the product and contact the store.
② Do not disassemble the product.
Do not deform or disassemble the
battery.
- It may generate heat, cause a
rupture or a fire.
③ Do not store the product with a completely discharged battery for a long
period of time (over 3 months).
- This may be the cause deterioration
of the battery.
OFF
1) Ensure that the power is off.
2) It is recommended to stand on the left
side of Mando Footloose with the front
wheel heading forward.
3) To fold the handlepost, loosen the
handlepost clamp folding lever and lift
the whole clamp upward.
4) When the handlepost clamp is lifted,
the whole handlepost can be folded
backward to its left side.
5) Check that the right pedal is forward the
cranks horizontal (incorrectly aligned
pedals may damage the frame).
6) U
nlock the folding lever located in the
center frame by pulling it up (hold the
upper part of the front frame with your
left hand and lift the folding lever with
your right hand).
7) Hold the position of rear wheel with
your right foot against the tire so Mando
Footloose does not move during folding,
fold Mando Footloose by lifting the seat
or centre frame up.
8) Hold the seat or frame with your left
hand and push down the folding lever to
the ‘fixed position’ with your right hand.
9) Use the handlebar alignment grip to lock
the steering with the wheels parallel.
2. Unfolding Mando Footloose: Reverse the steps above.
3. Tips for folding / unfolding
1. Ensure that the power is off before folding / unfolding.
2. Do not turn the power on during folding.
3. After unfolding, lock the folding lever so it is closed properly. If the folding lever is not fixed completely, it may cause
a problem during a ride.
① Do not leave the product in hot
areas such as inside a car or beside
a heater.
- If it is stored in hot areas,
the capacity of the battery may be
reduced which may shorten the
range, and an internal safety switch
may be activated to disable the
battery for a time.
② Before storing the product for a
long period of time, ensure that the
battery is fully charged to ensure a
longer battery lifetime.
③ Do not operate the product at a
temperature below- 10°C.
- It may reduce the lifetime of the
battery.
④ Do not operate the product at a
temperature higher than 40°C.
- It may reduce the lifetime of the
battery.
About replacing the battery
If battery replacement is required (battery replacement is a paid service).
The replacement schedule varies with the operating environment, temperature
or charging habits. However, the battery has to be replaced if the range per
battery charge becomes too short, the battery does not recover and the
performance of the product deteriorates.
(In the winter, the range per battery charge reduces due to low temperatures.
It recovers as the temperature goes up, so battery replacement is not
required).
F-2
English
Mando Footloose user manual
Battery and charging
12
F-3
Description of the battery
1. About the lithium-ion battery equipped in Mando Footloose
The battery equipped in Mando Footloose is a lithium-ion battery which produces a high output, leading to high capacity and performance. Compared
to the conventional nickel-cadmium cell or nickel-hydrogen cell, it can store a
high amount of electricity within a small-sized / light-weight battery.
2. Features of the battery
1) Batteries are susceptible to hot or cold temperatures. In a battery, charging
and discharging occurs by chemical reactions. The chemical reactions
are affected by the temperature and the performance of a battery is highly
influenced by hot climate in the summer and cold climate in the winter
(avoid operating the product at a temperature below - 10°C or above 40°C.
It may reduce the lifetime of the battery).
2) A battery naturally discharges. The discharged amount is recovered after
charging before use.
3) A new battery may not show the best performance at first use. It will be
maximized after 2~3 times of use (if you don’t see any improvement,
contact the store).
3. Degradation during winters
The range may shorten or speed may decrease due to the low output in cold
temperature eg below - 10°C. However, it recovers as the temperature gets
warmer (when it is at the optimal temperature). Therefore, it is recommended
to keep the battery at room temperature before use.
4. How to maintain the battery when it is hot
Avoid charging the battery directly after a ride or charging in a hot place such
as near a heater. It may shorten the life or range. If the temperature of the
battery is too high, it may not function.
1) A lithium ion battery discharges slowly compared to the conventional
batteries, but completely discharging it may reduce the lifetime of the battery. If you need to keep the battery for a long period of time (more than 1
month), keep it in a cool, dry place after fully charging it.
2) A lithium-ion battery is susceptible to high temperatures.
- Do not keep the battery in hot places such as inside a car under the sun
or beside a heater in winter time.
- Do not recharge a fully charged battery.
5. Factors that affect the lifetime of the battery
1) A lithium ion battery discharges slowly compared to the conventional
batteries, but completely discharging it may reduce the lifetime of the battery. If you need to keep the battery for a long period of time (more than 1
month), keep it in a dry place after fully charging it.
2) A lithium-ion battery is susceptible to high temperatures.
- Do not keep the battery in hot places such as inside a car under the sun
or beside a heater in winter time.
- Do not recharge a fully charged battery.
A new way of moving
Battery and charging
13
F-4
Before charging the battery
Even though the battery has a high quality its capacity decreases as it is charged
and discharged repeatedly; thus, a
replacement is necessary (as with any
other battery).
Cautions when charging the battery:
1) If a charging plug gets unplugged while charging, do not plug it back in
right away in order to prevent any possible false operation. Plug it back in
after 5~10 seconds.
2) Do not keep the Mando Footloose charger in a place where children or
pets can reach it.
- It may be dangerous or cause a fire due to their unexpected behavior.
3) Do not touch the power plug of the Mando Footloose charger or charging
socket with wet hands.
- The socket may be contaminated with foreign substances.
4) Always use the Mando Footloose(original) charger.
- If you use a charger other than Mando Footloose charger, it may generate
heat, cause a rupture or a fire. Do not use other types of chargers.
5) Do not use Mando Footloose charger for other electronic appliances.
- The Mando Footloose charger is designed only for Mando Footloose.
Even with the same type of socket, do not use the Mando Footloose
charger to charge other products. It may cause a fire or damage.
6) To maintain the Mando Footloose charger, keep the following in mind:
- Do not bind or roll the power cord when using it for charging. Do not
damage or make an alteration to the power cord. Do not bend or twist
the power cord by force.
- Do not put a heavy object on the power cord or do not fix the power cord
with a nail.
- Do not use a damaged power cord (a power cord with disconnected or
exposed wires).
It is very dangerous as it may cause a fire or electric shock. If you find any
defect, do not use it and contact the store.
7) Do not disassemble or rebuild the Mando Footloose charger.
- It may cause a fire or electric shock.
8) Do not place the Mando Footloose charger on a high surface such as a table.
- It may fall off the table and cause injury.
9) Do not leave the Mando Footloose charger connected to house hold
current.
- Dust accumulated on the electrical outlet may cause a fire. When the
Mando Footloose is not in use, keep the power cord unplugged from the
electrical outlet for safety.
10) Do not immerse the Mando Footloose charger in water or do not leave it
in rain.
- Using a charger that is wet is very dangerous as it may cause a fire. If
it is wet, unplug the power cord from the electrical outlet and have it
checked at the store.
11) Do not charge near inflammable vapours.
- It maycause a fire.
12) If Mando Footloose is not in use for more than 10 days, “Deep sleep
mode” would be activated to protect the battery. It can be awaken
bycharging the battery 1~2 times for 1 minute each
1) Ensure that the Mando Footloose
charger is placed on an even and
stable place.
- The power cord may bepulled by an
object, or it may fall off from a height,
and become malfunctioned.
2) Do not drop the Mando Footloose
charger from a height or hit it.
- It may not work properly or may get
damaged.
3) Do not put a cover or an object on
the Mando Footloose charger. Also,
do not use multiple Mando Footloose
chargers stacked or attached to
each other.
- The interior of the chargers may become hot and may not work properly.
4) Do not step on the Mando Footloose
charger.
- It may cause a failure or damage.
5) Ensure that the sockets on the Mando
Footloose charger and the main body
are not wet or dusty.
- It may cause a failure in charging the
battery or damage. Always keep the
sockets clean.
6) Do not attach metal to the sockets.
- It may cause a failure.
7) Do not use the AC power of a car.
- Always use the household current to
charge the product.
8) Do not leave the Mando Footloose
charger connected to household
current after fully charged.
- It may cause a failure due to lightning
or other factors. When the Mando
Footloose charger is not in use, keep
the power cord unplugged from the
electrical outlet for safety.
English
Mando Footloose user manual
Battery and charging
14
F-5
Appropriate places for charging the battery
1. Appropriate places for charging the battery
Charge the battery at a place where the following conditions exist:
- A flat and stable place
- A place away from water or rain
- A place not exposed to direct sunlight
- A well ventilated dry place
- A place which children or pets cannot reach
- A place with a room temperature between 0~30°C.
However, during hot summer or cold winter time, charging may begin, but
may be discontinued. Try to charge the battery at a room temperature between 15~25°C, which is optimal for the battery.
- Summer: charging at a place exposed to the direct sunlight and charging the
battery directly after a ride. Even though charging may begin normally, it may be discontinued when the temperature of the battery
exceeds the possible charging temperature in order to protect the
battery. In this case, cool down the battery and charge the battery
again at a cooler place.
- W i n t e r : charging outdoor, at a cold place such as a warehouse, or near
a heater. Even though charging may begin normally, it may be
discontinued when the temperature reaches below 0°C in order
to protect the battery. In this case, charge the battery at a warmer
place.
Battery and charging
F-6
Charging Instructions
Despite the battery charging temperature
is between 0~30°C, when the battery is
stored at a place exposed to the direct
sunlight or directly after a ride, charging
cannot be initiated as the interior temperature of the battery is out of the range
of possible charging temperature. It may
take up to 3 hours to reach the possible
charging temperature in a place with a
room temperature of 30°C.
1) Examples of appropriate places for charging the battery
- Summer: a shady and well-ventilated place (optimal temperature 15~25°C)
- W i n t e r : a warm place where the temperature is kept above 0°C at night
(optimal temperature 15~25°C) Charging is possible at a temperature between 0~30°C. However, if the interior temperature of the
battery is out of the range of possible charging temperature directly
after a ride, then it will enter a ‘standby state’ until the interior temperature of the battery reaches the possible charging temperature.
2. Inappropriate places or ways for charging the battery
15
A new way of moving
1. 2A General Charger
1) Plug the power cord into an electric
outlet.
2) Connect the charging plug to Mando
Footloose.
4) When charging is completed (the green
lamp of the charger means ON), disconnect
the charging plug from Mando Footloose.
5) Unplug the power cord from the electric
outlet.
3) Charge (the red lamp of the charger
means ON).
2. 4A High-speed Charger
Occasionally, charging the battery near
electric appliances like TV or radio may
cause noise in the radio or may distort
the image on TV. In this case, charge the
battery in a place away from the electric
appliances.
1) Ensure that the power of the charger is
‘OFF’. Plug the power cord into an
electric outlet.
2) Connect the charging plug to Mando
Footloose.
3) Turn on the power of the charger.
4) Charge (the red lamp of the charger
is ON).
5) Charging completed (the green lamp of
the charger is ON).
6) Turn off the power of the charger.
7) Disconnect the charging plug from
Mando Footloose.
8) Unplug the power cord from the electric
outlet.
do not disconnect the charging plug from Mando Footloose while charging. It may
cause false operation or a failure.
if charging does not begin properly, turn off the power of the
charger and retry charging.
English
16
Mando Footloose user manual
Battery and charging
F-7
For the proper use of the product
1. How to check the charging status
1. Safety tips: for safe riding, safety equipments required. Be
aware of the safety requirements (including the NATIONAL
TRAFFIC LAWS) and follow them.
2A General
Charger
4A High-speed charger
Left Lamp
Right Lamp
Off
Power Off
Off
Off
Standby
Red
Red
Off
In Progress
Red
Red
Red
Completed
Green
Red
Green
2. Troubleshooting
1) Power LED is not ON
- Check if AC power is ON and if the power cord is plugged properly.
2) Red LED is not ON while charging the battery
- Check if the charger port is properly plugged.
3) Red LED does not change to green LED while charging the battery
- Check whether the room temperature is at the optimal temperature. If red
LED is still ON at the optimal temperature, it indicates that the battery has
a failure - contact the store.
4) Red LED changes to green instantly
- It indicates that the battery is fully charged. Otherwise, it indicates that the
battery has a failure - contact the store.
5) Green LED is ON even though the battery is not fully charged
- Repeat recharging the battery after completely discharging 2~3 times. If
you still have the same problem, contact the store.
Time to Charge
Using a general charger, it usually takes about 5.5 hours when the
battery icon on the HMI screen is completely empty (it takes about 3
hours when using a high-speed charger, sold separately).
* The time to fully charge a battery varies with the condition of the battery and the room temperature.
Even though charging may begin normally, it may be discontinued when the battery temperature exceeds the possible
charging temperature in order to protect
the battery. In this case, cool down the
battery and charge the battery again at
a cooler place
Despite the battery is at between 0~
30°C, if the battery is charged at a place
exposed to direct sunlight or directly after
a ride, charging cannot be initiated
because the interior temperature of the
battery is out of the possible charging
temperature range.
Carrying lighting devices and reflective material on your Mando Footloose vehicle
is important for your safety. Seeing and to be seen while participating in traffic conditions is key. All member states of the EU have their own dedicated local national
regulations with regards to lighting and reflection, the way how these should be
carried and the conditions and timing when these should be carried. Please make
sure you are fully aware of the national regulations which apply to your personal
situation and please make sure your vehicle is equipped with the proper lighting
and reflective material in conformity with these national regulations.
1) Wear a helmet that meets the safety code. Follow the steps, instructions
and suggestions stated in the user manual.
2) Conduct a safety inspection with a specialist regularly.
3) Practice the operation of the product including pedaling, handling, braking
and throttling in advance.
4) Wear a pair of comfortable shoes. A lose cloth might get caught by the
product. Do not wear sandals or pedal with bare feet when riding the
product.
5) Use lights and wear bright colors so pedestrians or car drivers can notice
you when riding Mando Footloose at night.
6) Protect your eyes by wearing sunglasses when the sunlight is strong.
7) Wear safety equipment and use lights to meet local traffic laws.
8) Do not perform any stunts while riding. Stunts and dangerous actions can
bring instant excitement, but it may harm the product or cause injuries.
9) Operate the product at the appropriate speed depending on the circumstances. Higher speeds may increase danger.
10) The maximum weight of a rider for this product is 100 kg (including
personal belongings).
F-8
If you find any problem while charging a
battery, turn off the power of the charger
immediately, disconnect the charging
plug of the charger from the product, and
unplug the power cord from an electric
outlet.
* Charging a battery that has not been
used for a long period of time may
take longer and as long as the red
LED is ON, you may consider it as
working properly.
G
How to use the
product properly
How to check the charging status
1) Indication by the charging lamp
17
A new way of moving
Wear a helmetthatmeets the safety code
Safety equipment
2. Motor and Alternator
1) Ensure that the number of pedal rotations do not exceed 90 times per
minute (Excessive rotations may cause a damage due to overheat).
2) Do not use high pressure washers to clean the product. Use a soft sponge.
3) The motor and alternator shouldn’t be submerged in water.
=> It is waterproof but only at the normal level for daily living.
4) Do not disassemble the motor or alternator.
If you disassemble the motor or alternator warranty will be void.
5) Do not operate the product in reverse direction at a speed higher than 5 km/h.
(avoid reverse rotations. It may damage the product due to abnormal voltages)
3. Regular Maintenance
For safe use of Mando Footloose, have a maintenance service every 6
months at the store. Perform the first maintenance service within 2 months of
date of purchase.
Do not disassemble
Avoid reverse rotations
English
Mando Footloose user manual
How to use the
product properly
For the proper use of the product
4. Safety Tips for Riding
1) Follow the road regulations and traffic rules in the local area.
2) Assume that others cannot see you during a ride.
3) Mind the cars that are moving slowly, turning and following, opening of
doors of parked cars, children and pets on the road.
4) Secure a clear view and mind obstacles on the road such as a construction
site, railroad or uneven road.
5) Before passing an intersection, stop temporarily at the intersection and look
at both directions.
6) Always follow the traffic regulations when turning or crossing a street.
7) Do not wear earphones during a ride.
8) Do not carry someone on your back during a ride. Do not link the product
with a towing device such as a trailer.
9) Do not install any equipment that may block the view or interrupt the
operation of Mando Footloose.
10) Do not obstruct pedestrians or cause fear by jumping out, driving dangerously or swerving intentionally.
11) Do not ride Mando Footloose after drinking alcohol.
12) Avoid riding Mando Footloose in bad weather.
13) Do not press the throttle lever while rolling Mando Footloose.
14) This product is designed to be operated on paved road. It is not
appropriate for riding on uneven roads, off road, racing, jumping or stunts.
Inappropriate use may damage the frame.
15) If too much pedaling speed is used (over 90 rpm) the internal circuit
protection may be over riden.
16) For braking, always use the right brake (rear brake) first and then the left
brake (front brake).
17) Depending on the repeated use of the brakes, the disk brakes may produce a noise. When it produces a noise, contact the store to adjust the
gap between the brakes.
18) Ensure that the folding lever is completely locked after unfolding Mando
Footloose. If the folding lever is not completely fixed, it may cause a
problem during the ride.
19) Do not operate the motor while braking.
20) Do not hit the HMI or detach it from the product while riding.
21) Do not turn the power off while riding.
22) Do not turn the power on while throttling.
23) If the distance going up a hill is too short, the gear may not shift to the
‘hill mode (the first gear)’ during a ride under the automatic transmission mode.
24) If the frame of Mando Footloose is deformed, the automatic transmission
mode may not operate properly.
25) If Mando Footloose is hit by something during a ride, the automatic transmission mode may not operate properly.
26) After shifting to ‘hill mode’ (the first gear), the riding speed is limited
(low-speed and high-torque mode).
27) When riding up a hill at a low speed, the automatic transmission may not
operate properly.
28) Do not operate the product if it was disassembled and rebuilt by the user.
18
G
19
A new way of moving
G
How to use the
product properly
For the proper use of the product
Cautions in rainy weather:
in rainy weather, it is hard for a tire to grip the road. Also, it is hard to secure the safety of the rider
and other car drivers due to low braking power and unclear visibility. Wet roads increase the risk of
accidents. Ensure the product is only used at low speeds and learn how to stop safely on a wet road,
by braking gently.
Suggestions for a night ride:
riding Mando Footloose at night is more dangerous than riding it during day time. Try to avoid riding at
night or in early mornings since a rider cannot be seen by other car drivers or pedestrians. For a ride at
night or in early mornings, use lights and wear safety accessories.
Securing a clear view
Use a light during a night ride.
Check regularly if the rear reflector is well attached to the product.
Do not remove the rear reflector. It is necessary for safety. Without the rear reflector, an accident may
be caused because a rider cannot be seen by car drivers or pedestrians. If you collide with a car, you
may be critically injured and even die. For a night ride, keep the following suggestions in mind:
- Wear a helmet that has reflective stripes on it. Attach a safety light to your body and Mando Footloose.
- Install a brightly colored light so you can easily be seen by car drivers or pedestrians.
- Ensure that the light and reflector is not blocked by any object.
- Ensure that the rear reflecting plate is installed properly.
- Ride at a slow speed for your safety.
- Avoid riding in a dark area or crowded place.
- Avoid riding off road or on uneven roads.
- Ride on a familiar routes and protect yourself with defensive riding.
Replacement of parts, installation of accessories:
There are many kinds of parts and accessories that can improve the riding quality, performance and
design. However, you should be cautious when you replace parts or install accessories.
The safety is not ensured when parts are replaced and accessories are installed to Mando Footloose
because the manufacturer of Mando Footloose has not tested the compatibility between
Mando Footloose and these parts / accessories. Before installing any part, accessory or tire on
Mando Footloose, contact the store to check the compatibility. Read the manual of the part / accessory
to check the compatibility between Mando Footloose and the part / accessory.
It the parts / accessories are not compatible with Mando Footloose, do not install it. In appropriate use
of parts / accessories may cause a critical injury .
For replacement of parts, for safety and warranty service it is recommended to use the genuine parts.
Contact the store before replacing any part / accessory.
5. Tightening torques
Bolts or nuts which have been tightened using the incorrect torque:
- may come loose if the torque is too low
- may be overstretched if the torque is too high and consequently break off
A torque that is too high may also damage the components. There is a rish of an accident.
Always tighten the bolts and nuts to the specified torque. If you do not own a torque wrench, have this
work carried out at a qualified specialist workshop.
Parts
Tightening torque
Handlebar clamp
8Nm
Handle grib
3Nm
Handle post
6Nm
Saddle
6Nm
English
20
Mando Footloose user manual
G
How to use the
product properly
A new way of moving
Guarantee of Quality
For the proper use of the product
Application and limitation of the warranty
6. Brake settings
1. Warranty Promises
1) How to use the break
This warranty applies to the product that has defects in material or workmanship excluding consumable parts. The product will be repaired or
replaced free of charge according to the conditions specified below
(“warranty”):
2. Warranty period
Warranty period-2 years from the date of purchase
Parts applied for warranty-all parts of the product, excluding consumable parts
1) Right lever (Rear brake, grip, throttle
lever, brake lever)
Brake reach contral
2) For stable use, it is recommended to use
throttle with your thumb, and grab the
grip with forefinger and middle finger.
3) Left lever(front brake) - use your
forefinger and middle finger to opperate
the brake.
3. Items not covered by the warranty
1) The warranty does not cover the defect/damage specified below or
resulted from any of the the following circumstances:
1) Use 2mm hex wrench.
BB7 and BB5 Installation & Set-Up Guide
2) Initial position.
English
2) PAD REPLACEMENT (BB5 ONLY)
APAD
pad
should be replaced
when its total thickness (backing plate and friction
REPLACEMENT
(BB5 ONLY)
A pad should be
when its3mm.
total thickness (backing plate and friction material) is less than 3mm.
material)
is replaced
less than
2) The manufacturer does not cover the following expenses or loss:
1. REMOVE THE OLD PADS
Back
the innerTHE
adjustment
knob all the way out (counterclockwise). Pull the pad spreader clip from between the pads, then pull
①
REMOVE
OLD PADS
the pads out of the caliper one at a time.
Back the inner adjustment knob all the way out (counterclockwise). Pull the pad spreader clip from
pads,
pull
theSPREADER
pads out of the caliper one at a time.
2.between
INSTALLthe
THE
NEWthen
PADS
AND
Insert
the newTHE
padsNEW
one atPADS
a time into
theSPRING
caliper.
②
INSTALL
AND
Insert the new pads one at a time into the caliper.
VERY IMPORTANT: MAKE SURE YOU PLACE THE BLACK PAD ON THE INNER SIDE (TOWARDS THE WHEEL) AND THE BLUE PAD ON THE OUTSIDE
VERY
IMPORTANT:
MAKE
SURE
YOU
PLACE THE BLACK PAD ON THE INNER SIDE (TOWARDS THE
(AWAY FROM THE WHEEL.) ONCE THE PADS ARE IN THE CALIPER YOU CAN SLIDE THE SPREADER CLIP BACK INTO POSITION – BETWEEN THE PADS.
WHEEL) AND THE BLUE PAD ON THE OUTSIDE
(AWAY FROM THE WHEEL.) ONCE THE PADS ARE IN THE CALIPER YOU CAN SLIDE THE SPREADER
CLIP BACK INTO POSITION – BETWEEN THE PADS.
Pad spreader
Black pad “Left”
3) Adjusted reach position.
① small defects (sound, vibration etc) which do not affect the quality or function of the product
② a flat tire or cut made by nails or broken glass
③ when the user did not follow “the user’s responsibility” as stated below
④ having inappropriate maintenance or service
⑤ using a part that is not genuine or not approved by the manufacturer
⑥ rebuilding the product or installation of parts that are not approved by the manufacturer and legislation
⑦ accidents caused by collisions, falling off, rolling into a ditch or any other actions caused by the user’s
careless riding
⑧ unintended use of the product such as racing, or off road use.
⑨ operating the product in unusual circumstance such as on stairs where Mando Footloose cannot be
operated properly
⑩ damage of parts due to prolonged use and ‘normal wear and tear’ (heating of the battery due to its
life time, natural discoloration of the painted or plated surface, heating of used parts)
⑪ external factors including vehicle exhaust, chemicals, bird droppings or damage from sea wind / water
⑫ natural disasters such as an earthquake, typhoon, flooding or a fire
Pads
① replacement, repair or additional cost of consumable parts (such as: tire, tube, wire, grip, brake shoe,
pedal, fuse, gasket, bolds and nuts, light bulbs, springs or similar parts)
② expenses for maintenance, cleaning and repair
③ repair costs at a store that is not approved by Mando Footloose
④ expenses accompanied with the repair such as a telephone charge, shipping fee or car rental
⑤ compensation for loss of business revenue or loss resulting from a malfunctioning product
4. Users Responsibility
In order to ensure proper functioning of Mando Footloose and operate it
safely, the user must meet the responsibilities stated below while bearing the
expenses associated with the responsibilities.
1) The proper operation of Mando Footloose
The proper operation based on the information about maintaining the
product and requirements (the maximum weight capacity(100kg) of a user)
stated in this manual.
2) Checking the product before a ride (refer to ‘B. Items to be checked before
riding’)
3) Receiving a regular maintenance service or additional repair service approved by the manufacturer
5. Start of Warranty
This warranty is started by the registration of a genuine product at a shop
where Mando Footloose is purchased.
Pad spreader clip in place
Blue pad “Right”
SRAM Corporation
July 2005
13
21
H -1
English
22
Mando Footloose user manual
Guarantee of Quality
H -1
Application and limitation of the warranty
23
A new way of moving
Accessories
Light
6. How to repair the product during the warranty period
In order to repair the product during the warranty period, visit the store with
your Mando Footloose and its warranty certificate and apply for the warranty
repair. The certificate is required for the warranty repair.
7. The area covered by the warranty
This warranty applies only to the products purchased and used within the
country where Mando Footloose is bought. Therefore, the warranty expires
when it is transferred to another country.
Components ( Light unit, Bracket, Battery X 2 )
1) Slide the cover backward, while pressing
down the dot section on the top of
the unit.
2) Install batteries.
3) Replace the cover.
4) Wind the bracket strap around the
handlebar.
5) Put the strap through the opening.
6) Screw the dial into the bracket to secure it
temporarily.
7) Insert the light unit to the bracket until it
cliks, and adjust the beam angle.
Securely tighten the dial, and cut off any
excess bracket strap.
8. Other
The warranty is a written guarantee, promising to repair or replace the product
if necessary within a specified period of time. Therefore, in principle, repair
for the damage occurred after the warranty period is chargeable. However,
for damages resulted from the manufacturer the manufacturer will repair the
product at a fair cost based on the conditions stated in the warranty and the
degree of the manufacturer’s responsibility. In such case, contact the store.
Registration of a genuine product
To apply for the warranty, a genuine product must be registered.
H -2
How to register a genuine product
1) Enter the information in Certificate of Authenticity on page 22
2) Please hand in Certificate of Authenticity to a shop.
3) Registration of a genuine product is now completed.
Location of the serial number
I
Specification
Driving System
Maximum
Speed
Series Hybrid System
Wheel Size
20”
Detachable HMI Display
(2.4” Color LCD)
25 km/h
Display
Range
Max. 35~45 km*
Frame
Aluminum
Motor
Dual winding motor, 250W
Fork
Carbon fiber
Battery
36V 8.2Ah
Weight
21.7 kg
* Based on a ride by pedaling. Subject to change according to the conditions of operating environment
including the intensity of pedaling, the weight of the rider and the road condition.
8) Press for 2~3 seconds to turn on
and off.
I -1
English
24
Mando Footloose user manual
Accessories
Bell
I -2
25
A new way of moving
Accessories
Reflector
How to mount the bell
1) Components ( Bell, Bolt , Nut )
How to mount a rear reflector
1) Prepare a screwdriver.
2) Check how where to insert the bolt
and nut.
3) Decide where to place the bell.
2) Loosen the bolt so the ring bracket can
be oepn.
3) Place on the sit post to face back ward.
4) Open the bracket and place it on the
handle bar.
5) Make it place on the position you want.
4) Fasten the bolt with a screw driver.
5) Adjust the angle.
6) Fasten the bolt with a screw driver.
7) Finished.
6) Finished.
I -3
English
2622
A new way of moving
Accessories
I -4
Mando Footloose user manual
Certificate of
authenticity
SellerInformation
Anti folding strap
Date of Purchase
Period of Warranty
Seller
Phone Number
How to use the anti folding lever strap
1) Pull up the lever and fit the strap on it.
CustomerInformation
Name
2) Push the lever down.
3) Wind the strap around the frame.
Address
Phone Number
E-mail
* For more details about the warranty, please read the user manual provided with the product.
* Please hand in this page to a shop when you purchase Mando Footloose.
4) Pass the strap tail into the sliver ring.
5) Wind the remaining strap gain.
S/N :
6) Move the strap around.
8) Finished.
7) Attach the velcro.
23
27
J