1
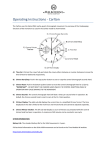
Table of Contents INFORMATION TO THE USER .................................................................................................................. 2 SPECIFICATIONS ........................................................................................................................................ 3 GENERAL DESCRIPTION........................................................................................................................... 3 FRONT PANEL CONTROLS: .......................................................................................................................... 3 REAR PANEL CONNECTORS ........................................................................................................................ 4 VK-64 SET UP ............................................................................................................................................... 5 CW SET UP ................................................................................................................................................. 5 PHONE SET UP ............................................................................................................................................ 5 AUDIO LEVEL ADJUSTMENT ....................................................................................................................... 6 COMPUTER INTERFACING ........................................................................................................................... 6 GENERAL OPERATION .............................................................................................................................. 6 CW OPERATION .......................................................................................................................................... 7 CW MESSAGE RECORDING ......................................................................................................................... 8 CW MESSAGE PLAYBACK .......................................................................................................................... 8 VOICE MESSAGE OPERATION ..................................................................................................................... 8 VOICE MESSAGE PLAYBACK ...................................................................................................................... 9 VOICE MESSAGE RECORDING ..................................................................................................................... 9 FEATURE CONFIGURATION .................................................................................................................... 9 WARRANTY ................................................................................................................................................12 APPENDIX 1 – DB CONNECTOR PINS ....................................................................................................14 APPENDIX 2 - SUMMARY OF PROGRAMMABLE OPTIONS ..............................................................15 APPENDIX 3 – VK-64 SCHEMATIC .........................................................................................................16 APPENDIX 4 – VK-64 AUDIO CABLE SCHEMATIC .............................................................................17 Information To The User This device complies with Part 15 of the FCC rules. Operation is subject to the following two conditions: (1) This device may not cause harmful interference, and (2) this device must accept any interference received, including interference that may cause undesired operation. NOTE: This equipment has been tested and found to comply with the limits for a Class B digital Device, pursuant to Part 15 of the FCC Rules. These limits are designed to provide reasonable protection against harmful interference in a residential installation. This equipment generates, uses and can radiate radio frequency energy and, if not installed and used in accordance with the instructions, may cause harmful interference to radio communications. However, there is no guarantee that the interference will not occur in a particular installation. If this equipment does cause harmful interference to radio or television reception, which can be determined by turning the equipment off and on, the user is encouraged to try to correct the interference by one or more of the following measures: --Reorient or relocate the receiving antenna. --Increase the separation between the equipment and receiver. --Connect the equipment into an outlet on a circuit different from that to which the receiver is connected. --Consult the dealer or an experienced Radio/TV technician for help. The user is cautioned that any changes or modifications not expressly approved by the party responsible for compliance could void the user's authority to operate the equipment. Unified Microsystems reserves the right to change specifications of its products at any time without notice. 2 Specifications Size: W: 6.25” x L: 6.25” x H: 2.25” Weight: 1.25 lb. Power Requirements: 9-14VDC, 500ma Voice Messages: 4, 15 seconds each CW Messages: 4, approximately 400 letter each CW Keying: Solid state, 24V DC maximum CW weighting: Adjustable CW side tone frequency: Adjustable and ON/OFF CW Keying type, Iambic, type A & B, selectable General Description Front Panel Controls: Power/Delay Time This is a dual control. It is the power on switch and a control for setting the delay when doing auto-repeat when playing message 1 (both CW and voice messages). The delay can be adjusted from approximately 1-12 seconds. Note that this control becomes active at approximately the 10 o’clock position. Between the PWR OFF position (approximately 8 o’clock) and 10 o’clock the repeat function is disabled. CW Speed This controls the speed CW is sent at. The speed ranges from approximately 5-45 WPM in two speed ranges. STOP Switch This button stops any message currently playing. It is also used to end recordings and configuration changes. MODE Switch This switch is used to change between CW and Voice keyer operation. The current state is indicated by the red LEDs labeled CW and PHONE. Pressing this switch will change to the other mode. MSG1-MSG2 Switches These switches select the message for play back or for recording. When the VK-64 is in the CW mode, these switches control the CW messages. When the VK-64 is in the voice mode, these switches control the voice messages. 3 FCN Switch This switch initiates changing the configuration settings and special function such as TUNE. REC Switch This switch starts recording. The type of recording (CW or phone) will depend on the current mode setting. CW LED, PHONE LED These red LEDs show the current mode setting. Only one will be turned on at any time. STATUS LED This yellow LED shows status of certain operations in progress. It can be OFF, flash slowly, flash quickly, or be constantly on, depending on the current operation. PWR LED This green LED indicates the power is on. Rear Panel Connectors Power Connector 9-14 VDC, 500ma maximum is supplied through this connector. The center conductor is the positive lead. The VK-64 is protected from reverse polarity and internally fused at 750ma. DB-25 This connects to the computer printer port and is used for optional computer control of the VK-64. See Appendix 1 for pin out information. DB-9 Audio and PTT signals from the microphone and to the transmitter connect through this connector. See Appendix 1 for pin out and cable information. The VK-64 normally routes the audio and PTT signals from your microphone to the transmitter. When the VK-64 is recording voice messages, the microphone audio goes to the internal circuitry. During phone message playback the microphone is disconnected and stored audio is connected to the transmitter. This configuration records with the same microphone you are using to talk. This ensures the recorded audio sounds as close to live audio as possible. CW Out This phono style connector is the CW output. The outer shield is ground and the inner connector is grounded for the key down state. 4 CW Paddle This 1/8” stereo connector is used to connect your CW paddle for sending. The tip connects to the Dit side, and the middle sleeve connects to the Dah side. The end sleeve is ground. The VK-64 can be configured to reverse the Dit and Dah sides. This is useful for Field Day and other multi-operator events. See the Configuration section for more information. Audio Adjust This adjusts the play back audio output level to the transmitter. See the Voice Keyer Set Up section for information on adjusting the audio output. VK-64 Set Up CW Set Up The CW paddle plugs into the 1/8” stereo jack on the rear panel. The plug’s tip is for the Dit side and the middle sleeve is for the Dah connection. The outer sleeve is ground. CW output is through the RCA phono plug on the rear panel. The inner connector is the positive side, and the outer shield is ground. You can make your own CW output and paddle cables or buy them from Unified Microsystems. The VK-64 uses solid state keying. It must not be used with tube type rigs. See the CW Operation section for more information. Phone Set Up You will need an audio cable to connect the VK-64 to the microphone and the transmitter. You can build your own or purchase one from Unified Microsystems. Plug the microphone cable into the DB-9 connector on the rear panel. Be sure that you have the proper cable for your type of radio. Different transceiver brands and models have different microphone pin outs. See Appendix 1 for more information on the audio cable. The cable end with the female pins plugs into your transmitter. The cable end with the male pins connects to the microphone. Essentially, the VK-64 goes between the microphone and the transmitter. The VK-64 audio cable has +5V available to power Electret or other microphones requiring power. Normally this is supplied through a separate pin on the microphone connector. Some microphones require power to be on the same pin as the audio signal. Power can be applied to the audio line to the microphone by shorting the pins on JP1 on 5 the VK-64 main circuit board. This requires opening up the unit. Use care when configuring your VK-64. If you later use a different microphone, you could damage it if the jumper is not removed first. Audio Level Adjustment Record a test message in one of the memories. See the section on phone operation for instructions. Using a dummy load, key your transmitter and speak as for normal phone operation. Note the output power or ALC meter readings as you speak. Press the button corresponding to the message you recorded. Adjust the audio level control on the rear panel with a small screw driver until the meter reads the same levels as is did when you were speaking. Computer Interfacing The VK-64 can be controlled by a PC through its LPT printer port. The printer connections meet the K8CC Standard. This was the original standard for controlling external voice keyers, LPT CW keying, and PC PTT. It was originally introduced with NA, and most of the popular computer logging programs follow this standard. If your logging program follows the K8CC Standard, you can use a standard 25 pin computer cable with a male DB-25 on one end and female DB-25 on the other end. This should be a shielded cable, with straight through wiring. See Appendix 1 for information on the pin connections in case your logging program uses different pins for controlling external voice keyers. If your program supports the W9XT Contest Card, you should be able to use a standard cable. Users of the W9XT Contest Card will find voice keyer operation nearly identical to the VK-64. The main difference is that computer controlled voice recording is not supported with the VK-64. You must record voice messages with the front panel switches. See the manual for your logging program for information on configuring your logging program for controlling external voice keyers. General Operation The VK-64 is a combination voice and CW memory keyer. It can run stand alone with the front panel controls, or controlled by a computer through its LPT printer port. The voice and CW sections of the VK-64 are independent. It is capable of voice and CW operations simultaneously, although few users would use it in that manner. The front panel message switches only operate in the mode that is currently selected. 6 Computer control for CW and voice through the printer port is done with different signals, and do not depend on the current mode of the VK-64. This means that if the computer can start a voice message even if the VK-64 is in the CW mode. CW Operation The VK-64 contains an Iambic CW keyer. Your paddle is plugged into the CW in jack on the rear panel. The output jack is plugged into the key input of your transmitter. The VK64 uses solid state keying. It should only be used with solid state rigs. Plugging the VK-64 CW output into the key jack of a tube transmitter may seriously damage the VK-64. If you are unsure if your transmitter is compatible with the VK-64, perform the following steps: 1) With the CW cable not connected to the VK-64, plug the other end into your transmitter. 2) Measure the voltage on the other end of the cable with a voltmeter. Put the positive lead on the center connector and the ground lead on the outer contact. 3) If the meter reads a positive voltage under 20VDC, the VK-64 will key the transmitter properly. If the voltage is higher or reads negative, do not attempt to use the VK-64 to key CW. CW speed is adjustable with the CW speed control on the front panel. The CW section can be set up for a number of configurations. The options include: Mode A or mode B keying Internal Side Tone ON or OFF Side Tone Frequency Right or Left handed paddle High or low CW speed range See the VK-64 Configuration section for selecting different options. The VK-64 has a built in CW interface for computer generated CW. The interface is compatible with the major contest logging programs including NA, WriteLog, CT, and TRLog. Computer control does not depend on which mode the VK-64 is in. The output of the computer CW interface is essentially “wire ORed” with the internal CW keyer. This means that you can send a CW message with your computer, and then send CW with your paddle without doing anything special. It also means that if your computer is sending CW, and you send CW with the paddle or start playback of a CW message, the output will be garbled. 7 CW Message Recording CW recording is handled through the front panel switches. The VK-64 must be in the CW mode, and the red CW LED must be on. To record a CW message perform the following steps: 1. Press the REC button. The yellow LED will blink rapidly. 2. Press the MSG button corresponding to the message you wish to record. The yellow status LED will blink slowly, at a rate of about 1 flash per second. 3. Start sending CW with your paddle. Recording does not start until you send the first Dit or Dah. The side tone will be active during recording regardless of the state of the side tone configuration. The CW output will not be active during recording, so you will not transmit while recording a message. 4. Press the STOP key to finish recording. The yellow LED will go out. Each message can hold approximately 400 Morse letters. If a message is too long it will record over write the beginning of the message. CW Message Playback To play back a CW message, the VK-64 must be in the CW mode. Simply press the MSG button to play the corresponding message. The message will play until completion. The side tone will sound the message if it is enabled. If you press the STOP button or touch one of the paddles while a message is playing, the message will stop. Message 1 can be set to auto-repeat. This feature is normally used to call CQ. If you don’t get an answer within the delay time, the CQ will repeat. The Delay control determines the delay time before finishing the message and starting it again. If the control is set below approximately the 10 o’clock position, the repeat function is disabled. Delay times can be adjusted from approximately 1-12 seconds. If you have the repeat function enabled, and you get an answer to your CQ, pressing the stop key or one of the paddles will temporarily cancel Message 1 repeat. Messages 2-4 can be played back in their normal single play mode. Pressing the MSG1 key will reactivate repeat play unless the Delay control is set below the 10 o’clock position. Voice Message Operation The front panel controls for voice operation are only active when the unit is in phone mode. This is indicated by the states of the red CW and SSB LEDs. Press the Mode button to change states. 8 Voice Message Playback To play back a message, simply press the corresponding MSGn button. The VK-64 will activate the PTT line and play the message. It will turn off the PTT line when the message is complete. You can terminate a message by pressing the STOP button. Voice Message Recording Press the REC button to place the VK-64 in record mode. The yellow STAT LED will blink rapidly. Press the MSGn button corresponding to the message to be recorded. The yellow STAT LED will start blinking at a rate of about 1 blink per second. Begin speaking immediately. Press the STOP button to finish recording. If you accidentally press the REC button you can cancel the command by pressing the STOP button before pressing a MSGn button. The VK-64 has space for 4 messages, 15 seconds each, for a total of 60 seconds. If you record more than the 15 seconds, you will record into the next message space. You could record a single 1-minute message if you desire. It is the user’s responsibility to time the recording to avoid recording into the next message space if four separate messages are desired. Voice messages can also be controlled by the computer through the printer port. The major contest logging programs support this. Usually pressing F1-F4 on the computer keyboard will play back the corresponding message number. Pressing the ESC key will terminate a message already playing. The computer can control voice messages regardless of the SSB/CW state of the VK-64. You cannot record a message with computer control. This must be done with the VK-64 front panel switches. Computer control can be disabled in the VK-64 configuration settings. Feature Configuration The user can configure some of the operating functions of the VK-64. These settings are stored in non-volatile memory in the internal microcontroller. The values stored will remain in effect until changed. The basic keystroke sequence for configuration settings is as follows: FCN – MSGn – MSGm …- [FCN] - … - [FCN] – STOP 9 The MSGn and MSGm indicate the two digit function number, e.g. 1 – 4, 2 –1, etc. The [FCN] indicates additional FCN key presses to select the next setting for the active configuration. After the FCN-MSGn-MSGm keys are pressed, the VK-64 will send the current setting in Morse code. If you wish to leave the setting unchanged, press the STOP button. If you want to select the next option press the FCN key and the next setting will be indicated in Morse code. Repeated pressing of the FCN key will cycle through the menu of allowable options. Press the STOP key to terminate the configuration set up sequence and save the new setting. Note that the Morse functions will be sent at with the internal side tone speaker at a fixed speed, and weight regardless of the state of settings for these in normal operation. The Morse status codes are only sent on the side tone speaker, and will not key the transmitter. The keys for configuration and special functions are to be pressed sequentially. Do not press more than one key at a time. Side Tone ON/OFF FCN – MSG1 – MSG1 Default: OFF Morse status codes: ST ON, ST OFF Indicates if the side tone will be on or off when sending through the keyer or playing CW messages. Note that the side tone only operates in response to the internal keyer. Computer generated CW sent through the printer port will not key the side tone. Paddle Reverse FCN – MSG1 – MSG2 Default: Normal Morse status codes: P N (normal) , P R (reverse) Reverses the CW paddles. Useful for Field Day when left handed or operators used to reversed paddle keyers operate. Allows the user to reverse the paddle without re-wiring the paddle cable. Mode A/B Keying FCN – MSG1 – MSG3 Default: B Morse status codes: A, B Switches between Mode A and Mode B type CW keying. Side Tone Frequency FCN – MSG1 – MSG4 10 Default: TBD Morse status codes: VV (sent at current side tone frequency setting) This allows the user to select between 6 different side tone frequencies. The side tone volume is not adjustable. CW Weighting FCN – MSG2 – MSG1 Default: 6 Morse status codes: 4, 5, 6, 7, 8, 9 Standard CW weighting has a Dah length equivalent to 3 dit periods. The VK-64 allows you to adjust the Dah length in ½ dit periods. The status codes indicate the number of ½ dit periods for Dah length. Divide the number sent by 2 to get the current length of a Dah. For example if the setting is 7, a Dah length is 3 ½ times the dit length, slightly longer than standard CW timing. CW messages are stored in memory as dit, Dah, and space codes. The CW weight sent will depend on the current weight setting, regardless of the weight setting when the message was recorded. Note that the CW speed ranges are based on standard timings of Dah lengths being 3 times the Dit time. Changing the weight will increase or decrease the actual number of letters sent per minute. Enable PC PTT FCN – MSG2 – MSG2 Default: OFF Morse status codes: “PTT ON”, “PTT OFF” Some logging programs allow you to control the transmitter PTT when sending computer generated CW. This function allows you to disable that in case your PC causes the PTT to operate at times it should not or if you wish to use QSK. See Appendix 1 for information on the signals used to control the PC generated PTT. CW Speed Range FCN – MSG2 – MSG3 Default: Slow Morse status codes: “S L”, “S H” The VK-64 has two CW speed ranges, Low and High. This allows for smoother adjustment. The low speed range is from approximately 5WPM to 35 WPM. The high speed range is from approximately 15WPM to 45WPM. Most users will find that one or the other speed setting will cover the majority of their operating styles. Enable/Disable PC Control FCN – MSG3 – MSG1 11 Default: OFF Morse status codes: “PC ON”, “PC OFF” This function enables or disables PC control of playing voice messages and CW keying. NA, CT, and TRLog are DOS programs and take complete control of the printer ports. Windows 98 and other operating systems control the operation of the printer ports and may do unexpected operation on them. These operations may include valid commands to the VK-64 and cause playback of voice or CW messages and keying of the transmitter. Disable PC control of the VK-64 unless your computer logging program has proper control of the printer port. You can also unplug the cable from the PC LPT port or VK64 when running your computer in other applications. Restore Defaults/Software Version FCN – MSG4 – MSG4 Default: None Morse status codes: DEFLT Vx.yz This resets configuration settings to factory defaults. After sending the status message, the function is exited without having to press the STOP key. Starting with software version 1.02, this function will send the current software reversion level e.g. V1.02. Special Functions Tune FCN – MODE This function produces a key down state to tune a radio, amplifier, etc. Terminate this function by pressing the STOP key or tapping the CW paddle. The side tone will be on during the key down state if the side tone option has been enabled. Do not press both keys simultaneously. Warranty & Support Unified Microsystems warrants the components and workmanship of the VK-64 or a period of one year from purchase. Unified Microsystems will, at its option, repair or replace defective units returned during the warranty period. Before returning a VK-64 for service, please contact Unified Microsystems for a RMA (Return Materials Authorization) number. If you have questions about the VK-64 or other products, please contact us. Check the web page support sections for the latest information and manuals for most Unified Microsystems products. 12 Email is the best way to get support. Due to the problem of spam, please use a descriptive subject line such as “VK64 CW question”. Unified Microsystems 3310 Bonnie Lane PO Box 133 Slinger, WI 53086 Email: [email protected] Web site: www.unifiedmicro.com Unified Microsystems reserves the right to change specifications of its productions at any time without notice. 13 Appendix 1 – DB Connector Pins Printer Cable Pins DB-25 Pin # 1 2 3 4 5 6 16 17 22 23 24 25 LPT Signal Name Strobe Data Bit 0 Data Bit 1 Data Bit 2 Data Bit 3 Data Bit 4 Init Select In GND GND GND GND VK-64 Functions CW Control Message Abort Message 1 Message 2 Message 3 Message 4 PTT Control CW Control GND GND GND GND Audio Cable Pin out DB9 Pin 1 2 3 4 5 6 7 8 9 Signal Audio GND PTT GND +5V Audio GND PTT GND Audio PTT Audio PTT 4/8 Pin Connector MIC MIC MIC TRANSMITTER TRANSMITTER MIC MIC TRANSMITTER TRANSMITTER Warning: It is critical that the various grounds are isolated from each other! Shorting the grounds together can result in severe hum on the audio signal. 14 Appendix 2 Summary of Programmable Options Side Tone ON/OFF FCN – MSG1 – MSG1 Paddle Reverse FCN – MSG1 – MSG2 Mode A/B Keying FCN – MSG1 – MSG3 Side Tone Frequency FCN – MSG1 – MSG4 CW Weighting FCN – MSG2 – MSG1 Enable PC PTT FCN – MSG2 – MSG2 CW Speed Range Select FCN – MSG2 – MSG3 Enable/Disable PC Control FCN – MSG3 – MSG1 Restore Defaults FCN – MSG4 – MSG4 Tune FCN – MODE 15 16 17