1
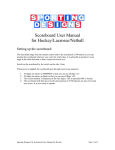
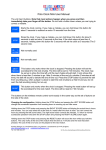
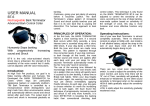
Scoreboard User Manual
Setting up the scoreboard
The maximum range from the remote control unit to the scoreboard is 400 meters so you can
position the scoreboard wherever you want. We recommend that you position it at 45 degrees at a
corner. This means that everyone on and around the field will be able to see it. On windy days, it
is advisable to position it at an angle to the wind direction so that it cannot be blown over. You
can also use guy ropes and stakes.
Open the bottom and top flaps and secure.
Connect the battery supply. The scoreboard requires 24 volts and is derived from 2, 12 volt car
batteries in series. Be sure to connect it up correctly as shown below, red wire to +ve terminal;
black wire to –ve terminal.
When power is applied, the scoreboard goes through a power-up sequence:
1.
2.
3.
4.
All digits are shown as blank so that you can see all flaps ‘off’.
All digits are shown at 8888888 so that you can see all flaps ‘on’.
The version number is displayed on the time digits. This is typically P03 or similar.
The scoreboard will then be set to the start position of 7:00 minutes, zero scores and
chukka no 1. It is now ready to operate.
Sporting Designs Ltd. Scoreboard User Manual
Page 1 of 6
Operating the scoreboard using the remote control unit.
The maximum range of the remote control unit is approximately 400 meters. The unit has 6
buttons.
The unit has 6 buttons. Note that most actions happen when you press and then immediately
take your finger off the button. Do not hold a button down unless you are trying to correct a
mistake.
Starts the clock running. If you press this for more than about 5 seconds an additional
10 seconds will be added to the time. This is to correct any mistakes by the
timekeeper. If the clock stops at less than 5 seconds, holding down the button for
about 5 seconds will set the clock at 5 seconds (The 5 second rule).
Stops the clock. But see also below for how to change some settings
Pressing once will add one to the left hand score (as you look at the scoreboard). If
you make a mistake, you can hold down this button for about 4 seconds to reduce the
score by one (hold the button down until the score changes).
Pressing once will add one to the right hand score (as you look at the scoreboard). If
you make a mistake, you can hold down this button for about 4 seconds to reduce the
score by one (hold the button down until the score changes).
This button only works when the clock is stopped. Pressing the button will set the
scoreboard for the next chukka. The time will be set to 7:00 minutes and the chukka
number will be incremented by one. If you make a mistake, you can hold down the
button for about 4 seconds. This will reduce the chukka number by one.
This button only works when the clock is stopped. Pressing the reset button will set
up the scoreboard for the next match. The time will be reset to 7:00 minutes, the
chukka number set to one and both scores set to zero. If you make a mistake, hold
down this button for about 4 seconds. In this case, the scoreboard will revert to all the values
before you pressed the button.
Holding down the
button and pressing the
button will sound the horn whilst
you hold the buttons. This only works at the end of the match when the time is 7 minutes and the
chukka number is 1. The use of this is to hurry on the players for the next match.
Sporting Designs Ltd. Scoreboard User Manual
Page 2 of 6
Changing the configuration.
To change the scoreboard operation from counting down to counting up. Counting down
from 7:00 minutes is the normal mode. For informal chukkas, you can start the clock at zero and
count up. This means that you can use the clock to see how long you have been playing for and
then stop when you want. In this mode, neither the bell nor the horn is sounded. The clock will
continue to count up until it is stopped. It will stop at 99:59 minutes (of course, the scoreboard
only has 3 time digits and so only the first minutes digit will not be displayed).
To change the scoreboard operation from counting down to counting up:1. Stop the clock by pressing the STOP button.
2. Hold down the STOP button and press the left score
button.
To revert to counting down, go through steps 1 and 2 again.
To display the actual time in hours and minutes. At the end of a match (when the chukka
number is 1 and the time is 7 minutes) you can display the actual time in hours and minutes by
holding down the STOP button and pressing the right score button.
To correct the hours, press the left score button.
To correct the minutes, press the right score button.
To revert to normal operation, hold the STOP button and press the right score button again.
Note that some scoreboards may not have a digit for tens of hours and so will not display 10:00,
11:00 and 12:00 correctly.
Sporting Designs Ltd. Scoreboard User Manual
Page 3 of 6
Batteries
The scoreboard is operated from 2, 12 volt car-type batteries connected in series to provide 24
volts. These batteries are normal lead-acid ‘leisure’ batteries and can be re-charged with a 24 volt
charger or individually one at a time with a normal 12 volt car battery charger.
The batteries will provide enough power for at least a few days without having to be re-charged.
The remote control unit uses 2, AAA batteries. These are nonrechargeable and are widely available from DIY shops, supermarkets
and petrol stations. When changing these batteries, be sure to insert then
the correct way with the positive terminal facing the mark +. This has a
red wire. The negative terminal faces the mark -. This has a black wire.
See layout above.
Sporting Designs Ltd. Scoreboard User Manual
Page 4 of 6
Registering a new remote control unit.
1. Power off the whole scoreboard.
2. Un-screw the top left back section from the scoreboard (when looking from the back)
3. On the receiver module, set the 3 switches to:Switch
Setting
M1
OPEN
M2
OPEN
SET
GND
The switches have a mid position which is not used so make sure the switches are fully
over.
4. Power up the scoreboard
5. After 5 seconds, press any key on the new control unit for one second.
6. Wait 5 seconds.
7. Power off the scoreboard.
8. On the receiver module, set the 3 switches to:Switch
Setting
M1
GND
M2
GND
SET
OPEN
The switches have a mid position which is not used so make sure the switches are fully
over.
9. Power up the scoreboard.
10. After the power-up sequence is complete (it takes about 25 seconds), test the new control
unit.
Sporting Designs Ltd. Scoreboard User Manual
Page 5 of 6
Troubleshooting
If the scoreboard does not do anything when you power it up, check that:1. The 2, 12 volt batteries are charged.
2. The circuit breaker inside the scoreboard has not tripped. This is in the bottom left of the
scoreboard when looking from the back. It should be in the up position.
3. Look at the lights on the white WAGO ‘brain’ The DSR light at the bottom of the left
module should be flashing green once per second. Note that it only starts to flash once the
start up sequence is complete.
4. Check that no wires are loose coming from the battery.
If the remote control unit does not work, check that:1. The two AAA batteries have enough power.
2. No loose connections can be seen inside.
Suggestions
We are very pleased to receive any suggestions from you as we want to improve the operation of
the scoreboard and make it easier to operate. Please contact Paul Girdham, Sporting Designs Ltd.
Thank you.
Contacting Sporting Designs Ltd.
One Barkers Field,
Long Clawson,
Leicestershire
LE14 4PL, UK
Tel: 07860 303 217
Fax 0870 210 1008
email: [email protected]
web: www.SportingDesigns.co.uk
Ref: Docs06\SportingDesignsLtd\UserManual V003
Sporting Designs Ltd. Scoreboard User Manual
Page 6 of 6