1
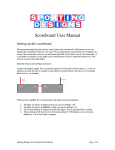
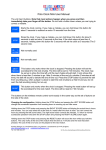
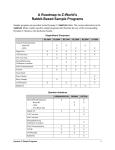
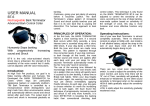
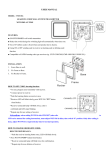
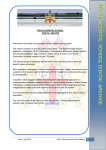
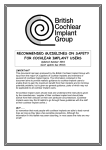
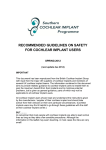
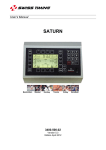
User Manual
for polo clock
Setting up the clock
Open the bottom legs. These are designed to be pushed into grass. There are spikes to stop the
clock from blowing over.
Connect the battery supply. The clock requires 12 volts and is derived from a 12 volt car or
‘leisure’ battery. Be sure to connect it up correctly as shown below, orange/red wire to +ve
terminal; black wire to –ve terminal.
Sporting Designs Ltd. User Manual for Polo Clock Page 1 of 14
When power is applied, the clock goes through a power-up sequence:
1. All digits are shown at 888 so that you can see all flaps ‘on’.
2. All digits are shown as blank so that you can see all flaps ‘off’.
3. The version number is displayed on the time digits. This is typically P37 (if set for polo
or A37 if set for Arena polo) or similar.
4. The clock will then be set to the start position of 7:00 minutes. It is now ready to operate.
Sporting Designs Ltd. User Manual for Polo Clock Page 2 of 14
Operating the clock using the remote control unit.
The maximum range of the remote control unit is approximately 300 meters. The unit has 6
buttons.
The unit has 6 buttons. Note that most actions happen when you press and then immediately
take your finger off the button. Do not hold a button down unless you are trying to correct a
mistake.
Starts the clock running. If you make a mistake, you can hold down this button for
about 3 seconds to subtract 10 seconds from the time.
Stops the clock. If you make a mistake, you can hold down this button for about 3 seconds to
add 10 seconds to the time. If the clock stops at less than 5 seconds in the last chukka,
holding down the button for 3 seconds will set the clock at 5 seconds (The 5 second rule).
Not normally used.
Not normally used
This button only works when the clock is stopped. Pressing the button will set the
clock for the next chukka. The time will be set to 7:00 minutes. If you make a
mistake, you can hold down the button for about 4 seconds. After 3 minutes of the
end of a chukka (5 minutes at half time), the bell will sound to denote the end of time out. Press
the STOP button to prevent the bell from sounding (e.g. when a player is about to start the next
chukka by a free hit and you do not want the bell sounding during the run-up)
This button only works when the clock is stopped. Pressing the reset button will set
up the clock for the next match. The time will be reset to 7:00 minutes. If you make a
mistake, hold down this button for about 4 seconds. In this case, the clock will revert
to the value before you pressed the button.
Holding down the
button and pressing the
button will sound the horn whilst
you hold the buttons. This only works at the end of the match when the time is 7 minutes. The use
of this is to hurry on the players for the next match.
Sporting Designs Ltd. User Manual for Polo Clock Page 3 of 14
Changing the configuration.
To change the clock operation from counting down to counting up. Counting down from 7:00
minutes is the normal mode. For informal chukkas, you can start the clock at zero and count up.
This means that you can use the clock to see how long you have been playing for and then stop
when you want. In this mode the bell is sounded normally at 7:30 and regularly thereafter (see the
section on changeable values). The clock will continue to count up until it is stopped.
To change the clock operation from counting down to counting up:1. Stop the clock by pressing the STOP button.
2. Hold down the STOP button and press the left score
button.
To revert to counting down, go through steps 1 and 2 again.
To display the actual time in hours and minutes. At the end of a match (when the chukka
number is 1 and the time is 7 minutes) you can display the actual time in hours and minutes by
holding down the STOP button and pressing the right score button.
To correct the hours, press the left score button.
To correct the minutes, press the right score button.
To revert to normal operation, hold the STOP button and press the right score button again.
To set up an outdoor polo clock for Arena operation. The Arena version has different timing.
This can be set up from the remote control unit. Power off the clock. Power it up and during the
self-test routine when all the digits are blank, press and hold the NEXT PERIOD button. Change
the use to AA (see also below).
Changeable values
There are a number of values which may be changed by the user. These values are stored
permanently even if the clock is powered down. It is also possible to revert to ‘factory’ settings
which are shown in the list below under the column ‘Factory’.
To change any settings:
1. Power off the clock.
2. Power up the clock. When all the digits go blank, press and hold the ‘NEXT PERIOD’
button.
3. After a few seconds, the 3 time digits will show CHA (for change). Release the NEXT
PERIOD button.
4. For each parameter, the parameter number will first be shown followed by the 3 character
display text followed by the value.
5. Press the LEFT SCORE button to go down and the RIGHT SCORE button to go up. The
setting is permanently changed immediately.
6. Press the NEXT PERIOD to step onto the next value. Use the LEFT SCORE and RIGHT
SCORE buttons to increment or decrement the value. See the table below for all the
values.
Sporting Designs Ltd. User Manual for Polo Clock Page 4 of 14
7. Some of the timer settings are in tenths of seconds (a value of 35 means 3.5 or 3½
seconds) – see table below.
8. At any time you can power down / up the clock to use the new values or continue to press
NEXT PERIOD button through all the values.
Sporting Designs Ltd. User Manual for Polo Clock Page 5 of 14
Value Display
no.
at top
Factory
settings
Range
1
USE
1 (PO) See->
Clock type where:Later
PO = Outdoor polo
AA = Arena polo
HO = Hockey
R1 = Running race (mins/secs)
R2 = Running race (hrs/mins/secs)
RU = Rugby
SO = Soccer
SH = Show jumping
PC = Polo Cross.
LA = Lacrosse
NE = Netball
CR = Cricket (only if RN1100 present)
2
CHU
4
4-6
3
BEL
30
0-99
4
HOR
30
0-99
5
DIS
1
0-1
Number of chukkas. Only used to get the time
between chukkas for polo correct.
Time (in tenths of seconds) the bell sounds for
towards the end of a chukka. (30 = 3.0 seconds)
Time (in tenths of seconds) the horn sounds for at the
end of a chukka / period. (30 = 3.0 seconds)
Display time to end of time-out (1=Yes; 0=No)
6
BE2
30
0-99
7
APO
10
0-99
8
PS1
7
0-99
9
PSS
0
0-50
10
AS1
6
0-99
11
ASS
30
0-50
12
EN1
7
0-50
Time (in tenths of seconds) the bell sounds for at the
end of time-out between chukkas.
Time before clock powers down if idle. In tenth’s of
hours (10=1.0 hours)
Start time (minutes) for chukkas for outdoor polo to
start.
Start time (seconds) for chukkas for outdoor polo to
start.
Start time (minutes) for chukkas for arena polo to
start.
Start time (seconds) for chukkas for arena polo to
start.
First bell time (minutes) when in count up mode
13
EN2
30
0 / 30
First bell time (seconds) when in count up mode
14
ENR
0
0 / 30
Repeat bell time (0 means every minute; 30 means
every 30 secs) when in count up mode
Sporting Designs Ltd. User Manual for Polo Clock Page 6 of 14
Value Display
no.
at top
Factory
settings
Range
15
FL1
100
100 +
16
FL0
5
5+
17
HS1
35
5-95
18
BEE
0
0-99
19
HS2
0
0-30
20
SEC
50
0-99
21
POF
1
0-9
22
POB
0
0-1
23
SPC
6
1-8
24
SE2
0
0-99
25
SE3
0
0-99
26
FLE
0
0-99
27
SOU
0
0-3
28
RCD
0
0-1
29
LS1
15
0-35
Flap ON pulse time (ms). 100 is subtracted so 00
means 100; 99 means 199. Only adjust on
instructions from Sporting Designs. (Later are *10)
Flap off gap time. There is a minimum of 5 ms. Only
adjust on instructions from Sporting Designs.
Start minutes for Hockey/Rugby/Soccer (may also be
adjusted by holding down the START button before
the match starts)
Beep time. Beeps the horn when the operator
start/stops/increments a score. 0=Off. 40 is approx
1/2 second
Stop minutes for Hockey/Rugby/Soccer. If > 0 will
automatically stop the clock at this so that the umpire
can use his own clock to decide when to say the
match is over. If 0, does not stop.
Time correction in seconds to adjust timer accuracy.
Subtract a value of 50 to get the actual adjustment
value. A resultant of +9 means add 1 second every 9
minutes. A value of 45 (means -5) means subtract 1
sec every 5 mins. See also parameter nos 24 and 25.
Flap position when clock does auto-power off. 0
means set to all - - - - - - . 1 means set to all black.
Power off beep. If set to 1, the clock beeps every hour
(whatever the timer is) if no power off
circuit exists and the clock should have powered off
(parameter 7 (APO) > 0).
Start minutes for Polo Cross (mode 9(PC)). Start
seconds are always zero.
Time correction in 10 times seconds to adjust timer
accuracy. A value of 9 means add 1 second every 90
minutes
Time correction in 100 times seconds to adjust timer
accuracy. A value of 9 means add 1 second every 900
minutes
Flap exercise time. A value of 24 means exercise all
the flaps every 24 hours (assuming power is on). This
timer gets reset whenever the clock is running.
Sounds. 0=normal; 1=always sound horn; 2=always
sound bell; 3=always alternate bell/horn.
Real time clock counts down if = 1 and sounds bell if
gets to 0 then counts up.
Lacrosse start time – Minutes
30
LSS
0
0-30
Lacrosse start time - Seconds
31
12B
0
0-50
32
PUL
0
0-20
Beep horn ½ way through each chukka/period for this
time (30 = 3.0 seconds). 0 means don’t sound.
Pulse sounds on/off time. 5=1/2 sec on & 1/2 sec off.
Sporting Designs Ltd. User Manual for Polo Clock Page 7 of 14
Value Display
no.
Factory
settings
Range
33
LE1
20
0-99
34
LE2
50
10-99
35
LE3
0
0-99
36
HC1
40
0-99
37
HC8
10
0-99
LED minimum brightness (in %) where 99=full
brightness. For LED clocks only
ADC value divided by 10 where LED is at maximum
brightness. Typical value is 540/10 = 54.
ADC value divided by 10 where LED is at minimum
brightness. Typical value is 0.
Hockey corner time (secs)
Bell time (*10) at end of hockey corner time. (15 =
1.5 seconds)
Sporting Designs Ltd. User Manual for Polo Clock Page 8 of 14
To revert to Factory settings:
1. Power off the clock.
2. Power up the clock. When all the digits go blank, Press and hold the RESET button.
3. After a few seconds, all the digits will show 888. Release the RESET button. Factory
settings will have been stored.
Sporting Designs Ltd. User Manual for Polo Clock Page 9 of 14
Batteries
Battery
The clock is operated from a 12 volt car-type battery. This battery is a normal lead-acid ‘leisure’
battery and can be re-charged with a normal 12 volt car battery charger.
The battery will provide enough power for quite a few days without having to be re-charged.
Remote control unit
The remote control unit uses two AAA batteries. These are nonrechargeable and are widely available from DIY shops, supermarkets
and petrol stations. When changing these batteries, be sure to insert then
the correct way with the positive terminal facing the mark +. This has a
red wire. The negative terminal faces the mark -. This has a black wire.
See layout above.
Sporting Designs Ltd. User Manual for Polo Clock Page 10 of 14
1.
The Control box
Control box
Sporting Designs Ltd. User Manual for Polo Clock Page 11 of 14
Registering a new remote wireless control unit.
1. Power off the whole clock. Wait for 10 seconds for the power to decay.
2. Un-screw the bottom left back section from the clock (when looking from the back)
3. On the receiver interface module, set the 3 switches to:Switch
Setting
M1
OPEN (UP)
M2
OPEN (UP)
SET
GND (DOWN)
4. Power up the clock
5. After 5 seconds, press any key on the new remote control unit for one second.
6. Wait 5 seconds.
7. Power off the clock. Wait for 10 seconds for the power to decay.
8. On the receiver interface module, set the 3 switches to:Switch
Setting
M1
GND (DOWN)
M2
GND (DOWN)
SET
OPEN (UP)
9. Power up the clock.
10. After the power-up sequence is complete (it takes about 25 seconds), test the new remote
control unit.
Erasing all remote control units.
11. Power off the whole clock. Wait for 10 seconds for the power to decay.
12. Un-screw the bottom left back section from the clock (when looking from the back)
13. On the receiver interface module, set the 3 switches to:Switch
Setting
M1
OPEN (UP)
M2
GND (DOWN)
SET
GND (DOWN)
14. Power up the clock
15. Wait 10 seconds.
16. Power off the clock. Wait for 10 seconds for the power to decay.
17. On the receiver interface module, set the 3 switches to:Switch
Setting
M1
GND (DOWN)
M2
GND (DOWN)
SET
OPEN (UP)
18. Now you can register a new remote control unit as per the previous section, (start at item
3).
Sporting Designs Ltd. User Manual for Polo Clock Page 12 of 14
Troubleshooting
The remote only works very close to the clock. The antenna in the receiver (normally
within a small box in the top of the clock or near the two dots for the time digits) has
either been damaged or has pulled out of the receiver module. The antenna is a small
black wire about 10 cm long. It is a push fit into the receiver module
The remote only works after a 15 second delay. If you have two remote control units, you
must leave a 15 second delay before using a button on a second unit.
The flaps on some digits are not working. Check exactly what the problem is by powering
off the clock and powering it up again. Watch the self-test sequence when all flaps show
on (all digits are 8) followed by all off (all digits are blank). There are a number of
reasons why the flaps may not operate properly:
1. Can you see a mechanical reason why the flaps cannot move (is a flap fouling the border
or the Perspex? fouling something else?)
2. Is the battery voltage sufficient? Normally a 12 volt battery is used. The clock may work
when the voltage is as low as 11 volts but certainly will not work correctly if the voltage
is as low as 10 volts.
3. Is the same flap on all digits not working? In this case it is likely to be a faulty relay or
possibly the 14 way ribbon cable which goes from digit to digit has broken. If the same
flap on all digits is set on then try replacing the ‘reset’ relay (and vice versa). Look at the
drawings to see which relay.
The relays used to drive individual flaps to on (white) are R3 to R9 for A to G and to
drive the flaps off (black) are R11 to R17 for A to G. You can normally swap the relay
with R32 or a spare at the end which is not normally used. R33 drives the lamp to say
when a button is pressed (if present). Relays R18 onwards are used to select each digit
1,2,3,4,,, - see below.
One digit is not working at all, Check that the single black wire going to the digit is still
connected. If it is, check which is the relay used to drive the digit and replace this.
Sporting Designs Ltd. User Manual for Polo Clock Page 13 of 14
Digits are numbered:1. Seconds Units
2. Seconds Tens
3. Minutes Units
The remote control unit is not working at all (but the clock goes through its self-test ok).
Try replacing the batteries. It takes two AAA batteries but be sure to place them + to the
red wire and – to the black wire. If still faulty, check that the switches in the control box
have not been changed (M1 down M2 down, SET up). Check that no wires are loose. If
still not working you will have to contact Sporting Designs.
If the clock does not do anything when you power it up, check that:1. The 12 volt battery is charged and connected up the correct way. The voltage should be at
least 12 volts.
2. The fuse inside the clock control box has not tripped. This is normally in the bottom left
of the clock when looking from the back.
3. Look at the Power LED and the Controller Running LED. Both should be on.
4. Check that no wires are loose coming from the battery.
Suggestions
We are very pleased to receive any suggestions from you as we want to improve the operation of
the clock and make it easier to operate. Please contact Paul Girdham, Sporting Designs Ltd.
Thank you.
Contacting Sporting Designs Ltd.
One Barkers Field, Long Clawson,
Leicestershire, LE14 4PL, UK
Tel: 07860 303 217 (intl +44)
email: [email protected]
web: www.SportingDesigns.co.uk
Ref: SportingDesignsLtd\UserManualPoloClock.doc
Sporting Designs Ltd. User Manual for Polo Clock Page 14 of 14