1
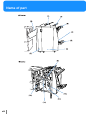
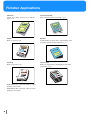
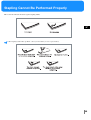
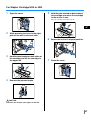
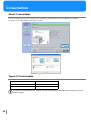
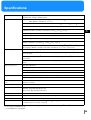
Notice about the law and the standard
High Speed Colour Printer
Model: HC5500T
This product contains RFID (Radio Frequency Identification) system.
Model: 444-59005
This equipment has been tested and found to comply with the limits for a Class B digital device, pursuant to part 15 of the FCC Rules.
These limits are designed to provide reasonable protection against harmful interference in a residential installation. This equipment
generates, uses and can radiate radio frequency energy and, if not installed and used in accordance with the instructions, may cause
harmful interference to radio communications. However, there is no guarantee that interference will not occur in a particular
installation. If this equipment does cause harmful interference to radio or television reception, which can be determined by turning
the equipment off and on, the user is encouraged to try to correct the interference by one or more of the following measures:
•
•
•
•
Reorient or relocate the receiving antenna.
Increase the separation between the equipment and receiver.
Connect the equipment into an outlet on a circuit different from that to which the receiver is connected.
Consult the dealer or an experienced radio / TV technician for help.
This Class B digital apparatus complies with Canadian ICES-003.
Cet appareil numérique de la classe B est conforme à la norme NMB-003 du Canada.
Copyright © 2006 RISO KAGAKU CORPORATION
i
Preface
Welcome to the world of this product!
This machine is a finisher that is connected to a printer manufactured by our company and performs stapling, punching, and stitching
of prints.
About This Manual
Notes
1)
2)
3)
4)
5)
6)
No part of this book may be reproduced without permission.
For improvement of the product, this manual is subject to change without prior notice.
Note that RISO is not liable for any influence caused by use of this manual or this unit.
For operation of the printer and the printer driver manufactured by our company, refer to the manuals supplied with the printer.
For scanning paper originals using an optional scanner, refer to the Help of the optional touch panel.
In this manual, the number of sheets is based on the dedicated paper (A4 / 85 g/m2 ).
Trademark Acknowledgments
All product names and company names written in this manual are trademarks or registered trademarks of their respective companies.
ii
How to Read This Manual
Notation of Explanation of Operation
The following symbols are used in this manual for description of functions, operation, and notes.
and
are cautions for safety. Be sure to read these items before using this machine.
iii
Safety Precautions
This section describes the items that should be followed for safe use of this machine. Be sure to read this section.
Warning Symbols
To use the machine properly and to prevent human injury and damage to properties, the following warning symbols are used.
Read the meaning of the symbols to understand and then read this manual.
Indicates that incorrect handling by ignoring this symbol may cause death or serious human
injury.
Indicates that incorrect handling by ignoring this symbol may cause human injury or damage to
properties.
Example of icons
The
symbol indicates a prohibited action. A concrete prohibited action is drawn in the symbol or near the symbol. (The left figure shows prohibition of disassembly.)
The
symbol indicates a forced action or an instruction. A concrete instruction is drawn in the symbol. (The left
figure shows an instruction to remove the power plug from the electrical outlet.)
Location for Installation
! CAUTION
! This machine weighs approximately 440 kg (970lb) (maximum value with full options). Place the machine
on a flat and stable surface.
Otherwise, the machine might be inclined, resulting in human injury.
! Do not place the machine in a dusty or humid location.
Otherwise, a fire or an electric shock might occur.
! Do not place the unit in a location that is subject to water leak or water splashes. If water enters the unit, a
fire or an electric shock might occur.
Power Connection
! WARNING
! Install the machine near the wall socket to avoid using an extension cord between the machine and the wall
socket. If an extension cord is absolutely required, do not use longer than 5m (15ft). Otherwise, a fire or an
electric shock might occur.
! Do not damage or rebuild the power cord. Placing a heavy object on the cord or pulling or bending
forcibly the cord may damage the cord, resulting in a fire or an electric shock.
! The power cord supplied with this product can be used only for this machine. Do not use it for
another electric product. A fire or an electric shock might occur.
! Do not plug or unplug the power cord if your hands are wet. Otherwise, an electric shock might
occur.
iv
! CAUTION
! Do not pull the power cord when unplugging it. Otherwise, it could become damaged and a fire or an
electric shock might occur. Be sure securely to hold on to the plug before unpluging it.
! If the machine is not used for a long time, for example due to consecutive holidays, unplug the power cord
from the electrical outlet for safety.
! Pull out the power plug from the electrical outlet more than once a year and clean the prongs of the plug
and their surroundings. Dust collected on these areas can result in fire.
Handling
! WARNING
! Do not place water containers or metallic objects on the machine. If water drips inside the machine or a
metallic object drops inside it, a fire or an electric shock might occur.
! Do not place any bare fire source such as candle on the unit.
! Do not insert or drop any metallic material or flammable substances into the machine through any opening.
A fire or an electric shock might occur.
! Do not remove the covers. Otherwise, you might be electrically shocked by the high-voltage part inside.
! Do not disassemble or rebuild the machine by yourself. Otherwise, a fire or an electric shock might
occur.
! If the machine emits excessive heat, smokes or foul odour, immediately turn off the power, unplug
the electrical (power) cord and contact your service representative because a fire or an electric
shock might occur.
! If something drops inside the machine, immediately turn off the Main Power Switch, unplug the
electrical (power) cord and contact your service representative. If you continue using it, a fire or an
electric shock might occur.
! CAUTION
! Never stick your hands or fingers in the openings around the Cover Sheet Tray and the Stacking Tray
during operation. Otherwise, human injury might occur.
! When moving the machine, contact your service representative. If you try to move the machine by force,
the machine might turn over, resulting in human injury.
! When removing jammed staples, take sufficient care to prevent injury to fingers.
v
Before Starting to Use
This section explains precautions you have to observe when using the machine.
Location for Installation
! The location for installation is determined based on consultation with the customer at the time of delivery.
! Contact your service representative before moving the machine.
! Avoid installing the machine in the locations listed below. Failure to observe this precaution may lead to machine failure or
human injury.
•
•
•
•
•
•
Locations that are subject to sudden temperature change.
Extremely hot and humid locations or cold and dry locations
Heated locations or locations to exposed to direct cold air, direct hot air, or direct radiant heat
Badly ventilated locations
Dusty locations
Locations that are subject to frequent vibration
Operation Environment
! Install the machine in a location of which the levelness meets the following conditions.
Front to rear: 3 mm (1/8") or less
Side to side: 3 mm (1/8") or less
! Appropriate environment conditions are shown below.
Temperature range: 15°C - 30°C (59°F to 86°F)
Humidity range: 40% - 70%(noncondensing)
Overall Dimensions
Space for extending the Booklet tray is required.
The dimensions are expressed in mm.
Dimensions of HC full system (mm)
Width
Depth
Height (*)
Remarks
Normal state
2,633
743
1,165
End of Standard Feed Tray to end of Booklet tray
Extended state
2,633
1,278
1,335
For opening/closing Paper Feed Tray on the stand
and ink cover
*:The optional touch panel display is not included.
vi
Handling of The Machine
! Do not turn off the Main Power Switch of the printer or unplug the electrical (power) cord during operation.
! Do not open any covers during operation.
! Do not move the machine.
! The machine has precision parts and driving parts inside. Do not handle the machine in other ways than described in this
manual.
! Do not place heavy objects on or apply shocks to the machine.
! Be sure to open and close any cover gently.
Power Connection
! Connect the power plug securely to the electrical outlet to avoid improper connection.
! Install the machine near the electrical outlet.
! Use only the power cord supplied by the seller of the finisher, or use a cord that is earthed, not longer than 4.5m, rated not less
than the finisher is rated, and authorized by the state or the region where it is used.
About connectors
! The allowable voltage for all input/output connectors is 5V.
Registration of Paper Size
Non-standard paper sizes can be registered in the printer or in the controller. When using non-standard size paper, be sure to
register the size. Up to five sizes can be registered in the printer and up to 20 sizes can be registered in the controller.
The paper sizes that can be registered are shown below. The paper sizes that can be used, however, differ depending on the
finisher functions to be used.
" Paper sizes that can be registered
Width (Vertical)
Length (Horizontal)
Paper sizes that can be registered in
the printer
100 - 330mm
(315/16 - 13")
148 - 488mm
(513/16 - 193/16")
Paper sizes that can be registered in
the controller
90 - 316mm
(39/16 - 127/16")
148 - 460mm
(513/16 - 181/8")
" Relation between the finisher functions and the paper sizes that can be used
Width (Vertical)
Length (Horizontal)
Booklet
210 - 316mm (81/4 - 127/16")
280 - 457mm (11 - 18")
Stapler
203 - 297mm (8 - 1111/16")
182 - 432mm (73/16 - 17")
Output to Stacking Tray
182 - 316mm (73/16 - 127/16")
182 - 460mm (73/16 - 181/8")
Offset output
203 - 297mm (8 - 1111/16")
182 - 460mm (73/16 - 181/8")
2-fold
210 - 316mm (81/4 - 127/16")
280 - 457mm (11 - 18")
# "HC User’s Manual for Printer Main Body" "5.1 Paper Size Entry"
# "HC User’s Manual for Console" "Controller Setting 2" "Custom Size Entry"
# "Finisher Function" #p.2
vii
Name of part
viii
(1)
Name of part
Function
Cover Sheet Tray
Load paper used as a front cover or a back cover.
#p.2
Paper placed here is not printed on.
(2)
Top Tray
If the Finisher functions are not used or if the output tray is not specified
from the printer driver, prints are output here.
Paper capacity: 500 sheets (*)
(3)
Stacking Tray
If the Stapler or Offset output function is used, prints are output here.
Even if these functions are not used, this tray can be specified as the output tray from the printer driver.
Paper capacity
2000 sheets (or 200 sets) (*)
(4)
Output button
Press to remove prints output on the Booklet tray so that the tray moves
to a position that facilitates removal of prints.
(5)
Booklet tray
Booklets or twice-folded prints are output here.
Paper capacity: 20 sets (*)
(6)
Right cover
-
(7)
Left cover
-
(8)
Transfer Cover
If a paper jam occurs when paper is transferred from the printer to the Finisher, open this cover and remove the jammed paper.
(9)
Stapler cartridge
A stapler cartridge is set. Take out when replacing staples or removing
jammed staples.
#p.43 #p.46
(10)
Stapler cartridge for centre binding
Two stapler cartridges for booklets are set. Take out when replacing staples or removing jammed staples.
#p.44 #p.47
(11)
Booklet unit
-
(12)
Trash box in punching
unit
Chips generated in punching are collected here. Take out when discarding chips.
#p.48
(13)
Stapler cartridge storage
Store stapler cartridges here.
* The paper capacity depends on the paper size, paper type, and orientation.
ix
Finisher Applications
Add cover
A front cover and/or a back cover are added to
prints.#p.2
Paper fold (2-fold)
Inner 2-fold of prints is performed.#p.11
Stapler
Prints are stapled.#p.6
Booklet
2-fold booklets are made. Also centre binding can be
performed with the Stapler function.#p.13
Punching
Prints are punched.#p.8
Offset output
Prints are output into the Stacking Tray with offset
positioning.#p.15
If HC Finisher A is connected, 2-hole or 3-hole
punching can be made.
If HC Finisher B is connected, 2-hole or 4-hole
punching can be made.
x
Contents
Chapter1 Finisher Applications . . . . . . . . . . . . . . . . . . . . . . . 1
Finisher Functions . . . . . . . . . . . . . . . . . . . . . . . . . . . . . . . . . . . . . . . . . . . . . . . . . . . . . 2
Add cover . . . . . . . . . . . . . . . . . . . . . . . . . . . . . . . . . . . . . . . . . . . . . . . . . . . . . . . . . . . . . . . . . . . . 2
Stapler . . . . . . . . . . . . . . . . . . . . . . . . . . . . . . . . . . . . . . . . . . . . . . . . . . . . . . . . . . . . . . . . . . . . . . . 6
Punching . . . . . . . . . . . . . . . . . . . . . . . . . . . . . . . . . . . . . . . . . . . . . . . . . . . . . . . . . . . . . . . . . . . . . 8
Paper Fold . . . . . . . . . . . . . . . . . . . . . . . . . . . . . . . . . . . . . . . . . . . . . . . . . . . . . . . . . . . . . . . . . . . 11
Booklet . . . . . . . . . . . . . . . . . . . . . . . . . . . . . . . . . . . . . . . . . . . . . . . . . . . . . . . . . . . . . . . . . . . . . . 13
Output Tray . . . . . . . . . . . . . . . . . . . . . . . . . . . . . . . . . . . . . . . . . . . . . . . . . . . . . . . . . . . . . . . . . . 15
Offset Output . . . . . . . . . . . . . . . . . . . . . . . . . . . . . . . . . . . . . . . . . . . . . . . . . . . . . . . . . . . . . . . . . 15
Example of Operation with Finisher . . . . . . . . . . . . . . . . . . . . . . . . . . . . . . . . . . . . . . 16
Example 1: Preparation of Stapled Material for Meeting . . . . . . . . . . . . . . . . . . . . . . . . . . . . . . . . 16
Example 2: Creation of Booklet with Centre Binding . . . . . . . . . . . . . . . . . . . . . . . . . . . . . . . . . . . 18
Example 3: Creation of Pamphlets with Inner 2-fold . . . . . . . . . . . . . . . . . . . . . . . . . . . . . . . . . . . 21
Chapter2 Troubleshooting . . . . . . . . . . . . . . . . . . . . . . . . . . 23
Explanation of Set Error Display . . . . . . . . . . . . . . . . . . . . . . . . . . . . . . . . . . . . . . . . . 24
Error Message and Error symbols . . . . . . . . . . . . . . . . . . . . . . . . . . . . . . . . . . . . . . . . . . . . . . . . . 24
Paper Jam Occurs . . . . . . . . . . . . . . . . . . . . . . . . . . . . . . . . . . . . . . . . . . . . . . . . . . . 28
H3 Paper Jam in the Paper Receiving Section . . . . . . . . . . . . . . . . . . . . . . . . . . . . . . . . . . . . . . . 30
H4 Paper Jam at the Right Transfer Path Cover . . . . . . . . . . . . . . . . . . . . . . . . . . . . . . . . . . . . . . 30
F1 . . . . . . . . . . . . . . . . . . . . . . . . . . . . . . . . . . . . . . . . . . . . . . . . . . . . . . . . . . . . . . . . . . . . . . . . . 31
F2 . . . . . . . . . . . . . . . . . . . . . . . . . . . . . . . . . . . . . . . . . . . . . . . . . . . . . . . . . . . . . . . . . . . . . . . . . 32
F3 . . . . . . . . . . . . . . . . . . . . . . . . . . . . . . . . . . . . . . . . . . . . . . . . . . . . . . . . . . . . . . . . . . . . . . . . . 33
F4 . . . . . . . . . . . . . . . . . . . . . . . . . . . . . . . . . . . . . . . . . . . . . . . . . . . . . . . . . . . . . . . . . . . . . . . . . 34
F5 . . . . . . . . . . . . . . . . . . . . . . . . . . . . . . . . . . . . . . . . . . . . . . . . . . . . . . . . . . . . . . . . . . . . . . . . . 35
F6 . . . . . . . . . . . . . . . . . . . . . . . . . . . . . . . . . . . . . . . . . . . . . . . . . . . . . . . . . . . . . . . . . . . . . . . . . 36
F7 . . . . . . . . . . . . . . . . . . . . . . . . . . . . . . . . . . . . . . . . . . . . . . . . . . . . . . . . . . . . . . . . . . . . . . . . . 37
F12 . . . . . . . . . . . . . . . . . . . . . . . . . . . . . . . . . . . . . . . . . . . . . . . . . . . . . . . . . . . . . . . . . . . . . . . . 38
F13 . . . . . . . . . . . . . . . . . . . . . . . . . . . . . . . . . . . . . . . . . . . . . . . . . . . . . . . . . . . . . . . . . . . . . . . . 39
F14 . . . . . . . . . . . . . . . . . . . . . . . . . . . . . . . . . . . . . . . . . . . . . . . . . . . . . . . . . . . . . . . . . . . . . . . . 39
F15 . . . . . . . . . . . . . . . . . . . . . . . . . . . . . . . . . . . . . . . . . . . . . . . . . . . . . . . . . . . . . . . . . . . . . . . . 40
F16 . . . . . . . . . . . . . . . . . . . . . . . . . . . . . . . . . . . . . . . . . . . . . . . . . . . . . . . . . . . . . . . . . . . . . . . . 41
F17 . . . . . . . . . . . . . . . . . . . . . . . . . . . . . . . . . . . . . . . . . . . . . . . . . . . . . . . . . . . . . . . . . . . . . . . . 42
Staples Run Out . . . . . . . . . . . . . . . . . . . . . . . . . . . . . . . . . . . . . . . . . . . . . . . . . . . . . 43
For Stapler Cartridge UR1 . . . . . . . . . . . . . . . . . . . . . . . . . . . . . . . . . . . . . . . . . . . . . . . . . . . . . . . 43
For Stapler Cartridge UR2 or UR3 . . . . . . . . . . . . . . . . . . . . . . . . . . . . . . . . . . . . . . . . . . . . . . . . . 44
Stapling Cannot Be Performed Properly . . . . . . . . . . . . . . . . . . . . . . . . . . . . . . . . . . . 45
For Stapler Cartridge UR1 . . . . . . . . . . . . . . . . . . . . . . . . . . . . . . . . . . . . . . . . . . . . . . . . . . . . . . . 46
For Stapler Cartridge UR2 or UR3 . . . . . . . . . . . . . . . . . . . . . . . . . . . . . . . . . . . . . . . . . . . . . . . . . 47
The Trash Box in Punching Unit is Full of Punch Dust . . . . . . . . . . . . . . . . . . . . . . . . 48
Other Trouble . . . . . . . . . . . . . . . . . . . . . . . . . . . . . . . . . . . . . . . . . . . . . . . . . . . . . . . 49
The Finisher Does Not Operate . . . . . . . . . . . . . . . . . . . . . . . . . . . . . . . . . . . . . . . . . . . . . . . . . . 49
The Finisher Does Not Operate according to the Setting . . . . . . . . . . . . . . . . . . . . . . . . . . . . . . . 49
xi
Chapter3 Appendix . . . . . . . . . . . . . . . . . . . . . . . . . . . . . . . 51
Consumables . . . . . . . . . . . . . . . . . . . . . . . . . . . . . . . . . . . . . . . . . . . . . . . . . . . . . . . .52
About Consumables . . . . . . . . . . . . . . . . . . . . . . . . . . . . . . . . . . . . . . . . . . . . . . . . . . . . . . . . . . . .52
Types of Consumables . . . . . . . . . . . . . . . . . . . . . . . . . . . . . . . . . . . . . . . . . . . . . . . . . . . . . . . . . 52
Specifications. . . . . . . . . . . . . . . . . . . . . . . . . . . . . . . . . . . . . . . . . . . . . . . . . . . . . . . . 53
Index . . . . . . . . . . . . . . . . . . . . . . . . . . . . . . . . . . . . . . . . . . . . . . . . . . . . . . . . . . . . . . .54
xii
Chapter1 Finisher Applications
This chapter describes finisher applications and principal finisher functions.
For details of the operation method and the setting method of the printer driver, refer to "HC5500 User's Manual for Printer Driver."
1
Finisher Functions
This section describes principal finisher functions.
For setting the functions described here, use the [Finisher] tab of the printer driver.
Add cover
A printed sheet of paper or another type of paper can be added to the body of prints as a front cover and/or a back cover. Load
the covers in the Cover Sheet Tray of the Finisher or in the Interposer Tray of the printer.
" Paper Types That Can Be Used for Add Cover
• Paper size and HC5500setting orientation:
• Paper weight: For Cover Sheet Tray: 60g/m2 - 220g/m2 (16-lb bond to 58.7-lb bond)
For Interposer Tray (Standard Feed Tray): 60g/m2 -210g/m2 (16-lb bond to 56-lb bond)
For Interposer Tray (Tray1/Tray2): 60g/m2 - 104g/m2 (16-lb bond to 28-lb bond)
• Up to 200 sheets can be loaded in the Cover Sheet Tray.
• If [Booklet] is [ON], back covers cannot be added.
• If [Separate books] is set in Details of [Booklet], either front covers or back covers cannot be added.
• The paper size that can be loaded as front covers are the same as the paper size for the body of prints. When loading front covers
of a different size from the body of prints, set the paper size of the tray (Cover Sheet Tray / Interposer Tray) to the size of [Output
paper size] on the [Layout] tab of the printer driver. However, do not set [Auto].
# "4.1/4.2/4.3 Standard Feed Tray" of "HC5500 User’s Manual for Printer Main Body"
# "4.11 Cover Sheet Tray" of "HC5500 User’s Manual for Printer Main Body"
• Irregular size paper cannot be used as covers.
• When loading covers in the Interposer Tray, setting is required in advance.
# "5.3 Separation Paper" of "HC5500 User’s Manual for Printer Main Body"
2
" Settings of Printer Related to This Function
• 4.1 Standard Feed Tray Setting / 4.2 Tray 1 Setting / 4.3 Tray 2 Setting
• 4.11 Cover Sheet Tray
• 5.3 Separation Paper
" Printer Driver Setting Related to This Function
• Output paper size on [Layout] tab
" Method of loading Covers
Depending on the combination of finisher functions, load the covers face up or face down.
1
• For adding covers to booklets: Load the covers face down so that the first page is located on the left side.
• For adding covers to prints other than booklets (Stapler, Punching, etc.): Load the covers face up so that the punching or
stapling position is located on the right side.
! When using the Cover Sheet Tray of the Finisher, load the covers as shown below.
3
! When using the Interposer Tray of the printer, load the covers as shown below.
4
" Flow of Paper
1
5
Stapler
Up to 100 sheets can be stapled at a specified position.
The initial setting is [OFF].
For the paper size and setting orientation, refer to #p.10
Stapled prints are output to the Stacking Tray.
" Paper Types That Can Be Used for Stapling
• Paper size and setting orientation:
• Paper weight: 46g/m2 - 210g/m2 (12-lb bond to 56-lb bond) (60g/m2 to 220g/m2 [16-lb bond to 58.7-lb bond] for cover
sheet)
" Maximum Number of Sheets for Stapling
• For A4, A4-R, B5-R, letter, and letter-R: 2 to 100 sheets
• For standard sizes other than those above: 2 to 65 sheets
• If the number of sheets exceeds the maximum number for stapling, printed sheets are output to the Stacking Tray without stapling.
• For paper shown below, the maximum number for stapling is 2 to 65 sheets.
- Paper with width in the paper ejection direction of 216 mm (81/2") or more
- Paper larger than the size of 297 mm (1111/16") long and 216 mm (81/2") wide
6
" Binding Margin and Auto Reducing
If the original has no margin for stapling, a margin can be made.
The binding margin width can be set from 0 mm to 50 mm (2") in 1 mm(0.04") increments.
If the image exceeds the print area because of margin setting, you can turn on [Auto reducing] to reduce the image size automatically.
1
" Relation to Punching
The Stapler function can be used with the Punching function. The selectable stapling positions are restricted according to the
setting of Punching.
Setting of
Punching
Stapling position
OFF
Left 2 positions / Left top 1 position / Top 2 positions / Top left 1 position / Top
right 1 position / Right 2 positions / Right top 1 position
Left
Left 2 positions / Left top 1 position
Top
Top 2 positions / Top left 1 position / Top right 1 position
Right
Right 2 positions / Right top 1 position
" Flow of Paper
7
Punching
The punching hole position can be selected.
If HC Finisher A is connected, 2-hole or 3-hole punching can be made. If HC Finisher B is connected, 2-hole or 4-hole punching
can be made.
The initial setting is [OFF].
For the paper size and setting orientation, refer to #p.10
" Paper Types That Can Be Punched
Punching hole
Paper size and setting orientation that can be used for punching
2 holes (initial setting)
3 holes
4 holes
• Paper weight: 46g/m2 - 157g/m2 (12-lb bond to 42-lb bond) (up to 220g/m2 [58.7-lb bond] for cover sheet)
" Relation to Stapler
The Punching function can be used with the Stapler function. In this case, the selectable punching positions are restricted
according to the setting of the Stapler function.
Setting of Stapler
Punching position
OFF
Left / top / right
Left 2 positions / Left top 1 position
Left
Top 2 positions / Top left 1 position / Top right 1 position Top
Right 2 positions / Right top 1 position
8
Right
" Binding Margin and Auto Reducing
A margin can be set so that the punching holes do not overlap the image area.
The binding margin width can be set from 0 mm to 50 mm (2") in 1 mm (0.04") increments.
If the image exceeds the print area because of margin setting, you can turn on [Auto reducing] to reduce the image size automatically.
1
" Flow of Paper
The tray to which prints are output is switched according to the setting of [Output Tray].
9
Relation between Paper Setting Orientation in Tray and Stapling/Punching Position
For stapling and punching, the paper width shall be within the range from 203 mm (8") to 297 mm (1111/16").
Load the paper in the proper orientation in a tray so that the stapling or punching position is perpendicular to the paper output direction. The
image print orientation is automatically rotated according to the stapling/punching position and the paper setting orientation in the tray.
Paper output
image
Paper size and setting orien- A4-R, B5-R, Letter-R
tation in tray
A3, A4, B4, Ledger, Legal, Letter
Original
Portrait
Portrait
Landscape
Landscape
Left top 1 position / Left
Top left 1 position / Top
Right top 1 position / Right
Top right 1 position / Top
Top 2 positions / Top
Left 2 positions / Left
Right 2 positions / Right
If you set the stapling position to Left top 1 position, Right top 1 position or Top right 1 position on A4-R or A3 size paper,
stapling is performed obliquely.
10
Paper Fold
2-fold functions can be used.
1
" Paper Types That Can Be Used for Paper 2-fold
• Paper size and setting orientation:
• Paper weight:60g/m2 to 105g/m2 (16-lb bond to 28-lb bond)
" Designation of Print Face
The print face can be selected.
• Print inside (initial setting): The print face (*) is located inside when the paper is folded.
• Print outside:
The print face (*) is located outside when the paper is folded.
*First page in duplex printing
11
" Flow of Paper
Either stapling or punching cannot be performed.
12
Booklet
Duplex printing of multiple continuous pages is performed with pagination, and the prints are folded in two to create a booklet.
Centre binding by stapling can also be performed.
1
" Paper Types That Can Be Used for Booklet
• Paper size and setting orientation:
• Paper weight: 60g/m2 to 90g/m2 (16-lb bond to 24-lb bond) (up to 220g/m2 [58.7-lb bond] for covers)
" Maximum Stapling Capacity
The capacity is 60 pages (15 sheets) in total including covers.
" Separate Books
When making a booklet of 16 sheets (61 pages) or more, the separate books setting is required.
• Auto: For fold and staple, prints are separated every 15 sheets (60 pages).
For only Fold, prints are separated every 5 sheets (20 pages).
• No. /sheets?: The number of sheets separated with the separate books function can be set.
The number can be set from 1 to 15 sheets (60 pages) for Fold and staple and from 1 to 5 sheets (20 pages)
for Fold.
When creating a booklet from prints of 16 sheets (61 pages) or more, be sure to use the Separate books function. If [Separate books]
is set to [OFF] for prints of 16 sheets (61 pages) or more, stapling is not performed and a booklet with an incorrect page order and
fold is created.
" Centre Binding Margin / Auto Reducing
To prevent the folding portions from hiding in 2-fold, a margin can be set at the centre of the folding portion.
The centre binding margin can be set from 0 mm to 50 mm (2") in 1 mm (0.04") increments.
Also the image can be automatically reduced so that the image is included in the image area.
" Print Cover Separately
When adding a cover to a booklet, the cover and other pages can be printed separately.
13
" Flow of Paper
Method of Using the Booklet Tray
Up to 20 sets can be output to the Booklet tray.
When outputting a lot of booklets into the Booklet tray, pull out the plate and turn it down.
Place a box or the like under the tray to store booklets.
To return the plate to its original position, raise the plate and slide it toward the Finisher.
• When the Booklet tray becomes full, a message appears in the display of the printer.
Remove all the output booklets.
• The maximum number of sets that can be output depends on the paper size and the number of pages.
14
Output Tray
Use this function to set a tray to which prints are output. Normally, set this function to [Auto].
" Settings
• Auto:
An adequate tray is automatically selected according to the driver setting.
• Stacking Tray: Prints are output to the Stacking Tray. If the number of sheets to be output exceeds 500, select the Stacking
Tray.
The size of paper that can be output to the Stacking Tray is 182 mm to 330mm x 182 mm to 488 mm
(73/16" to 13" x 73/16" to 193/16").
(for stapling: 203 mm to 297mm x 182 mm to 432 mm [8" to 1111/16" x 73/16" to 17"])
1
If the following functions are set, [Stacking Tray] cannot be selected.
• Booklet:[Fold and staple] or [Fold] is selected.
Offset Output
Prints are output to the Stacking Tray at an offset position for each set.
[Offset output] is a function of the Stacking Tray. This function cannot be used with functions that do not use the Stacking Tray such
as Booklet. The [Job separation] function on the [Option] tab of the printer driver cannot be used with this function either.
" Paper Types That Can Be Used for Offset Output
• Paper size:
• Paper weight: 46g/m2 - 210g/m2 (12-lb bond to 56-lb bond) (60g/m2 to 220g/m2 [16-lb bond to 58.7-lb bond] for cover
sheet)
15
Example of Operation with Finisher
Example 1: Preparation of Stapled Material for Meeting
Staple two or more sheets of paper like the conference material etc.
Procedure for preparing the following material is described here.
• Stapling at left top 1 position
• Offset output for each set
• Binding margin width: 10 mm (3/8") (with auto reducing)
Printed sheets or other sheets of paper can be added as front covers and back covers.
#p.2
16
1
Prepare data to be printed.
2
Display the [Print] dialog box.
4
Set the following items on the [Finisher] tab.
• Stapler: Left top 1 position
• Offset output: ON
Select [Print] from the [File] menu.
1
3
Enter the Number of copies and click
the [Properties] button.
5
Click the [Details] button for [Stapler]
and set the following items if you
need.
• Put binding margin: Place a checkmark.
• Binding margin width: 10 mm (3/8")
• Auto reducing: Place a checkmark.
!
Be sure to clear the checkmark from [Collate].
Set the ejection mode on the [Main setting]
tab.
6
Perform printing.
Stapled prints are output into the Stacking Tray.
Since the prints are offset for each set, classification is
easy.
17
Example 2: Creation of Booklet with Centre Binding
An example of procedure for creating twice-folded booklets such as pamphlet and catalog is described below. This procedure is
useful for making travel pamphlets, advertisements, leaflets, handy manuals, and catalogs.
Procedure for creating the following booklets is described here.
• 2-fold and centre binding (Stapler)
• Centre binding margin: 10 mm (3/8") (auto reducing)
• The capacity for stapling is 60 pages (15 sheets) in total including covers.
• Printed sheets or other sheets of paper can be added as the cover.
#p.2
18
1
Prepare data to be printed.
2
Display the [Print] dialog box.
4
Set the following item on the [Finisher] tab.
Booklet: Fold and Staple
Select [Print] from the [File] menu.
1
3
Enter the Number of copies and click
the [Properties] button.
The printer driver performs automatically the optimum setting.
5
Click the [Details] button for [Booklet]
and set the following items if you
need.
• Put centre binding margin: Place a checkmark.
• Binding margin width: 10 mm (3/8")
• Auto reducing: Place a checkmark.
!
Be sure to clear the checkmark from [Collate].
Set the ejection mode on the [Main setting]
tab.
19
6
Perform printing.
Booklets with centre binding are output into the Booklet tray.
7
Press the Booklet eject button on the
Finisher and remove the booklets.
The output booklets move to the right so that they can
be easily removed.
20
Example 3: Creation of Pamphlets with Inner 2-fold
Direct mail, advertisements, and leaflets are made by folding in two.
1
Paper that can be used for the desired fold is set in a feed tray.#p.11
Procedure for creating the following prints is described here.
• The original size is A4-R.
• Duplex printing is performed with the first page outside.
1
Prepare data to be printed.
2
Display the [Print] dialog box.
3
Enter the Number of copies and click
the [Properties] button.
Select [Print] from the [File] menu.
!
Be sure to clear the checkmark from [Collate].
Set the ejection mode on the [Main setting]
tab.
21
4
Set the following item on the [Main
setting] tab.
Duplex printing: Short edge binding
5
Set the following item on the [Finisher] tab.
Paper fold: fold
6
Click the [Details] button for [Paper
fold] and set the following item.
Folding direction: Print outside
7
22
Perform printing.
The data is printed.
8
Press the Booklet eject button on the
Finisher and remove the booklets.
The output booklets move to the right so that they can
be easily removed.
Chapter2 Troubleshooting
This chapter describes the method of removing jammed paper from inside the Finisher and the operation
against jammed staples.
23
Explanation of Set Error Display
If trouble occurs in the Finisher during printing, printing stops and a symbol lights up on the Operation Panel of the printer or an error
message appears in the display.
You can check the location based on the symbol or the number and see the information from the message in the display.
When an error occurs in the Finisher, error symbol 21 lights up.
If error symbol 1, 2 or 5 - 20 lights up, an error occurs in the printer. For measures against the error, refer to "HC5500 User's Manual
for Printer Main Body."
Error Message and Error symbols
" Error Number
Under a message in the display, an error number that consists of alphanumeric characters is displayed. The first letter of the
error number indicates the error type.
The number of digits of the error number depends on the error location.
Example of
Error Number
S00-000
24
Description
Service Call
Displayed when inspection or repair by service personnel is required.
Contact your local dealer (or service representative).
X00-000 F00
Jam Error
Displayed when a paper jam occurs in the Finisher.
X00-000 H00
Jam Error
Displayed when a paper jam occurs in the printer. For jammed paper
removal, refer to "HC5500 User's Manual for Printer Main Body."
U00-000
Unit Error
Displayed when inspection or repair by service personnel is required.
Contact your local dealer (or service representative).
Y00-000
Consumables Error
Displayed when the trash box in punching unit is full of chips by
punching or staples run out.
Z00-000
Check Settings Error
Displayed when a cover or the like is not securely closed.
W00-000
Warning
Various warning messages are displayed.
Y00-000
Consumables Error
Lighting location
Message
Solution
Discard all chips from the trash box
in punching unit.
#p.48
If the CANCEL key is pressed,
the machine except the relevant
unit can be used.
Staples run out. Set new staples.
#p.43
2
If the CANCEL key is pressed,
the machine except the relevant
unit can be used.
Z00-000
Check Settings Error
Lighting location
Message
Solution
A cover is not securely closed. Check
the location indicated by the error
number and close the cover securely.
The Booklet maker unit is not
securely installed. Install the unit
securely.
S00-000
Service Call
Lighting location
Message
Solution
An error occurs in the Finisher. Turn
off the power and on again. If the
same message appears again, contact
your local dealer (or service representative). At this time, tell the error
number indicated in the message display of the printer.
25
X00-000
Paper Jam Error
Lighting location
Message
Solution
A paper jam occurs in the Finisher.
Check the jam location and remove
the paper.
"Paper Jam" #p.28
U00-000
Unit Error
Lighting location
Message
Solution
An error occurs in the Finisher. Turn
off the power and on again. If the
same message appears again, contact
your local dealer (or service representative). At this time, tell the error
number indicated in the message display of the printer.
If the CANCEL key is pressed,
the machine except the relevant
unit can be used.
26
W00-000
Warning
Lighting location
Message
Solution
Paper in the Cover Sheet Tray runs
out. Load paper in the tray.
The paper capacity is exceeded.
Remove paper and press the CANCEL key.
xxxxx is a tray name or a unit
name
2
An error occurs in the Finisher. Turn
off the power and on again. If the
same message appears again, contact
your local dealer (or service representative). At this time, tell the error
number indicated in the message display of the printer.
If the CANCEL key is pressed,
the machine except the relevant
unit can be used.
Paper in the Cover Sheet Tray does
not match the paper size specified by
the printer driver. Load proper paper
and check the Operation Panel of the
printer for the paper size that has
been set in "Menu 4.11 Cover Sheet
Tray."
# "HC5500 User's Manual for
Printer Main Body"
Paper in the Interposer Tray runs out.
Load paper in the tray.
"Separation Paper" is set to "OFF" in
the menu setting of the printer. To
insert separation paper, select the
desired tray in "5.3 Separation Paper"
of the menu setting.
# "HC5500 User's Manual for
Printer Main Body."
27
Paper Jam Occurs
If a paper jam occurs in the Finisher or in the printer, printing stops and the jam location is indicated on the Operation Panel and the
optional touch panel. In this case, remove the jammed paper and resume printing.
Since this printer performs high speed paper feeding and output, paper jams may occur at multiple locations. In this case, remove all
the jammed paper.
!
Gently remove the jammed paper. Take care not to leave pieces of paper inside the printer and the Finisher.
" Paper Jam Location
Details of the locations indicated on the Operation Panel and the optional touch panel display are shown below.
! Operation Panel of printer
! PS7R touch panel (optional)
As shown in the figure below, numbers that indicate paper jam locations are indicated on the screen. Touch the number to display the method of removing jammed paper.
Remove all jammed paper until all the paper jam indicators are cleared because paper remains if any indicator is displayed.
After removing jammed paper, close the covers of the printer and the Finisher and check that all paper jam location display is
cleared on the Operation Panel of the printer and on the optional touch panel display.
For removing jammed paper from the printer (when H1 - H20 is lit), refer to "HC5500 User's Manual for Printer Main Body."
28
For detailed procedure for removing jammed paper, refer to the respective indicated pages.
Jam location
Printer
Finisher
Page referred to
H3 Paper Receiving section
#p.30
H4 Right Transfer Path Cover
#p.30
F1
#p.31
F2
#p.32
F3
#p.33
F4
#p.34
F5
#p.35
F6
#p.36
F7
#p.37
F12
#p.38
F13
#p.39
F14
#p.39
F15
#p.40
F16
#p.41
F17
#p.42
2
F8 - F11 are not displayed.
29
H3 Paper Jam in the Paper Receiving Section
1
Open the Transfer Cover.
!
3
2
If it is not easy to pull out the paper, open
the Front Cover of the printer and remove
the paper from the side of the Transfer
Roller because the paper might be torn.
Close the Transfer Cover.
Pull out and remove the jammed
paper.
H4 Paper Jam at the Right Transfer Path Cover
30
1
Open the Transfer Cover.
3
Remove the jammed paper.
2
Open the Right Transfer Path Cover.
4
Return the covers to their original
positions.
F1
1
Open the covers.
5
Return [1a] to its original position.
2
2
Open [1a] downward.
3
Remove the jammed paper.
4
If it is not easy to pull out the paper,
open the Transfer Cover and remove
the jammed paper.
6
Close the covers.
31
F2
32
1
Open the covers.
5
Return [1a] and [1d] to their original
positions.
2
Open [1a] downward and remove the
jammed paper while turning [1c]
counterclockwise.
6
Close the covers.
3
If it is not easy to pull out the paper,
raise [1d] to lock it.
4
While turning [1c] clockwise, remove
the jammed paper.
F3
1
Open the covers.
5
Return [1b] and [1d] to their original
positions.
2
2
Open [1b] to the right and remove the
jammed paper.
3
If it is not easy to pull out the paper,
raise [1d] to lock it.
4
While turning [1c] clockwise, remove
the jammed paper.
6
Close the covers.
33
F4
34
1
Open the covers.
2
Open [3d] and [3b] to the left and
remove the jammed paper.
3
If it is not easy to pull out the paper,
raise [1d] to lock it.
4
While turning [3a] clockwise, remove
the jammed paper.
5
Return [1d] and [3b] to their original
positions and then return [3d] to its
original position.
6
Close the covers.
F5
1
Open the covers.
5
Return [3b] to its original position and
then return [3d] and [3e] to their original positions.
2
2
Open [3e] downward.
6
3
While turning [3c] clockwise, remove
the jammed paper.
4
If it is not easy to pull out the paper,
open [3d] and [3b] to the left, and
remove the jammed paper.
Close the covers.
35
F6
36
1
Open the covers.
2
Raise [3g] to lock it.
3
While turning [3f] clockwise, remove
the jammed paper.
4
Return [3g] to its original position.
5
Close the covers.
F7
1
Open the covers.
5
Close the covers.
2
2
Open [4b] to the left.
3
While turning [3a] clockwise, remove
the jammed paper.
4
Return [4b] to its original position.
37
F12
38
1
Open the covers.
2
Pull out the Booklet maker unit [4] to
the front side.
3
Turn [4a] until no paper comes out.
4
Grasp and pull the green tab to open
the cover and remove the jammed
paper.
5
Return the green tab to its original
position and return the Booklet maker
unit [4] to its original position.
6
Close the covers.
F13
1
Remove the paper jammed in the Top
Tray.
2
Open and close the covers.
2
F14
1
Remove the paper jammed in the
Stacking Tray.
2
Open and close the covers.
39
F15
40
1
Open the covers.
2
Turn [4a] clockwise until no paper
comes out into the Booklet tray.
3
Close the covers.
F16
1
Press the cover button [1e] located on
the Cover Sheet Tray to open the
cover and remove the jammed paper.
5
Close the left cover.
2
6
2
If it is not easy to pull out the paper,
open the left cover.
3
Open [1b] to the right and remove the
jammed paper.
4
Return [1b] to its original position.
Return the cover of the Cover Sheet
Tray to its original position.
41
F17
1
Open the Transfer Cover.
2
Pull out and remove the jammed
paper.
!
3
42
If it is not easy to pull out the paper, do not
pull it forcibly because the paper might be
torn. In this case, open the left cover of the
Finisher and remove the paper from the
side of the Transfer Roller.
Close the Transfer Cover.
Staples Run Out
When staples run out, printing stops and a message appears in the printer display. Check the message and insert new staples using
the following procedure.
For Stapler Cartridge UR1
1
Open the cover.
4
Insert a new staple case into the cartridge.
2
Hold the handle of the cartridge and
pull it to the front and up a little.
5
Remove the sealing tape from the staple case.
6
Close the cover of the cartridge.
3
Press the points indicated by the
arrows (1) to flip open the cover of the
cartridge (2) and remove the staple
case (3).
2
43
7
Return the cartridge to its original
position.
8
Close the cover.
4
Hold the tabs located on both sides of
the new cartridge and insert the cartridge into the unit.
Push the cartridge in until it clicks.
For Stapler Cartridge UR2 or UR3
1
Open the cover.
Press the cartridge down until it clicks.
2
3
44
While pressing the lever to the right,
pull out the unit to the front.
Hold the tabs located on both sides of
the cartridge and lift the cartridge to
the upper left.
5
Return the unit to its original position.
6
Close the cover.
Stapling Cannot Be Performed Properly
This section describes the measures against stapling failure.
2
When stapling results in these problems, contact your local dealer (or service representative).
45
For Stapler Cartridge UR1
1
Open the cover.
5
Return the cartridge to its original
position.
Press the cartridge down until it clicks.
2
3
Hold the handle of the cartridge and
pull it to the front side to remove while
raising it a little.
Open the cover of the cartridge and
remove the jammed staple.
! CAUTION
Take care not to injure your fingers or the like.
4
46
If the jammed staple cannot be
removed, press the bottom of the cartridge in the direction indicated by the
arrow to remove the staple.
6
Close the cover.
For Stapler Cartridge UR2 or UR3
1
Open the cover.
5
Hold the tabs located on both sides of
the cartridge and return the cartridge
to the unit as it was.
Press the cartridge down until it clicks.
2
2
3
4
While pressing the lever to the right,
pull out the unit to the front side.
Hold the tabs located on both sides of
the cartridge and lift the cartridge to
the upper left.
6
Return the unit to its original position.
7
Close the cover.
Remove the jammed staple.
! CAUTION
Take care not to injure your fingers or the like.
47
The Trash Box in Punching Unit is Full of Punch Dust
If the trash box in punching unit becomes full of chips (punch dust), printing stops and a message appears in the display of the printer.
Check the message and remove the trash box in punching unit to discard the chips.
!
• When the trash box is removed, be sure to discard all the chips. If chips remain, the box becomes full of chips
before the message indicating replacement is displayed, resulting in failure.
• Be sure to perform this operation while the printer power is on. When the printer is in the Stand-by mode or Sleep
mode, press the Wake-Up Key or Sleep Key on the operation panel to turn on the printer power. If not, the printer
cannot recognize that the trash box in punching unit is emptied.
1
Open the cover.
4
Return the trash box in punching unit to
its original position.
2
Pull out the trash box in punching unit to
the front side to remove it.
5
Close the cover.
3
Discard all the chips.
Check that no chip remains in the trash box.
48
Other Trouble
The Finisher Does Not Operate
Problem
Cause and Solution
The Finisher does not operate.
• Check to see if the power plug is properly inserted into the outlet.
• Check to see if the printer is securely connected to this unit through the
cord.
• Check to see if the printer main power is on. If the power is off, turn on the
power and then press the Sleep Key on the Operation Panel of the printer.
• Turn off the printer power and then on again.
Alternatively, restart the computer that is connected to the printer.
If the Finisher does not operate nevertheless, contact your local dealer (or
service representative).
An error occurs.
2
An error occurs in the printer or the Finisher.
Check the error message displayed on the Operation Panel of the printer and
take proper measures.
"Chapter 3 Troubleshooting" of "HC5500 User's Manual for Printer Main
Body" #p.3-1
The Finisher Does Not Operate according to the Setting
Problem
Cause and Solution
Covers cannot be added.
[Add cover] is not set in the printer driver.
Set [Add cover] on the [Finisher] tab in the printer driver.
"Add cover" of "HC5500 User's Manual for Printer Driver" #p.3-3
Paper is not loaded in the Cover Sheet Tray.
Check the paper types and the number of sheets that can be loaded in the
Cover Sheet Tray and load the paper.
"Add cover" #p.2
Setting of the Cover Sheet Tray is not performed.
For loading paper in the Cover Sheet Tray, register the type of paper to be
loaded using menu setting "4.11 Cover Sheet Tray" of the printer.
"4.11 Cover Sheet Tray" of "HC5500 User's Manual for Printer Main Body"
#p.2-29
When registering, match the menu settings with the settings of [Output paper
size] and [Paper type] of the printer driver. If the settings do not match, the
printer judges that no paper is loaded and does not perform printing.
The orientation of the covers is different from The orientation of setting of the covers is different.
the setting.
For adding covers to booklets, load the paper with the back side up and the
first page to the left in the Cover Sheet Tray.
For adding covers to prints other than booklets using stapling or punching,
load the paper with the front side up and the stapling or punching position to
the right.
"Chapter 3 Troubleshooting" of "HC5500 User's Manual for Printer Main
Body" #p.3-1
49
50
Chapter3 Appendix
51
Consumables
About Consumables
You can check the status of printer operation and consumables on the [Monitoring screen] of RISO Console PS7R.
For details, refer to "HC5500 User's Manual for Console."
Types of Consumables
Type of staple
Quantity
HC STAPLE 100
5000 pcs. x 3 cases
HC STAPLE BOOKLET
5000 pcs. x 4 cases
!
52
Use staples recommended by our company. Do not use improper consumables because they may cause
failure or trouble.
Specifications
Tray System
Top Tray: Sorting, stacking
Stacking Tray: Sorting, stacking (offset)
Paper Size
Top Tray: Max. A3W or equivalent (330 mm x 488 mm [13" x 193/16"])
Min. 100 mm x 148 mm (4" x 513/16")
Stacking Tray: 182 mm to 330mm x 182 mm to 488 mm (73/16" to 13" x 73/16" to 193/16") (*1)
Use of Cover Sheet Tray: A3/A4/A4-R/B4/B5/B5-R/Ledger/Legal/Letter/Letter-R
For stapling: A3/A4/A4-R/B4/B5-R/Ledger/Legal/Foolscap/Letter/Letter-R/ custom size entry
(203mm to 297mm x 182 mm to 432 mm [8" to 1111/16" x 73/16" to 17"])
3
For punching (2 holes): A3/A4/A4-R/B4/B5-R/Ledger/Legal/Letter-R
For punching (3 holes): A3/A4-R/B4/B5-R/Ledger/Letter-R
For punching (4 holes): A3/A4-R/Ledger/Letter-R
For creation of booklet:A3/A4/B4/Ledger/Legal/Foolscap/Letter/ custom size entry (210 mm to
316mm x 280 mm to 457 mm [81/4" to 127/16" x 11" to 18"])
For offset output: 203mm to 297mm x 182 mm to 460 mm (8" to 1111/16" x 73/16" to 181/8")
(For stapling: 203mm to 297mm x 182 mm to 432 mm (8" to 1111/16" x 73/16" to 17")
Paper Weight
Cover Sheet Tray: 60 to 220g/m2 (16-lb bond to 58.7-lb bond)
Top Tray: 46 to 210g/m2 (12-lb bond to 56-lb bond) paper, postcard (up to 220g/m2 [58.7-lb bond]
for cover sheet)
Stacking Tray: 46 to 210g/m2 (12-lb bond to 56-lb bond) paper (up to 220g/m2 [58.7-lb bond] for
cover sheet)
Booklet Tray: 60 to 90g/m2 (16-lb bond to 24-lb bond) paper (up to 220g/m2 [58.7-lb bond] for cover
sheet)
Paper Capacity (*2)
Top Tray: 500 sheets
Cover Sheet Tray: 200 sheets
Stacking Tray: 2,000 sheets (200 sets)
Booklet Tray: 20 sets
Stapling Capacity (*2)
Stapler: 2 to 100 sheets (2 to 65 sheets for A4 size or larger)
Centre binding: 2 to 15 sheets (including covers)
Paper Capacity for Folding
(*2)
Fold and staple: 2 to 15 sheets
2-fold: 1 to 5 sheets
Power Source
100 - 120 / 220 - 240 V~, 50/60 Hz, 2.0 / 1.0 A or more
Power Consumption
Maximum: 175 W or less
Stand-by: Approximately 30 W or less
Sleep mode: Approximately 1W or less
Operating Noise
Operating: 68 dB or less
Operating Environment
Temperature: 15°C to 30°C (59°F to 86°F) ; Humidity: 40% to 70% (no dew condensation)
Mass (*3)
130kg (286lb) (with transfer unit: 143 kg [315lb])
Dimensions (W x D x H)
1,050 mm x 725 mm x 1,165 mm (415/16" x 289/16" x 457/8") (with transfer unit: 1,358 mm x 725 mm
x 1,165mm [537/16" x 289/16" x 457/8"])
*1 The maximum paper size that can be specified by the printer driver is 316 mm x 460 mm (127/16" x 181/8").
*2 For 85g/m2 (22.6-lb bond), A4
*3 Consumables are not included.
53
Index
A
Location for Installation . . . . . . . . . . . . . . . . . . . . . . iv, vi
Add cover . . . . . . . . . . . . . . . . . . . . . . . . . . . . . . . . . . . 2
O
B
Offset Output . . . . . . . . . . . . . . . . . . . . . . . . . . . . . . . 15
Operation Environment . . . . . . . . . . . . . . . . . . . . . . . . vi
Output Tray . . . . . . . . . . . . . . . . . . . . . . . . . . . . . . . . 15
Overall Dimensions . . . . . . . . . . . . . . . . . . . . . . . . . . . vi
Booklet . . . . . . . . . . . . . . . . . . . . . . . . . . . . . . . . . 13, 18
C
Check Settings Error . . . . . . . . . . . . . . . . . . . . . . . . . 25
Consumables Error . . . . . . . . . . . . . . . . . . . . . . . . . . 25
Cover . . . . . . . . . . . . . . . . . . . . . . . . . 43, 44, 46, 47, 48
E
Error . . . . . . . . . . . . . . . . . . . . . . . . . . . . . . . . . . . . . .
Error Message . . . . . . . . . . . . . . . . . . . . . . . . . . . . . .
Error Number . . . . . . . . . . . . . . . . . . . . . . . . . . . . . . .
Error symbols . . . . . . . . . . . . . . . . . . . . . . . . . . . . . . .
24
24
24
24
P
Paper Fold . . . . . . . . . . . . . . . . . . . . . . . . . . . . . . . . . 11
Paper fold. . . . . . . . . . . . . . . . . . . . . . . . . . . . . . . . . . 21
Paper Jam . . . . . . . . . . . . . . . . . . . . . . . . . . . . . . . . . 28
Paper Jam Error. . . . . . . . . . . . . . . . . . . . . . . . . . . . . 26
Paper Receiving Section . . . . . . . . . . . . . . . . . . . . . . 30
Punching . . . . . . . . . . . . . . . . . . . . . . . . . . . . . . . . . . . 8
R
F
Right Transfer Path Cover . . . . . . . . . . . . . . . . . . . . . 30
F1 . . . . . . . . . . . . . . . . . . . . . . . . . . . . . . . . . . . . . . . . 31
F12 . . . . . . . . . . . . . . . . . . . . . . . . . . . . . . . . . . . . . . . 38
F13 . . . . . . . . . . . . . . . . . . . . . . . . . . . . . . . . . . . . . . . 39
F14 . . . . . . . . . . . . . . . . . . . . . . . . . . . . . . . . . . . . . . . 39
F15 . . . . . . . . . . . . . . . . . . . . . . . . . . . . . . . . . . . . . . . 40
F16 . . . . . . . . . . . . . . . . . . . . . . . . . . . . . . . . . . . . . . . 41
F17 . . . . . . . . . . . . . . . . . . . . . . . . . . . . . . . . . . . . . . . 42
F2 . . . . . . . . . . . . . . . . . . . . . . . . . . . . . . . . . . . . . . . . 32
F3 . . . . . . . . . . . . . . . . . . . . . . . . . . . . . . . . . . . . . . . . 33
F4 . . . . . . . . . . . . . . . . . . . . . . . . . . . . . . . . . . . . . . . . 34
F5 . . . . . . . . . . . . . . . . . . . . . . . . . . . . . . . . . . . . . . . . 35
F6 . . . . . . . . . . . . . . . . . . . . . . . . . . . . . . . . . . . . . . . . 36
F7 . . . . . . . . . . . . . . . . . . . . . . . . . . . . . . . . . . . . . . . . 37
Finisher . . . . . . . . . . . . . . . . . . . . . . . . . . . . . . . . . . . . 1
Functions . . . . . . . . . . . . . . . . . . . . . . . . . . . . . . . . . . . 2
S
H
Unit Error . . . . . . . . . . . . . . . . . . . . . . . . . . . . . . . . . . 26
H3. . . . . . . . . . . . . . . . . . . . . . . . . . . . . . . . . . . . . . . . 30
H4. . . . . . . . . . . . . . . . . . . . . . . . . . . . . . . . . . . . . . . . 30
W
Service Call . . . . . . . . . . . . . . . . . . . . . . . . . . . . . . . . 25
Specifications. . . . . . . . . . . . . . . . . . . . . . . . . . . . . . . 54
Staple. . . . . . . . . . . . . . . . . . . . . . . . . . . . . . . . . . . . . 16
Stapler . . . . . . . . . . . . . . . . . . . . . . . . . . . . . . . . . . . . . 6
Stapler Cartridge UR1 . . . . . . . . . . . . . . . . . . . . . 43, 46
Stapler Cartridge UR2 . . . . . . . . . . . . . . . . . . . . . 44, 47
Stapler Cartridge UR3 . . . . . . . . . . . . . . . . . . . . . 44, 47
Staples. . . . . . . . . . . . . . . . . . . . . . . . . . . . . . . . . . . . 43
Stapling . . . . . . . . . . . . . . . . . . . . . . . . . . . . . . . . . . . 45
T
Trash Box in Punching Unit . . . . . . . . . . . . . . . . . . . . 48
U
Warning . . . . . . . . . . . . . . . . . . . . . . . . . . . . . . . . . . . 27
L
List of Options . . . . . . . . . . . . . . . . . . . . . . . . . . . . . . 53
033-03017-100
54


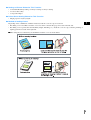
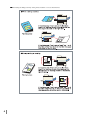

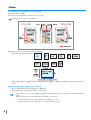

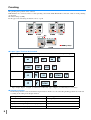
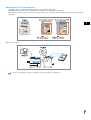


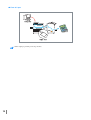

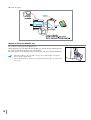


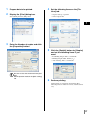

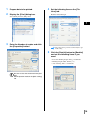


![1 Click the [OK] button.](http://vs1.manualzilla.com/store/data/005894494_1-d1f52ee6fd3b2146a5f252d3f1858c3b-150x150.png)


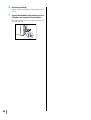
![[4] para - Riso.com](http://vs1.manualzilla.com/store/data/006041379_1-f987c63d0f56da21f929a771461d5686-150x150.png)


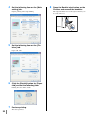
![2 Haga clic en el botón [Aceptar].](http://vs1.manualzilla.com/store/data/006292855_1-18424f3b5bf7ebf043fd2e6aa576beb6-150x150.png)

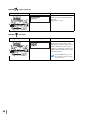
![2 Clique no botão [OK].](http://vs1.manualzilla.com/store/data/006043970_1-e2974f1cd0f0465d2cb4d13e53c48ce2-150x150.png)