1
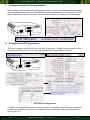
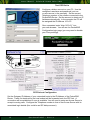
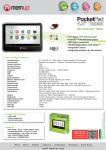
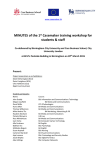
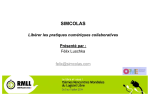
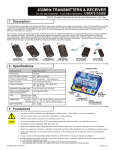
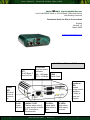
M U LT E N E T
P O C K E T PA D R O U T E R
e
MULT NET PocketPAD Router
Low Cost RS232 Serial to 10/100 Base-T Ethernet Device
with Routing functions
Quickstart Guide for Dial-In Connections
English
Version 1.0
March 2005
[email protected]
10/100 Base-T PocketPAD Router
NET
10/100 Base-T
Ethernet Port
10/100 LED
Ethernet speed
indication:
ON = 100 Mbps
OFF = 10 Mbps
COM
Serial Ports
Heartbeat
LED
Flashes
during normal
operation.
If solidly lit
there is a
problem.
Power
LED
ON when
device is
powered
up.
5V DC
Power
200 mA
1
LNK/ACT LED
Flashes when activity
is seen on the network.
OFF if network is
disconnected.
TX LEDs
Lights when
serial data is
sent.
Q U I C K S TA R T - D i a l - i n
RX LEDs
Lights when
serial data is
received.
1
M U LT E N E T
1.
2.
3.
4.
P O C K E T PA D R O U T E R
Connect the Serial, Ethernet and Power cables.
Configure the IP Address and Subnet Mask using EtherPAD Explorer.
Configure the Serial Port parameters.
Configure the PPP parameters.
1. Connect the Serial, Ethernet and Power cables.
Serial Line Connection
Check the type of serial device you wish to connect to your PocketPAD.
RS232 only
For DCE devices (e.g. modems) you require
a straight serial cable, while for DTE devices
(e.g. computers) you require a crossed serial
cable. Standard off-the-shelf cables can be
used (check the user manual for detailed pin
outs).
Connect your modem to the PocketPAD’s COM 1.
Pin
1
2
3
4
5
6
7
8
9
RS232
CD
RX
TX
DTR
GND
DSR
RTS
CTS
RI
Ethernet Network Connection
Connect your Ethernet cable to the PocketPAD. The LNK LED
will light up if the connection is good. The 10/100 LED will light if
100 Base-TX is available.
If the PocketPAD is connected directly to your PC, use a crossed
Ethernet cable. If it is connected via a hub or switch, use a
straight Ethernet cable.
RJ45 Connector
Power Supply Connection
PocketPAD
A 5Vdc (2W) PSU can be connected to
the PocketPAD. A light weight Torpedo
style power supply unit is available.
If you have connected your PC COM port to the PocketPAD
COM1 port you will be able to log into the unit via a terminal
session (i.e. HyperTerminal) to configure it (check the user manual
for more details) while the TX/RX LEDs are flashing. Default
password is “user”.
2
Q U I C K S TA R T - D i a l - i n
1
TX-
2
TX+
3
RX+
4, 5
na
6
RX-
7, 8
na
Ethernet Cable
2
M U LT E N E T
P O C K E T PA D R O U T E R
2. Configure the IP Address and Subnet Mask using EtherPAD Explorer.
Launch EtherPAD Explorer to quickly find all Multenet units on the local segment. EtherPAD
Explorer can be run from the CD, or installed onto your PC.
Configure the PocketPAD’s IP Address and Subnet Mask by highlighting the new device and
clicking ‘Set IP Address’. After setting the IP Address and Network Mask, you can configure
the PocketPAD by clicking ‘Web Configuration’.
The ‘Set IP Address’ window will appear while the unit is rebooting or if your network
parameters are incorrect.
EtherPAD Explorer Network Configuration
Web Configuration
Should your web browser launch but fail to download a web page, there may be a problem
related to your browser proxy configuration. Disable the proxy and restart the browser.
Another common problem is that of duplicate IP Addresses. The IP Address you inserted may
belong to another host. The user manual has more info on faultfinding these issues.
The following login screen
should appear if the network
parameters are good.
Web Network Configuration
3
Q U I C K S TA R T - D i a l - i n
3
M U LT E N E T
P O C K E T PA D R O U T E R
3. Configure the Serial Port parameters.
Next, configure the Serial Port for the external modem. Check your serial device parameters.
The parameters below sets your PocketPAD with serial communication configured for 57600
baud, 8 data bits, 1 stop bit, no parity, no flow control. Check your modem for these details.
4. Configure the PPP parameters.
The most common use for the Router is for dial-in purposes. Enable remote access to local
networks and serial devices. You may need to delete the default dial-out account.
PPP Dial-in Configuration
Configure the PocketPAD Router to accept incoming connections over PPP from an external
modem. An IP Address of 10.0.0.2 is assigned to the remote side, while the PocketPAD is
seen at 10.0.0.1.
4
Q U I C K S TA R T - D i a l - i n
4
M U LT E N E T
P O C K E T PA D R O U T E R
Test PPP Dial-in
Configure a dialup account on your PC. Use the
configured username and password (root:xxx
or user:user as in the example). Set the correct
Telephone number of the modem connected to the
PocketPAD Router. Set the account to obtain an IP
Address automatically. In the example the PC will
be assigned the IP Address 10.0.0.2.
Once connected enter “http://10.0.0.1” into
your web browser. You will see the PocketPAD
Configuration login page (you may need to disable
your Proxy settings).
PPP Dial-out Configuration
Set the Gateway IP Address of your networked hosts to the IP Address of the PocketPAD
Router. Traffic not destined for the local subnet will be forwarded onto the PPP link. A
connection will be established if none is available. You will need to setup an Access Server to
accept incoming calls. Configure the Telephone number to that of the Access Server with its
associated login details (this could be an ISP dialup account).
5
Q U I C K S TA R T - D i a l - i n
5