1
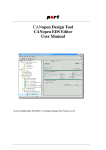
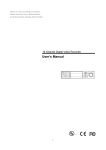
Document Submission Tool
After using Falcon to down load view files to the local computer in the
(C:/Documents\cfms_local\view…) folder. Use the Document Submission
Tool application to print one or multiple files.
Using the Document Submission Tool Application
What is a Print Job?
An 8830 print job can consist of one or more print or data files (also known as documents). These
print files can be the output from a Windows application. There are a number of options
associated with each document in the print job as well as the print job itself. You can let the
Xerox PC Document Submission Tool software use the default settings to run the job, or you can
change these settings. You can save the print job group of files as a named file to be used again
later.
Creating and managing print jobs is done through the DOCUMENT SUBMISSION TOOL Main
Window).
When the Document submission Tool is first opened it will be empty.
Click on the Add Document Hot Key.
When the Add document to job window opens navigate to (C:/Documents\cfms_local\view…) and
select the files that are to be printed by highlighting and Opening the files.
At this point highlight from one to all TIF files.
2
When getting ready to set up and submit a print job to the 8830 Plotter, there are fields in the
DOCUMENT SUBMISSION TOOL Main Window that you may want to change.
In the DOCUMENT SUBMISSION TOOL Main Window Job Group, there are three fields
dealing with Job Options: Job Name, print job Priority and the number of Copies.
Job Name
The Job Name field is provided so you can enter a name for the current print job. You can use
whatever naming convention is appropriate for your work. If no Job Name data is entered, the
Job Name defaults to the first file name in the Print Job Window. You can change this Job Name
anytime. The Job Name is used to identify the print job in all communications with the 8830
Plotter.
Priority
You can assign a Priority to the current print job. The priority number values range from a low of
1 to a high of 10 (default is 5).
Copies
You can enter the number of printed Copies in this field. The number of copies is applied
uniformly to each file in the current print job. You cannot change the number of copies from file
to file in the same print job. The number of copies ranges from 1 to 999 (default is 1).
After making the desired selections.
Select the appropriate default printer settings
3
Default printer settings have been set in files under the Documents directory at
C:\Documents\cfms_local\view (the same area that falcon places the files from the plan file
room). The files are “fullsize.xdd” and “halfsize.xdd”
Select File in the “Document Submit Window” Session Setup and select the appropriate printer,
this selection will remain
4
After selecting the desired printer settings click on the submit Hot Button.
The Transfer Status window provides a view of the current print job transfer status. This dialog
also provides the means to cancel a print job submission.
Print Job Submit Progress
The status field at the top of the Transfer Status window displays the status of the transfer.
Initially, this field contains the word “ Connecting...”. During transfer, the name of the file being
transferred is displayed. As each file is transferred, the name in this status field will change to
reflect that file.
The progress bar below the status field displays the progress of the transfer using a series of
colored rectangles. As the file is transferred, the number of rectangles increases from left to right.
5
This progress bar will be completely filled when the entire file has been transferred. The bar will
become empty as the next file starts its transfer.
Print Job Cancel
You can cancel a print job submission at any time when the transfer dialog window is active by
clicking the Cancel button. The status field at the top of the Transfer Progress window will
indicate that a cancel is pending. The 8830 Printer will then be instructed to cancel the print job, a
pop up confirmation window will be displayed, the transfer dialog window will be removed, and
the DOCUMENT SUBMISSION TOOL Main Window will become active.
Exiting the Document Submission Tool Application
You exit the Document Submission Tool application by clicking once on the Control icon in the
outer corner of the title bar of the DOCUMENT SUBMISSION TOOL Main Window, or go to
File then Exit.
When you do this, if there are any changes pending for the current print job, a pop up window
will appear to let you confirm or cancel any changes to the current print job.
6
Yes to save changes, No to quit with out saving and cancel to stop and retune to the document
submission tool.
7