1
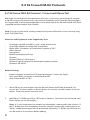
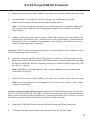
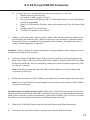
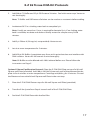
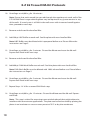
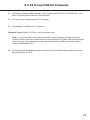
E-Z 96 Tissue DNA Kit
D1196-00
D1196-01
D1196-02
1 x 96 preps
4 x 96 preps
20 x 96 preps
May 2013
E-Z 96 Tissue DNA Kit
Table of Contents
Introduction and Principle.........................................................2
Illustrated Protocols......................................................................3
Kit Contents and Storage...........................................................4
Preparing Reagents......................................................................5
Guideline for Vacuum Manifold..............................................6
Tissue and Mouse Tail Protocol................................................8
Cultured Cell Protocol...............................................................12
Bacterial DNA Protocol.............................................................16
Blood DNA Protocol...................................................................20
Vacuum Manifold Protocol.....................................................24
Troubleshooting Guide.............................................................26
Ordering Information................................................................28
Manual Revision: May 2013
Innovations in nucleic acid isolation
1
Introduction and Principle
Introduction
The E-Z 96 Tissue DNA Kit allows rapid and reliable isolation of high-quality total cellular
DNA from a wide variety of animal tissues or cell cultures in a 96-well plate format.
Up to 30 mg tissue or two 0.6 cm mouse tail segments can be processed in each well.
The system combines the reversible nucleic acid-binding properties of Omega Biotek’s HiBind® matrix with the speed and versatility of E-Z 96 DNA Plate to eliminate
polysaccharides, phenolic compounds, and enzyme inhibitors from tissue lysates. Purified
DNA is suitable for PCR, restriction digestion, and hybridization applications. There are
no organic extractions, thus reducing plastic waste and hands-on time to allow up to 96
samples to be processed at one time.
Principle
If using the E-Z 96 Tissue DNA Kit for the first time, please read this booklet to become
familiar with the procedures. Tissue or tail samples are cut into smaller pieces, and then
lysed in specially formulated buffer and protease. Binding conditions are then adjusted
and the sample is applied to the E-Z 96 DNA Plate. Three rapid wash steps remove trace
contaminants such as residual polysaccharides, and pure DNA is eluted with the Elution
Buffer provided. Purified DNA can be directly used in downstream applications without
the need for further purification.
New In this Edition
•
•
•
•
•
2
HB Buffer has been replaced by HBC Buffer. Isopropanol is required and supplied by
the user.
Equilibration Buffer (used in an Optional Column Equilibration protocol) is no longer
included with this kit.
Equilibration Buffer can be replaced with 3M NaOH provided by the user.
OB Protease is now supplied in a liquid form eliminating the step to respuspend prior
to use. OB Protease Solution can also be stored at room temperature for 12 months.
Proteinase Storage Buffer is no longer included in the kit.
Centrifugation Protocol
Vacuum Protocol
Lyse the Samples
Lyse the Samples
Adjust the Binding
Conditions
Adjust the Binding
Conditions
Bind and
Wash 3x
Innovations in nucleic acid isolation
Bind and
Wash 3x
Vacuum
Dry Membrane
Dry Membrane
Innovations in nucleic acid isolation
Elute
Elute
3
Kit Contents
Product Number
D1196-00
D1196-01
D1196-02
E-Z 96 DNA Plate
1
4
20
96-well Round-well Plate (1.2 mL)
1
4
20
24 x 8
100 x 8
500 x 8
1
4
20
Caps for Round-well Plate
96-well Square-well Plate (2.2 mL)
96-well Racked Microtubes (1.2 mL)
1
4
20
Caps for Racked Microtubes
12 x 8
50 x 8
250 x 8
TL Buffer
25 mL
100 mL
500 mL
BL Buffer
25 mL
100 mL
500 mL
HBC Buffer
40 mL
200 mL
3 x 270 mL
OB Protease Solution
3 mL
12 mL
60 mL
Elution Buffer
50 mL
200 mL
1000 mL
DNA Wash Buffer
25 mL
100 mL
3 x 200 mL
AeraSeal film
5
20
100
User Manual
P
P
P
™
Storage and Stability
All of the E-Z 96 Tissue DNA Kit components are guaranteed for at least 12 months from
the date of purchase when stored as follows. OB Protease Solution can be stored at room
temperature for up to 12 months. For long-term storage, store OB Protease Solution at
2-8°C. During shipment or storage in cool ambient conditions, precipitates may form in
the buffers. Dissolve such deposits by warming the solution at 37°C and gently shaking.
4
Preparing Reagents
•
•
•
Dilute DNA Wash Buffer with 100% ethanol as follows and store at room temperature.
Kit
100% Ethanol to be Added
D1196-00
100 mL
D1196-01
400 mL
D1196-02
800 mL per bottle
Dilute HBC Buffer with isopropanol as follows and store at room temperature.
Kit
Isopropanol to be Added
D1196-00
16 mL
D1196-01
78 mL
D1196-02
109 mL per bottle
For Protocols other than Blood, dilute BL Buffer with 100% ethanol as follows and
store at room temperature.
Kit
100% Ethanol to be Added
D1196-00
25 mL
D1196-01
100 mL
D1196-02
500 mL
Important: DO NOT dilute BL Buffer with ethanol if the Blood Protocol is to be used.
5
Guideline for Vacuum Manifold
The following is required for use with the Vacuum Protocol:
A) Vacuum Manifold (We recommend Omega Bio-tek’s VAC-03)
Other Compatible Vacuum Manifolds: Qiagen QIAvac24, Sigma AldrichVM20, Promega Vacman®, or manifold with standard Luer connector
B) Vacuum Flask
C) Vacuum Tubing
D) Vacuum Source (review tables below for pressure settings)
Manifold
Recommended Pressure (mbar)
VAC-03
-200 to -400
Conversion from millibars:
Multiply by:
Millimeters of Mercury (mmHg)
0.75
Kilopascals (kPa)
0.1
Inches of Mercury (inchHg)
0.0295
Torrs (Torr)
0.75
Atmospheres (atmos)
0.000987
Pounds per Square Inch (psi)
0.0145
Illustrated Vacuum Setup
Innovations in nucleic acid isolation
Omega Bio-tek’s VAC-03
C) Vacuum Tubing
D) Vacuum Source
A) Vacuum Manifold
B) Vacuum Flask
6
Guideline for Vacuum Manifold
Lysate Clearance Setup
DNA Bind Setup
Lysate Clearance Plate
E-Z 96 DNA Plate
Vacuum Manifold Top
Innovations in nucleic acid isolation
Vacuum Manifold Top
Innovations in nucleic acid isolation
E-Z 96 DNA Plate
Waste Collection
300 μL Microplate
Vacuum Manifold Bottom
Standard Elution Setup
Vacuum Manifold Bottom
Optional Elution Setup
E-Z 96 DNA Plate
E-Z 96 DNA Plate
Vacuum Manifold Top
Innovations in nucleic acid isolation
Vacuum Manifold Top
Innovations in nucleic acid isolation
96-well Racked Microtubes
300 μL Microplate
Vacuum Manifold Bottom
300 μL Microplate
96-well Racked Microtubes
Vacuum Manifold Bottom
7
E-Z 96 Tissue DNA Kit Protocols
E-Z 96 Tissue DNA Kit Protocol - Tissues and Mouse Tail
Although no mechanical homogenization of tissue is necessary, pulverizing the samples
in liquid nitrogen will improve lysis and reduce incubation time. Once the liquid nitrogen
has evaporated, transfer the powdered tissue to each well of the 96-well Round-well Plate
(supplied) and proceed to Step 2 below.
Note: Do not use too much starting material; the lysate will be too viscous and may clog
the E-Z 96 DNA Plate.
Materials and Equipment to be Supplied by User:
•
•
•
•
•
•
•
•
•
•
Centrifuge capable of 4,000 x g with swing bucket rotor
Centrifuge adapter for deep-well microplates
Water baths, incubators, or heat blocks capable of 70°C
100% ethanol
Isopropanol
Multichannel pipet with tips
Vortexer
Optional: RNase A (20 mg/mL)
Optional: Liquid nitrogen for freezing/disrupting samples
Optional: 3M NaOH
Before Starting:
•
•
•
Prepare reagents according to “Preparing Reagents” section on Page 5
Set a water bath, incubator, or heat block to 60°C
Heat Elution Buffer to 70°C
1. Mince 20 mg tissue and place into the 96-well Round-well Plate (provided). For
mouse tails, cut the samples to 0.6 cm pieces; for rat tails, cut the samples to 0.3 cm
pieces. Place two pieces into each well.
2.
Add 200 μL TL Buffer and 25 μL OB Protease Solution. Seal with Caps for Round-well
Plates. Vortex to mix thoroughly.
Note: It is very important that samples are completely submerged in the solution. If
the TL Buffer does not completely cover the sample, increase the sample volume to
300 μL. (Additional reagent can be purchased separately). TL Buffer and OB Protease
can be made as a mastermix before adding.
8
E-Z 96 Tissue DNA Kit Protocols
3.
Briefly spin the plate at 2,500 -3,000 x g to collect any residue solution from the caps.
4.
Incubate at 60°C overnight or until the samples are completely lysed. Mix
occasionally during incubation by rotating the plate gently.
Note: The lysate should be clear and viscous after digestion is complete. Make sure
the samples are completely lysed. Undigested material may clog the E-Z 96 DNA
Plate in Step 11.
5.
Shake or vortex the plate vigorously from side to side (do not shake up and down to
avoid leaking around the caps). Hold the caps to ensure the plate is sealed properly.
Ensure the lysate is completely homogeneous after shaking. If a gelatinous mass is
visible, further digestion is required.
Optional: Add 5 μL RNase A solution (20 mg/mL, not provided) to each sample and let sit
at room temperature for 5 minutes.
6.
Add two volumes BL Buffer (about 450 μL) to each sample. A white precipitate may
form at this step; it will not interfere with DNA isolation. Seal the plate with new Caps
for Round-well Plates. Mix the sample by shaking or vortex the plate vigorously (side
to side) for 1 minute.
Note: BL Buffer must be diluted with 100% ethanol before use. Please follow the
instructions on Page 5.
7.
Briefly spin the plate at 2,500 -3,000 x g to collect any residue solution from the caps.
Note: Do not centrifuge for a prolonged time. Once the speed reaches 2,500 -3,000 x
g stop the centrifuge.
Optional Column Equilibration Protocol: Place the E-Z 96 DNA Plate on top of a 96-well
Square-well Plate (provided). Add 100 μL 3M NaOH into each well of the plate and let the
plate sit for 4 minutes at room temperature. Centrifuge at 4,000 x g for 3 minutes. Discard
the filtrate and reuse the 96-well Square-well Plate in the next step.
8.
Place the E-Z 96 DNA Plate on top of a 96-well Square-well Plate (provided).
9.
Transfer all the lysate from Step 7 to each well of the E-Z 96 DNA Plate.
9
E-Z 96 Tissue DNA Kit Protocols
10. Seal the E-Z 96 DNA Plate with AeraSeal film.
11. Centrifuge at ≥4,000 x g for 10 minutes.
Note: Ensure that each sample has passed through the membrane in each well of the
E-Z 96 DNA Plate. Longer centrifugation may be required if any lysate remains in any
of the wells. If some lysate is still left in the wells even with increased centrifugation
time, proceed to next step.
12. Remove and discard the AeraSeal film.
13. Add 500 μL HBC Buffer to each well. Seal the plate with new AeraSeal film.
Note: HBC Buffer must be diluted with isopropanol before use. Please follow the
instructions on Page 5.
14. Centrifuge at ≥4,000 x g for 5 minutes. Discard the filtrate and reuse the 96-well
Square-well Plate.
15. Remove and discard the AeraSeal film.
16. Add 600 μL DNA Wash Buffer to each well. Seal the plate with new AeraSeal film.
Note: DNA Wash Buffer must be diluted with 100% ethanol before use. Please follow
the instructions on Page 5.
17. Centrifuge at ≥4,000 x g for 5 minutes. Discard the filtrate and reuse the 96-well
Square-well Plate.
18. Repeat Steps 15-17 for a second DNA Wash step.
19. Centrifuge at ≥4,000 x g for 15 minutes. Discard the filtrate and the 96-well Squarewell Plate.
Note: This step is critical for removing trace residual ethanol that might otherwise
interfere with downstream applications. The plate can be further dried by placing the
plates in an incubator or vacuum oven preset at 70°C to dry the membrane.
10
E-Z 96 Tissue DNA Kit Protocols
20. Transfer the E-Z 96 DNA Plate to a set of 96-well Racked Microtubes (provided).
21. Remove and discard the AeraSeal film.
22. Add 200 μL Elution Buffer heated at 70°C to each well of the E-Z 96 DNA Plate. Seal
the E-Z 96 DNA Plate with new AeraSeal film.
23. Let sit at room temperature for 2-5 minutes.
24. Centrifuge at ≥4,000 x g for 5 minutes.
Optional: Repeat Steps 21-24 for a second elution step.
Note: A second elution will increase total DNA yield; however, due to increased
elution volume, the DNA concentration will be reduced. If higher DNA concentration
is desired, the second elution can be performed with the 200 μL eluate from first
elution, reheated to 70°C.
25. Seal the 96-well Racked Microtubes with the Caps for Racked Microtubes and store
the eluted DNA at -20°C.
11
E-Z 96 Tissue DNA Kit Protocols
E-Z 96 DNA Kit Protocol - Cultured cells
Materials and Equipment to be Supplied by User:
•
•
•
•
•
•
•
•
•
•
•
•
Centrifuge capable of 4,000 x g with swing bucket rotor
Adapter for deep-well microplates
Water baths, incubators, or heat blocks capable of 70°C
100% ethanol
Isopropanol
Multichannel pipet with tips
Ice bucket
Vortexer
Trypsin
PBS
Optional: RNase A (20 mg/ mL)
Optional: 3M NaOH
Before Starting:
•
•
•
•
Prepare reagents according to “Preparing Reagents” section on Page 5
Set a water baths, incubators, or heat blocks to 60°C
Heat Elution Buffer to 70°C
Chill PBS on ice
1. Harvest and resuspend the cells using one of the following protocols.
A. For cells grown in suspension, do not use more than 5 x 10⁶ cells.
1. Centrifuge cells at 300 x g for 5 minutes.
2. Resuspend cells with 200 μL cold (4°C) PBS and transfer to a 96-well Roundwell Plate (provided).
3. Add 25 μL OB Protease Solution and seal the plate with Caps for Round-well
Plate.
4. Incubate at 60°C for 10 minutes.
5. Continue the protocol with Step 2.
12
E-Z 96 Tissue DNA Kit Protocols
B.
2.
For cells grown in a monolayer, do not use more than 5 x 10⁶ cells.
1. Release the cells with trypsin.
2. Centrifuge at 300 x g for 5 minutes.
3. Resuspend cells with 200 μL cold (4°C) PBS and transfer to a 96-well Roundwell Plate (provided).
4. Add 25 μL OB Protease Solution and seal the plate with Caps for Round-well
Plate.
5. Incubate at 60°C for 10 minutes.
6. Continue the protocol with Step 2.
Shake or vortex the plate vigorously from side to side (do not shake up and down to
avoid leaking around the caps). Hold the caps to ensure the plate is sealed properly.
Ensure the lysate is completely homogeneous after shaking. If a gelatinous mass is
visible, further digestion is required.
Optional: Add 5 μL RNase A solution (20 mg/mL, not provided) to each sample and let sit
at room temperature for 5 minutes.
3.
Add two volumes BL Buffer (about 450 μL) to each sample. A white precipitate may
form at this step; it will not interfere with DNA isolation. Seal the plate with new Caps
for Round-well Plates. Mix the sample by shaking or vortex the plate vigorously (side
to side) for 1 minute.
Note: BL Buffer must be diluted with 100% ethanol before use. Please follow the
instructions on Page 5.
4.
Briefly spin the plate at 2,500 -3,000 x g to collect any residue solution from the caps.
Note: Do not centrifuge for a prolonged time. Once the speed reaches 2,500 -3,000 x
g stop the centrifuge.
Optional Column Equilibration Protocol: Place the E-Z 96 DNA Plate on top of a 96-well
Square-well Plate (provided). Add 100 μL 3M NaOH into each well of the plate and let the
plate sit for 4 minutes at room temperature. Centrifuge at 4,000 x g for 3 minutes. Discard
the filtrate and reuse the 96-well Square-well Plate in the next step.
5.
Place the E-Z 96 DNA Plate on top of a 96-well Square-well Plate (provided).
6.
Transfer all the lysate from Step 4 to each well of the E-Z 96 DNA Plate.
13
E-Z 96 Tissue DNA Kit Protocols
7.
Seal the E-Z 96 DNA Plate with AeraSeal film.
8.
Centrifuge at ≥4,000 x g for 10 minutes.
9.
Note: Ensure that each sample has passed through the membrane in each well of the
E-Z 96 DNA Plate. Longer centrifugation may be required if any lysate remains in any
of the wells. If some lysate is still left in the wells even with increased centrifugation
time, proceed to next step.
Remove and discard the AeraSeal film.
10. Add 500 μL HBC Buffer to each well. Seal the plate with new AeraSeal film.
Note: HBC Buffer must be diluted with isopropanol before use. Please follow the
instructions on Page 5.
11. Centrifuge at ≥4,000 x g for 5 minutes. Discard the filtrate and reuse the 96-well
Square-well Plate in the next step.
12. Remove and discard the AeraSeal film.
13. Add 600 μL DNA Wash Buffer to each well. Seal the plate with new AeraSeal film.
Note: DNA Wash Buffer must be diluted with 100% ethanol before use. Please follow
the instructions on Page 5.
14. Centrifuge at ≥4,000 x g for 5 minutes. Discard the filtrate and reuse the 96-well
Square-well Plate in the next step.
15. Repeat Steps 12-14 for a second DNA Wash step.
16. Centrifuge at ≥4,000 x g for 15 minutes. Discard the filtrate and the 96-well Squarewell Plate.
Note: This step is critical for removing trace residual ethanol that might otherwise
interfere with downstream applications. The plate can be further dried by placing the
plates in an incubator or vacuum oven preset at 70°C to dry the membrane.
14
E-Z 96 Tissue DNA Kit Protocols
17. Transfer the E-Z 96 DNA Plate to the 96-well Racked Microtubes (provided).
18. Remove and discard the AeraSeal film.
19. Add 200 μL Elution Buffer heated at 70°C to each well of the E-Z 96 DNA Plate. Seal
the E-Z 96 DNA Plate with new AeraSeal film.
20. Let sit at room temperature for 2-5 minutes.
21. Centrifuge at ≥4,000 x g for 5 minutes.
Optional: Repeat Steps 18-21 for a second elution step.
Note: A second elution will increase total DNA yield; however, due to increased
elution volume, the DNA concentration will be reduced. If higher DNA concentration
is desired, the second elution can be performed with the 200 μL eluate from first
elution, reheated to 70°C.
22. Seal the 96-well Racked Microtubes with the Caps for Racked Microtubes and store
the eluted DNA at -20°C.
15
E-Z 96 Tissue DNA Kit Protocols
E-Z 96 DNA Kit Protocol - Bacteria
Materials and Equipment to be Supplied by User:
•
•
•
•
•
•
•
•
•
•
•
•
Centrifuge capable of 4,000 x g equipped with swinging-bucket rotor
Adapter for deep-well microplates
100% ethanol
Isopropanol
Water baths, incubators, or heat blocks capable of 70°C
Shaking water bath capable of 56°C
TE Buffer
Lysozyme (50 mg/mL)
RNase A (20 mg/mL)
Vortexer
Deep-well culture plate with mat or caps
Optional: 3M NaOH
Before Starting:
•
•
•
•
Prepare reagents according to “Preparing Reagent” section
Set a shaking water bath to 56°C
Set a water baths, incubators, or heat blocks to 30°C
Heat Elution Buffer to 70°C
1. Collect and resuspend the bacteria using one of the following protocols.
A. For 2 mL gram-positive bacteria culture:
1. Centrifuge bacteria at 4,000 x g for 10 minutes.
2. Remove and discard the supernatant.
3. Add 180 μL TE Buffer and resuspend the pellet.
4. Add 18 μL lysozyme (50 mg/mL) and vortex to mix.
5. Incubate at 30°C for 10 minutes.
6. Centrifuge digested cell at 4,000 x g for 5 minutes.
7. Aspirate supernatant leaving ~20 μL residual liquid.
8. Vortex to resuspend pellet.
9. Continue the protocol with Step 2.
B.
16
For 2 mL gram-negative bacteria culture:
1. Centrifuge bacteria at 4,000 x g for 10 minutes.
2. Remove and discard the supernatant.
3. Add 20 μL TE Buffer and resuspend the pellet.
4. Continue the protocol with Step 2.
E-Z 96 Tissue DNA Kit Protocols
2.
Add 200 μL TL Buffer and 25 μL OB Protease Solution. Seal with mat or caps. Vortex to
mix thoroughly.
Note: TL Buffer and OB Protease Solution can be made as a mastermix before adding.
3.
Incubate at 56°C in a shaking water bath to complete lysis.
Note: Usually no more than 1 hour is required for bacterial lysis. If no shaking water
bath is available, incubate and shake or briefly vortex the samples every 20-30
minutes.
4.
Add 5 μL RNase A (20 mg/mL, not provided). Vortex to mix.
5.
Let sit at room temperature for 5 minutes.
6.
Add 450 μL BL Buffer. A precipitate may form at this point but does not interfere with
DNA isolation. Vortex for 30 seconds to mix thoroughly.
Note: BL Buffer must be diluted with 100% ethanol before use. Please follow the
instructions on Page 5.
Optional Column Equilibration Protocol: Place the E-Z 96 DNA Plate on top of a 96-well
Square-well Plate (provided). Add 100 μL 3M NaOH into each well of the plate and let the
plate sit for 4 minutes at room temperature. Centrifuge at 4,000 x g for 3 minutes. Discard
the filtrate and reuse the 96-well Square-well Plate in the next step.
7.
Place the E-Z 96 DNA Plate on top of a 96-well Square-well Plate (provided).
8.
Transfer all the lysate from Step 6 to each well of the E-Z 96 DNA Plate.
9.
Seal the E-Z 96 DNA Plate with AeraSeal film.
17
E-Z 96 Tissue DNA Kit Protocols
10. Centrifuge at ≥4,000 x g for 10 minutes.
Note: Ensure that each sample has passed through the membrane in each well of the
E-Z 96 DNA Plate. Longer centrifugation may be required if any lysate remains in any
of the wells. If some lysate is still left in the wells even with increased centrifugation
time, proceed to next step.
11. Remove and discard the AeraSeal film.
12. Add 500 μL HBC Buffer to each well. Seal the plate with new AeraSeal film.
Note: HBC Buffer must be diluted with isopropanol before use. Please follow the
instructions on Page 5.
13. Centrifuge at ≥4,000 x g for 5 minutes. Discard the filtrate and reuse the 96-well
Square-well Plate in the next step.
14. Remove and discard the AeraSeal film.
15. Add 600 μL DNA Wash Buffer to each well. Seal the plate with new AeraSeal film.
Note: DNA Wash Buffer must be diluted with 100% ethanol before use. Please follow
the instructions on Page 5.
16. Centrifuge at ≥4,000 x g for 5 minutes. Discard the filtrate and reuse the 96-well
Square-well Plate in the next step.
17. Repeat Steps 14-16 for a second DNA Wash step.
18. Centrifuge at ≥4,000 x g for 15 minutes. Discard the filtrate and the 96-well Squarewell Plate.
Note: This step is critical for removing trace residual ethanol that might otherwise
interfere with downstream applications. The plate can be further dried by placing the
plates in an incubator or vacuum oven preset at 70°C to dry the membrane.
18
E-Z 96 Tissue DNA Kit Protocols
19. Transfer the E-Z 96 DNA Plate to the 96-well Racked Microtubes (provided).
20. Remove and discard the AeraSeal film.
21. Add 200 μL Elution Buffer heated at 70°C to each well of the E-Z 96 DNA Plate. Seal
the E-Z 96 DNA Plate with new AeraSeal film.
22. Let sit at room temperature for 2-5 minutes.
23. Centrifuge at ≥4,000 x g for 5 minutes.
Optional: Repeat Steps 20-23 for a second elution step.
Note: A second elution will increase total DNA yield; however, due to increased
elution volume, the DNA concentration will be reduced. If higher DNA concentration
is desired, the second elution can be performed with the 200 μL eluate from first
elution, reheated to 70°C.
24. Seal the 96-well Racked Microtubes with the Caps for Racked Microtubes and store
the eluted DNA at -20°C.
19
E-Z 96 Tissue DNA Kit Protocols
E-Z 96 DNA Kit Protocol - Blood
Important: DO NOT dilute BL Buffer with ethanol prior to performing this protocol.
Materials and Equipment to be Supplied by User:
•
•
•
•
•
•
•
•
•
•
Centrifuge capable of 4,000 x g with a swing bucket rotor
Adapter for deep-well microplates
Water bath, incubator, or heat block capable of 60° C
100% ethanol
Isopropanol
Multichannel pipet with tips
Incubator or vacuum oven preset at 70°C
Vortexer
Optional: RNase A (20 mg/ mL)
Optional: 3M NaOH
Before Starting:
•
•
•
Prepare reagents according to “Preparing Reagents” section on Page 5
Set a water bath, incubator, or heat block to 60°C
Heat Elution Buffer to 70°C
1. Pipet 25 μL OB Protease Solution into the bottom of each well of a 96-well Roundwell Plate (provided).
2.
Add 250 μL whole blood, serum, or body fluid to each well of the 96-well Round-well
Plate. (Up to 6 x 10⁶ lymphocytes can be used in each well.)
Note: For sample volumes smaller or larger than 250 μL, adjust the sample volume to
250 μL.
3.
Add 250 μL BL Buffer. A white precipitate may form at this step; it will not interfere
with DNA isolation. Seal the plate with Caps for Round-well Plates. Mix the samples
by shaking or vortex the plate vigorously (side to side) for 1 minute.
Note: DO NOT dilute BL Buffer with ethanol prior to performing this protocol.
Shake the plate side to side, not up and down, to prevent possible leakage around
caps.
20
E-Z 96 Tissue DNA Kit Protocols
Optional: Add 20 μL RNase A solution (20 mg/mL, not provided) to each sample and let
sit at room temperature for 5 minutes.
4.
Centrifuge briefly at 2,500-3,000 x g to collect any solution from the caps.
5.
Incubate at 60°C for 10 minutes in an incubator or oven. Mix occasionally during
incubation by rotating the plate gently.
Note: Incubation for more than 30 minutes at 60°C can cause DNA degradation.
6.
Centrifuge briefly at 2,500-3,000 x g to collect any solution from the caps. Remove the
caps and add 250 μL 100% ethanol to each well.
7.
Seal the 96-well Round-well Plate (provided) using new Caps for Round-well Plates.
8.
Mix the samples by vortexing or vigorously shaking the plate (side to side) for 1
minute. Centrifuge briefly at 3,000 rpm to collect any liquid from the caps.
Optional Column Equilibration Protocol: Place the E-Z 96 DNA Plate on top of a 96-well
Square-well Plate (provided). Add 100 μL 3M NaOH into each well of the plate and let the
plate sit for 4 minutes at room temperature. Centrifuge at 4,000 x g for 3 minutes. Discard
the filtrate and reuse the 96-well Square-well Plate in the next step.
9.
Place the E-Z 96 DNA Plate on top of a 96-well Square-well Plate (provided).
10. Transfer all the lysate from Step 8 to each well of the E-Z 96 DNA Plate.
11. Seal the E-Z 96 DNA Plate with AeraSeal film.
12. Centrifuge at ≥4,000 x g for 10 minutes.
Note: Ensure that each sample has passed through the membrane in each well of the
E-Z 96 DNA Plate. Longer centrifugation may be required if any lysate remains in any
of the wells. If some lysate is still left in the wells even with increased centrifugation
time, proceed to next step.
21
E-Z 96 Tissue DNA Kit Protocols
13. Remove and discard the AeraSeal film.
14. Add 500 μL HBC Buffer to each well. Seal the plate with new AeraSeal film.
Note: HBC Buffer must be diluted with isopropanol before use. Please follow the
instructions on Page 5.
15. Centrifuge at ≥4,000 x g for 5 minutes. Discard the filtrate and reuse the 96-well
Square-well Plate in the next step.
16. Remove and discard the AeraSeal film.
17. Add 600 μL DNA Wash Buffer to each well. Seal the plate with new AeraSeal film.
Note: DNA Wash Buffer must be diluted with 100% ethanol before use. Please follow
the instructions on Page 5.
18. Centrifuge at ≥4,000 x g for 5 minutes. Discard the filtrate and reuse the 96-well
Square-well Plate in the next step.
19. Repeat Steps 16-18 for a second DNA Wash step.
20. Centrifuge at ≥4,000 x g for 15 minutes. Discard the filtrate and the 96-well Squarewell Plate.
Note: This step is critical for removing trace residual ethanol that might otherwise
interfere with downstream applications. The plate can be further dried by placing the
plates in an incubator or vacuum oven preset at 70°C to dry the membrane.
21. Transfer the E-Z 96 DNA Plate to the 96-well Racked Microtubes (provided).
22. Remove and discard the AeraSeal film.
22
E-Z 96 Tissue DNA Kit Protocols
23. Add 200 μL Elution Buffer heated at 70°C to each well of the E-Z 96 DNA Plate. Seal
the E-Z 96 DNA Plate with new AeraSeal film.
24. Let sit at room temperature for 2-5 minutes.
25. Centrifuge at ≥4,000 x g for 5 minutes.
Optional: Repeat Steps 22-25 for a second elution step.
Note: A second elution will increase total DNA yield; however, due to increased
elution volume, the DNA concentration will be reduced. If higher DNA concentration
is desired, the second elution can be performed with the 200 μL eluate from first
elution, reheated to 70°C.
26. Seal the 96-well Racked Microtubes with the Caps for Racked Microtubes and store
the eluted DNA at -20°C.
23
E-Z 96 Tissue DNA Kit Protocols
E-Z 96 DNA Kit Protocol - Vacuum Protocol
The following protocol has been tested only on cultured cells and limited types of animal
tissues. It may not work for some types of animal tissue samples rich in polysaccharides.
Materials and Equipment to be Supplied by User:
•
Vacuum Manifold
1.
Prepare the lysate using one of the previous protocols, E-Z 96 Tissue Protocol Steps
1-7, E-Z 96 Cultured Cells Protocol Steps 1-4, Bacterial DNA Protocol Steps 1-6, or
Blood DNA Protocol Steps 1-8.
2.
Assemble the plate on the vacuum manifold according the manufacturer’s
instructions.
Optional Column Equilibration Protocol: Place the E-Z 96 DNA Plate on top of a 96-well
Square-well Plate (provided). Add 100 μL 3M NaOH into each well of the plate and let the
plate sit for 4 minutes at room temperature. Turn on the vacuum source until all the liquid
passes through the E-Z 96 DNA Plate.
3.
Transfer the lysate to the E-Z 96 DNA Plate.
4.
Turn on the vacuum source to draw the lysate completely through the E-Z 96 DNA
Plate.
5.
Turn off the vacuum source.
6.
Add 500 μL HBC Buffer to each well.
Note: HBC Buffer must be diluted with isopropanol before use. Please follow the
instructions on Page 5.
7.
Turn on the vacuum source to draw the liquid completely through the E-Z 96 DNA
Plate.
8.
Turn off the vacuum source.
24
E-Z 96 Tissue DNA Kit Protocols
9.
Add 600 μL DNA Wash Buffer to each well.
Note: DNA Wash Buffer must be diluted with 100% ethanol before use. Please follow
the instructions on Page 5.
10. Turn on the vacuum source to draw the liquid completely through the E-Z 96 DNA
Plate.
11. Turn off the vacuum source.
12. Repeat Steps 9-11 for a second DNA Wash step.
13. Add 600 μL ethanol to each well.
14. Turn on the vacuum source to draw the liquid completely through the E-Z 96 DNA
Plate.
15. Continue to apply the vacuum for 10 minutes after all liquid has passed through the
E-Z 96 DNA Plate.
16. Place the plate in a vacuum oven preset on 70°C to further dry the plate. It is very
critical to completely dry the plate before elution.
17. Place the 96-well Racked Microtubes inside the base of the manifold.
18. Place the E-Z 96 DNA Plate on top of the manifold.
19. Add 200 μL Elution Buffer heated to 70°C to each well.
20. Turn on the vacuum source to draw the liquid completely through the E-Z 96 DNA
Plate.
21. Seal the 96-well Racked Microtubes with the Caps for Racked Microtubes and store
the eluted DNA at -20°C.
25
Troubleshooting Guide
Please use this guide to solve any problems that may arise. We hope that it will aid in
clearing up any questions for you. If for any reason you need further assistance, please
contact our technical support staff at our Toll Free Number 1-800-832-8896.
Possible Problems and Suggestions
Problem
Cause
Solution
Incomplete lysis
Extend lysis incubation time with TL
Buffer and OB protease Solution. Add the
correct volume of BL Buffer and incubate
for specified time at 60°C.
Sample amount too
large
If using more than 30 mg tissue, increase
proportionately volumes of OB Protease
Solution, TL Buffer, BL Buffer, and
ethanol. Pass aliquots of lysate through
successively.
Incomplete lysis from
sample preparation
Increase the centrifugation time by an
additional 10 minutes. Or add HBC Buffer
and proceed with next step.
Sample too viscous
Following lysis, divide sample into
multiple tubes, adjust volume to 250 μL
with 10 mM Tris-HCl.
Improper washing
DNA Wash Buffer must be diluted with
100% ethanol as instructed on Page 5
before use.
Cause
Solution
Incomplete lysis due to
improper mixing with BL
Buffer
BL Buffer is viscous and the sample must
be vortexed thoroughly.
Ethanol was not added
to the DNA Wash Buffer
Dilute DNA Wash Buffer with the
indicated volume of ethanol before use.
96-well plate is
clogged
Problem
Washing leaves
colored residue
in column
26
Troubleshooting Guide
Problem
Low A260/A280
ratio
Solution
Extended centrifugation
during elution step
Resin from the plate may be present in
eluate. Avoid centrifugation at speeds
higher than specified. The material
can be removed from the eluate by
centrifugation, it will not interfere with
PCR or restriction digestion.
Poor cell lysis due to
incomplete mixing with
BL Buffer
Repeat the procedure and make sure
to vortex the sample with BL Buffer
immediately and completely.
Incomplete cell lysis or
protein degradation
due to insufficient
incubation.
Increase incubation time with TL Buffer
and OB Protease Solution. Ensure that no
visible pieces of tissue remain.
Samples are rich in
protein.
After applying to the plate, wash with
300 μL of a 1:1 mixture of BL Buffer and
ethanol and then with HBC Buffer and
DNA Wash Buffer.
Poor cell lysis due to
improper mixing with BL
Buffer
Mix thoroughly with BL Buffer prior to
loading to the DNA plate.
Poor cell and/or protein
lysis in Buffer TL
Tissue sample must be cut or minced
into small pieces. Increase incubation
time at 60°C with TL Buffer to ensure that
tissue is completely lysed.
Ethanol was not added
to BL Buffer
Before applying sample to column, an
aliquot of BL Buffer/ethanol must be
added. See protocol above.
Ethanol was not added
to the DNA Wash Buffer
Dilute DNA Wash Buffer with the
indicated volume of ethanol before use.
Isopropanol was not
added to the HBC Buffer
Dilute HBC Buffer with the indicated
volume of isopropanol before use.
Poor elution
Repeat elution or increase elution
volume (see note on Page 11).
Incubation at 70°C for 5 minutes with
Elution Buffer may increase yields.
Problem
No DNA eluted
27
Ordering Information
The following components are available for purchase separately.
(Call Toll Free at 1-800-832-8896)
Product
Part Number
BL Buffer (100 mL)
PD062
TL Buffer (100 mL)
PD061
DNA Wash Buffer (100 mL)
PS010
Elution Buffer (100 mL)
PDR048
OB Protease Solution
AC130
AeraSeal Film
AC1201
HiBind®, E.Z.N.A.®, and MicroElute® are registered trademarks of Omega Bio-tek, Inc.
Qiagen®, QIAvac® and Vacman® are all trademarks of their respected companies.
PCR is a patented process of Hoffman-La Roche. Use of the PCR process requires a license.
28