1
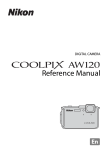
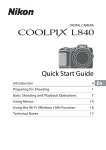
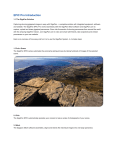
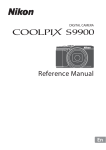
Quick Pallet Maker 4.8.2 User Manual Koona, LLC. http://www.koona.com/qpm Contents WELCOME TO QUICK PALLET MAKER 7 WHAT DOES QUICK PALLET MAKER DO? 7 PREFERENCES 8 GENERAL 8 COLOR 9 DETAILED REPORT 10 CASE CONSTRAINTS 10 STANDARD CASES AND PALLETS 11 STANDARD CASES 11 ENABLE, ADD AND EDIT BOXES 12 Enable or disable boxes 12 Add or delete boxes 12 Edit boxes 13 USE STANDARD BOXES IN CENTIMETERS 13 ALLOW QUICK PALLET MAKER TO ASSIGN THE HEIGHT OF THE STANDARD BOXES 13 ADD VERTICAL COMPRESSION 14 STANDARD PALLETS 14 EDIT, ADD OR DELETE STANDARD PALLETS 15 Edit pallets 15 Add or delete pallets 15 SET A DEFAULT PALLET 15 CONTAINERS 15 EDIT, ADD OR DELETE CONTAINERS 16 Edit containers 16 Quick Pallet Maker User Manual 4.8.2 Page 2 of 61 Add or delete containers 16 SET A DEFAULT CONTAINER 16 OPTIMIZE FROM PRIMARY PACKAGE 17 PRIMARY PACKAGE INFORMATION 17 CASE INFORMATION 18 STANDARD CASES 19 PALLET DIMENSIONS 20 LOAD PROPERTIES (INCLUDING SHIPPING PALLET) 20 OPTIMIZE FROM BOX 22 CASE INFORMATION 22 CASE DIMENSIONS 22 PALLET DIMENSIONS 23 LOAD PROPERTIES (INCLUDING SHIPPING PALLET) 23 CREATE BOXES 24 Manually create boxes 24 Copy and paste boxes from a spreadsheet 24 DELETE BOXES 25 IMPORT BOX 25 CALCULATE PALLETS 25 OPTIMIZE FROM FILL CONTAINER 26 INPUT DATA 26 CONTAINER 27 SHIPMENT 28 SHIPMENT DATA 28 CREATE BOXES, PALLETS OR CYLINDERS 29 Manually creating 29 Quick Pallet Maker User Manual 4.8.2 Page 3 of 61 Copy and paste from a spreadsheet 29 DELETE BOXES, PALLETS OR CYLINDERS 29 IMPORT BOXES AND PALLETS 29 CALCULATE CONTAINER 30 AVAILABLE SOLUTIONS WINDOW 31 ELEMENTS OF THE AVAILABLE SOLUTIONS WINDOW 31 DELETE ROWS AND SORT TABLE 33 Delete rows 33 Sort pallets list 33 CHANGE PALLET AND BOX VIEW 33 Change pallet view 33 Change box view 34 EXPORT BOX OR PALLET 34 RECALCULATE BOX 35 ASSIGN CODE AND DESCRIPTION FOR BOXES AND PALLETS 35 ADD INTERNAL CASE SLACK 35 KNOWING THE BOX COMPRESSION 35 LAYER EDITOR 37 M AIN ELEMENTS OF THE LAYER EDITOR 38 CHANGE PALLET VIEW 39 MOVE, DELETE AND ROTATE BOXES 40 Move 40 Delete 40 Rotate 40 Rotate Layers Above 40 IMPORT BOXES 40 Quick Pallet Maker User Manual 4.8.2 Page 4 of 61 DUPLICATE BOXES 41 USE THE EDITED PALLET 41 SHIPMENTS 42 CREATE SHIPMENT 42 REPORTS 43 DETAILED REPORT 43 NEW MULTI-PALLET REPORT WITH DRAWING 44 BILL OF MATERIALS 44 PALLETIZING MOVIE 45 BOX COORDINATES 46 VIEW THE DETAILED REPORT 46 PRINT THE DETAILED REPORT 46 SAVE THE DETAILED REPORT 47 EXPORT DETAILED REPORT 47 SAVE BILL OF MATERIALS 48 CREATE A PALLETIZING MOVIE 49 SAVE BOX COORDINATES 49 ADVANCED INPUT OPTIONS 50 M AIN ELEMENTS OF THE ADVANCED INPUT OPTIONS 51 QUICK PALLET MAKER MENUS 53 QUICK PALLET M AKER OSX 53 FILE 53 EDIT 58 TOOLS 58 VIEW 59 WINDOW 60 Quick Pallet Maker User Manual 4.8.2 Page 5 of 61 HELP Quick Pallet Maker User Manual 4.8.2 60 Page 6 of 61 Welcome to Quick Pallet Maker Quick Pallet Maker helps the package designer create optimal box and pallet arrangements to fit more products into a pallet or container load, thus minimizing shipping costs. Quick Pallet Maker facilitates handling and cargo security, by adhering to plant guidelines such as: practical box proportions, maximum box weight, vertical compression, slack, etc. Quick Pallet Maker offers three easy ways to begin the optimization process according to the data and the desired outcome: From the primary package, for building and filling the boxes From the box dimensions From the fill container Resulting pallets can be modified to add or remove boxes, combine different boxes, and move layers to give more stability to the pallet. It is possible to fill containers with pallets or boxes directly on the container floor. What does Quick Pallet Maker do? The goal of Quick Pallet Maker is to help you place your products in a quick and easy way into pallets or containers and design the boxes properly. If you start from the primary package dimensions: 1. Quick Pallet Maker takes the input data, 2. It builds boxes for primary packaging or uses the loaded boxes, 3. Fills the boxes with the number of packages you need, and 4. Calculates pallets with those filled boxes, stacking as many boxes as possible Quick Pallet Maker gives you the ability to modify the resulting arrangements, move the boxes to include more or add slack to increase stability. Once you choose a solution, it can be used to fill a container or exported to a variety of formats, including a palletizing movie. If you want to fill a shipping container using boxes and/or pallets, Quick Pallet Maker provides the means to do so directly. Quick Pallet Maker User Manual 4.8.2 Page 7 of 61 You can also choose to start from known box dimensions and calculate a new pallet arrangement. This saves time and allows the inclusion of different box sizes within the same shipping pallet. Preferences If this is your first time using Quick Pallet Maker, we recommend reviewing the preferences. Go to Tools and click Settings (Windows) or select Preferences from the Quick Pallet Maker menu (OSX). Quick Pallet Maker Preferences window has four tabs: General, Color, Detailed Report and Case constraints. General Units It allows user to select the default units between mm/kg, cm/kg y inches/lbs. Auto-save last file Quick Pallet Maker User Manual 4.8.2 Page 8 of 61 If selected it will save the last input file and open an identical file each time you call for a new document. This option is useful when working with similar data and customized case widths. Pallet Divider Thickness It refers to the thickness of the pallet supports and is applied to: top cap, corner posts and layer dividers. Shift display cases towards pallet borders The boxes will be shifted to the pallet borders in display pallets. In this case, there will be some slack between boxes to make sure that the load dimensions are equal to the shipping pallet dimensions, adding stability to the load. Default Case View Selecting which case view would you like to see first when recalculating data. It is always possible to switch between views without accessing preferences. Views: Internal box view External box view Open box Don’t check for updates When checked, Quick Pallet Maker will not attempt an Internet connection to see if there is a newer version available. Color Change the default color of these drawing: Primary Package Color: one color per side Corrugated Container Color Internal Box Divider Color Layer pads, top caps and corners color Pallet Color Quick Pallet Maker User Manual 4.8.2 Page 9 of 61 Detailed Report Quick Pallet Maker allows choosing the language of the detailed report between the default language (English, in this case) and a local language. You can also use a special terminology. To edit or add a translation: 1. Select the appropriate row and the translation (if there is any) will appear in the text box at the bottom 2. Type the text in the box and change to another row to update the text Case Constraints Quick Pallet Maker saves calculation time by leaving out unlikely box sizes, based on the relations between their dimensions and weight. Maximum Primary Package Length Maximum Primary Package Width Maximum Primary Package Height Maximum Primary Package Weight Maximum Pallet Length Maximum Pallet Width Maximum Pallet Height Maximum Pallet Weight Maximum Case Weight Length/Width Ratio (Minimum and Maximum), prevents from designing very narrow or wider than long boxes Length/Height Ratio (Minimum and Maximum), prevents from designing a too tall or too short box Height/Width Ratio (Minimum and Maximum), similar than above Quick Pallet Maker User Manual 4.8.2 Page 10 of 61 Standard Cases and Pallets It is very easy to manage boxes, pallets and containers from the Standard Cases and Pallets window. You can access this window from any input method: go to the File menu, select New Data Sheet and click the input method you prefer. The Standard Cases and Pallets window will appear in the background. Standard Cases Quick Pallet Maker provides the user with two lists of standard cases to be filled with primary packages: Standard English Unit Cases (inches) Standard Metric Unit Cases (millimeters) Quick Pallet Maker User Manual 4.8.2 Page 11 of 61 The purpose of this classification is to use a reduced number of sizes of boxes to pack your goods. The menu on top of each table allows you to select whether the standard case dimensions in the table will be used as internal or external. Quick Pallet Maker uses the unit you selected on the preferences; if you selected units in inches and pounds, the boxes will be taken from the table of Standard English Units Cases. Enable, add and edit boxes Enable or disable boxes All boxes can be enabled or disabled by clicking the checkbox in the first column of the table. The disabled boxes are ignored in all calculations. Add or delete boxes Select the box you want to delete and press the DEL key or the BKSP key on the keyboard. To add a box, please follow this procedure: 1. Click on a box 2. Then, on the Edit menu, click Duplicate or press CTRL + D (Command + D on OSX), another box will appear and you can edit the dimensions Quick Pallet Maker User Manual 4.8.2 Page 12 of 61 Edit boxes You can group boxes using the Type column of the table and perform calculations on specific types of cases. To edit boxes follow this procedure: 1. Select a box and double-click on it 2. Edit the dimensions and then click another row or press the ENTER key on the keyboard to finish Use standard boxes in centimeters To use standard boxes in centimeters, multiply the dimensions by 10, and then write them on the Standard Metric Unit Cases table. Allow Quick Pallet Maker to assign the height of the standard boxes If you wish to fix only standard lengths and widths, leaving the height value to be calculated by QPM, please assign a case height value of zero to the listed box. If the standard case height is greater than zero, then Quick Pallet Maker will assume that you want to define an exact box (length, width and height). Quick Pallet Maker User Manual 4.8.2 Page 13 of 61 Add vertical compression To add vertical compression, please follow this procedure: 1. Select the box and double-click on it 2. Set the desired value and then click another row or press the ENTER key on the keyboard to finish Quick Pallet Maker will calculate pallet loads that do not stress the lower boxes more than the allowed value. If the compression value is zero, Quick Pallet Maker will not use this variable when placing the boxes. Standard Pallets Quick Pallet Maker provides a list of four commonly-used pallet sizes that can be modified or expanded to include different pallets. Quick Pallet Maker User Manual 4.8.2 Page 14 of 61 Edit, add or delete standard pallets Edit pallets 3. Select the pallet and double-click on it 4. Edit the dimensions and then click another row or press the ENTER key on the keyboard to finish Add or delete pallets Select the pallet you want to delete and press the DEL key or the BKSP key on the keyboard. To add a pallet, please follow this procedure: 1. Click on a pallet 2. Then, on the Edit menu, click Duplicate or press CTRL + D, another pallet will appear and you can edit the dimensions Set a default pallet If you want to set a pallet as default, choose one from the drop-down menu and Quick Pallet Maker will use that pallet every time a new document window (primary package or box) is opened. Please note that you can always change the pallet. Containers Quick Pallet Maker offers the possibility of working with standard shipping containers and storing their properties in the second tab of the Standard Cases and Pallets window. We provide a list of containers that can be modified or expanded to include more. Quick Pallet Maker User Manual 4.8.2 Page 15 of 61 Edit, add or delete containers Edit containers 1. Select the container and double-click on it 2. Edit the dimensions and then click another row or press the ENTER key on the keyboard to finish Add or delete containers Select the container you want to delete and press the DEL key or the BKSP key on the keyboard. To add a container follows this procedure: 1. Click on a container 2. Then, on the Edit menu, click Duplicate or press CTRL + D, another container will appear and you can edit the dimensions Set a default container If you want to set a container as default, choose one from the drop-down menu and Quick Pallet Maker will display its dimensions first when opening a new Fill Container window. Please note that you can always change the container. Quick Pallet Maker User Manual 4.8.2 Page 16 of 61 Optimize from primary package To begin from the primary package, go to the File menu, select New Data Sheet, and then click Start from PP. You will find preloaded data on this window; those default values are based on real-life data and can be used to view the program's features. To calculate, go to Tools menu and click Recalculate. Primary Package Information The available options and their purposes are: Package Shape Select from Rectangular, Cylinder or Bottle depending on whether your primary package looks more like a carton, a can or a bottle. Irregular-shaped objects will most of the time resemble a rectangle. Narrow-neck bottles (wine, ketchup, etc.) that are selected as bottles can only be stacked upwards. Dimensions Allowed Vertical to Pallet Quick Pallet Maker User Manual 4.8.2 Page 17 of 61 Check the orientations that are suitable for your product. Some products may have unallowed orientations. The least options that are checked, the faster Quick Pallet Maker will calculate the available solutions. External Dimensions Type the Length, Width and Height or Diameter and Height, depending on whether your package is rectangular or cylindrical. Bottle Cap and Body A pair of radio buttons appears if you have selected the Bottle package shape. Clicking on these radio buttons will determine which one of the bottle properties can be modified by dragging within the drawing. Dragging the drawing vertically will change the bottle proportions. Dragging sideways when the cap button is activated will allow changing its diameter. Weight Type the gross weight of your package. This is useful for calculating the corrugate carton resistance and pallet weight limitations. Case Information The available options and their purposes are: Case Count Type the number of primary packages per case. If you are not sure of this number, you can test different scenarios with the Advanced Input Options window. Construction You can choose between two different types of boxes: RSC, Tray, Stretch-Wrap, Rectangular, and Packout, and several standard corrugate thicknesses. Board Thickness Each type of box has a default thickness. The purpose of this is to calculate the added thickness that is provided by the boxes and to display the box drawings accordingly. The options are not a limit, you can overrule the box thicknesses that appear in the values at right of the menus and type your own. Quick Pallet Maker User Manual 4.8.2 Page 18 of 61 Case Constraints The case constraints allow the user to limit the different types of boxes that the program will create based on the dimensions. Case Properties Here you will find the internal dividers and/or add slack to the cases. Quick Pallet Maker includes a list of standard dividers that will add the specified space into the boxes for proper calculation. The box drawings with dividers will show internal slack but will not display the dividers. To add a partition, follow this procedure: 1. Select a partition from the Internal Divider Type list 2. Then, select a standard board width from the Flute Type or enter a custom value 3. Click OK to include the partition into the calculations Standard Cases The available options and their purposes are: Type When adding or editing standard cases in the Standard Cases and Pallets window, you can define the type of box to discriminate quickly using this menu. The default value for the boxes in the list is Box. Standard Cases This pull-down menu enables you to choose how you would like to fill the cases: Do Not Use Standard Cases: Will calculate normally and will create boxes according to the primary package arrangement Using Standard Sizes Whenever Possible: This option will only replace the calculated boxes with standard case sizes when their range is within the range of the standard box. Those cases that cannot be standardized will be left as they were calculated Use ONLY Standard Cases: Only cases within the specified range will be considered and those cases that cannot be standardized will be ignored. If no standard cases are possible, then Quick Pallet Maker will deliver a "No solutions found" message Fill Standard Cases: When this option is selected, Quick Pallet Maker will arrange the primary packages (this feature is not available for cylindrical packages) in such a way that it Quick Pallet Maker User Manual 4.8.2 Page 19 of 61 maximizes the number of packages per box. In this case, the maximum slack restrictions will apply Fill Standard Cases With Constant Case Count: Will add as many boxes as determined in the Case Count cell Maximum Internal Compression in Case It represents the distance that a product inside the box can be compressed. Compression should be used only when the product will not be damaged. For example, pillows and soft foam products. In all other cases, compression should be zero. Maximum Slack in Case Slack should only be used when the product will not be damaged due to movements within the box or when internal padding can be added. Pallet Dimensions The available options and their purposes are: Pallet Type Select the pallet to use. All pallets from Standard Cases and Pallets window are listed. Pallet Dimensions Shows the dimensions of the selected pallet, you can edit if necessary. Weight Enter the empty pallet weight. Load Properties (including shipping pallet) The available options and their purposes are: Minimum Load Dimensions Quick Pallet Maker User Manual 4.8.2 Page 20 of 61 Minimum values for pallet load. Maximum Dimensions Maximum values for pallet load. Overhang (load bigger than pallet) is usually unacceptable since it may damage the cases during transportation. Maximum Weight Enter the maximum weight on a pallet load. NOTE Remember that the pallet height and weight are included into these values Quick Pallet Maker User Manual 4.8.2 Page 21 of 61 Optimize from Box From the box dimensions, you can calculate pallet loads and then you have the ability to use those pallets to fill a shipping container. The options available in this window are similar to those in Start from PP. To begin from the box, go to the File menu, select New Data Sheet, and then click Start from Box. Case Information The available options and their purposes are: Construction You can choose between five different types of boxes: RSC, Tray, Stretch-Wrap, Rectangular, and Packout, and several standard corrugate thicknesses. Board Thickness Each type of box has a default thickness. The purpose of this is to calculate the added thickness that is provided by the boxes and to display the box drawings accordingly. The options are not a limit, you can overrule the box thicknesses that appear in the values at right of the menus and type your own. Case Dimensions The available options and their purposes are: Length, Width, Height, Weight In this section you can write the external dimensions and weight of the boxes, and Quick Pallet Maker will use the Board Thickness values to automatically calculate the other dimension. Amount Number of cases. Color Quick Pallet Maker User Manual 4.8.2 Page 22 of 61 Box color. Dimensions Allowed Vertical to Pallet Check the orientations that are suitable for your product. Some products may have some orientations not allowed. The least options that are checked, the faster Quick Pallet Maker will calculate the available solutions. Pallet Dimensions The available options and their purposes are: Pallet Type Select the pallet to use. All pallets from the Standard Cases and Pallets window are listed. Try All Standard Pallets Quick Pallet Maker will create loads that use all the standard pallets in the list, and all result will be listed in the Available Solutions window. Pallet Dimensions Shows the dimensions of the selected pallet, that you can edit if necessary. Weight Enter the empty pallet weight. Load Properties (including shipping pallet) The available options and their purposes are: Minimum Load Dimensions Minimum values for pallet load. Maximum Dimensions Quick Pallet Maker User Manual 4.8.2 Page 23 of 61 Maximum values for pallet load. Overhang (load bigger than pallet) is usually unacceptable since it may damage the cases during transportation. Maximum Weight Enter the maximum weight on a pallet load. NOTE Remember that the pallet height and weight are included into these values. Create boxes Manually create boxes Type the box dimensions in the left cells and then click the Add Box button or select the option Add Box. Copy and paste boxes from a spreadsheet 1. To perform this action the data must be in the following order: a) b) c) d) e) f) g) h) i) j) Unit: Write 0 for mm/kg, 1 for cm/kg or 2 for inches/pounds Type: Fill this column with the value 1 assigned to boxes Length Wight Height Weight Color: Hexadecimal code Amount Code: Box code Description: Box description 2. Select the data in the spreadsheet 3. On Quick Pallet Maker, go to File menu, select New Data Sheet, and then click on Start from Box Go to the Edit menu, select Paste, or press CTRL + V (Command + V in OSX) Quick Pallet Maker User Manual 4.8.2 Page 24 of 61 Delete boxes Select the box you want to delete and go to the File menu and click Delete, or press the DEL key or the BKSP key on the keyboard. Import box This feature allows you to import boxes that were created and saved with Quick Pallet Maker. To import, follow one of these procedures: Procedure 1: 1. Click the Import Box button below the table in Start from Box, then a window will appear for you to select the box, click Open to finish Procedure 2: 1. Go to the File menu, click on Insert and then click Box 2. A window will appear for you to select the box 3. Click Open to finish Calculate pallets If you have already loaded all the necessary data to calculate, please go to Tools menu and click on Recalculate, or press CTRL+ R (Command + R in OSX). If the data does not lead to any solution, you will see a message. Quick Pallet Maker User Manual 4.8.2 Page 25 of 61 Optimize from Fill Container The container fill window allows you to: Calculate container fill with one element type (pallet, box or drum) Fill as many containers as needed depending on a given order or shipment View the list of containers, pallets and boxes in a given shipment To begin from fill container, go to the File menu, select New Data Sheet, and then click Fill Container. Input Data Package Choose whether you will add or import a pallet or a box. A drum is considered a stretch-wrap box with a cylinder inside so it can only be used by importing it. Length, Width, Height, Diameter, Weight Type the dimensions for your boxes, pallets or cylinders. Quick Pallet Maker User Manual 4.8.2 Page 26 of 61 Amount Enter the number of boxes, pallets or cylinders. Dimensions Allowed Vertical to Container Check the orientations that are suitable for your product. Some products may have not allowed some orientations. The least options that are checked, the faster Quick Pallet Maker will calculate the available solutions. Container Type Select the container to use. All containers from Standard Cases and Pallets window are listed. Shipping Rate per Container This cell contains the price of shipping the container or truck to any given location. It will be used for calculating the cost per item, box or pallet. Load Properties Select from the menu, how would you like Quick Pallet Maker to load your container, whether it is Load From Back to Front or Load From Bottom to Top. Minimum and Maximum Load Dimensions Range of load. Internal Dimensions Defines the usable space of the container. Optimize Sections Sorts the boxes inside the container to fit a higher number. Container In this window, you will see the result of the container calculation; the drawing of the loaded container and the informative data. Quick Pallet Maker User Manual 4.8.2 Page 27 of 61 3D Drawing Clicking on this checkbox will shift the view from 3 dimensions to 2 dimensions and back. The same result can be achieved by clicking on the Toggle Pallet View option in the View menu. Show Empty Pallets/Show Full Pallets Depending on the selection, the pallets will be shown with the load or without it. The same result can be achieved by clicking on the Toggle Pallet View option on the View menu. Forward and Backward Arrows A triangle will appear on the upper right corner if there are more containers in the calculated shipment. Use them to move between containers. Shipment Bill of Materials This table contains all the containers, pallets and boxes that are present in the shipment. Click on each element to see its drawing and position below the table. Container Drawing Show the container(s) for the given shipment. Shipment Data Here you will find in a menu, the list of reports about the container shipment. These are either a summary or detailed type. Quick Pallet Maker User Manual 4.8.2 Page 28 of 61 Create boxes, pallets or cylinders Manually creating Type the item dimensions on the left cells, and then click on the Add Pallet or Add Box buttons, right under the table. Copy and paste from a spreadsheet 1. To perform this action the data must be in the following order: a) b) c) d) e) f) g) h) i) j) Unit: Write 0 for mm/kg, 1 for cm/kg or 2 for inches/pounds Type: Fill this column with the value 1 for box and 0 for pallets Length Wight Height Weight Color: Hexadecimal code Amount Code: Box code Description: Box description 2. Select the data in the spreadsheet 3. On Quick Pallet Maker, go to File menu, select New Data Sheet, and then click on Fill Container 4. Go to the Edit menu, select Paste, or press CTRL + V (Command + V on OSX) Delete boxes, pallets or cylinders 1. Select the item you want to delete 2. Go to the File menu and click Delete, or press the DEL key or the BKSP key on the keyboard Import boxes and pallets This feature allows you to import boxes and pallets that were created and saved with Quick Pallet Maker. To import, follow one of these procedures: Quick Pallet Maker User Manual 4.8.2 Page 29 of 61 Procedure 1: 1. Click the Import Box or Import Pallet button below the table on Fill Container, then a dialog box will appear for you to select the item, click Open to finish Procedure 2: 1. Go to the File menu, click on Insert and then click Box or Pallet 2. A window will appear for you to select the item 3. Click Open to finish Calculate container If you have already loaded all the necessary data to calculate, please go to Tools menu and select Recalculate, or press CTRL+ R (Command + R in OSX). Another option is go to the Container tap. Quick Pallet Maker User Manual 4.8.2 Page 30 of 61 Available Solutions window In this window you can see the list of pallet arrangements that Quick Pallet Maker has found as solutions. You can make changes to the initial solutions until you are satisfied with the outcome. Elements of the Available Solutions Window Detailed Load Information Each time a pallet is selected, the detailed information for that pallet is shown in the left area of the window. This information is read-only. Pallet Drawing Displays the currently selected pallet and clicking on the pallet drawing will switch views. Box List Displays the feasible cases, the standard cases will appear with a light blue background. There are three pallet solutions per box. Quick Pallet Maker User Manual 4.8.2 Page 31 of 61 Feasible Pallets Displays the amount of feasible cases; if you delete or add a pallet, the number updated. Pallets List The section at the bottom contains all the available pallets. As mentioned before, there are three pallet solutions per box. Pallet Actions This menu contains the pallet rearrangement actions that can be performed with the selected pallet. These actions can also be found under the Tools menu, option Pallet Actions. To perform an action on a pallet, select an item from this menu and press the Go button. Available actions: Optimize: Tries to create a new pallet with an optimized arrangement, based on the boxes and pallet restrictions of a selected pallet Optimize and Flip Cases: Creates two new pallets with optimized arrangements of flipped cases (i.e. on their sides), based on the boxes and pallet restrictions of the selected pallet Mix Layers and Optimize In Height: You must select two pallets, and Quick Pallet Maker will create a new pallet that mixes the first layer of each one of the selected pallets. The layers are mixed to fit as many boxes as possible within the available height Alternate Layers: Creates a new pallet with boxes arranged in opposite directions on each level in order to add stability to the load Mix Pallet: You must select two pallets, and Quick Pallet Maker will create a new pallet with one of each of the first layers of the selected pallets Display Box Length: Creates a new pallet in which the boxes are placed in such a way that as many boxes as possible show the longest face outwards Display Box Width: Creates a new pallet in which the boxes are placed in such a way that as many boxes as possible show the shortest face outwards Generate Stable Pallets: Alternates the boxes on the pallet so that lengthwise and transversal columns follow each other. The resulting pallet type is more stable (although it doesn't necessarily fit more boxes) Quick Pallet Maker User Manual 4.8.2 Page 32 of 61 Delete rows and sort table Delete rows You can delete items from the pallets and boxes lists. For that, please follow this procedure: 1. Select the item you want to delete 2. Go to the File menu and click Delete, or press the DEL key or the BKSP key on the keyboard. Sort pallets list The pallets list can be sorted by any column. To do this, please follow this procedure: 1. Go to the Tools menu, and select the Power Sort option 2. In the dialog box, select the sort parameters Change pallet and box view Change pallet view 1. Click on the pallet drawing 2. To see the rest of the views offered by Quick Pallet Maker, right click on the image or go to the View menu 3. Select one option from the list or press CMD + click on OSX Available pallet views One Layer: Shows only the first pallet layer All Layers: Shows all the pallet layers Empty Tray: If working with trays, will display them without the primary packages. This feature is useful to detect the tray layout in the pallet, which may not be so obvious when viewing the loaded trays Quick Pallet Maker User Manual 4.8.2 Page 33 of 61 Show Corner Posts: Will display the pallet with corner posts, which are the corrugated board supports that are frequently placed on the corners of the pallet load to facilitate stretch wrapping Show Top Cap: Cardboard sheet placed at the top of the pallet Show Layer Pads: Cardboard pads between the layers to provide stability to the pallet Change box view 1. Right click on the box drawing or press CMD + click on OSX 2. Then select one option from the list Available box views Internal Box View: Display the box contents (primary packages) External Box View: Display a closed box or a full tray, whichever the case type Open Box: If you are working with an RSC box, this action will open the flaps View Box Contents: If you are working with an RSC box, this action will open the flaps and show the content by removing the front boards. This feature is useful for viewing the effect of slack on the box Export box or pallet This feature allows you to save the box and pallet data to a file for future use. Using this feature will allow you to keep boxes for combining with others to create a pallet that contains different products. Follow one of these procedures: Procedure 1 1. Select the box or pallet you want to save 2. Go to the File menu, click on Export and then select Box or Pallet option 3. Choose File (XML) option Procedure 2 1. Right click (CTRL+ click on OSX) over the drawing Quick Pallet Maker User Manual 4.8.2 Page 34 of 61 2. Select the Export option Recalculate box This feature is useful when the original pallets were deleted or when a box was imported into the list. 1. Select one box from the Box List 2. Press Recalculate on the Tools menu, and you will have three pallets from that box Assign code and description for boxes and pallets You can set code and description to the boxes and pallets, following this procedure: 1. Right click or CMD + click on OSX over the drawing 2. Select Description option 3. In the next window, type the data and click OK to save Add internal case slack Slack can be added to the calculated cases to obtain round numbers for the case dimensions and/or to add stability. Slack is also recommended to compensate for normal box manufacturing variation. To add slack to a box, follow this procedure: 1. Select a pallet and its box dimensions will show up in the Enlarge boxes cells, below the box drawing 2. Adjust the dimensions to the desired values and exit the editing box If the resulting pallet dimensions have not exceeded the predetermined limits, then a new box will be created with internal slack. Knowing the box compression The box design should involve the top to bottom resistance of the box in order to protect its contents. This feature helps you know the compression of the boxes in the pallet. Quick Pallet Maker User Manual 4.8.2 Page 35 of 61 To obtain the box compression, please follow this procedure: 1. From the Available Solutions window 2. Select one pallet 3. Go to Tools menu and click on Box Compression Elements of this window Pallet Stack: If you will be stacking pallets on top of each other, select the total amount of pallets that will be part of a stack. If using racks, choose 1 Pallet Box Number: Use this menu to select which box you will display the compression for. Most of the time, we are interested in the compression for the first box from bottom to top Compression Per Box: Vertical compression that is applied to each box. This number is calculated considering the portion of boxes that are above the selected box and how much those boxes weigh. Note that is number includes the corrugate weight, besides the weight of the box contents Multiply by Safety Factor: This factor depends on the warehouse humidity, the box handling, the type of box stacking (interlocked or columnar box stacking), among other factors. If your company does not have general guidelines to choose the safety factor, then ask your corrugate box supplier for assistance. Please note that this value should be greater than 1, because it will be multiplied, not divided by the original Compression Per Box to obtain the final compression Quick Pallet Maker User Manual 4.8.2 Page 36 of 61 Min T-B Compression: This number indicates the minimum force that the empty box should withstand in order to protect the box contents and to provide stability to the pallet load. The units for this number will be weight units (kg or lbs) Use Max Compression For All Boxes: If this item is enabled, then all the boxes in the pallet should be manufactured to support the maximum compression that is present in any of them Layer editor This feature allows you to change pallet arrangements, make adjustments between the levels, move, delete, import and rotate boxes to get the desired pallet arrangement. To open the Layer Editor 1. From the Available Solution window 2. Select one pallet from the Pallet List 3. Go to the Tools menu and click on the Layer Editor option Quick Pallet Maker User Manual 4.8.2 Page 37 of 61 Main Elements of the Layer Editor Pallet Drawing Displays the selected pallet. Layer A list of the pallet layers. Choose Box The list of boxes per each layer. Show One Layer Displays the drawing of the selected layer. Show Full Pallets Displays the drawing of the full pallet. Rotate 90º in Z Axis Rotates the selected box 90º in the Z axis. Rotate 90º in X Axis Rotates the selected box 90º in the X axis. Rotate 90º en el eje Y Rotates the selected box 90º in the Y axis. Organize Boxes Refreshes the pallet drawing. Copy Selected Layer Quick Pallet Maker User Manual 4.8.2 Page 38 of 61 Reapplies the selected level at all levels of the pallet. Position This shows the position of the selected box on each axis. You can type a coordinate XYZ and if the movement is possible the box will move. You can move boxes by dragging them with the mouse. To avoid undesired movements, use the check next to each axis. Add Layer Pad/Remove Layer Pad Place a pad on the selected layer to add stability. Toss Boxes Allow quick movement when dragging boxes with the mouse. Code Use this option to assign a box code. Description Use this option to assign a box description. Change pallet view To change the pallet view, follow any of these procedures: Press CTRL + T Click on Toggle Pallet View on the View menu Right click on the pallet drawing and select Toggle Pallet View If you are using OSX, press CMD + click To see a specific layer of the pallet, follow this procedure: 1. Select Toggle Pallet View of the right panel 2. Change the view pressing CTRL + T, until you find the right view Quick Pallet Maker User Manual 4.8.2 Page 39 of 61 Move, delete and rotate boxes Move To move a box, you can drag with the mouse to the desired location or type a coordinate in the XYZ cells to the right and the box will move. Delete In some cases it is necessary to remove or erase some boxes from the pallet, just select the box, go to the Edit menu and click Delete. Rotate To rotate boxes, you should work on the top level of the pallet; the highest one, so the box can rotate on all axii without the upper layer blocking the movement. Otherwise, you will hear a beep and the box will not move. 1. To rotate one box, separate from the rest of the boxes, to allow the movement 2. Press any of the axis buttons You can undo the box movement and return it to its original position, just select the box and go to Edit menu and click on Undo option. You can repeat this procedure with other boxes. Rotate Layers Above You can find this option by right clicking on the pallet drawing at the Layer Editor. This feature rotates 90º the pallet layers above the select level. For example, if you have a 5 layer pallet and you are working on layer 2, if you click on Rotate Layers Above, layers from 2 to 5 are going to rotate and the layer 1 will remain in its place. Import boxes This feature allows you to import boxes that were created and saved with Quick Pallet Maker. 1. From the Layer Editor, go to the File menu 2. Click on Insert and select the Box option Quick Pallet Maker User Manual 4.8.2 Page 40 of 61 3. Then a window will appear for you to select the item, click Open to finish Duplicate boxes You can make copies of the boxes, using the Duplicate option. 1. From the Layer Editor, select one box 2. Go to the Edit menu and then click on Duplicate Use the edited pallet After editing the pallet in the Layer Editor, you can use that pallet to load a shipping container, following this procedure: 1. Click OK, the edited pallet will be on the Available Solution list 2. Select the pallet and go to the Tools menu and click on Fill Container 3. Then click on Recalculate on the Tools menu or press CTRL+ R Quick Pallet Maker User Manual 4.8.2 Page 41 of 61 Shipments This feature fills cases with primary packages to calculate the amount of pallets that are needed to complete the shipment of a given quantity. This function can be explained into three steps: 1. Quick Pallet Maker creates boxes or fills existing ones, with the given quantity of packages 2. It calculates pallets load for you to choose the best arrangement 3. The result is the amount of pallets you will need to accomplish the shipment of a given quantity of primary package Create shipment This option is available when you are working from primary package. Follow this procedure: 1. Go to File menu and select New Data Sheet 2. Then click on Start from PP 3. Enter the quantity of packages per box in the Case Count field 4. On the Tools menu, select Load Multiple Packages and on the next window define your packages 5. On the Amount field, type the total number of packages you need to ship, this will be the quantity of primary packages that your shipment will have, and then click Done 6. On the Start from PP window, go to the Tools menu and click Recalculate or press CTRL+ R (CMD+R in OSX) 7. In the Available Solutions window, select one pallet arrangement and then go to Tools menu and click on Create Shipment 8. As a result, in the Pallet List will stay only the pallet arrangement you choose, with the amount of primary packages you set on the step 4. You will see as many pallets as needed to accomplish the amount of packages If you want to put those pallets into a shipping container, follow this procedure: 1. Select all the resulting pallets 2. Go to the Tools menu and click on Fill Container Quick Pallet Maker User Manual 4.8.2 Page 42 of 61 Reports Quick Pallet Maker provides a set of reports with all the information about the pallets and containers loads. These reports can be exported into different formats as required. Detailed Report This report displays the information of one selected pallet and features four tabs. Quick Report Contains the three main graphics: the primary package drawing, the case drawing and the pallet drawing. Clicking on them with the right button (CMD + click in OSX), allows copying the drawings onto a third-party application. HTML This tab allows you to preview and edit the pallet report as an HTML (web page) file. To change the default drawing, right click (CMD + click in OSX) on the drawing and select from the menu any of the options, and then enable them by clicking the checkbox at the left of the drawing. Quick Pallet Maker User Manual 4.8.2 Page 43 of 61 Pallets Views Displays bigger drawing of the selected pallet with different views. You can see each drawing at a time by selecting Toggle Pallet View from the View menu. RSC Contains the Knocked-Down-Flat (KDF) drawing of a RSC box using the dimensions of the selected box. The box that is selected can be changed by using the horizontal scrollbar under the box drawing in the first tab. New Multi-Pallet Report With Drawing This is a HTML report that shows the details of one or more pallets, including the drawings of each one. The difference between this and the regular Detailed Report is the possibility of having more than one pallet in the same report and including the drawings. Bill of Materials HTML report with the pallet properties with and without load, the box list, the load properties and the box location into the pallet. Quick Pallet Maker User Manual 4.8.2 Page 44 of 61 Palletizing Movie It is an animated sequence that depicts the pallet and container loading box-by-box. The palletizing sequence is captured frame by frame. The time that this takes depends on the amount of cases per pallet (equal to the number of frames) and your computer speed Quick Pallet Maker User Manual 4.8.2 Page 45 of 61 NOTE This feature requires the free installation of QuickTime, an Apple product. You can download it directly from their website through this link: http://www.apple.com/es/quicktime/ Box Coordinates Quick Pallet Maker can export a comma-delimited file with the X, Y, Z coordinates of all boxes in the pallet. This file can be read by a palletizing machine to arrange boxes in a pallet. View the Detailed Report 1. From the Available Solution window, select one pallet 2. Go to the Window menu and click on the Detailed Report option Print the Detailed Report 1. From the Detailed Report window, go to File menu 2. Click on Print Report, select your printer and preferences if needed Quick Pallet Maker User Manual 4.8.2 Page 46 of 61 Save the Detailed Report Use this feature to save a file containing all the report information. This file can be opened by Quick Pallet Maker at any time as if it were a document. You can save the report without previewing it on screen (procedure 2). To save a report follows one of these procedures: Procedure 1 1. From the Available Solution window, select one pallet 2. On the Window menu, click on Detailed Report option 3. Go to the File menu and click on Save Report 4. Type a name and save it on your preferred location Procedure 2 1. From the Available Solution window, select one pallet 2. Go to the File menu and click on Save Report 3. Type a name and save it on your preferred location Open Report 1. From the Available Solution window 2. Go to the File menu and click on Open Report 3. Select the file you want to open Export Detailed Report You can export the Detailed Report in multiple formats, this way you will have the information available for use with third-party applications. Quick Pallet Maker User Manual 4.8.2 Page 47 of 61 Available formats: Format Procedure What do I get? TXT Go to File menu, select Export and then Pallet options, click on Text, set a name and preferred location First tab of the Detailed Report XLS Go to File menu, select Export and then Pallet options, click on To MS Excel, set a name and preferred location First tab of the Detailed Report SVG Go to File menu, select Export and then Pallet options, click on Detailed Report (SVG), set a name and preferred location First tab of the Detailed Report JPG, JP2, PNG, MPI Go to File menu, select Export and then Pallet options, click on Graphics, set a name and preferred location First tab of the Detailed Report NOTE All the procedures start from the Detailed Report window. Save Bill of Materials 1. From the Available Solution window, select one pallet 2. Go to the File menu and click on Export and then on Pallet 3. Click on HTML Bill of Materials 4. A window will open for you to set a name and preferred location Quick Pallet Maker User Manual 4.8.2 Page 48 of 61 Create a palletizing movie 1. From the Detailed Report, go to File menu 2. Click on Export and then click on Pallet and select Palletizing Movie 3. A window will open for you to set a name and preferred location 4. In the next window called Compression settings, we recommend Animation as the Compression Type NOTE This feature requires the free installation of QuickTime, an Apple product. You can download it directly from their website through this link: http://www.apple.com/es/quicktime/ Save Box Coordinates 1. From the Available Results window, go to File menu 2. Select Export and then click on Pallet and on Box Coordinates 3. A window will open for you to set a name and preferred file location Quick Pallet Maker User Manual 4.8.2 Page 49 of 61 Advanced Input Options Quick Pallet Maker provides a way to quickly test different scenarios and calculate the best option for a range of scenarios. This feature is called Advanced Input Options. In some cases, you may not be exactly sure about one of the variables that make up the primary package input or one of those variables may be flexible. Some examples of this situation are the following: Unknown case count: The amount of primary packages per box can be adjustable within a certain range that will not affect the customer Known volume but unknown dimensions: The product is sold by volume (e.g. beverage) but the primary package dimensions can vary Variation in permitted pallet height: The products will be shipped to different locations in which the maximum allowable pallet height is different. The load arrangement and box dimensions must be then optimized for different pallet heights To access the advanced features: 1. From Start from PP window, go to Tools menu 2. Select Advanced Input Options Quick Pallet Maker User Manual 4.8.2 Page 50 of 61 Main elements of the Advanced Input Options Variable This menu contains the variable to be tested under different scenarios. The options are: Primary Package Weight Primary Package Length Primary Package Width Primary Package Height Case Count Maximum Load Height Maximum Load Weight Pallet Type Variable Range These two cells indicate the range in which the variable will be tested. For example, you want to calculate the results for a case count from 4 to 24. Criteria This menu allows you to select from a list of comparative criteria. The options are the followings: Greater than Less than In between Equal to As low as possible As high as possible Quick Pallet Maker User Manual 4.8.2 Page 51 of 61 Limit Range Depending on the criterion you select, one, two or none limit range may appear on the criteria list. For example, if you choose Greater than criteria, you will be able to set one limit, but if you choose As low as possible criteria you will have no limit range to set. Target This menu indicates the variable used for comparing the results. This is the variable that you wish to minimize or maximize. For example, to achieve a number of cases per layer, then select Cases per Layer as the target. The options are as follows: Case Corrugate Area, It refers to the area of corrugated carton per box; the measuring unit is square meters Cases per Layer Total Cases per Pallet Area Efficiency, area occupied by the boxes divided by the available pallet area Volume Efficiency, space occupied by the boxes divided by the available space within the load Primary Packages/Pallet, Total number of primary packages per pallet Adjustment slider Adjust the rate of measurement of the variable to be tested. For example, if you use the variable Maximum Load Height, you could choose to try every 5 mm instead of 1 mm. This will speed up the calculation time and deliver fewer results for analysis. Constant Primary Package Volume This option is available only when the variable is one of the primary package type. The remaining primary package dimensions will be adjusted accordingly to keep the primary package volume constant. For example, if you wish to calculate the pallet arrangements and box dimensions for a can of beverage by varying the can diameter, the can height will be adjusted to keep the volume of beverage constant. Show All Results This option appears when the you are working with As high as possible or As low as possible criteria. Quick Pallet Maker User Manual 4.8.2 Page 52 of 61 Only Show Best Result Instead of displaying all the values, this option will make Quick Pallet Maker find the best value from the list and calculate the pallets for this value. Quick Pallet Maker menus Learn the actions and features that are in our menus. Quick Pallet Maker OSX About QPM: Displays the version of the program and the registration data. If you have not registered the application, the Register button will show Register: Will display the Register window. If you have already registered the application, this menu can be used for changing the user name. Buy QPM: Begins the process of buying your Quick Pallet Maker license. We appreciate when you choose this option Activate serial number: Use this option to activate your license number, enter the data that was provided after you purchase Disable serial number: With this option disables your copy of Quick Pallet Maker Preferences: Opens the basic settings of Quick Pallet Maker File New Data Sheet - Start from PP: This option will open a new window that allows pallet calculations based on primary package data. If auto-save has been checked, then the program will open the last saved file New Data Sheet - Start from Box: Opens the simplified input window where you can work with box dimensions New Data Sheet - Fill Container: If you start optimizing from this option, you can fill containers with boxes and pallets previously calculated or define new elements Quick Pallet Maker User Manual 4.8.2 Page 53 of 61 Close: Closes the foremost document window. Will not close the Standard Cases and Pallets window Load Input Data: Open files saved with Quick Pallet Maker (.qpm) Save Input Data: Saves a text file with the input data. If the file has previously been saved, it will overwrite it. If not, it will save with a new name Save as: Saves the file with another name Insert - Primary Package: Loads a saved primary package. You can do this from Start from Primary Package and Fill Container windows Insert - Box: Loads a saved box to Start from Box, Fill Container, Available Solutions and the Layer Editor windows Insert - Pallet: Loads a saved pallet to Fill Container and Available Solutions windows Insert - Container: Use this feature to display a full container that has been saved. You can do this from Fill Container window Insert - Shipment: This option lets you view the contents of a container group that has been saved. You can do this from Fill Container window Export - Primary Package: Save package data in two different formats; set a name and preferred location for you file. You can load this item to Quick Pallet Maker through the Import option on this menu Formats are: Format Option name What do I get? XML File (XML) XML of the primary package SVG Drawing (SVG) Primary package drawing Export - Box: Save box data in different formats. You can load this item to Quick Pallet Maker through the Import option on this menu Quick Pallet Maker User Manual 4.8.2 Page 54 of 61 Formats are: Format Option name What do I get? XML File (XML) XML of the box SVG Drawing (SVG) Box drawing MOV Movie Animated sequence that depicts the box loading. Export - Pallet: Save pallet data in different formats. You can load the XML file to Quick Pallet Maker through the Import option on this menu Formats are: Format Option name What do I get? XML File (XML) XML of the pallet TXT Text First tab of the Detailed Report XLS To MS Excel First tab of the Detailed Report CSV Box Coordinates Comma-delimited file with the coordinates X, Y, Z of all boxes in the pallet SVG Drawing (SVG) Pallet drawing SVG Detailed Report (SVG) First tab of the Detailed Report JPG, JP2, PNG, MPI Graphics First tab of the Detailed Report MOV Palletizing Movie Animated sequence that depicts the pallet loading box-by-box Quick Pallet Maker User Manual 4.8.2 Page 55 of 61 Export - Pallet - HTML Bill of materials: HTML report with the pallet, box and load properties Export - Container: Save container data in different formats. You can load the XML file to Quick Pallet Maker through the Import option on this menu Formats are: Format Option name What do I get? XML File (XML) XML of the container SVG Drawing (SVG) Container drawing JPG, JP2, PNG, MPI Graphics Container drawing Imprint Fill Sequence Print the container fill sequence XLS To MS Excel Bill of materials and item positions MOV Movie Animated sequence of the container load item by item CSV CSV Bill of materials Bill of materials TXT Tab-Delimited bill of materials Bill of materials HTML HTML Bill of materials Bill of materials - 2D Container Drawings Options not available Export - Shipment: Save the shipment data in different formats. A shipment can be one or more containers. You can load the XML file to Quick Pallet Maker through the Import option on this menu Quick Pallet Maker User Manual 4.8.2 Page 56 of 61 Formats are: Format Option name What do I get? XML File (XML) XML of the shipment XLS To MS Excel Bill of materials and item positions XLS Export BOM to Excel Bill of materials on a different presentation CSV CSV Bill Of materials Bill of materials TXT Tab-Delimited Shipment BOM Bill of materials Load Solutions: Load to Quick Pallet Maker the saved pallets to use them in other calculations Save Solutions: Saves the selected pallets from the Available Solutions window into the folder you choose. The resulting pallets are saved in individual files and named automatically with a consecutive number, starting from "Detailed Report0000” Open Report: It allows loading the Detailed Report you selected. You can do this from the Available Solutions and Start from PP windows Save Report: Display the saving window to save the Detailed Report Page Setup: Allows you to select the page layout for printing. Horizontal is recommended for all prints except for the display of HTML in the browser Print Report: With this option you can perform multiple actions depending on where you use this function: From Option name What do I get? Detailed Report / First tab Print Report Print the first tab of the Detailed Report Detailed Report / HTML tab Preview in Browser Viewing the report in your browser Detailed Report / third and fourth tab Print Report Print the images shown Fill container / Container tab Print Report Print the container report Fill container / Shipment Data Preview in Browser Viewing the shipment report in your browser Quick Pallet Maker User Manual 4.8.2 Page 57 of 61 Available Solutions Preview in Browser New Multi-Pallet Report With Drawing Exit: Ends Quick Pallet Maker Edit Undo: return the boxes to its original position at the Layer Editor Copy / Paste: Basic functions that let you copy and paste text and selected items Copy Report: Copy the image of the Detailed Report to the clipboard Delete: Delete the selected box in the Layer Editor Duplicate: Create boxes, pallets and containers, identical to the one selected Text: You can resize the editable text of Quick Pallet Maker and change the interface font Tools Recalculate: Calculate box loads with primary package, pallet arrangements and containers Calculate Multiple Boxes: This feature allows you to mix multiple box sizes in a pallet sequence. You can do this from Start from PP Change Data: Returns to the input data window Advanced Input Options: Opens the advanced input window, where the data can be set to a range for finding an optimal solution to a given problem Load Multiple Packages: Opens the window where you load the list of primary packages and then fill the boxes with these multiple packages Dividers: Edit the dividers type and slack of the cases Fill Container: Fill the container with the selected pallets in the Available Solutions window Layer Editor: Opens the Layer Editor from the Available Solutions window Quick Pallet Maker User Manual 4.8.2 Page 58 of 61 Pallet Actions: Pallet arrangements applicable to the selected pallet Create shipment: Calculate the number of pallets needed to complete the shipment of a specific quantity of boxes filled with primary packages. You can do this from the Load Multi Packages window Distribute Load Weight: Centers the load in a container for better handling Power Sort: Sorts the list of pallets on the Available Solutions window Box Compression: This feature helps you know the compression of the boxes in the pallet Units: Change the units in which the data is defined in the active window, you can choose from three options available Round Numbers: If this option is checked, all calculation results for lengths will be displayed without decimals. This does not affect the weight results, which are always displayed with two decimals Convert Data On Unit Change: If activated, the sizes of the loaded elements are automatically converted when changing measurement unit Delete Saved Solutions: Delete from the Quick Pallet Maker memory all the temporarily stored calculations Settings: Opens the Preferencias para Quick Pallet Maker window where you can change the program settings View Color: Display the drawings in color Black and White: Display the drawings in black and white. This is useful for printing to monochrome printers Internal Box View: Display the box contents (primary packages) External Box View: Display a closed box or a full tray, whichever the case type Open Box: If you are working with an RSC box, this action will open the flaps View Box Contents: If you are working with an RSC box, this action will open the flaps and show the content by removing the front boards. This feature is useful for viewing the effect of slack on the box Spread Primary Packages: If this option is checked, the primary package layers will separate as the sliding bar at the right of the box drawing in the Available Solutions window is moved upwards Quick Pallet Maker User Manual 4.8.2 Page 59 of 61 One Pallet Layer: Shows only the first pallet layer All Pallet Layers: Shows all the pallet layers Show Corner Posts: Will display the pallet with corner posts, which are the corrugated board supports that are frequently placed on the corners of the pallet load to facilitate stretch-wrapping Show Top Cap: Cardboard sheet placed at the top of the pallet Show Layer Pads: Cardboard sheets between the layers to provide stability to the pallet Show Pallets Straps: The pallet drawing will show a pair of straps per pallet side holding the boxes in place Show Box Tape: The pallet drawing will show all boxes with a strap of box sealing tape Empty Tray: If the pallet contains trays, this option will show them without contents on the pallet drawing. This is useful for visualizing the tray location which can be confusing with all of the primary packages in place Toggle Pallet View: Change the view of the selected pallet (front, top, and 3D) Window Detailed Report: Opens the Detailed Report window Standard Cases and Pallets: Display the Standard Cases and Pallets window Help Quick Pallet Maker Help: Opens this help Quick Pallet Maker FAQ: Answers to frequently asked questions about Quick Pallet Maker Examples on the Web: Customer cases, practical examples of different functions and situations that can be solved with Quick Pallet Maker Download Instructions: Downloads a manual of Quick Pallet Maker in PDF format About Quick Pallet Maker: (Windows only): Displays information about the installed version of Quick Pallet Maker and your license Register (Windows only): Displays the registration box Quick Pallet Maker User Manual 4.8.2 Page 60 of 61 Buy QPM (Windows only): Starts the online process for purchasing Quick Pallet Maker to obtain your serial number. We appreciate it greatly when you select this option Activate Serial Number (Windows only): Use this option only if you are instructed after registering your license of Quick Pallet Maker. Deactivate Serial Number: (Windows only): Use this option if you want to move your installation of Quick Pallet Maker to another computer; erase the log data from your old computer so you can use the serial that you already have on your new computer Quick Pallet Maker User Manual 4.8.2 Page 61 of 61