1
5
FSX Scenery Design Concept
2 - Acquiring the imagery from the imagery provider
The next step in the scenery design is the acquisition of the imagery itself. Let’s use Google Earth as an example of image provider in this case:
First, with the area of interest selected (basically deciding what exactly will the scenery cover), we will decide on the resolution of the imagery. This is a simple task of deciding how
much of the detail will be visible in the scenery: Will the user be able to spot their own house from the air, or just general landscape features? Usually, a good high resolution scenery is
where individual vehicles can be spotted on the road, and to get to that level of resolution in Google Earth, simply zoom in on the area you’d like to create in the scenery. A good way of
determining (and remembering) the resolution in Google Earth is the “altitude” readout: the lower the altitude, the higher the resolution of the imagery is. Let’s assume that an altitude at
which the imagery looks nice and crisp is 520 meters. REMEMBER / NOTE this value, as you may inadvertently zoom in or out from it, and you’ll have to get back to that exact zoom
level.
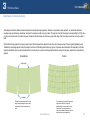
The idea here is to take a screenshot (capture) of the area (Google Earth has an option for that) and
then move on to an adjacent area. This can be accomplished fairly easily by (using a mouse)
scrolling the area horizontally, from top right corner to top left corner, taking a screen capture and
then repeating the process for the next adjacent area. The important thing to note is that, by doing it
this way, a small overlap area is left on sides of both images, and this area will be used later to line
up the images for a seamless fit. The same principle applies to top/down move-and-capture
process, always leaving a small area of the imagery overlap that will be used for lining up the
imagery.
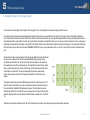
The images created this way are stored as BMP imagery and named in consecutive numbers. The
pattern of capture is not important, as long as it is consecutive and orderly, so that the assembly of
the mosaic within the TerraBuilder FSX application will be easier. The best patterns are usually
horizontal rows started from the top left of the area of coverage, and moved down to bottom right, as
depicted in the graphic below: (note the transition of direction between captures 6 and 7 and 12 and
13)
1
2
3
4
5
6
12
11
10
9
8
7
13
14
15
16
17
18
21
20
19
While this process may feel cumbersome at first, with a bit of practice it will be possible to quickly capture large areas of high-resolution landscape.
www.terrabuilder.com
21