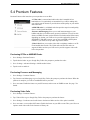
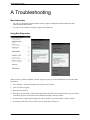
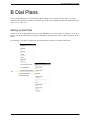
1
Bria Android Edition
User Guide
CounterPath Corporation
CounterPath Corporation
Suite 300, One Bentall Centre
505 Burrard Street, Box 95
Vancouver, BC V7X 1M3
Tel: 604.320.3344
[email protected]
www.counterpath.com
© 2014 CounterPath Corporation. All rights reserved.
This document contains information proprietary to CounterPath Corporation, and shall not be used for
engineering, design, procurement, or manufacture, in whole or in part, without the consent of CounterPath
Corporation. The content of this publication is intended to demonstrate typical uses and capabilities of the Bria
Android Edition application from CounterPath Corporation. CounterPath makes no warranty regarding the
content of this document, including—but not limited to—implied warranties of fitness for any particular
purpose. In no case will CounterPath, its employees, officers or directors be liable for any incidental, indirect or
otherwise consequential damage or loss that may result after the use of this publication.
CounterPath and the
logo are trademarks of CounterPath Corporation.
This manual corresponds to Bria Android Edition version 3.1.0.
Google and Android are trademarks of Google Inc.
SILK is a registered trademark of Skype Inc.
The Bluetooth word mark, figure mark, and combination mark are all trademarks that are owned by the
Bluetooth SIG.
All other trademarks are the trademarks of their respective owners.
Rev 2
June 2014
Contents
About Bria Android Edition..........................................................................................................1
Configuring Bria ...........................................................................................................................3
Getting Ready .........................................................................................................................3
Setting up ................................................................................................................................4
Setting up Presence and Instant Messaging ............................................................................7
Widget.....................................................................................................................................10
Adding Facebook Friends .......................................................................................................11
Making Phone Calls......................................................................................................................13
Starting and Quitting Bria.......................................................................................................13
Interaction between Bria and Native Phone ...........................................................................14
Placing a Bria Call ..................................................................................................................15
Handling Incoming Calls ........................................................................................................18
Handling One Established Call...............................................................................................19
Recording Calls.......................................................................................................................20
Placing a Second Bria Call .....................................................................................................21
Handling Two Established Calls.............................................................................................23
Unattended (Basic) Transfer ...................................................................................................24
Attended Transfer ...................................................................................................................26
Conference Call ......................................................................................................................26
History ....................................................................................................................................27
Handling Video Calls..............................................................................................................29
Accessing Voicemail ..............................................................................................................31
Presence and Instant Messaging ...................................................................................................33
Sending an IM.........................................................................................................................34
Sending an SMS......................................................................................................................36
Receiving an IM and SMS......................................................................................................38
Starting XMPP Group Chat ....................................................................................................39
Viewing Others’ Status (Adding a Buddy).............................................................................41
Setting Your Own Status ........................................................................................................44
Responding to Buddy Requests ..............................................................................................45
Settings..........................................................................................................................................47
Accounts .................................................................................................................................48
Preferences..............................................................................................................................55
Advanced Settings ..................................................................................................................58
Premium Features ...................................................................................................................63
Share .......................................................................................................................................64
A Troubleshooting ........................................................................................................................66
B Dial Plans ..................................................................................................................................67
C Glossary.....................................................................................................................................69
i
CounterPath Corporation
ii
Bria Android Edition User Guide
1 About Bria Android Edition
Bria Android Edition is a SIP-based phone for an Android phone. With Bria Android Edition (Bria), you can use
the Wi-Fi internet connection on your Android phone to make and receive calls without using your mobile data
plan. In addition, you can use the mobile data connection for phone calls when you are not in a Wi-Fi zone.
Standard Telephone Features
Bria Android Edition has all the standard telephone features, including:
•
•
•
•
•
•
•
•
•
Call display and Voicemail indicator.
Speakerphone, Mute and Hold.
Call history – list of received, missed and dialed calls.
Call transfer.
Audio call recording.
Three-way audio conference.
Audio codecs G.711, G722, GSM, iLBC, SILK™, and OPUS, with an option to purchase codecs G.729a
and Adaptive Multi-Rate wideband (AMR-WB).
Ringtones and contact avatars.
Support for DTMF: the ability to enter numbers to use an auto attendant.
Advanced Features
•
•
•
•
•
•
•
•
•
Video calls. Must be purchased separately as an in-app purchase.
Presence and Messaging using the XMPP protocol and the SIP SIMPLE protocol. Must be purchased
separately as an in-app purchase.
NAT traversal (STUN and ICE).
Secure call signaling (TLS).
Audio encryption (SRTP).
Quality of Service (QoS).
DNS SRV record lookups.
Call quality statistics.
Application diagnostics (logging and log files uploading).
1
CounterPath Corporation
Operating System
Your device must run on Android V2.3.3 or later.
Accessories
The following accessories are supported:
•
•
2
Headset with microphone (including Bluetooth™): Bria uses the ear-piece and microphone on the headset.
Headphones (no microphone): Bria uses the ear-piece on the headphone and the built-in microphone on the
Android phone.
Bria Android Edition User Guide
2 Configuring Bria
We strongly recommend that you perform your initial setup from within a “known” network, such as in
your enterprise or university campus Wi-Fi zone or within range of your home network (if you have
one) and not in a network such as an internet cafe.
2.1 Getting Ready
1. Set up Wi-Fi connection. From the main phone screen, tap Settings > Wireless & networks, and look at the
Wi-Fi field:
•
•
•
If it has a checkmark and a message such as “Connected to MyEnterprise”, then your phone has a WiFi connection. Go to the next step.
If it has no checkmark and the line “Turn on Wi-Fi”, then tap the field to turn on Wi-Fi and wait for the
message “Connected to MyEnterprise”
If the message does not appear, tap Wi-Fi settings (the next field). On the Wi-Fi settings screen, tap the
desired network and complete the popup that appears. The message “Connected” will appear.
You can connect to as many networks as you want. Whenever you move into range of one of these
networks (and assuming you are not already connected elsewhere), you will automatically connect to
that network.
Indicates that there is a Wireless connection
2. Set up mobile data connection (if applicable). From the main phone screen, tap Settings > Wireless &
networks, and then tap Mobile networks. Make sure:
•
•
Data enabled is On
Use only 2G networks is Off (in order to enable 3G).
3. Let Bria use mobile data when no Wi-Fi is available. To do so, launch Bria and go to Preferences and turn
on “Use When Available” and “Allow VoIP Calls”.
4. Obtain account information from your VoIP service provider
•
•
•
Your username, password and domain.
Your authorization name, if used by your service provider.
Your voicemail number, if your service provider provides this service.
5. Tap the Bria icon on the phone.
In general, Bria works in portrait mode. It also supports landscape mode for typing messages so users can take
advantage of bigger keyboard.
3
CounterPath Corporation
2.2 Setting up
Tap
Tap
Select your VoIP service
provider, if it is on the list.
Otherwise, select Generic
SIP Account.
Complete the User Details
section and Voice Mail section
(optional) with the information
provided by your service provider
When done, tap the Back key.
Then tap the circle to register.
When you have successfully
registered, tap the Back key and
then tap the Phone icon.
Enter a phone number and
click the Call icon
4
Bria Android Edition User Guide
Account Status
Status
Meaning
The account is in the process of registering.
The account is enabled and registered for incoming and outgoing calls.
The account is enabled only for outgoing calls. (Accounts > Account Advanced > Incoming Calls is
turned off.)
The account is disabled. You can enable it; it will then automatically register.
The account is enabled but registration failed. Check that you entered your account credentials correctly.
Setting up Multiple Accounts
You can set up more than one account if you have service from more than one VoIP service provider.
Tap
Set up the account in
the usual way, and
tap the Back button
Enable the account
5
CounterPath Corporation
Setting the Primary Account
One account is always set as the primary account. This account is used by default for outgoing calls. You can
change the primary account or you can override it for one call (page 16).
This green dot indicates the
current primary account.
Long-tap the desired
account
Tap
6
Bria Android Edition User Guide
2.3 Setting up Presence and Instant Messaging
Presence and Messaging is a premium feature available as an in-app purchase. With Presence and Messaging,
you can share online status with your buddies (such as Available, Away, On the phone), and exchange instant
messages with them.
Bria supports the XMPP protocol and the SIP SIMPLE protocol. You can create an XMPP account on Bria with
your Gmail or Facebook credentials to communicate with your buddies. To use a SIP account for Presence and
Messaging, make sure your VoIP service provider supports this service for SIP SIMPLE. Texting (sending
SMS) to PSTN phone numbers is also available if your VoIP service provider supports this service.
To use the Presence and Messaging feature for XMPP and/or SIP SIMPLE, you need to purchase the feature
from Google Play. To do so, go to Settings > Premium Features, and follow the prompt (see page 63 for details).
After the purchase, the Messages tab appears at the bottom of Bria. Then follow the steps below, depending on
the protocol you want to use.
For XMPP
To use the Presence and Messaging feature for XMPP, you need to create an XMPP account with the credentials
such as Gmail or Facebook. As soon as your account is connected to an XMPP server, your buddies appear on
your Buddies list.
7
CounterPath Corporation
i
Go to
Settings >
Accounts.
Tap
Tap XMPP
Account status
Complete the User Details section
with the information provided by your
service provider.
Tap the Back key. Make sure that the
account shows a checkmark.
Tap the Back key, and tap Contacts > Buddies
to see who is online.
To add a new buddy, see page 41.
Account Status
Status
Meaning
The account is in the process of registering.
The account is connected to an XMPP server, and can be used to send and receive instant messages.
The account is disabled. You can open the account and enable it; it will then automatically connect.
The account is enabled but it is not connected. To connect, tap the checkmark on the right.
If you do not want to use an account, you should disable it (rather than disconnecting). If you leave the
account disconnected (instead of disabled) it will automatically connect next time you start Bria.
8
Bria Android Edition User Guide
For SIP SIMPLE
To use the Presence and Messaging feature for SIP SIMPLE, you need to change the setting on your SIP
account. Then add a new buddy to see other people’s presence (see page 41). If you are new to Bria and have
not set up your SIP account for making phone calls yet, it will be easier to set up Bria as a phone first (see
page 4), then follow the steps below.
Tap Settings > Accounts.
Unregister your SIP account to make
changes, and then tap the account.
Tap Account
Specific
Features
Tap to enable IM and
Presence (and SMS if
applicable),then tap the
Back key.
Tap the checkmark to register the SIP
account.
Tap Contacts, and add buddies (page 41).
9
CounterPath Corporation
2.4 Widget
Bria has a widget which allows you quick access to each tab of Bria such as: Dial Pad, Contacts, History,
Messages and Settings. The widget does not show a badge for unread messages or missed calls.
To add the widget to the home screen, go to the widgets library on your device, look for Bria, hold down the
Bria icon and drop it on to the Home screen.
Hold down the icon.
10
Bria widget on home screen
Bria Android Edition User Guide
2.5 Adding Facebook Friends
On Bria, you can merge Facebook friends in the contacts list. After the merge, Bria’s contact detail page will
show the latest status of your friends posted on Facebook.
Go to Settings > Accounts.
Tap
To remove Facebook friends
from the contact list, turn it off.
Log in to Facebook
if prompted.
Tap OK to give Bria a permission
to access your Facebook account.
This pop-up appears only once.
Facebook Connect
is turned on.
Go to the Contact list and tap one of your Facebook friends.
You can add phone
numbers or other fields
to this contact. These
fields will remain on your
device even after you
turn off Facebook
Connect.
All information coming
from Facebook will be
read only.
11
CounterPath Corporation
12
Bria Android Edition User Guide
3 Making Phone Calls
3.1 Starting and Quitting Bria
Tap the Bria icon to start Bria. After a few seconds, the Bria screen appears.
Indicates all the accounts on Bria
are registered and ready.
Tap
Indicates no accounts on Bria are
registered.
Indicates some of the accounts
on Bria are not registered.
The contacts tab is automatically
populated with contacts from your
Android contact list.
To quit the Bria application:
1. Display the Phone, Contacts, or History screen or the first Settings screen.
2. Tap the Menu button on the Android phone and choose Exit.
13
CounterPath Corporation
3.2 Interaction between Bria and Native Phone
Contacts
•
Bria uses your contacts saved on your phone. Bria’s contacts are continually synchronized with your native
contacts; adding, modifying or deleting a contact from one list updates the other list.
Placing Calls
•
•
You can place a Bria call so long as you are not already on a native call or not already on two Bria calls.
You can place a native call regardless of the state of Bria.
Incoming Calls
•
•
An incoming Bria call rings on your phone unless you are on a native call or you are already on two Bria
calls. In both these cases, the new incoming call will go to Bria voicemail instead.
Incoming native calls: Being on a Bria call has no impact on your native phone: native calls will be
received in the usual way. Therefore, you should be prepared to accept or decline a native call.
Established Calls
•
•
14
If you accept an incoming native call, any live Bria call goes on hold. You will not be able to take the Bria
call off hold until you end the native call.
You can have up to two Bria calls established at the same time and switch between them.
Bria Android Edition User Guide
3.3 Placing a Bria Call
You can place a Bria call unless you are already o n a native call or already on two Bria calls.
Using the Dialpad
To enter letters and symbols, tap on the call
field; the keyboard appears.
Enter the phone number
Tap
From the Bria Contact List
Tap the Contacts tab at the
bottom of the screen
If phone numbers from your contact list need
to be modified (for example, to remove extra
characters such as +), you can set up a dial
plan. See page 67.
Search for the
contact and tap it
Tap the desired
phone number
Tap
15
CounterPath Corporation
The “Network Quality Issues“ Message
This message appears if there is network congestion or a poor quality Wi-Fi signal. Try moving closer to your
Wi-Fi access point.
Making a Call from another Account
If you have more than one account enabled, you can change the account to use on a given phone call.
The account currently being used for calls
Dial a phone
number.
Long-tap to display
the Choose Account
menu
This account will be used only
for this call. To permanently
change the account, see page 5.
Tap the account
you want to use
16
Bria Android Edition User Guide
From the Bria Contact List
Tap
This account will be used only
for this call. To permanently
change the account, see page 5.
Tap the desired
phone number
Tap the current
account
Tap the account
you want to use
17
CounterPath Corporation
3.4 Handling Incoming Calls
If you are on a native call or already on two
Bria calls, the incoming call does not ring on
your phone: it goes to Bria voicemail
instead.
Hold and slide right to
accept the call
Hold and slide left to
decline the call
When Bria Is in the Background
If you receive an incoming call when Bria is in the background, Bria will automatically come to the foreground
so you can handle the call.
18
Bria Android Edition User Guide
3.5 Handling One Established Call
Mute or unmute
the active call
Place a second
phone call, or
transfer a call
Tap to show a keypad in order to enter
numbers, for example, when choosing
menu items such as “enter 1 for
customer support”.
Enable or disable speakerphone for the active
call. Or choose other audio output options if
connected. To use a bluetooth device, Use
Bluetooth under Preferences must be turned on.
Add video to an audio call.
Hold or release
hold on the active
call.
End the call.
Tap the Android Menu button to
access extra items.
Start recording the audio of the
active call.
View live call statistics. This is a
shortcut to Settings > Advanced
Settings > Call Statistics.
19
CounterPath Corporation
3.6 Recording Calls
Tap the Android menu button and then tap
Turn on recording.
You can pause recording by stopping recording and then
starting again. Both recording sessions are saved in one file.
To stop recording, tap the Android menu button and tap Turn
off recording.
Recording Indicator
Recording also stops
automatically when you end the
call
You can listen to the recording on the History screen on Bria. You can also access the recorded files using a file
explorer or a file manager. The recording is saved in the WAV format under the /sdcard/Bria folder of the
device.
Go to History tab.
The red dot indicates the call was recorded.
Tap to listen to the recording. Bria
launches a media player on the device.
Tap to delete the recording.
20
Bria Android Edition User Guide
3.7 Placing a Second Bria Call
When you are already on one Bria call, you can place a second Bria call using the dial pad, from your Contact
list, or from the History.
Using the Dialpad
The arrow icon transfers the call. You will
not be able to talk to the second person.
Place the call on hold
first, if desired
Tap add
To switch to the other
person, tap Swap
Dial the number of the
second person
Tap add
The second call is dialed
When the call connects, the first call is put on hold.
You are now speaking to the second person.
21
CounterPath Corporation
From the Contact List
If you want to go back to the
first call, tap the Phone tab.
Tap add.
To switch to the other
person, tap Swap
Tap Contacts
Find the person and tap.
(If the list is long, search for
the name)
Tap a desired number.
Tap Call. The second
call is dialed.
When the call connects, the first call is put
on hold. You are now speaking to the
second person.
From the History
Or tap the Phone tab to go
back to the first call
Tap add
Tap History
Find the person and either
1) tap the entry, then tap Call, or
2) long tap on the entry and tap call.
The second call is dialed.
When the call connects, the first call is put on hold.
You are now speaking to the second person.
22
To switch to the other
person, tap Swap
Bria Android Edition User Guide
3.8 Handling Two Established Calls
Handling Two Bria Calls
Transfer the call to the other person
who is on hold.
Add video to the audio call.
Switch to the other person.
Merge two separate calls to a
conference call.
Handling a Bria Call and a Native Call
If you accept an incoming native call, any live Bria call goes on hold.
Use the Android navigation bar to switch
between calls
You will not be able to take the Bria call off
hold until you end the native call.
You cannot start another Bria call until you
end the native call.
23
CounterPath Corporation
3.9 Unattended (Basic) Transfer
You can transfer the current Bria call to a second person without first talking to the second person.
Using the Dialpad
Place the call on
hold, if desired
Tap add
Dial the number of the
person to transfer to
Tap Transfer
24
A call is placed to the
transferee, and it
ends on your side.
Or if the transferee
declines the incoming
call, the first call is
returned to you.
Bria Android Edition User Guide
From the Contact List
If you want to go back to the
first call, tap the Phone tab.
Tap add.
Tap Contacts
Find the person and tap.
(If the list is long, search for
the name)
Tap a desired number.
Tap Transfer. Bria tries to
transfer the call to the
person.
A call is placed to the
transferee, and it ends
on your side.
Or if the transferee
declines the incoming
call, the first call is
returned to you.
From the History
Or tap the Phone tab to go
back to the first call
Tap add
Tap History
Find the person and either
1) tap the entry, then tap Transfer, or
2) long tap on the entry and tap Transfer.
Bria tries to transfer the call to the person.
A call is placed to
the transferee,
and it ends on
your side.
Or if the
transferee
declines the
incoming call, the
first call is
returned to you.
25
CounterPath Corporation
3.10 Attended Transfer
You can speak to the second person first then transfer the first person to them.
Establish two calls
(page 21)
It does not matter which call is live
and which is on hold
Tap Transfer
A message appears
Both calls end on your side
3.11 Conference Call
When you have two Bria calls established, you can merge the calls into a three-way conference call.
Establish two calls
(page 21)
Tap Merge
If desired, you can split the conference
back into two separate calls. The top
call will be the live call.
Tapping End Call ends the conference
and hangs up on both calls.
The two calls are merged into a
conference between you and the two
other people
26
Bria Android Edition User Guide
3.12 History
Tap the History tab.
Incoming call that
was answered
Missed incoming call
Outgoing call
Tap to phone this
person
Tapping quickly displays
this menu
Long-tap on a name
displays this menu
27
CounterPath Corporation
Adding a Contact from the History
Quick-tap or
long-tap
The long-tap menu
The quick-tap screen
Tap
Tap the desired item;
the icon on the top
right corner creates a
new contact.
Tap DONE. The
contact is saved
on your native
contacts as well.
28
The contact detail
screen appears.
Bria Android Edition User Guide
3.13 Handling Video Calls
To use video on Bria, the Video Calls premium feature must be purchased (see page 63).
Placing a Video Call
Go to Contacts, and tap a softphone number.
Tap to stop sending your video.
Tap to switch cameras
Tap Video.
You
Bria starts sending your video as soon as
the other party accepts your video call.
Adding Video during an Audio Call
When you place a call using Dialpad, Bria makes an audio call. You can add video to the audio call by tapping
the video icon.
29
CounterPath Corporation
Offering Video to the other party
During an Audio Call
Tap the video
icon to add
video
Tap the video icon
to stop sending
video. You will still
be able to see the
other party’s video
when ready.
To remove video
from both ways,
tap the Android
menu button and
Remove Video.
The call goes
back to an audio
call.
Receiving a Video Call
When the other party places a video call, you will see their video on Bria after you answer the call.
•
•
You can start sending your video if desired by tapping the Video icon on the top bar.
If you do not want to receive the other party’s video during a call, tap the Android menu button and tap
Remove Video. The call will be switched to an audio call.
During a Video Call
During a video call, you can:
•
•
•
30
transfer a video call. The transferred call will be placed as an audio call, and then both parties can add video
to the audio call.
establish two video calls and merge them into an audio conferernce call (no video conference call supported
yet).
record only audio of video calls.
Bria Android Edition User Guide
3.14 Accessing Voicemail
If your VoIP service provider provides a voicemail service, then incoming calls go to voicemail if:
•
•
•
Bria is not running.
You are currently on a native call.
You already have two Bria calls established.
The voicemail indicator
Tap the voicemail icon to connect to
voicemail.
To set up a voicemail number, go to
Settings > Accounts.
Clearing the Voicemail Indicator
After you have checked your voicemail, you can clear the voicemail indicator to stop the notification. (If you
clear the indicator while you still have unchecked messages, the indicator will appear again!)
Swipe right to clear the
notifications.
Tap to launch Bria. This
notification remains in the status
bar all the time to inform the
registratopm status.
31
CounterPath Corporation
32
Bria Android Edition User Guide
4 Presence and Instant Messaging
With Presence and Messaging, you can share your online status (presence) and exchange instant messages with
the contacts who have a softphone number or an XMPP address. You can also send an SMS from a SIP account
to PSTN mobile phone numbers if your service supports this feature (ask your VoIP service provider).
Presence and Messaging is available as an in-app purchase. Make sure your VoIP service provider supports SIP
SIMPLE before purchasing this option if you plan to use this feature over SIP SIMPLE. To purchase this option
and set up your Bria, see page 7.
Using Emoticons
Bria displays the following set of emoticons.
Icon
Typing
Meaning
:)
Happy
:))
Laughing
:-D
Big grin
:-O
Surprised
:-(
Sad
:'(
Crying
:-@
Evil
X-(
Angry
;-(
Winking
8-)
Cool
:-P
Tongue out
:-S
Worried
:-|
Speechless
33
CounterPath Corporation
4.1 Sending an IM
You can send an instant message to your buddy. If you have no buddies, add someone as a buddy first (page 41).
Tap the Messages tab.
Tap More to choose a canned message.
You can also call this person if this person provides a
phone number. SIP is used to make calls.
Tap a
conversation.
Or tap to select
a buddy.
“Enter a new line” inserts a
line break in a message (it
works as the Return key).
Type a message.
Tap to send.
34
Bria Android Edition User Guide
By Selecting a Contact
Tap Contacts.
Or long-tap a buddy then you will
see “Send IM“.
Tap Buddies
and quick-tap a
buddy.
An XMPP account
A SIP account
Tap to send an IM.
Type a message.
Tap to send.
35
CounterPath Corporation
4.2 Sending an SMS
You can send an SMS from your SIP account to mobile phone numbers if your service supports this feature (ask
your VoIP service provider). Before sending an SMS, make sure SMS is enabled (ON) on Preferences and on
your SIP account.
Tap the Messages tab.
Tap SMS tab.
Then tap to
select a buddy.
Start typing the
name or number
to which you want
to send SMS. Bria
will show the local
contacts that match
entered texts.
On older devices,
you will see the +
icon on the top right
corner that allows
you to choose from
the contacts.
Type a
message.
Tap to send.
36
Bria Android Edition User Guide
By Selecting a Contact
Tap Contacts.
Search for and
long-tap the
contact.
Tap SMS.
Choose a
different number if desired.
Type a message, and tap the icon
to send.
37
CounterPath Corporation
4.3 Receiving an IM and SMS
An alert comes up when you receive an IM or SMS.
Swipe down
from the top.
Tap.
Tap the
Message tab.
38
Bria Android Edition User Guide
4.4 Starting XMPP Group Chat
You can host a group chat using your XMPP account on Bria when the following requirements are met:
•
•
•
Your XMPP server must support Multi User Chat extension as defined in XEP-0045.
All the clients must support XEP-0045. For example, users with the previous version of the app cannot join
a group chat.
All the users must connect to the same XMPP server; in other words their XMPP accounts must have the
same domain.
You can be one of the participants in a group chat if you have an XMPP account.
How it Works
In a group chat, multiple participants can share messages. When a host starts a group chat, an invitation message
is sent to all the selected buddies. The buddies join the chat either automatically or after accepting the invitation
depending on the client they are using. If a buddy is offline or declines the invitation, the buddy will not be
placed into the group chat.
Once a group chat becomes available, the chat remains active until everyone leaves the chat. The participants
including the host can leave the chat and come back later if the chat is still active. If there are undelivered
messages, Bria will download the messages from the XMPP server and display them in chat history. The chat
history will be saved locally on Bria so that the user can look at it even when the XMPP account is unregistered.
Tap the Messages tab, then tap IM.
Tap a conversation to send
messages and see chat history.
Names of current participants.
Your messages appear on
the right.
The green chat icon
inducates the group chat
session is active.
You can copy a message to
the device’s clipboard by a
long-tap on a message.
If a session appears with No Participants and a
green icon, that means you are the last person
in the chat; the session will be closed when you
leave.
39
CounterPath Corporation
Starting a Group Chat
You can invite up to 10 XMPP buddies; 11 people maximum in one chat including you.
•
Buddies must be online (registered to the XMPP server); if their accounts are unregistered, they will not
receive your invitation and therefore cannot join the group chat.
Once a group chat is held with participants, you cannot remove some of the participants.
•
Tap the Messges tab, then IM.
Tap the icon to select a buddy.
You will see messages when
they join or leave the room.
Tap + to add more
buddies.
As you add a buddy, an
invitation request is sent to
them.
Joining a Group Chat
You might get invited to a group chat. On Bria, the invitation message will come in to your XMPP account as a
regular message. As soon as you receive the message, you are automatically placed into the group chat.
Leaving a Group Chat
Unregistering your XMPP account lets you leave all the active group chats.
Deleting a group chat on the Messages tab also lets you leave the chat, but you will not be able to come back to
the chat or view the chat history.
40
Bria Android Edition User Guide
4.5 Viewing Others’ Status (Adding a Buddy)
To view someone’s online status, you need to add this person as a buddy. A buddy must have an XMPP address
or a softphone number. An XMPP address and a softphone number are typically a username. For XMPP
accounts, your buddies are stored in an XMPP server, not in your local Android phone contacts. This means the
name and presence of your buddies appear in your Buddies list (not in All Contacts) while your XMPP account
is connected. For SIP accounts, your buddies are stored in your local Android phone contacts.
XMPP Accounts
Make sure your XMPP account is ON (connected to an XMPP server).
Tap
Tap Buddies,
then +.
Choose XMPP Buddy in a pop-up.
Select an account which the buddy
belongs to if asked.
Enter a username, then tap Save.
Your buddy apppears in your
Buddies list.
41
CounterPath Corporation
SIP Accounts
To see someone’s online status, you can either add a new contact as a buddy, or edit an existing contact.
Editing an existing contact to see online status
Tap.
Search for
the contact
and longtap the
entry.
Tap Edit.
Change the phone
type to Softphone.
Tap Presence and IM.
Tap a softphone number,
and tap DONE. The
domain is automatically
populated.
The person appears both
in your Contacts and
Buddies lists.
42
Bria Android Edition User Guide
Adding a new contact as a buddy
Tap.
Tap
Buddies,
and then
tap +.
Tap SIP Buddy in a
pop-up.
Make sure the label is
Softphone. Enter a softphone
number.
Tap Presence and IM.
Tap a softphone number, and
tap DONE.
The person appears both in your Contacts
and Buddies lists.
43
CounterPath Corporation
4.6 Setting Your Own Status
When you start Bria, your online status becomes “Available”. When you make or receive a phone call, Bria
automatically updates your status to “On The Phone” if your online status is “Available” and no custom status
note is specified. You can change your status from “Available” to other statuses such as “Busy” or “Away”.
Once you change your status from “Available” or specify a custom status note, your status will remain as
specified until you switch yourself.
Tap.
Your current
status. Tap to
change.
Your buddies will see your status and custom note.
Tap a status.
Write a note to
publish if you
want.
Presence
Status
Available
Meaning
People can call you and send you an IM. If no custom status note is specified, Bria automatically
switches “Available” to “On The Phone” when you make or receive calls.
People can call you and send you an IM.
Away
People can call you and send you an IM.
Busy
Do Not Disturb
No one can call you; the call fails and your call history shows a missed call. Your buddies can send
you IM; an alert comes up on the Messages/IM tab.
On The Phone
When you make or receive phone calls, Bria automatically updates your status to “On The Phone” if
your status is “Available“ and no custom note is specified. When your call finishes, your status goes
back to “Available“.
While you are on the phone, you can still send and receive IMs.
Appear Offline
44
You are able to see presence of your buddies, but your buddies see you as offline. You will actually
receive phone calls and IMs if your buddies do contact you; they are unlikely to do so because your
buddies cannot tell the difference between “Appear Offline“ and you really being offline.
Bria Android Edition User Guide
4.7 Responding to Buddy Requests
When using an XMPP account, you may receive a buddy request. You must respond to the request.
A pop-up message comes up when someone adds you as a buddy .
Tap a desired
option.
When using a SIP account for presence, you will not receive a buddy request. As soon as the person on the other
end registers your softphone number on the client, the person will see your presence without your acceptance.
Similarily, you will see someone’s presence right away without having to wait for the person’s response.
45
CounterPath Corporation
46
Bria Android Edition User Guide
5 Settings
•
•
•
•
•
Accounts: See page 48.
Preferences: See page 55.
Advanced Settings: See page 58.
Premium Features: See page 63.
Share feature: See page 64.
47
CounterPath Corporation
5.1 Accounts
All the information for the fields on this screen must be supplied by your VoIP service provider.
To change these fields on an existing account, you must first unregister the account.
SIP Accounts
Field
Description
Account Name
Change the name as desired. For example, “business account” **do bfc version ()read
only)
Display As
Your name. Other people may see this as the caller ID (or they may see just your phone
number).
Username
Typically the account number (phone number) for the account. Provided by your VoIP
service provider. For example, if your account is [email protected],
the username is “6045551212”
Password
Provided by your VoIP service provider.
Domain
Provided by your VoIP service provider. For example, if your account is
[email protected], the domain is “myVoipProvider.com”
VM Number
The number to dial to connect to voicemail and check messages. Provided by your VoIP
service provider. If there is a number in this field, tapping the VM icon on the phone tab
will connect to voicemail; see page 31.
Account Specific Features
See below.
Account Advanced
See page 50.
Dial Plan
See page 67.
48
Bria Android Edition User Guide
Account Specific Features (SIP)
Field
Description
Disable Mobile Data
If you have multiple accounts and want to use mobile data only on some of the accounts, turn this
setting on for the account you do not want to use data. This setting appears only when “Use
When Available” is enabled under Preferences.
• When ON, no mobile data will be used; this account does not register with SIP service when
Bria is in the mobile network. You will get no messages or notifications on this SIP account
when Wi-Fi is not available. You also will not be able to place or receive calls without Wi-Fi.
• When OFF, Bria will attempt to connect to SIP service using mobile data.
Disable VoIP Calls
If you have multiple SIP accounts and want to allow VoIP Calls over the mobile network only on
some of the accounts, turn this setting on for the account you do not want to allow VoIP calls.
This setting appears only when “Allow VoIP calls” is enabled under Preferences and “Disable
Mobile Data” is OFF (You need to allow Bria to use mobile data in order to place/receive VoIP
calls).
• When ON, no VoIP calls will be made on this SIP account when Wi-Fi is not available.
• When OFF, VoIP calls will be made on this SIP account.
Enable Video
ON to make video calls on this SIP account. To use this feature, you must purchase “Video Calls”,
and enable video on Preferences . See page 63 for purchasing the feature.
Always Offer Video
ON to always dial a number with video offer. Whether you use the keypad, the Contacts tab, or
the History tab, all the outgoing calls will offer video to the other party. The default is Off.
Auto Send Video
When On, Bria automatically starts sending video when you receive video calls. When Off, video
does not start until you tap the video icon. The default is Off.
Auto Speaker On
Usually ON. While headsets are connected to Bria, the sound always comes from the headsets
regardless of this setting.
This setting could solve a problem that audio calls are treated as video calls (thus the speaker
comes on automatically). Turning this setting off allows you to hear the sound from the earpiece.
Enable IM and Presence
ON to share your online status with and send instant messages to your buddies. To use this
feature, you must purchase “Presence and Messaging”. See page 63.
Presence Agent
Turn ON if your VoIP service provider supports Presence Agent for SIP SIMPLE. The default is
Off.
Publish Refresh
Interval for publishing your status over SIP SIMPLE. Value in seconds. Minimum 30, default
900.
Subscribe Refresh
Interval for subscribing your buddy’s status over SIP SIMPLE. Value in seconds. Minimum 30,
default 900.
49
CounterPath Corporation
Field
Description
Enable SMS
ON to send an SMS to PSTN cell phone numbers by using the SIP SIMPLE protocol. Turn ON if
your service supports this feature (ask your VoIP service provider). The purchase of “Presence
and Messaging” is required to use this feature.
Split Longer Messages
This setting controls who will split a long SMS - either the client side or the server side. You can
type long messages on Bria regardless of this setting. The default is off (server side). Turn this on
if your SIP server does not accept/split long SMS.
• when on, Bria splits a long message to multiple SMS (140 characters per one SMS), and sends
them to the SIP server.
• when off, Bria sends a long message to the server and lets the server split it to multiple SMS.
Account Advanced (SIP)
Field
Description
Outbound Proxy
If your VoIP service provider has an outbound proxy and requires that you provide that address to
Bria, enter the domain name or the IP address obtained from your provider.
Authorization Name
May not be required. But if it is required, it will be provided by your VoIP service provider.
Send DTMF using
The method used for DTMF, sent when you press a number key when dealing with an auto
attendant (such as “press 1 for customer service”).
Enter the value specified by your VoIP service provider: RFC 2833, SIP Info, or Inband DTMF. If
Bria recognizes the chosen method (RFC 2833 or SIP Info) fails, it sends Inband DTMF instead.
If DTMF tones are not being recognized, trying the other method may resolve the issue. If DTMF
is still not working, contact your VoIP service provider for information about DTMF and IVR.
Suppress STUN Wi-Fi
Allows you to control the use of STUN per account.
• On: No STUN is used on this particular account. This setting overrides the STUN Wi-Fi
setting under Advanced Settings (which applies to all accounts); when Suppress STUN Wi-Fi
is ON, no STUN is used on this particular account even if STUN is enabled under Advanced
Settings.
• Off (default): the app decides whether to use STUN depending on the STUN Wi-Fi setting
under Advanced Settings.
Suppress STUN Mobile
50
This setting has the same functionality as Suppress STUN Wi-Fi, but applies only when you are
connected over the mobile network.
Bria Android Edition User Guide
Field
Description
Use ICE Wi-Fi
ICE is involved only in media routing (it is not involved in SIP signaling).
ON: Bria will use ICE to discover addresses for media packets. ICE provides a good guarantee of
two-way audio. However, to use ICE successfully, both endpoints in a call must use ICE and
specifically must use draft 19 of the ICE standard.
OFF: Try turning ICE off if you are not using Android phone behind a firewall or NAT.
Use ICE Mobile
This setting has the same function as ICE Wi-Fi, but applies only when you are connected over
the mobile network.
Global IP Wi-Fi
• On (checked): Bria will publish its public IP address at the signaling level. The public address
may not work with some NATs or firewalls.
• Off: Bria will publish its private IPs at the signaling level. Typically, you turn this field off
only if instructed to do so by your VoIP service provider or system administrator.
Global IP Mobile
This setting has the same function as Global IP Wi-Fi, but applies only when you are connected
over mobile network.
If you set this setting to On, you must also set Global IP Wi-Fi to On.
SIP Transport
Tap to display the choices. Contact your VoIP service provider to identify the types of transport
that are supported.
• UDP and TCP do not support signal encryption.
• TLS does support signal encryption. You may need to install a certificate on your Android
phone; speak to your VoIP service provider.
Encrypt Audio
You can encrypt a phone call at the media (audio) level:
• Never: Audio is not encrypted.
• Optionally: On a given call, audio will be encrypted if the other person supports and is also
using audio encryption. If not, audio will not be encrypted.
• Always: Audio will always be encrypted. The call will fail if the other person cannot accept
encrypted calls.
• Best Effort: Similar to "Optionally", but Best Effort has more chances of establishing calls. If
you have trouble establishing a call using "Optionally", try Best Effort. With Best Effort, first
Bria requests audio encryption when making a call. If the remote party cannot accept the
encrypted call, then Bria immediately makes a non-encrypted call to the person.
Incoming Calls
Typically On (which means you can receive calls on Bria). If Off, you will not be able to receive
calls.
Wi-Fi Refresh Interval
The timer interval between Bria’s attempts to register in order to refresh the account registration.
Range 30-900 in seconds. This value is placed in the “Expires” header field of the SIP
REGISTER message.
Change this value only if advised to do so by your VoIP service provider.
Mobile Refresh Interval
This setting has the same functionality as Refresh Interval, but applies only when you are
connected over the mobile network.
Use Tel Uri
Change this value only if advised to do so by your VoIP service provider.
• On: Prefix SIP URIs with tel://
• Off (default): Prefix SIP URIs with sip://
Single Register
• On (checked): Bria will register using a single register request.
• OFF: Bria will register using an unregister and a register.
Only turn on if advised by your VoIP service provider.
Connection Reuse
• ON: Bria uses existing connections by including an “ob“ parameter in a header as defined in
RFC5626.
• OFF: Bria does not reuse existing connections.
Changing this setting might solve problems with dropping or holding calls. The default is On.
51
CounterPath Corporation
Field
Description
Passive Session Timer
Controls the use of session timers on SIP accounts. The session timer is used to determine if the
call is still active. Only choose Off if advised by your VoIP service provider.
• ON (default): Bria will not use session timers in any session, except it is explicitly required by
the remote party.
• OFF: Bria will use session timers in all sessions whenever the remote party supports and uses
it.
Enable IMS
When On, Bria supports the IP Multimedia Subsystem. The default is Off. Subject to VoIP service
provider. Only choose ON if advised by your VoIP service provider. When On, Bria does the
following:
• Populates authorization header upon every SIP request right away, instead of after challenge.
• Uses the SIP account domain for authorization realm.
Keep Alive - Wi-Fi Interval
A “keep alive” message is a mechanism for maintaining a “pinhole” through your firewall so that
phone calls proceed smoothly. The interval specifies how often the message is sent (in seconds).
If you are experiencing problems during a Wi-Fi call (a call made over the Wi-Fi internet
connection), try setting this interval to a lower number such as 20.
Keep Alive - Mobile Interval Same as above, except the interval applies to calls made over the mobile network.
52
Bria Android Edition User Guide
XMPP Accounts
Field
Description
Account Name
Change the name as desired. For example, “Gmail”.
Username
The XMPP user ID.
Password
Password for the XMPP user ID.
Domain
Domain of the XMPP service. For example, “gmail.com”.
Account Specific Features
See below.
Account Advanced
See below.
Account Specific Feature (XMPP)
Field
Description
Disable Mobile Data
If you have multiple accounts and want to use mobile data on only some of the accounts, turn this
setting on for the account you do not want to use data. This setting appears only when “Use
When Available” is enabled under Preferences.
• When ON, no mobile data will be used; therefore you will get no messages or notifications on
this XMPP account when Wi-Fi is not available.
• When OFF, mobile data will be used for this XMPP account when Wi-Fi is not available.
53
CounterPath Corporation
Account Advanced (XMPP)
Field
Description
Outbound Proxy
If your VoIP service provider has an outbound proxy and requires that you provide that address to
Bria, enter the domain name or the IP address obtained from your provider.
Resource
Used to identify an XMPP session when you log in to multiple clients with this XMPP account
(for example, /work or /home).
Priority
The priority of the resource. The range is from -128 to 127.
Use Ping
ON to send ping messages to the XMPP server to indicate that the connection is active.
Interval
Specifies how often a ping message is sent to the XMPP server (in seconds). The default is 300.
54
Bria Android Edition User Guide
5.2 Preferences
Field
Description
Use When Available
Appears only on the devices with mobile data connectivity.
• On (checked): When a Wi-Fi connection is not available, Bria will attempt to connect
to SIP/XMPP services using the mobile data network. Data charges with your mobile
carrier will apply. You will be able to receive messages and voice mail notifications
when Bria is in the mobile data network. You will also have a choice to allow/
disallow VoIP calls using a separate setting "Allow VoIP Calls".
• Off: When a Wi-Fi connection is not available, SIP and XMPP services will be
unregistered; you will get no messages or notifications. "Allow VoIP Calls" is OFF;
you will not be able to place or receive calls either.
Allow VoIP Calls
Appears only on the devices with mobile data connectivity. "Use When Available" must
be On to use this setting.
• On (checked): When a Wi-Fi connection is not available, Bria will attempt to place
calls using the mobile data network. Data charges with your mobile carrier will apply.
If you turn this setting on, we recommend you purchase the G.729 codec (page 63)
because it provides better audio quality on 3G/4G calls.
• Off: When a Wi-Fi connection is not available, you will not be able to place or
receive calls.
Play Ringtone
On to hear the ringtone.
Vibrate
On to vibrate when you receive a call.
Contact Image
ON to display the image of your contact while receiving or making calls. Use the
Android native app to save photos of contacts.
Ringtone
Set to the desired ringtone.
Enable IM and Presence
On to enable IM and Presence on Bria.
Enable SMS
On to enable SMS on Bria.
Alert Sound
ON to play a ringtone when you receive a new message.
Alert Vibration
ON to vibrate when you receive a new message.
Alert Text Tone
The ringtone for incoming messages.
Custom Colors
You can change the default color of Bria.
55
CounterPath Corporation
Field
Description
Single Touch to Call
• When On, tapping a phone number on the Contacts or History tab will immediately
make a call. However, if SMS and/or video is enabled on the account, user will get a
prompt to choose call/sms/video.
• When Off, user will see a confirmation prompt.
Show URI Domain
• On: The phone number displayed for an incoming, outgoing or established call will
include the domain name (for example, [email protected]).
• Off (default): The domain name is not included in the display.
Forward Calls
On to send all incoming calls to a specific number. So long as Bria is enabled and
registered and Keep Awake (above) is on, incoming calls will be forwarded to this phone
number.
To Number
The number to forward calls to, when Forward Calls is on.
Play Keypad Tone
On to hear a tone when you tap the dialpad.
Keep Wi-Fi Radio Awake
Controls whether the Wi-Fi radio stays on when the screen goes dark (phone gets auto
locked).
• On (checked): The Wi-Fi radio stays on, so that when the screen goes dark (1) you
stay logged on via Wi-Fi (as long as you are in your Wi-Fi network) and (2) incoming
calls will use Wi-Fi instead of mobile data. Radio On uses more battery power.
Perhaps choose On if you have a limited data plan.
• Off: The Wi-Fi radio is turned off, so that when the screen goes dark (1) Bria will relog in via the mobile data network and (2) incoming calls will use your mobile data
plan. (Unless mobile data is not enabled on your phone and/or in Bria, in which case
Bria logs out and you will not receive calls as long as the phone is dark.) Radio Off
uses less battery power. Perhaps choose Off if you have an unlimited data plan.
Auto Start on Boot
On to automatically start and log into Bria when you start your Android phone. Even if
Bria was logged out when you powered off the phone, Bria will start and log in when the
phone starts.
Contact Sort Order
Changes the sort order of the Contacts tab. This setting does not apply to the Buddies
tab, which is always sorted and displayed by first name.
This setting becomes available/changeable when Bria cannot access the preferences on
the Android OS. If this setting is read-only in Bria, go to the OS settings (such as
Contacts app) and change the sort preference on the OS. This will change the sort order
of the contact list within Bria.
Contact Display Order
Changes how to display someone’s name in your Contacts list.
• "First name first" displays a contact name as John Smith.
• "Last name first" displays as Smith, John.
This setting does not apply to the Buddies tab, which is always displayed with first name
first.
This setting becomes available/changeable when Bria cannot access the preferences on
the Android OS. If this setting is read-only in Bria, go to the OS settings (such as
Contacts app) and change the display preference on the OS. This will change the display
order of each contact within Bria.
Use Phonetic Sorting
On to sort contacts by phonetic names such as Yomigana/Furigana or Pinyin. Enabling
this preference will slow contact loading. The default is off.
When contact names include Japanese or Chinese characters and the names do not
appear correctly on Bria, enabling this preference may solve the problem.
Use LED Notifications
On to turn on the pulse notification light on supported devices. When Bria has a new IM/
SMS or a missed call, the notification light will blink.
Enable Video
ON to make video calls on Bria. Appears only after the “Video Calls“ feature is
purchased.
56
Bria Android Edition User Guide
Field
Description
Send Landscape
When ON, your video will be forcibly sent in the landscape orientation. This is a
compatibility mode for older devices that cannot render video in the portrait orientation.
Use as an exception. The default is "Off".
Video Quality
• Automatic: Recommended. Let Bria select the best quality to use in a given situation.
• Lower (QCIF): Quarter Common Intermediate Format uses 176 horizontal pixels and
144 vertical lines. QCIF transfers one fourth the amount of data; therefore it
consumes less memory than CIF.
• Higher (CIF): Common Intermediate Format uses 352 horizontal pixels and 288
vertical lines.
• Extra High Decode (CIF): Choose this setting when the other party requires a
different version of CIF (H.264 Baseline level 1.3), for example, Cisco hard phones.
57
CounterPath Corporation
5.3 Advanced Settings
When you changed an advanced setting, you may be prompted to apply the changes. In order to apply the
changes, Bria will automatically unregister and reregister all enabled accounts. This may take a few seconds.
Field
Description
Network Traversal Strategy
Tap to display the choices; see page 60.
STUN Wi-Fi, STUN Mobile,
DNS SRV, STUN server
See “Network Traversal Strategy”, below.
Use VPN If Active
If you are using Bria with a VPN connection to your network, turn this field on, to force
Bria to select the VPN network interface.
If you are not using a VPN, turn this field off.
Do not turn on this field when you not using a VPN connection: the wrong network
interface may be selected, resulting in registration problems.
Use Bluetooth
On to enable Bluetooth support on Bria. Since there are many known issues regarding
Bluetooth support on Android devices, we recommend that you keep this setting off
unless you understand the risks of using Bluetooth on Bria on Android devices.
Voice Activity Detection
• On: audio is not transmitted when no one is speaking. Turning this feature on may
reduce bandwidth usage.
• Off: audio is transmitted when no one is speaking.
Quality of Service
If desired, ask your VoIP service provider if Quality of Service(QoS) is supported. QoS
can allow your phone calls to be given a higher priority on the network.
Turning QoS on has no effect if your provider does not support it.
Noise Reduction Tx
When on, Bria attempts to reduce background noise on audio you are transmitting
(sending to the other person). This setting appears on the device that has not have native
noise reduction support.
Noise Reduction Rx
When on, Bria attempts to reduce background noise on audio you are receiving from the
other person.
Echo Cancellation
Try turning on this setting if you or the person you are talking to is hearing an echo.
When you turn this on, you can also choose the echo cancellation mode. If the other
person still hears an echo, turn this setting back to Off.
58
Bria Android Edition User Guide
Field
Description
Codecs Variable Bitrate
This setting applies when the negotiated codec is AMR-WB, SILK, Opus or H.264 (for
video call).
When this setting is turned on, Bria dynamically adjusts the bitrate throughout the call,
based on the current network conditions. For example, when Bria detects many packets
are lost, it tries to lower the bitrate (within the range of a bitrate supported by a specific
codec), in order to ensure the best possible quality under the circumstance.
We recommend that you leave this setting ON, especially when AMR-WB, SILK, Opus
or H.264 is enabled.
If you notice degradation in audio or video quality when your data connection is stable,
you can turn this setting off to see if it makes a difference.
RTP Port Start
Change this value only if advised to do so by your VoIP service provider.
This indicates the start of the ports range used for RTP and RTCP sessions. The range is
100 ports wide. The range is not observed if ICE is used. The default is 4000.
Microphone Gain
Changing this setting may improve audio quality if your voice is loud and distorted for
the person you are talking. There are five options; the default is Normal (100%).
Speaker Gain
Changing this setting may improve audio quality if your voice is loud and distorted for
the person you are talking. There are five options; the default is Normal (100%).
Audio API Type
You can change the audio API used in Bria. Try changing to the other if you experience
poor audio.
Echo Cancellation Mode
Applies only when the “Echo Cancellation“ setting is turned on.
• Auto: Lets Bria choose either software or hardware for echo cancellation.
• Hardware: You will see this choice only when your device supports this feature.
• Software
Auto Gain Control
On to automatically adjust the gain. Appears only when this functionality is supported on
the device. Typically on.
Low Latency Control
Appears only if the functionality is supported on the device (running Android OS 4.2 or
higher). This setting becomes changeable when "Audio API Type" is OpenSL ES. When
On, Bria tries to reduce latency.
Codec Options
See page 62.
Verify TLS Cert
Applies only if you use TLS as the transport.
• On (default): Bria attempts to verify the certificate, sent by the SIP server, to see if it is
trusted. For the certificate to be trusted, a corresponding CA certificate, provided by
your VoIP provider, must be installed on your device.
• Off: Bria accepts the certificate without attempting to verify it.
Alert In Background
• On: Bria sends notifications when an account fails to register. Bria also notifies the
user after the account is successfully re-registered.
• Off (default): Bria does not send notifications regarding account registration errors.
Speakerphone Fix
If the speakerphone is always turned on in Bria, turn on this setting and see if that forces
the speakerphone to turn off. If the speakerphone is still on, turn this setting off again.
Audio Input Source
This setting controls how the device processes the audio input from Bria. If the person
you are talking to is receiving poor audio, try changing the audio source.
Playback Stream
This setting controls how the device processes the audio receiving from the other party. If
you are receiving poor audio, try changing the playback stream.
Enable rport
• On: the outgoing INVITE message will have an rport parameter inside the Via header,
which indicates that Bria supports RFC 3581. If the server also support RFC 3581, the
server should respond with the rport parameter set to the incoming public IP port and
the received parameter set to the public IP address. This is the default behavior in
previous Bria versions.
• Off: Bria does not have the rport parameter in the Via header.
59
CounterPath Corporation
Field
Description
Enable PRACK
• On: Bria advertises that it supports “100rel” and allows PRACK, as defined in RFC
3262. The outgoing INVITE message will have “100rel” in the Supported header and
“PRACK” in the Allow header. This is the default behavior in previous Bria versions.
• Off: Bria will not advertise these features; there will be no “100rel” in the Supported
header.
Encode # in URI
• On (default): Bria escapes a hash character (#) used in the user part of SIP URI, as
required by RFC 3261.
• Off: Bria does not escape a hash character and sends it as is. Turn this setting off if you
are having trouble making outgoing calls to a number with a hash character.
Verbose Logging
Leave this setting OFF unless customer support instructs you to turn it ON in order to
troubleshoot a problem you are having on your device. See page 66.
Send Log
Tap to upload the current log to customer support. See page 66.
Call Statistics
To show detailed information about the current/last call. For example, the number of
packets lost.
For an ongoing call, you can refresh the statistics information by either tapping the
Refresh button or enabling Auto Refresh on the Call Statistics screen. When Auto
Refresh is enabled, the information will get updated every second.
Network Traversal Strategy
Speak to your VoIP service provider about the strategy to use. Make sure that
you change the STUN Server field.
•Application Managed: STUN On and DNS SRV On.
Bria will use the specified STUN server to discover the public address of your
device. It will present your public address for SIP signaling. When
negotiating media routing, it will present both your public and private
addresses or just your public address depending on the ICE settings under
Account Advanced.
•Server Managed: STUN Off and DNS SRV On.
Bria will present your device’s private address for SIP signaling and when
negotiating media routing. Choose this option if your VoIP service provider
advises you that it has implemented a network-hosted NAT traversal (or farend NAT traversal) technology such as a session border controller (SBC),
media proxy or RTP relay.
•Custom Configuration: Set the settings as desired.
Field
Description
STUN Wi-Fi
• On (checked): Bria will use a STUN server to discover your public IP address.
• Off: Bria does not discover your public IP address. Therefore, only the private IP
address will be used. Typically in this case, Global IP should be turned off.
STUN Mobile
This setting has the same function as STUN, but applies only when you are connected
over mobile network.
DNS SRV
• On (checked): Bria will use DNS SRV to discover the network addresses for your
VoIP service provider's VoIP-related services such as a STUN server, if any.
• Off: Bria will not use DNS SRV for discovery. Only turn this setting off if your
system administrator advises you to do so.
60
Bria Android Edition User Guide
Field
Description
STUN Server
Used only if STUN is on. The default is stun.counterpath.com but we recommend that
you change this to an address provided by your VoIP service provider. CounterPath
cannot guarantee the availability of their STUN server.
61
CounterPath Corporation
Codecs Selection
Codecs are programs in Bria involved in transmitting audio; each codec has different characteristics and
therefore each works better in some situations than in others.
In general, it is desirable to have several codecs enabled. Make sure that there are common codecs between you
and the remote peer, otherwise your call will fail with a 488 error.
SILK-SuperWideband (24k) and Opus-Fullband (48k) are available only in devices with 1.2 GHz dual core
CPU or higher. These codecs will be disabled on any slower devices.
Novice and Non-technical Users
We recommend you use the default setting/priority and let Bria select the best codec to use in a given situation.
Technically Savvy Users
You may choose to enable one, some or all codecs. If only one codec is enabled, all calls will be made with that
codec. If more than one is enabled, Bria negotiates the codec to use (from among the enabled codecs) with the
other person. If no codecs are enabled, Bria uses G.711u.
You can prioritize codecs by tapping the Up or Down icon in the list. Codecs higher in the list are given a higher
priority in the offer, when negotiating codecs with the other party. Therefore, moving a codec higher should
improve its chances of being chosen.
G.722, AMR-WB, SILK-WB, SILK-SWB (24kHz), and Opus-Full HD (48kHz) are wideband codecs. All
other codecs are narrowband. When a wideband codec is used, data usage will be higher and audio quality will
generally be better. When a narrowband codec is used, data usage may be lower but audio quality may be
affected.
Data usage for the codecs with a fixed bit rate, from high to low usage, is: G.722, G.711, iLBC, GSM, G.729a.
AMR-WB, SILK and OPUS have a variable bit rate; the data usage will fluctuate depending on the network
conditions. The optional G.729a codec will provide you the best performance (audio quality and bandwidth
usage/cost) when using mobile network for phone calls.
62
Bria Android Edition User Guide
5.4 Premium Features
Premium Features offer items that you can purchase to use on Bria.
• G.729a codec is a narrowband audio codec that is intended for low
bandwidth use. It is particularly recommended if you will be making calls
over mobile network because it provides better audio quality on your mobile
data connection.
•AMR-WB codec is a wideband codec that provides superior sound quality
due to a wider speech bandwidth.
•Presence and Messaging allows you to send instant messages to your
buddies and share your online status (presence) with them. You can use this
feature on XMPP accounts (such as Gmail or Facebook) and/or SIP accounts,
depending on whether your VoIP service provider supports this feature for
SIP SIMPLE. With SIP accounts, you can also send SMS to PSTN phone
numbers if your VoIP service provider supports this feature.
•Video Calls allows you to make video calls to softphone numbers over WiFi and mobile data network. The H.264 codec and the VP8 codec are
supported. Make sure that your VoIP service provider supports video calls
before the purchase.
Purchasing G.729a or AMR-WB Codec
1. Go to Settings> Premium Features.
2. Tap the desired codec to go to Google Play. Follow the prompts to purchase the codec.
3. Go to Settings > Advanced Settings > Mobile Audio Codecs.
4. Tap the codec to enable it.
Purchasing Presence and Messaging
1. Go to Settings > Premium Features.
2. Tap “Presence and Messaging“ to go to Google Play. Follow the prompt to purchase the feature. When the
purchase is complete, you will see an additional tab on your Bria.
3. Go to Accounts. Enable the feature on your SIP account, and/or create an XMPP account. See page 7 for
details.
Purchasing Video Calls
1. Go to Settings > Premium Features.
2. Tap “Video Calls“ to go to Google Play. Follow the prompt to purchase the feature.
3. Go to Settings > Preferences and scroll down to the bottom. Make sure the video option is enabled.
4. Go to Accounts > Account Specific Features. Enable the feature on your SIP account. Then you will see an
option to make video calls on the Contacts or History tab.
63
CounterPath Corporation
5.5 Share
You can share Bria with your friends via Facebook, Twitter, and Email. Bria will publish a post on your
Facebook or Twitter page on your behalf, with a link to the Bria’s app page.
To share on Twitter, make sure you have the official Twitter app installed on your device and already logged
into the sites. For email, make sure you have an email account set up on OS.
Open Bria, and go to Settings > Share, then choose how you want to share Bria.
Facebook
Tap
Tap OK to give Bria a
permission to access your
Facebook account. This pop-up
appears only once.
Type a message and tap
Share to publish the post.
64
Bria Android Edition User Guide
Twitter
Tap
Type a message and tap Share to
publish the post.
65
CounterPath Corporation
A Troubleshooting
More Information
•
•
You can view Frequently Asked Questions at https://support.counterpath.com/knowledge-base/briaandroid-android-tablet-edition.
You can send us comments from http://support.counterpath.com.
Using Bria Diagnostics
When you have a problem with Bria, customer support may ask you to turn on diagnostics in order to capture
information.
1. Go to Settings > Advanced Settings and scroll down to the bottom.
2. Turn on Verbose Logging.
3. Reproduce the problem.
4. When done, go to Settings > Advanced Settings and tap Send Log. Once the file has been sent, you will see
a Sending Log Success notification; this notification includes a reference number.
5. Send an email to [email protected] with the details of your issue and the reference number.
6. If sending the file fails, check your Wi-Fi and/or mobile data connectivity.
66
Bria Android Edition User Guide
B Dial Plans
You can create a dial plan in order to modify a phone number used in a phone call (the “input”), in order to
ensure the call is placed successfully. For example, you could create a dial plan to change any number that starts
with “+1613” to just “613”.
Setting up Dial Plans
You can create up to eight dial plans for an account. Dial plans are account-specific, so make sure you set up a
plan for each account that needs one. Bria goes through the dial plans in the order in which they appear on the
screen.
Go to Settings > Accounts. Unregister the account and tap the account to see details. Scroll down.
Tap
Complete the fields as
required; see below.
67
CounterPath Corporation
Designing the Dial Plan
A dial plan has two parts:
•
•
A pattern that the phone number (the input) must match. This corresponds to the Match Number field.
The modification to make if the input matches that pattern: removing a prefix, adding a prefix, or removing
one prefix and adding another one. The modification can add or remove characters and can be made up of
digits, wildcards or symbols. These correspond to the Remove Prefix and Add Prefix fields.
Example 1
Match number: +1613x.
Remove Prefix: +1613
Add Prefix: 9
If the input starts with “+1613”, then remove the “+1613” then add “9” and dial the number. So +16135550012
is dialed as 95550012.
Example 2
Match number: [2-9]xxxxxxxxx
Add Prefix: 1
If the input is a 10-digit number starting with a number other than 1, then add “1” and dial the number. So
6045550012 is dialed as 16045550012.
Match Number - Configuring the Pattern
The pattern can be made up of any combination of the following:
Element
Description
0 to 9
Any digit
x
A single wildcard
*#+
These keyboard symbols
[]
A collection that can include a range. For example [6-9] means 6 7
8 9. Or [136-9] means 1 3 6 7 8 9.
.
Repeat the last element 0 or more times. For example, with the
pattern “12.” the following input will match:
1 (The “2” is repeated zero times)
12
122
1222 and so on
Testing the Dial Plan
You can enter a phone number in Bria to verify if the dial plan is configured correctly. To test a dial plan, type a
phone number in the Number to test field. Bria applies the dial plan, and displays the resulting number.
68
Bria Android Edition User Guide
C Glossary
phone icon
Bria call
DTMF
ICE
IM
IP address
IVR
Media
Native call
Native phone service
PSTN
Presence
Signaling
SIP
SIP account
softphone address
STUN
Wi-Fi call
XMPP account
3G/4G call
The phone Menu icon, Back icon, Home icon and Search icon are icons (buttons) that
are part of the phone device and may have a different appearance and location on
different phone devices.
A call made using the Bria screen. Compare to “native call”.
Dual-tone multi frequency. DTMF is the system that is used in interactive voiceresponse menu systems such as the menu system for accessing voicemail messages.
The DTMF system allows the user to interact with the menu by pressing keys on a
dial pad or keyboard.
Interactive Connectivity Establishment. A method for traversing a firewall.
Instant Messaging. A technology that lets users send text messages for near
instantaneous delivery and display on each others’ devices.
A unique number that identifies a computer. Computers on a network use the IP
address communicate with each other.
Interactive Voice Response. IVRs use DTMF.
The audio portion (and the video portion if any) of a call. Compare to “Signaling”.
A call made using the phone service that comes with the Android phone.
The mobile phone service that comes with the Android phone.
Public Switch Telephone Network. The traditional land-line phone network.
An instant messaging feature that allows users to share information about their online
status.
The information in a call that deals with establishing and controlling the connection,
and managing the network. The non-signaling portion of the call is the Media.
Session Initiation Protocol. The signaling protocol followed by Bria for handling
phone calls.
An account that provides the user the ability to make VoIP phone calls. The account
encapsulates the rules and functions the user can access.
The address used to connect to a SIP endpoint. In other words, the “phone number”
used in a VoIP phone call. For example, sip:[email protected].
Simple Traversal of UDP through a firewall or NAT.
A call made over the Wi-Fi internet. To make a Wi-Fi call, you must be in a Wi-Fi
zone.
An account that provides the user with the ability to send IMs and view other people’s
presence.
A call made over the 3G/4G network. If you start (or receive) a Bria call with an
Android phone when you are not in a Wi-Fi zone, the call will be a 3G/4G call.
69
CounterPath Corporation
70