1
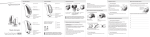
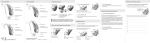
Polarity Maximizer
Installation &
User Manual
The Polarity Maximizer plug-in is a multi-track
analysis tool that routes audio from several
tracks to a single master controller that analyses
the audio and automatically sets the appropriate
polarity (in/out) of the plug-in on each track. The
output is guaranteed to give the maximum RMS
level of the summed audio.
Installation
How to use...
*
1
2
3 4
Additional Features
Questions
*
*
? *
Next | Installation
© 2014 | Audiomere
Installation
*
After downloading the appropriate installer,
simply run the installer package and follow the
provided instructions.
With the trial or purchased version, the license
key information needed to activate the plug-in
was emailed to you. After running the installer,
open a session in your DAW, create a new audio/
aux track (mono or stereo), and add the Polarity
Maximizer plug-in as an insert on that track. A
window will immediately appear asking for the
license information sent to you via email, which
includes your name, email address, and license
key. Enter this information exactly as it appears
in the email, as shown in figure 1 (simply cutand-paste the info from the email into the
registration window). You will only have to enter
this information once.
Note
To view your registration info
at any time, or to upgrade
from the trial demo to the
purchased version, simply click
on the “Audiomere” logo in
the lower-right of the plug-in
window.
You are ready to go!
figure 1 | Registering the plug-in
Next | How to use
© 2014 | Audiomere
How to use the Polarity Maximizer
STEP 1:
Insert the Master
The initial step is to open a session in your DAW
and create a new track for the master controller
to reside (as performed previously for activating
the plug-in license). Insert the Polarity Maximizer
plug-in on that track. Next, select the “MASTER”
button in the ROUTING section on the left-side
of the plug-in panel. This sets the plug-in into
Master-mode, and it will appear as shown in
figure 2.
figure 2 | Master plug-in panel
1
2
3 4
*
© 2014 | Audiomere
How to use the Polarity Maximizer
1
2
3 4
*
STEP 2:
Insert multiple Sending plug-ins
STEP 3:
Use appropriate gain levels
As the Master plug-in needs to analyze audio
from multiple tracks, the next step is to place a
new instance of Polarity Maximizer as an insert
on each audio track of a multi-mic recorded
instrument (e.g., across the tracks of a recorded
drum kit) to send/route the audio to the Master.
The default routing mode of the plug-in is
“SEND ON”, so each time the plug-in is inserted
on a track, its audio is routed additionally to
the Master for analysis. The plug-in can be
inserted on both mono and stereo tracks, and
the mono/stereo versions are shown in figure 3.
The current number of tracks/plug-ins “sending”
audio to the Master is shown in the LED counter
SENDS display of the Master plug-in.
As the recorded audio might have widely
different (or poorly recorded) gain levels, it is
suggested to set (if needed) the individual gain
levels of the tracks to an approximate desired
mix before the analysis. Note: it is possible to get
different polarity outcomes for different mixes,
as maximization is based on the ensemble of
audio being analyzed.
As some DAWs (Pro Tools) have only pre-fader
inserts (i.e., track faders do not affect the audio
level entering plug-ins), a “GAIN” rotary knob
is provided in each Send plug-in (figure 3) to
adjust the level of the audio (to both the Master
and the track itself). The outgoing signal
strength (in dBFS) of the plug-in is shown in the
SIGNAL meter. Double-clicking on the “GAIN”
knob resets the level to 0 dB.
figure 3 |
Send plug-in panel
Mono
figure 3 |
Send plug-in panel
Stereo
© 2014 | Audiomere
How to use the Polarity Maximizer
1
2
3 4
*
STEP 4:
Process & automatic configuration
The final step is for the Master to analyze the
audio and then set the polarity of each Sending
plug-in.
First, select the playback range on the timeline
of your DAW for the audio span to analyze.
[Note: the timespan should cover all of the sonic
characteristics of the instrument (e.g., for a
drumset, use a timespan that also includes fills
across the toms and cymbals), or simply select
the entire song/recording duration.]
Next, press the “MAXIMIZE” button in the Master
panel to arm the plug-in for analysis (the small
LED will be lit), as shown in figure 4. The Master
is now waiting for the audio playback to begin.
figure 4 | Master armed and waiting for audio playback
Start the audio playback in your DAW. When
playback is finished, the Master “does its job”
and then automatically configures the needed in/
out polarity button setting in each Sending plugin (see figure 5).
figure 5 |
A sending plug-in
panel with polarity
engaged
© 2014 | Audiomere
How to use the Polarity Maximizer
1
2
3 4
*
COMPLETE:
You are now Maximized!
The number of polarity changes and the increase
in dB RMS of the resulting audio (as compared
to the pre-maximized audio) is reported below
the “MAXIMIZE” button. Each Sending plug-ins
now acts simply as a low-latency pass-through of
polarity-corrected audio.
At this point, you can opt to press the “NONE”
button under the LED counter in the Master plugin to put all Sending plug-ins into the “SEND OFF”
routing state.
Note
Setting a plug-in routing to
“SEND OFF” does not bypass/
deactivate its polarity function
or gain setting, and thus the
plug-in by default passes
through audio using its given
polarity and gain settings.
Next | Additional features
© 2014 | Audiomere
Additional Features
*
LF BOOST
Engaging the “LF BOOST” button in the Master uses an extra
emphasis in the low-frequency region only during the analysis
stage (not altering the audio itself). This mode can be useful in some
situations where the low-end frequencies are not as dominant in
the overall signal mix. [Note: there will be no reported increase in
dB RMS after maximization due to the low-end preprocessing.]
FAST ALG
Naturally, a larger number of Sends will take longer to process.
For dealing with a very large track count when waiting time is of
importance (e.g., during a recording session), a “FAST” processing
mode has been provided in the Master. When engaged, this
mode replaces the default analysis method with an extremely fast
approximate approach. Results of the “FAST” mode are typically
identical to the normal mode, but when there is a difference, it is
usually slight and inaudible.
COMPARE
For easily comparing the audio before and after maximization,
a “Bypass Ø” button is provided in the COMPARE section of the
Master. By default, the “Bypass Ø” button is disengaged and the
maximized polarity settings for the Sending tracks are used during
audio playback. If the button is engaged, the audio is passed
through the Sending plug-ins without any polarity change (any
“GAIN” knob changes remain active). In essence, engaging this
button acts similar to a global bypass of the polarity setting for the
Sending plug-ins.
CHANNEL LINK
A small “LINK” button is provided in the stereo Send plug-in panel
that once engaged, ensures the left and right stereo channels have/
receive the same polarity setting (before/after analysis). Linking the
left and right channels also reduces the overall processing time.
This mode is particularly beneficial for DAWs that use only stereo
tracks even though the input is mono (e.g., Reaper and Live), as
employing the “LINK” button on stereo tracks containing mono
input provides much more efficient and faster processing.
Next | questions
© 2014 | Audiomere
Questions
? *
Can I analyze different
multi-mic instruments
within the same session?
If you have more than one multi-mic instrument to process (e.g.,
drums, piano, guitar), you can begin by placing the plug-in on all of
the tracks. By default, each plug-in is in Send mode. So to process
one of the multi-mic instruments (drums), simply turn the routing
to “SEND OFF” on the other plug-ins for the remaining instrument
tracks (piano, guitar), and then proceed to maximize as usual. To
process the next instrument (piano), set the routing of the track
plug-ins for that instrument to “SEND ON” and set the remaining
instrument tracks to “SEND OFF”, then continue as before. To
make all of the routing/switching easier, use the “NONE” button
under the LED counter in the Master plug-in. Pressing this button
sets the routing to “SEND OFF” for all Polarity Maximizer plug-ins,
making it easier/quicker to just activate/send desired tracks.
Should the plug-in be
placed in the first or last
insert slot of a track?
In general, the Polarity Maximizer plug-in (in Send mode) should
be placed on the first insert of each track, before any other effect
processing, but there may be some situations where it could reside
in the last insert (or even both the first and last inserts!).
If your standard procedure when mixing is to listen to the multimic tracks of an instrument together while judging which plug-in
effects (EQ, compression, etc.) to use (and how much) on each
track, it would make most sense to put the Polarity Maximizer plugin on the first insert of each track and maximize before including
your effects. Using the first insert would also be applicable when
tracking with outboard gear (hardware EQ, compression, etc.)
before the audio enters your DAW.
However, if instead you tend to adjust the effects of each track in
isolation of the other tracks, the Polarity Maximizer plug-in could
be placed on the last insert. Then after each track is individually
shaped with effects, the maximization would take place afterward
to ensure the best final global polarity setting across the tracks.
One other possibility, covering all bases, could be to put the Polarity
Maximizer in the first insert, followed by other effect plug-ins, and
then another Polarity Maximizer in the last insert. You could first
maximize the audio using only the first-insert plug-ins (to get the
raw audio polarity corrected), then adjust any other effect plug-ins
while listening to all of the tracks, and lastly do a final maximization
using only the last-insert plug-ins (to make sure the effects chain
did not corrupt the polarity).
© 2014 | Audiomere
Questions
? *
Will I always hear a
difference after using the
plug-in?
If your audio already has the correct polarity for each track, then
there will be no difference or change after analysis (no channel
flips and a 0 dB increase). If the improvement is within 1 dB, the
audible difference may not be obvious, though an improvement
has been made.
I’ve analyzed the same
number of tracks (and
song length) in both
Reaper and Pro Tools.
Why does it take longer
to process in Reaper?
Reaper (and some other DAWs) uses only stereo tracks in a session,
where Pro Tools has both mono and stereo tracks available. If you
load a mono input signal onto a stereo track in Reaper, by default
a stereo instance of Polararity Maximizer will be used. For every
stereo track, there will be two independent audio signals (L, R)
being analyzed. If you have a mono input signal on a stereo track,
use the “LINK” button on the Send panel (forcing the same polarity
for L and R) to significantly reduce the processing time. A set of
mono tracks in Pro Tools will take approximately the same amount
of time to process as the same set of tracks in Reaper with the
channel link button engaged on each stereo track.
Is polarity the same as
phase?
Many individuals and manufacturers incorrectly use the terms
polarity and phase interchangeably. Altering polarity refers to
inverting/flipping the signal while phase relates more closely to
temporally shifting/delaying the signal or certain frequencies
(though polarity inversion can be considered as a constant 180°
phase shift). Note that using polarity (rather than individual phase
rotation/alteration), does not alter the shape or characteristics
of the waveform (other than inversion). An excellent overview of
phase/polarity and associated comb filtering is presented in
[Everest 2009], and additional related discussions can be found at
[Lindell 2013, Senior 2008]. A useful case study addressing phase
and polarity for improving a mix is provided in [Senior 2010 ].
Everest 2009:
A.F. Everest. MasterHandbookofAcoustics. McGraw-Hill,
2009.
Lindell 2013:
B. Lindell, Phase Alignment Manifesto, www.benlindell.com/2013/01/phase-alignment-manifesto/
Senior 2008:
M. Senior. Phase Demystified. Sound on Sound, April 2008.
Senior 2010:
M. Senior. Mix Rescue: Phase relationships. Sound on Sound, April 2010.
Home | Audiomere