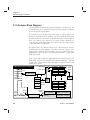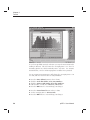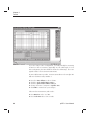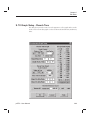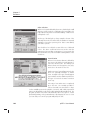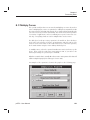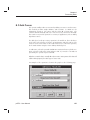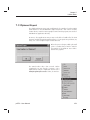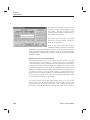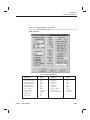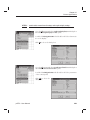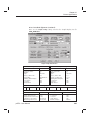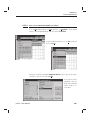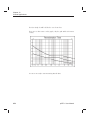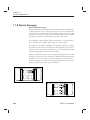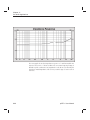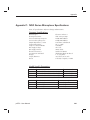
1
32 Band True RMS Real Time Analyzer
with 4 Channel Microphone Multiplexer
Version 2.00
Software: August 20, 1999
Manual: February 16, 2000
pcRTA - User Manual
User Manual
Precision Noise Analyzer
i
License Agreement and Limited Warranty
n Acceptance
Carefully read all of the following terms and conditions of this agreement before opening and using the contents of this package. The opening of this package
indicates your acceptance of the terms and conditions of this license agreement. If you are not willing to accept the terms and conditions of this agreement,
then you should return the entire product, with the package seal unbroken, to the place of purchase for a full refund of the purchase price.
n Copyright Ownership
Both the program and the documentation are protected under applicable copyright laws. LinearX is the holder of this copyright. Your right to use the program
and the documentation are limited to the terms and conditions described herein. Use of the software unless pursuant to the terms and conditions of this
license, or as otherwise authorized by law, is an infringement of the copyright.
n Limited Non-Exclusive License
You may: (a) use the enclosed program on a single computer, (b) physically transfer the program from one computer to another provided that the program is
used on only one computer at a time, and that you remove any copies of the program from the computer from which the program is being transferred, (c) make
copies of the program solely for backup or archival purposes. You must reproduce and include the copyright notice and label any backup copy.
You may not: (a) distribute copies of the program or the documentation to others, (b) lease, rent, grant sublicenses, or other rights to the program, (c) provide
use of the program in a computer service business, network, time-sharing multiple CPU or multiple users arrangement without the prior written consent of
LinearX, (d) translate or otherwise alter the program or related documentation without the prior written consent of LinearX.
n Terms
Your license to use the program and the documentation will automatically terminate if you fail to comply with the terms of this agreement. Your license
terminates in the event that you receive a license for an updated version of the product that replaces this product. If a license expiration date is printed on your
documentation, or provided through other means such as a time limited electronic or software key, your license expires on the day as shown in the documentation, or on the day that the electronic or software key expires. If this license is terminated you agree to destroy all copies of the program and documentation.
n Limited Warranty
LinearX warrants to the original licensee that the disk(s) and or electronic key(s) on which the program is recorded will be free from defects in materials and
workmanship under normal use for a period of ninety (90) days from the date of purchase as evidenced by a copy of your receipt. If failure of the product
components has resulted from accident, abuse, or misapplication of the product, then LinearX or third party licensors shall have no responsibility to replace
the disk(s) or key(s) under this limited warranty.
This limited warranty and right of replacement is in lieu of, and you hereby waive, any and all other warranties, both expressed and implied, including but not
limited to warranties of merchantability and fitness for a particular purpose. The liability of LinearX or third party licensors pursuant to this limited warranty
shall be limited to the replacement of the defective disk(s) or key(s), and in no event shall LinearX or third party licensors be liable for incidental, indirect,
punitive, or consequential damages, including but not limited to loss of use, loss of profits, loss of data or data being rendered inaccurate, or losses sustained
by third parties even if LinearX or third party licensors have been advised of the possibility of such damages. This warranty gives you specific legal rights
which may vary from state to state. Some states do not allow the limitation or exclusion of liability for consequential damages, so the above limitation may not
apply to you.
In addition to the foregoing, you should recognize that all complex software systems and their documentation contain errors and omissions. LinearX, its
distributors, and dealers shall not be responsible under any circumstances for providing information on, or corrections to, errors and omissions discovered at
any time in the product, whether or not they are aware of the errors or omissions. LinearX does not recommend the use of this product in applications in which
errors or omissions could result in loss of life, injury, or other significant loss.
This license agreement shall be governed by the laws of the state of Oregon and shall inure to the benefit of LinearX, its successors, administrators, heirs and
assigns or third party licensors.
n United States Federal Government Restrictions
If this software is acquired by or on behalf of the U.S. Federal government or its agencies, this provision applies. Use, duplication, or disclosure of this software
is subject to restrictions set forth in the appropriate FAR 52.227-19 and DFAR 252.227-7013 documents, as applicable. The software is "commercial computer
software" and is licensed only with "Restricted Rights". Other Federal restrictions may also apply.
This manual was produced on a Pentium/166 PC with Windows 95 using Adobe PageMaker 6.5, Adobe Illustrator 8.0,
Adobe Photoshop 5.0, and HyperSnap-DX 3.13 for screen captures. Digitally printed directly to Xerox Docutech 6135.
LinearX Systems Inc
9500 SW Tualatin-Sherwood Rd
Tualatin, OR 97062-8586 USA
TEL:(503) 612-9565
FAX:(503) 612-9344
Copyright 1999, LinearX Systems Inc. All rights reserved.
ii
EMAIL: [email protected]
WEB: www.linearx.com
All other Trademarks are the property of their respective owners.
pcRTA - User Manual
Table of Contents
Chapter 1: Installation
1
1.1 System Requirements .................................................................. 3
1.2 Software Installation ..................................................................... 4
1.3 Hardware Installation ................................................................... 5
1.4 Interface Cable and Connector Box ............................................. 8
1.5 Starting the pcRTA Software ....................................................... 10
1.6 Calibration .................................................................................... 11
1.7 Microphone Setup ........................................................................ 14
Chapter 2: General System Features
17
2.1 Main Screen Overview ................................................................. 19
2.2 Measurement Modes ................................................................... 21
2.3 Analyzer Block Diagram ............................................................... 22
2.4 Tool Bar ....................................................................................... 23
2.5 Curve Box .................................................................................... 27
2.6 Data Cursor ................................................................................. 31
Chapter 3: Tutorial
35
3.1 Introduction .................................................................................. 37
3.2 Example #1: Measuring the Generator Response. ...................... 39
3.3 Example #2: Measuring SPL Response. ..................................... 51
3.4 Example #3: Measuring Impedance ............................................. 57
Chapter 4: File Menu
63
4.1 New File ....................................................................................... 65
4.2 Open File ..................................................................................... 66
4.3 Save File ...................................................................................... 67
4.4 SaveAs File .................................................................................. 68
4.5 Save Graph Display Set ............................................................... 69
4.6 Load Graph Display Set ............................................................... 70
4.7 Save Control Panel Set ................................................................ 71
4.8 Load Control Panel Set ................................................................ 72
4.9 Print ............................................................................................. 73
4.10 Exit Program .............................................................................. 76
pcRTA - User Manual
iii
Table of Contents
Chapter 5: Edit Menu
77
5.1 Run/Stop Test .............................................................................. 79
5.2 Gen On/Off .................................................................................. 80
5.3 Curve Library ............................................................................... 81
5.4 Control Panel - Amplitude ............................................................ 87
5.5 Control Panel - Impedance .......................................................... 97
5.6 Control Panel - Reverb Time ....................................................... 101
5.7 Control Panel - Noise Analysis..................................................... 105
5.8 Graph Setup - Amplitude ............................................................. 111
5.9 Graph Setup - Impedance ............................................................ 117
5.10 Graph Setup - Reverb Time ....................................................... 119
5.11 Graph Setup - Noise Analysis .................................................... 123
5.12 Notes / Comments ..................................................................... 129
5.13 Microphone Setup ...................................................................... 131
5.14 MDF Convert ............................................................................. 137
5.15 Global Graph Design ................................................................. 139
5.16 System Options ......................................................................... 145
Chapter 6: Processing Menu
147
6.1 Scale Curve ................................................................................. 149
6.2 Invert Curve ................................................................................. 151
6.3 Multiply Curves ............................................................................ 153
6.4 Divide Curves ............................................................................... 155
6.5 Add Curves .................................................................................. 157
6.6 Subtract Curves ........................................................................... 159
6.7 Curve Averaging .......................................................................... 161
6.8 Curve Summation ........................................................................ 163
iv
pcRTA - User Manual
Table of Contents
Chapter 7: Utilities Menu
165
7.1 Export ASCII Data ....................................................................... 167
7.2 Import ASCII Data ....................................................................... 169
7.3 Clipboard Export .......................................................................... 171
7.4 Graphics Export ........................................................................... 173
7.5 IASCA Scoring ............................................................................. 177
7.6 USAC Scoring .............................................................................. 181
7.7 Outlaw SPL Scoring ..................................................................... 185
7.8 Drag Racing Scoring ................................................................... 189
7.9 True Sound Quality Scoring ......................................................... 193
7.10 Programmable EQ - PA-422 ...................................................... 199
7.11 Programmable EQ - RW-232 ..................................................... 203
7.12 PAC Interface ............................................................................ 207
7.13 Analyzer Calibration ................................................................... 215
Chapter 8: View Menu
217
8.1 Zoom In / Zoom Out .................................................................... 219
8.2 1X / 2X / 4X / 8X .......................................................................... 220
8.3 Redraw Screen ............................................................................ 221
8.4 Scale Up / Scale Auto / Scale Down ............................................ 222
8.5 Show/Hide Tool Bar ..................................................................... 223
8.6 Show/Hide Curve Box .................................................................. 224
Chapter 9: Help Menu
225
9.1 Contents ...................................................................................... 227
9.2 Search ......................................................................................... 228
9.3 About pcRTA ............................................................................... 229
pcRTA - User Manual
v
Table of Contents
Chapter 10: Cinema Applications
231
10.1 Introduction ................................................................................ 233
10.2 General Setup ............................................................................ 235
10.3 Microphones .............................................................................. 239
10.4 A-Chain Alignment ..................................................................... 245
10.5 B-Chain Alignment ..................................................................... 256
10.6 Noise Criteria (NC) Measurement .............................................. 266
10.7 Reverb Time (RT60) Measurement ........................................... 274
Chapter 11: Car Audio Applications
285
11.1 Measuring System Response .................................................... 287
11.2 Measuring SPL .......................................................................... 291
11.3 Vehicle Acoustics ....................................................................... 295
11.4 Measuring Transfer Function ..................................................... 298
11.5 Measuring Road Noise ............................................................... 304
11.6 Measuring Electrical Noise ......................................................... 305
11.7 Adjusting With an Equalizer ....................................................... 306
11.8 Spatial Averaging ....................................................................... 308
11.9 Measuring Impedance ............................................................... 313
11.10 Scoring Routines ...................................................................... 317
Appendix
333
Appendix A:
Appendix B:
Appendix C:
Appendix D:
pcRTA Analyzer Specifications .................................... 335
pcRTA Connector Box Interface ................................... 339
M50 Series Microphone Specifications ......................... 341
Keyboard Shortcuts Quick Reference .......................... 343
Index
Index .................................................................................................. III
vi
pcRTA - User Manual
Chapter 1
Installation
Installation
Chapter
1
pcRTA - User Manual
1
Chapter 1
Installation
2
pcRTA - User Manual
Chapter 1
Installation
1.1 System Requirements
The pcRTA program can be installed in any 386 or higher PC compatible
computer operating the Windows 3.1 graphical operating system. Since
pcRTA is an engineering type program, extensive use of floating point calculations are required. For this reason the use of a 80x87 math coprocessor is
strongly recommended. 486/DX CPUs have the coprocessor built in, and 486/
SX systems do not. The difference in the speed of calculations is typically an
order of magnitude faster with a coprocessor.
Also, high speed video animation techniques are used to display and update
information to the graphs on the screen in real time. The use of a Windows
Accelerator type video graphics card will greatly improve video performance.
For best overall performance, it is recommeded that a 486 system or higher be
used. Windows is a graphical operating system and places larger demands on
the CPU for both data processing and video operation.
The following is a list of the recommended minimum system configuration:
n 486DX CPU or higher (with math coprocessor)
n MS-Windows 3.1
n 8 MB RAM minimum
n VGA 640x480 video or higher, (accelerator type card preferred)
n Adobe ATM, or TrueType fonts
pcRTA - User Manual
3
Chapter 1
Installation
1.2 Software Installation
The software installation program is in itself a Windows application. You
can begin the installation from DOS if your Windows directory is in your
system path, or you may install the program from Windows directly.
Installation from Windows
If your Windows system is already up and running, follow these instructions
for installation:
n Place the distribution disk #1 into your floppy drive A: or B:
n Choose RUN... from the Start Menu.
n Type in A:SETUP (or B:SETUP) and press OK.
n Follow the instructions given by the installer program.
Installation from DOS
If your Windows directory is in your system path, and you are currently in
DOS, then follow these instructions for installation:
n Place the distribution disk #1 into your floppy drive A: or B:
n Type in A:SETUP (or B:SETUP) and press [ENTER].
n Follow the instructions given by the installer program.
If Windows does not load, then start Windows as you normally would and
use the method outlined above.
The installer will automatically create a new folder, and place the icon for
pcRTA in that folder. The installer will not modify your AUTOEXEC.BAT,
CONFIG.SYS, or WIN.INI files. Also, no files are placed in your Windows
or Windows/System directories. All files installed will be placed into the
pcRTA directory path.
4
pcRTA - User Manual
Chapter 1
Installation
1.3 Hardware Installation
IMPORTANT!! Your pcRTA analyzer card has several parts that are static sensitive
and can be damaged by the static electricity that may have built up in your body.
The best way to assure that no damage comes to your analyzer is to observe a
couple of precautions. First, handle the card by the edges, avoiding contact with
the gold finger tab area. Secondly, make sure to ground yourself to discharge any
static voltage retained in your body. This can be done by touching any large metal
surface such as the chassis of your computer, just prior to removing the card from
the anti-static bag.
ADR
P2
P1
21E
25E
31E
Selecting the I/O Port Address
The pcRTA has two jumpers located above the tab area near the
bottom of the PC board. These jumpers control the selection of the
I/O port address used by the analyzer/software. There are four
possible address selections: 21E, 25E, 31E, and 35E. Note- The
analyzer does not use any IRQ (interrupts) or DMA channels.
Typically, you can use the default selection of 21E without difficulty,
and no changes are necessary to the jumpers. However, if you have
a conflict with another card in your system at this address, the
jumpers can be changed as needed. A port map is shown on the
following page for the PC I/O architecture.
35E
Avoid Touching Gold Fingers! ->>
WARNING!
ELECTROSTATIC SENSITIVE DEVICE
STATIC PROTECTION REQUIRED
MAINTAIN ANTI-STATIC CONDITIONS
FOR HANDLING AND INSTALLATION
pcRTA - User Manual
P1,P2: I/O Port Select Jumpers
5
Chapter 1
Installation
IBM-PC ISA/EISA Expansion Bus I/O Port Map 200-3FF Hex
0 1 2 3 4
200
210
220
230
240
250
260
270
280
290
2A0
2B0
2C0
2D0
2E0
2F0
300
310
320
330
340
350
360
370
380
390
3A0
3B0
3C0
3D0
3E0
3F0
Game Controller
RTA
21E
Expansion Unit
Reserved
RTA
25E
LPT-3
3270 PC
Network Card
COM-4
Reserved
COM-2
RTA
31E
Hard Drive Controller
XT/370
RTA
35E
Floppy Drive Controller
LPT-2
BiSync Comm 2
BiSync Comm 1
Mono Video
LPT-1
EGA/VGA Video
CGA Video
Reserved
COM-3
Disk
COM-1
0 1 2 3 4
6
5 6 7 8 9 A B C D E F
20F
21F
22F
23F
24F
25F
26F
27F
28F
29F
2AF
2BF
2CF
2DF
2EF
2FF
30F
31F
32F
33F
34F
35F
36F
37F
38F
39F
3AF
3BF
3CF
3DF
3EF
3FF
5 6 7 8 9 A B C D E F
pcRTA - User Manual
Chapter 1
Installation
Installing the Analyzer PC Board
To install the card, first turn the power switch of your computer OFF. Remove
the cover or enclosure of your computer's chassis to access the slot area of the
mother board.
Insert the card into one of the empty bus slots. The pcRTA analyzer is an 8 bit
card, and can be used in any standard ISA 8 bit/16 bit, EISA, or VESA slot.
pcRTA Analyzer
The PC board is a full length card, so you will
need to have a clear space available for the
board over its entire length. On many newer
systems there can be large obstructions,
such as the CPU, located on the mother
board which may not allow for full length
access in some of the available slots.
If this is the case, you may need to re-arrange
existing cards to provide for a clear open full
length slot. Most system cards such as
video, serial/LPT port, disk controllers, etc.
do not require full length.
SIMM DRAM ARRAY
VLSI
CONTROLLER
KYBD
CNTRL
VLSI
CONTROLLER
CARD GUIDES
pcRTA - User Manual
CACHE SRAM
CACHE SRAM
CACHE SRAM
CACHE SRAM
CACHE SRAM
CACHE SRAM
CACHE SRAM
CACHE SRAM
CACHE SRAM
CACHE SRAM
CACHE SRAM
CACHE SRAM
CACHE SRAM
BIOS
EPROM
CACHE SRAM
BIOS
EPROM
CACHE SRAM
CPU
CACHE SRAM
Computer
Motherboard
Make sure the tail end of the pcRTA card is
held in the proper card guide for the slot.
Replace the cover of your computer, and
turn your computer power switch ON.
Note- Power Supply Considerations
The pcRTA contains substantial analog processing circuitry. This circuitry uses approx
200mA from the ±12Volt computer supplies.
Some computer power supplies have very
limited -12Volt current. If you have other
heavy analog processing cards (Sound Blaster,
multimedia, etc) in your system, they will also
consume -12Volt current. If your computer
fails to re-start, try removing one of these
other analog cards. You may be exceeding
the maximum available current for the -12volt
supply.
7
Chapter 1
Installation
1.4 Interface Cable and Connector Box
All connections to the pcRTA are provided through a DB15 pin interface
cable and connector box. The connector box has four female XLRs for the
microphone inputs 1,2,3,4 and two 1/4 inch jacks for the Line Input and
Line Output circuits. All circuits are unbalanced lines.
Depending on your application, you may need additional adapters and/or
connectors of a different type. In the case of Hi-Fi equipment, conversion
of the 1/4" jacks to RCA plugs will be common. These adapters and
connectors can be purchased at most electronic supply stores or Hi-Fi
shops.
The XLR mic inputs provide a DC voltage on pin 3 of approx +10V for
powering the M51 microphones. If you need to extend the microphone
cables, standard 3 pin XLR microphone cable may be used.
DB15F
Computer
DB15M
pcRTA Connector Box
M I C R O P H O N E
MIC 1
8
MIC 2
I N P U T S
MIC 3
MIC 4
LINE IN
LINE OUT
pcRTA - User Manual
Chapter 1
Installation
Pin Out for DB15 connector
The following diagram shows the pin out for the DB15 connector on the pcRTA
analyzer. Under normal use with the connector box, you will probably never
need to wire into this connector directly. However, this schematic is provided
for special applications which some customers may require.
DB-15 Male Connector Pin Out
Mic4:Vdc
1
Line Input
9
Mic4: Input
2
Line Output
10 500
Mic3: Vdc
Gnd
Mic3: Input
Gnd
Mic2: Vdc
Gnd
Mic2: Input
Gnd
Mic1: Vdc
Gnd
Mic1: Input
pcRTA - User Manual
3
+10VDC
GEN
+10VDC
11
4
12
5
+10VDC
13
6
14
7
+10VDC
15
8
9
Chapter 1
Installation
1.5 Starting the pcRTA Software
Once the installation program has been completed, a new folder [LinearX
Applications] will be shown on your Windows desktop. The folder may be
minimized, in which case it will appear as an icon in the taskber at the
bottom of your screen.
To start pcRTA, first maximize the folder if needed, and then double-click
on the pcRTA icon. The program will then begin to load and the
initialization process will begin.
While the initialization process is underway, the cursor will appear as an
hourglass. When completed, the cursor will return to an arrow.
After the cursor has returned to an
arrow, the main graph screen will be
drawn, and the previous library file will
be automatically loaded.
10
pcRTA - User Manual
Chapter 1
Installation
1.6 Calibration
After starting the software, the Calibration procedure must first be run to align
the analyzer to your particular computer. The pcRTA uses the bus clock of the
computer for many purposes. Each computer may have a different bus clock
speed. The Calibration routine measures the clock speed, along with extensive
testing and alignment of the analyzer circuitry.
Another very useful feature of the Calibration process, is to verify correct
operation of the analyzer and computer. This provides a good check to ensure
that there is not a port I/O address conflict with another card in the system. If
any of the tests fail, or fail randomly on occasion, this is usually an indication of
corrupted data being read/written to the analyzer through the bus. This
indicates the need for changing the P1,P2 jumpers to assign a different port
address for the analyzer. Go to the Utilities Menu, and then select Analyzer
Calibration.
pcRTA - User Manual
11
Chapter 1
Installation
Note- Before running the calibration routine, always allow your computer to
warm up for at least 15 minutes. This will provide best accuracy.
The calibration dialog box is shown below. The top area displays the
parameters which are stored within the analyzer EEPROM. The lower area
shows other additional results of the calibration process.
Press the Run Calibration button to start the operation. A message box
will appear that displays the tests currently being performed. The full
calibration process takes about 4 minutes.
If all of the tests pass, the utility will give a final message beep at the end,
and then write the new data to the EEPROM of the analyzer. If any test fails,
an error message box will appear. If this happens, try running the
calibration again. If the problem persists, it probably indicates a conflict
with another card, and the jumpers should be changed.
12
pcRTA - User Manual
Chapter 1
Installation
When the run has finished, the dialog box
should look similar to the one shown here at
the bottom of the page. You can then press
Exit to remove the dialog box.
The system calibration can be run again at anytime in the future as desired by
the user. Under most conditions it will not be necessary to run this unless the
pcRTA card is moved to another computer. In this case, the calibration must
be run again at least once to align the system to the new computer.
pcRTA - User Manual
13
Chapter 1
Installation
1.7 Microphone Setup
The pcRTA system uses Mic Data Files (MDF's) to provide the necessary
sensitivity and response curve information about a given microphone. If
you purchased M50 series mics with the analyzer, MDF files were provided
with them. These must now be loaded into the software. The MDF files
should be in the pcRTA subdirectory for your particular microphone(s)
serial number(s) if you followed the instructions during the installation of
the pcRTA software.
The pcRTA analyzer has five inputs; four Mic Inputs, and 1 Line Input. Each
of these inputs can be configured for an individual mic MDF file. Since
every microphone has unique characteristics which differ from others, the
mic which is setup for a specific input should always be used with that
particular input.
Go to the Edit Menu, choose Microphone Setup, and a specific input such
as Mic Input 1. A dialog box will open as shown on the next page.
14
pcRTA - User Manual
Chapter 1
Installation
This dialog box shows the current parameters assigned to the input. The parameters
at this time will be blank, or zero.
To load an MDF, press the Load Mic Data
File button. Another dialog box will appear
to select the file.
You should now look at your LinearX microphone and note the serial number. There
should be a matching SNnnnnnn.MDF file
in the pcRTA path. Highlight this file, and
then press OK.
The system will then read the file, and derive
the necessary parameters. When completed,
the setup parameter fields will be filled in as
shown in the dialog box below.
To keep your changes, you must now exit
the dialog box by pressing OK.
Installing Multiple Microphones
pcRTA - User Manual
15
Chapter 1
Installation
If you have multiple mics to install, simply repeat the same process for the
other inputs as well. Since each input is configured for a specific mic, you
will need to keep track of which mics have been setup for which inputs. The
mics should always be used on the inputs for which they have been
configured. This provides for very high accuracy in SPL measurements.
Note- If you ever forget which mics are setup for which inputs, just check the
Microphone Setup dialog box for the inputs. The parameter fields include
a serial number that shows what MDF file was loaded for that input.
Using the same MDF on Multiple Inputs
If you have a single microphone, and wish to use it on different inputs, you
can of course setup the same MDF on more than one input. There is really
no difference between any of the inputs, but if you would like to use the
same mic on more than one input, this can be done.
Using Microphones other than M50 Series
In order to setup other brands of microphones, you will need to construct
your own MDF file for that microphone. The MDF format is a simple ASCII
file, which can be created with any standard text editor or word processing
program. This is covered in the Edit Menu Chapter, under Microphone
Setup.
It should also be noted that the system allows you to setup a mic on the Line
Input. This will probably be the input source for a third party mic, since an
external preamp will likely be used. As an alternative, a special XLR
connector could also be wired to drop the +10V (pin 3) line of a mic input.
Many other mics/preamps would not necessarily use this voltage.
16
pcRTA - User Manual
Chapter 2
General System Features
General System Features
Chapter
2
pcRTA - User Manual
17
Chapter 2
General System Features
18
pcRTA - User Manual
Chapter 2
General System Features
2.1 Main Screen Overview
The main screen, as shown below, has a main window which displays the
various graphs and charts. The main window can be zoomed and scrolled, by
using the scroll bars, tool bar, menu bar, and minimize/maximize buttons.
At the top of the screen the menu bar and title bar are displayed. The menu bar
shows command menus which may be pulled down. The title bar will display
the current measurement mode and library name in the center.
A moveable (floating) window is also shown below. This is the Tool Bar. This
window can be moved anywhere on the screen, and can also be closed and
reopened. It provides special features, or direct access to menu commands
commonly used throughout the program.
The lower areas of the graph also respond to double clicks of the mouse. If the
mouse is double clicked over the Curve Legend, the curve library dialog box will
appear. The control panel will appear if the System area is double clicked, and
the Note editor will be activated if a note line is double clicked.
Title Bar
Menu Bar
Minimize/Maximize/Close
buttons
Tool Bar
Graph Artwork Board
Scroll Bars
Double Click
for Curve Library
Double Click
for Control Panel
pcRTA - User Manual
Double Click
for Note Editing
Data Cursor
Status Bar
19
Chapter 2
General System Features
Graph Formats
Conventional RTAs typically have very limited display capability. Generally
the display takes the form of discrete steps displayed by LEDs. The pcRTA
has a wide variety of powerful display modes and graphics capabilities. The
user is not merely limited to the conventional bar type readout. Line graphs
as well as precision text readouts are also available.
Resolution is provided on a pixel continuous basis, not as discrete coarse
steps. Moreover, full control is provided for the scale factor, graph
divisions, and displayed dynamic range.
Curve Libraries and Multi-Curve Display
Traditional RTAs have always had the limitation of single measurement
display. The pcRTA provides multi-curve display, as well as unlimited
storage. All measurements are placed as entries into a curve library. Each
library stores up to 20 measurements, and any number of libraries can be
saved as disk files.
Multiple curve entries from a library can be displayed simultaneously
together on the same graph. This provides for easy comparison of
measurements, without having to switch back and forth from one curve to
another.
Each curve entry can be given a name,
and additional library notes can also be
added by the user to be displayed and
printed on the graphs.
Processing Operations
A menu of processing functions is also
provided which allows mathematical
operations to be performed on the
curve entries within a library. Curves
can be inverted, multiplied, averaged,
summed, etc.
20
pcRTA - User Manual
Chapter 2
General System Features
2.2 Measurement Modes
The measurement mode refers to the type of data the analyzer/software is
currently configured to measure. There are four basic types of measurement
modes in the pcRTA: Amplitude, Impedance, Reverberation, and Noise Analysis.
The measurement mode is defined by the type of library which is currently in
use. Each type of measurement data is stored in specific libraries designed for
the data to be stored. Amplitude libraries are given the file extension .DB,
Impedance libraries have an extension of .Z, Reverberation libraries have .RT,
and Noise Analysis libraries are .NA. There are subdirectories which match
each of these types of library files.
Depending on the measurement mode there will be different menus, functions,
and options provided which are pertinent to the type of data being measured.
All of this is handled automatically by the program and requires no intervention
on the part of the user.
The type of data to be measured (the measurement mode),
is chosen by the type of library which is opened or created.
This is performed using the File menu option, and choosing
the desired type of library in the New or Open operations.
To change the type of data being measured, simply open a
different library type. All required menus and dialog boxes
will be automatically loaded for the new mode.
Amplitude Mode simply refers to the usual dBm or dBspl
data measured by all RTAs. This is the general purpose mode
of the analyzer for taking normal RTA measurements.
Impedance Mode is provided for general speaker or passive crossover
measurements. This gives a 31 point response curve for the impedance
characteristics of a transducer or component. The data is given in ohms.
Reverberation Mode (or ReverbTime) is a measure of how sound decays in a
closed environment. The data is given in seconds.
Noise Analysis Mode provides the ability to record and/or average signals or
noise over a period of time, and also produces a number of standard statistical
graphs. This mode produces measurements of LEQ, LNP, L10, L90, LOSHA.
pcRTA - User Manual
21
Chapter 2
General System Features
2.3 Analyzer Block Diagram
An equivalent block diagram for the pcRTA analyzer is shown below. The
various functions are shown in the gray blocks, with signal flow indicated
by arrows along the circuit paths.
The generator system provides three basic types of output: white noise,
pink noise, and a square wave oscillator. The most commonly used signal
is pink noise, but the other types are provided as well for special applications. The output of the generators is fed into a DAC attenuator for
controlling the output level, and is then routed to the Line Output with a
source impedance of 500 Ohms.
The input source to the analyzer can be one of 7 different signals. The five
external inputs, the Line Output, or the direct Generator signal. Auto
ranging gain is applied, and the signal is fed to the ANSI filter array.
Independent source selection for the full range band and 1/3 octave RTA
bands is provided.
Each of the bands contains a logging RMS detector which converts the
RMS signal energy in each band into the equivalent dB level. Each dB
output is then selected and fed into the analog to digital convertor, and
read by the software.
pcRTA Equivalent Block Diagram
Full Select
Full Range
RMS-dB
Input
Select
RTA Select
20Hz BPF
25Hz BPF
32Hz BPF
40Hz BPF
RMS-dB
RMS-dB
RMS-dB
RMS-dB
Mic1
Mic2
AutoRange Gain
Mic3
Mic4
Line
Input
ANSI-A
Auto
Range
Gain
ANSI-B
ANSI-C
ANSI-D
Filter
Select
ANSI-E
Line
Output
Generator
Select
Output
On/Off
500Ω
DAC Attenuator
22
BAND:0
BAND:1
Band
Select
BAND:2
BAND:3
BAND:4
ADC
CONV
8kHz BPF
10kHz BPF
12kHz BPF
16kHz BPF
20kHz BPF
Pink Noise Filter
RMS-dB
RMS-dB
RMS-dB
RMS-dB
RMS-dB
BAND:27
BAND:28
BAND:29
BAND:30
BAND:31
Digital Noise Generator
Square Wave Generator
pcRTA - User Manual
Chapter 2
General System Features
2.4 Tool Bar
The Tool Bar provides several buttons which duplicate commands also
provided on the menu bar. These commands mainly concern the display and
updating of information shown in the main window, and are provided here for
quick access. These commands are used repeatedly throughout the use of the
program. In adddition, other specialized comands are provided on the Tool Bar
for controlling measurement process.
The View menu provides a command to both display
and remove the Tool Bar. The second to the last line at
the bottom of the menu will toggle between Show Tool
Bar and Hide Tool Bar. The accelerator key CTRL-T (^T)
can also be used to activate the command.
The Edit | System Options dialog provides a
set of radio buttons for selecting fixed positions for the Tool Bar or allowing it to 'float'
and to be dragged around by the user. The
figure below shows the Tool Bar in the Fixed
Top position.
Note - Video resolutions below 800 x 600 (Super VGA) can cause
some of the Tool Bar buttons to disappear because the screen does not
have enough room to display all of them.
pcRTA - User Manual
23
Chapter 2
General System Features
RightMouse Button or
DELETE key
INSERT key
F3
F2
F4
^ Up
^A
^ Dn
^+
^Alt - 1
Run Test
The Run Test button will change to Stop Test after it has been pressed. This
button functions as a push-on/push-off, and toggles between these two
states. When it is pushed in, the analyzer is conducting a measurement,
and placing the data into the currently selected curve entry marked for data.
When the button is out, the measurement has stopped. There are also two
other means provided to activate this button: (1) the DELETE key on the
keyboard, and (2) the RightMouse button. Either of these controls can be
used to toggle the state of the Run/Stop Test button. Using the RightMouse
button is very convenient for remote control purposes.
Gen On
The Generator On button will change to Generator Off after it has been
pressed. This button functions as a push-on/push-off, and toggles between
these two states. When it is pushed in, the generator is producing an output
signal at the Line Output. When the button is out, the generator output is
turned off. The INSERT key on the keyboard can also be used to control
this button. Note- this button does not affect the Direct Generator input
source selection which is always active. The generator button and function
will also be activated automatically by the use of the RunTest button. Some
control panels provide for automatic generator On/Off control when
running a measurement test.
^R
Control Panel
The Control Panel button brings up the control panel for the analyzer under
the current measurement mode. After this button is pressed, a dialog box
will appear to set one or more parameters in the control panel. The control
panels differ for each type of measurement mode. The F3 key on the
keyboard can also be used to activate this button.
Graph Setup
The Graph Setup button brings up the editing dialog box which provides
control over the appearance of the graphs. Each measurement mode has
it's own graph setup dialog with different parameters that can be adjusted.
The F2 key on the keyboard can also be used to activate this button.
24
pcRTA - User Manual
Chapter 2
General System Features
Curve Library
The Curve Library button brings up the editing dialog box for the curve entries
in the library. After this button is pressed, a dialog box will appear. The F4 key
on the keyboard can also be used to activate this button.
Scale Up
The Scale Up button increases the value at the top of the graph scale by one
major division. Note- this is moving the scale up, so the data being displayed
moves down. The exact amount of the increase will depend on the type of scale,
and/or the dB per division. For log scales such as impedance, the increase will
conform to a 1-2-5 sequence. The screen will be automatically redrawn after
↑) on
the operation. This button can also be activated by pressing CTRL-UP (^↑
the keyboard.
Scale Auto
The Scale Auto button is used to allow the system to automatically adjust the
scale. When pressed, the program scans the data in the curves currently being
displayed, and determines the necessary top scale value.
This function is very useful for quickly locating the position of curves which are
currently not visible on the graph. The screen will be automatically redrawn
after the operation. This button can also be activated by pressing CTRL-A (^A)
on the keyboard.
Scale Down
The Scale Down button decreases the value at the top of the graph scale by one
major division. Note- this is moving the scale down, so the data being displayed
moves up. The exact amount of the decrease will depend on the type of scale,
and/or the dB per division. For log scales such as impedance, the increase will
conform to a 1-2-5 sequence. The screen will be automatically redrawn after
↓)
the operation. This button can also be activated by pressing CTRL-DOWN (^↓
on the keyboard.
pcRTA - User Manual
25
Chapter 2
General System Features
Zoom In
The Zoom In button will cause the graph window to be zoomed in by
increasing the magnification. The magnification steps are 141%, yeilding
a doubling of the magnification for every two increments of zoom factor.
The maximum zoom factor is 800%. This button can also be activated by
pressing CTRL-PLUS (^+) on the keyboard.
Zoom Out
The Zoom Out button will cause the graph window to be zoomed out by
decreasing the magnification. The magnification steps are 71%, yeilding
half the magnification for every two decrements of zoom factor. The
minimum zoom factor is 100% which is full view. This button can also be
activated by pressing CTRL-MINUS (^-) on the keyboard.
Zoom Full
The Zoom Full button will cause the graph window to be zoomed out to
full size. This is the 100% magnification factor and will display all of the
artwork in the window. This button can also be activated by pressing ALT-1
on the keyboard.
Redraw Screen
The Redraw Screen button will cause the graph window to be redrawn.
This is sometimes useful or necessary when manual changes have been
made to the artwork, notes, and data, or if fonts and colors have been
changed. This button can also be activated by pressing CTRL-R (^R) on the
keyboard.
26
pcRTA - User Manual
Chapter 2
General System Features
2.5 Curve Box
The Curve Box provides quick access to the entries in the Curve Library. It
duplicates much of the functionality of the Curve Library edit dialog box. The
Curve Box controls the selection of curves for display on the graphs, as well as
the data entry selection, and editing of curve entry names.
The example below shows the various elements of the Curve Box. Each of the
key features are detailed.
The View menu provides a command to both
display and remove the Curve Box. The last line at
the bottom of the menu will toggle between Show
Curve Box and Hide Curve Box. The accelerator
key CTRL-C (^C) can also be used to activate the
command.
Graphing Status
Data Curve Status
Library Name
Name Editing Box
Data Curve Indicators
Graphing Indicators
Curve List Box
pcRTA - User Manual
27
Chapter 2
General System Features
Library Name
The group box displays the current name of
the library being edited. This is the current
library in memory.
Graphing Status
This box will display the word Graph if the
currently selected (highlighted) curve entry
is selected for graph display. This status box
reflects the setting of the square markers.
Data Curve Status
This box will display the word Data if the currently selected (highlighted)
curve entry is selected as the data curve entry. This status box reflects the
setting of the circle markers. There can only be one entry selected as the
data curve. This is where the data from the next measurement will be
placed.
Name Editing Box
This box is used to edit/enter the name for a curve entry. Whenever a curve
entry in the list box is highlighted (focused), the name is automatically
copied to the name editing box. If you wish to edit the name, simply click
your mouse in this box, and begin editing. To save your changes, simply
click the mouse back into the main list box, and the text from the editing
box will be copied to the list box.
This function can also be initiated by pressing the 'N' key while a curve entry
name is highlighted (focused).
Curve List Box
The large list box displays the curve entry names within the library. All
library types have 20 curve entries. Each entry in the list can be highlighted
(focused), by using the mouse and scroll bar, or by using the cursor keys
on the keyboard.
Each entry also has a square and circle marker which is used to select and
indicate the curve's status for graphing and data selection.
28
pcRTA - User Manual
Chapter 2
General System Features
Graphing Indicators (Square Markers)
Each curve entry in the list box has a small
square shown at the beginning of the line.
This square indicates whether or not the
curve is selected for display on the graph.
When the curve is selected for display, the
square will be filled in with the assigned color
for the curve. The curve line color is set in the
Graph Display dialog box.
The square markers also function as selection buttons. When the mouse is
moved over a square and clicked, the indicator will change state.
The square graphing indicators can also be controlled by using the 'G' key on
the keyboard. Pressing the 'G' key will change the state of the graph indicator
on the currently selected entry.
Data Curve Indicators (Circle Markers)
Each curve entry in the list box has a small circle shown at the beginning of the
line. This circle indicates whether or not the curve is currently selected as the
data curve. Only one curve can be the data curve. When one circle is clicked
ON, the previous circle will be turned OFF.
When the curve is selected for data, the circle will be filled in with the assigned
color for the curve. The curve line color is set in the Graph Display dialog box.
The circle markers also function as selection buttons. When the mouse is
moved over a circle and clicked, the indicator will change state.
The circle data curve indicators can also be controlled by using the 'D' key on
the keyboard. Pressing the 'D' key will change the state of the data curve
indicator on the currently selected entry.
Selecting a curve as the data entry will also automatically turn on the graphing
indicator, since this is typically needed as well.
pcRTA - User Manual
29
Chapter 2
General System Features
30
pcRTA - User Manual
Chapter 2
General System Features
2.6 Data Cursor
The Data Cursor provides a digital readout of the data at any point on the curve.
This feature is very useful especially in the Noise Analysis mode when
evaluating the 3D plots, since it is very difficult to see exactly where the data
lies on all three axes.
The figure below details the fields in the cursor status bar. There is a checkbox
at the far left that shows / hides the cursor. The other fields will display relevant
data to the type of graph you are viewing. The Statistical Analysis (Noise
Analysis Mode) and Text Chart (Amplitude Mode) graphs do not display a
cursor, because they are text-only graphs.
Cursor Status
(On/Off)
Graph
Type
pcRTA - User Manual
Curve
Number
1/3
Octave
Band
TIme/Percent
Readout
Data
Readout
Cursor
31
Chapter 2
General System Features
When the cursor is first displayed, it will be undefined. In other words, it will
not necessarily be on any curves that are currently displayed, and the data
fields in the cursor status bar may be blank. The figure below illustrates this
condition.
Once the cursor is visible, you must press either PgUp or PgDn on your
keyboard to place the cursor onto a curve that is currently displayed. Once
there, the arrow keys will move the cursor across the graph one data point
at a time, while displaying the data in the cursor status bar.
The Amplitude vs. Time and Cumulative Distribution (Noise Analysis
Mode), and the Decay Time (Reverberation Mode) graph types will display
multiple curves showing each frequency band for a single library entry.
These graphs use the up and down keyboard arrows to select the desired
band within each entry.
The Probability Distribution (Noise Analysis Mode) graph also displays
curves for each band, but it uses the left and right arrows to select the bands,
because data is displayed across the Y axis (up and down).
32
pcRTA - User Manual
Chapter 2
General System Features
The 3D Frequency Perspective and 3D Time Perspective (Noise Analysis
Mode) graphs include a Z axis along with the typical X and Y axes. These graphs
utilize the up and down keyboard arrows to move along the Z axis.
The shape of the cursor and it's blink rate are controlled from the System
Options dialog under the Edit menu.
The figure below shows the cursor displaying the data of curve 1.
pcRTA - User Manual
33
Chapter 2
General System Features
34
pcRTA - User Manual
Chapter 3
Tutorial
Tutorial
Chapter
3
pcRTA - User Manual
35
Chapter 3
Tutorial
36
pcRTA - User Manual
Chapter 3
Tutorial
3.1 Introduction
This is a brief instructional tutorial for the program. Several examples are
provided each selected to illustrate a different type of measurement. These
examples should provide a basic operational understanding of how to use the
program to take basic measurements.
Note- Some of the examples will require other external equipment and/or
environments that you may or may not have at your disposal. If you do not have
the necessary facilities for a specific example, please skip the example.
There are many other additional features in the program that cannot be covered
here in detail. However, the descriptions of these features are covered under
their own specific chapters. The various examples will take you through the
essential features and explain the overall structure of the program. Please take
the time to work through at least the first example. These actually require very
little time and will answer many of your questions. The following examples are
provided:
n Example #1:
Measuring the Generator Response.
n Example #2:
Measuring SPL Response.
n Example #3:
Measuring Impedance.
Read Chapter 1
If you have not already read chapter 1, and fully installed the system, you must
complete this first before starting the tutorial. You will need to have the system
calibrated and the MDF files setup for your microphone.
Read Chapter 2
If you have not already read chapter 2, it is recommended that you first go
through that chapter before starting the tutorial. Many of the key aspects of the
overall operation of the program are introduced there, and will be helpful for
this tutorial.
pcRTA - User Manual
37
Chapter 3
Tutorial
Starting the Program
If you have not already started the program, do so now. This can be done
by double-clicking on the pcRTA icon. When the program has finished
initializing itself, go to the File menu, pick New, and Amplitude.
On-Line Help
The pcRTA software provides extensive on-line help which is available
throughout the program. Help can be accessed in two different ways:
(1) Go to the Help menu and open it directly.
(2) Press one of the help buttons shown in a dialog box. Pressing
a help button in a dialog box will bring up context sensitive help
about that specific dialog box and its options.
38
pcRTA - User Manual
Chapter 3
Tutorial
3.2 Example #1: Measuring the Generator Response.
In this example we will be performing a measurement of the signal/noise
generator itself. This is really nothing more than a simple self test of the system.
No external equipment is required.
If you have not already selected a new amplitude library, then do so now. Go
to the File menu, and select New|Amplitude. This will create a new amplitude
library, and set the measurement mode for amplitude.
The first step in taking a measurement, is selecting where you wish the data to
be placed. Remember, the system uses a library to store curves. The data from
a measurement is placed into one of the twenty library entries.
ä Go to the Edit menu and choose Curve Library.
A dialog box, as shown here, will be displayed
which lists the names of the curve entries in the
library. When you select File|New, the library is
initialized with simple names such as CurveName 1
etc.. These are really only temporary names until
you set your own names for the curves.
At the left of each entry name, is a square and a
circle marker. Note that only the first entry has
these markers filled in. The square marker indicates
whether or not the curve entry is selected for
display on the graph. Any number of curves can be selected for graph display
at the same time, so more than one square may be marked.
The circle indicates which one of the twenty entries is marked to receive the
next measurement data. There can only be one data curve marked. If another
circle is marked, the first one will be automatically turned off. In this case, entry
number 1 is the data curve. The next measurement will place data into curve
number 1. This entry is also marked for display on the graph as well.
The list can be scrolled up and down using the scroll bar on the right. To change
the status of a marker, simply move your mouse over the marker, and press the
left mouse button. Graph markers (squares) will toggle Off/On, and the data
markers (circles) will change if a different curve is picked.
pcRTA - User Manual
39
Chapter 3
Tutorial
To edit the name of a curve, simply click the mouse anywhere on the name
line, and the name text will be copied into the white edit box shown above.
Then, click your mouse in the edit box and change the name.
ä Select CurveName 1 into the edit box.
ä Change the name to "Pink Noise/ 0.1sec Ave".
ä Click the 1st curve line area to update the list box.
Your dialog box should now look something like
the one shown here. Editing the names, and
controlling the curve entry markers is very easy.
To keep your changes, you must exit the dialog box
by pressing OK. Pressing CANCEL would abort any
changes you have made.
Note- Most dialog boxes throughout the program
have three main buttons shown at the bottom: OK,
CANCEL, and HELP. If you wish to keep the changes
you have made in a dialog box, you must press OK
to exit. If you wish to abort the changes, press
CANCEL to exit. The HELP button will bring up
context sensitive help about the dialog box.
ä Click the OK button to exit the dialog box and keep your changes.
Looking at the lower left corner of the graph, note that an area called Curve
Legend is shown. The name of curve entry number 1 is shown here, along
with a colored line in front. Note also that this line has a small dot
placed on it. The dot means that this entry is the data curve.
The curve legend area lists the curves that are being displayed, and
also indicates what colors are assigned to the curves or bars. It also
indicates which curve is marked to hold the next measurement, and
gives the names of the curve entries. This fully automatic annotation
system provides very helpful information when viewing the graphs
or printing the graphs for record keeping purposes.
40
pcRTA - User Manual
Chapter 3
Tutorial
The next step is to setup the control panel for the exact measurement we wish
to perform.
ä Go to the Edit Menu and select Control Panel.
A similar looking dialog box should be displayed as
shown here on the left. Your parameter fields may not
be in exactly the same initial condition.
This dialog box is the heart of the pcRTA system. It is
the primary control over the analyzer board. We will
not go into all of its detail here.
For this test, we wish to measure the pink noise
generator directly. The dialog box displayed at the
bottom of the page shows the required settings.
Change the control settings as needed on your dialog
box until they match the control settings shown here.
ä Match your control settings to the ones shown below.
The generator box should be set for Auto, PinkNoise,
and 0.0dBm. The band response selections should be
marked FLAT on both. The type of measurement will
be marked dBm. Select the averaging time for 0.10
seconds.
For the input source, select GENERATOR. The last
group box Testing Mode should have CONTINUOUS checked. After you have matched these settings
press OK to retain your changes and exit.
ä Click the OK button to exit the dialog box and
keep your changes.
pcRTA - User Manual
41
Chapter 3
Tutorial
We are now ready to take a measurement. The top button on the Tool Bar
is labeled Run Test.
ä Press the Run Test button in the Tool Bar.
Note- There are also two other means provided to activate this button: (1)
the DELETE key on the keyboard, and (2) the RightMouse button.
The analyzer is now running. You should also note that the second button
Gen On is now depressed. This is the result of the generator Auto function
enabled on the control menu previously.
You may or may not be able to see any actual bar display on the graph at
this time. The scale may be too high or low to see the data. The Scale Auto
function can now be used to locate the bars.
ä Press the Scale Auto button in the Tool Bar.
After the screen is redrawn, you should now see the bars moving on the
graph. The display should appear similar to the one shown here.
The bars are moving in relatively rapid fashion. The bar
at the far left shows the overall full range response level,
and will be bouncing around
the 0dBm level.
The other 31 bars show the
energy in each 1/3 octave
band, at a level about 17dB
below the full range.
The lower bands are in constant motion and do not
maintain a smooth level. This
is due to the short averaging
time of 0.1sec.
42
pcRTA - User Manual
Chapter 3
Tutorial
To stop the display, simply press the Stop Test button.
ä Press the Stop Test button in the Tool Bar.
The display freezes. The bars maintain the last data when the measurement was
stopped, and the data is already stored in the curve library entry. You can press
the Run Test button again to reactivate the measurement process. Try this a
couple of times to get the feel of starting and stopping measurements.
ä Press the Run/Stop Test button in the Tool Bar a few times.
You will probably have noticed that the bars freeze in a different position each
time. This is due to the random nature of noise. With a short averaging time,
the noise is 'caught' at different levels when the measurement is stopped. It
should be clear that accurate low frequency levels cannot be measured using
short averaging times. Longer averaging times are necessary.
ä Press the Stop Test button in the Tool Bar to stop measuring.
We will now change the averaging time to a much longer value. Also, we will
place this new data into a different curve entry, so that the previous data will
not be lost.
First we will change the data curve. To bring up the Curve Library edit dialog
box again, this time use the button on the Tool Bar.
ä Press the Curve Library button in the Tool Bar.
Now we will change the name of entry 2, and change
the markers to make entry 2 the data entry, and the
only entry for graph display.
ä Edit the #2 name to "Pink Noise/ 10 sec ave".
ä Click the circle on entry #2.
ä Click the square on entry #2.
ä Click the square on entry #1.
Your dialog box should look the same as shown here
on the left.
ä Press OK to exit.
pcRTA - User Manual
43
Chapter 3
Tutorial
When the screen is redrawn, the graph will be filled by bars. This is because
the current data in entry number two is initially set to 0dB, which places all
bars at the top of the current scale.
We now need to change the control panel for an averaging time of 10
seconds. We will use the Tool Bar again.
ä Press the Control Panel button in the Tool Bar.
ä Change the averaging time to 10.0 Seconds.
ä Press OK to exit and retain your changes.
Now we can take another measurement.
ä Press the Run Test button in the Tool Bar.
You will not see an immediate effect, but every 10
seconds the screen will be updated with new data. After
about 30 seconds stop the test.
ä Press the Stop Test button in the Tool Bar.
The bars now show a very flat
response. Typically less than
±0.5dB across the entire range.
The pcRTA performs highly
accurate true RMS averaging
over time periods from 0.05 to
50 seconds. For typical measurements, an averaging time
of 10 seconds produces excellent results for Pink Noise.
This second measurement is
now held in curve entry number 2. The last exercise for this
example will be to display the
previous measurement along
with this new data.
44
pcRTA - User Manual
Chapter 3
Tutorial
This time, we will bring up the Curve Library dialog box
with yet another new method. The graph artwork
board has three areas near the bottom of the graph.
These areas are double-click zones. Pressing the left
mouse button twice quickly over either of these three
areas will activate either the Curve Library, Control
Panel, or Notes and Comments editor. This is another
way to access these very common functions.
ä DoubleClick mouse over Curve Legend area.
ä Click the square marker in entry number 1.
ä Press the OK button to exit and keep your changes.
Now we have added entry number 1 for display also. As the graph below
shows, there are now two sets of bars displayed on the graph. The width of the
bars has been divided in half. Also, the Curve Legend area displays the curve
names and color assignments. Note the new bar colors.
pcRTA - User Manual
45
Chapter 3
Tutorial
For the next measurement, curve entry number 3 will be used.
ä DoubleClick mouse over Curve Legend area.
ä Click the circle data marker on in entry number 3.
ä Click the square graph marker off in entry numbers 1 & 2.
ä Edit the name of entry 3 to "White Noise/ 10 sec ave".
ä Press the OK button to exit and keep your changes.
Now we need to change the control panel for a
generator signal of White Noise.
ä DoubleClick mouse over System area.
ä Select White Noise for the generator.
ä Press the OK button to exit
Now we are ready to take another measurement. Let the analyzer make
a couple of updates to the screen, and then turn off the test.
ä Press the Run Test button in the Tool Bar, and wait 10-30 seconds.
ä Press the Stop Test button in the Tool Bar.
46
pcRTA - User Manual
Chapter 3
Tutorial
The bar graph display now appears as shown below. Unlike the Pink Noise
which had equal energy per log frequency, White Noise has equal energy per
linear frequency. This produces an RTA response which increases 10dB per
decade of increasing frequency, or 1dB per 1/3 octave band. This results in the
upward staircase effect shown here. Since the RTA bands are slightly lower than
before, we can move the scale down to show the lower bands.
ä Press the Scale Down button in the Tool Bar twice.
The full range bar is now off
the top of the grid, but all of
the 1/3 octave bands are visible on the grid.
As this graph demonstrates,
there is exactly a 30dB difference between the 20Hz band
and the 20kHz band. These
frequency bands are three decades apart.
pcRTA - User Manual
47
Chapter 3
Tutorial
For the last test, we will measure the spectrum of a 250Hz square wave.
Curve entry number 4 will be used to hold the data.
ä DoubleClick mouse over Curve Legend area.
ä Click the circle data marker on in entry number 4.
ä Click the square graph marker off in entry number 3.
ä Edit the name of entry 4 to "250Hz square wave/ 1 sec ave".
ä Press the OK button to exit and keep your changes.
Now we need to change the control panel for a
generator signal of 250Hz. We will also change the
averaging time to 1.0 seconds. Since we are not
measuring a random signal such as noise, shorter
averaging times can be used.
ä DoubleClick mouse over System area.
ä Select 250Hz SqWave for the generator.
ä Select 1.0 Seconds for the averaging time.
ä Press the OK button to exit.
We are ready to take another measurement. Since the
measurement time is now only 1 second, you can stop
the measurement a couple of seconds after starting it.
ä Press the Run Test button
in the Tool Bar, and wait a
couple seconds.
ä Press the Stop Test button
in the Tool Bar.
48
pcRTA - User Manual
Chapter 3
Tutorial
The new data will be back higher in level, so the scale needs adjustment. You
can either use the Scale Up twice, or use the Scale Auto button to let the
software find the scale automatically.
ä Press the Scale Up button in the Tool Bar twice.
While the full range bar shows a level of 0 dBm, the 250Hz bar is about 1 dB
lower. This is because the full range bar is measuring the RMS level of the actual
full square wave, while the 250Hz band shows the level of the fundamental
250Hz pure frequency component.
The higher bands show the levels of the various harmonics of the square wave.
Square waves have odd harmonics, so the largest harmonic amplitude occurs
at 750Hz as indicated by the level of the 800Hz band.
The square wave oscillator is mainly used by the analyzer for self calibration. But
it is also a very useful output when a nonrandom signal is desired. Many
applications require a test tone for level alignment or setup.
pcRTA - User Manual
49
Chapter 3
Tutorial
For the last part of this example, we will now save the library. This can be
done using the menu File|SaveAs, or by using the accelerator key CTRL-S
(^S).
ä Select File from the menu, and then SaveAs.
A dialog box will appear to set the name. For this example library, enter
the name EXAMPLE1.DB. If you do not add the extension, the program will
automatically append the extension of DB.
Anytime you wish to save your changes in a library to disk, it is very quick
to use the ^S accelerator key. It is always a good idea to periodically save
any new changes to a library on a regular basis, in case your system should
crash or your computer power is lost.
50
pcRTA - User Manual
Chapter 3
Tutorial
3.3 Example #2: Measuring SPL Response.
In this example we will now make use of a microphone for measuring sound
pressure level (SPL). If you have not already setup your mic input(s) with the
proper MDF files, you should do so first before working this example.
Also, you will need to have an audio system to test. At a minimum, this would
consist of a power amplifier and loudspeaker. You will need to connect the
analyzer Line Output to the input of the amplifier. Depending on the type of
connector input for your amplifier, wiring connectors or adapters may be
required from the 1/4" jack of the connector box to the input of your power
amplifier. This should be done first before starting the example.
The microphone will need to be positioned by some manner in front of the
loudspeaker to be measured. Since this is only an example to demonstrate the
process, a perfect measurement is not necessary. The microphone can be laid
on the floor in front of the speaker, or held in a mic stand if one is available. The
intent is to pick up at least some of the sound from the speaker.
We will continue with the previous library. The
first step is to set the data curve. For this first SPL
measurement the data will be placed in entry #5.
ä DoubleClick mouse over Curve Legend area.
ä Click the circle data marker on in entry
number 5.
ä Click the square graph marker off in entry
number 4 and any others.
ä Edit the name of entry 5 to "SPL Test / 0.1 sec
ave".
ä Press the OK button to exit and keep your
changes.
pcRTA - User Manual
51
Chapter 3
Tutorial
The control panel now must be setup for the measurement. Since this is
the first time you are using the pcRTA with an amplifier, the proper signal
level needed will have to be determined experimentally.
If you have not already connected the pcRTA to your amplifier, do so now.
Also, connect power amp to the speaker, and the microphone to one of
the mic inputs of the pcRTA. It will be assumed you are using Mic-1.
To prevent driving the amplifier and
speaker at a level too high, we will
begin by setting the generator at a
fairly low level. Most power amplifiers have a volume control, and it
should be set at a typical normal level
for starting purposes. Later, you may
wish to change the generator level
from the pcRTA, or change the volume control of the amplifier.
ä Set the generator for PinkNoise.
ä Set the output level for -40dBm.
ä Set the Data Type for SPL.
ä Set the Averaging for 0.1 Sec.
ä Set the Input Source for Mic-1.
The remaining settings should be the
same from example number 1. If
they are not, set your parameters to
match the values shown here.
The Type of Data parameter is very important. When set to dBm, the
analyzer measures the simple voltage level of the selected input
(0dBm=0.775Vrms). Even if the input is a microphone, the MDF data is not
used. The reading is exactly a measurement of the input voltage.
When set to SPL, the MDF data is used to produce a true SPL reading.
Sensitivity offset and microphone response correction is applied as dictated in the loaded MDF mic setup. The pcRTA can measure very accurate
SPL levels with virtually any mic if correct MDF data is loaded.
52
pcRTA - User Manual
Chapter 3
Tutorial
When you have finished setting up the control panel, press OK to exit the dialog
box.
ä Press OK to exit and save your changes.
Now, test your output to see if it is too high or too low.
ä Press the GenOn button in the Tool Bar.
If the level is very low, press the Control Panel button and increase the level
10dB higher to -30dBm.
ä Press Control Panel in the Tool Bar.
ä Adjust generator level to -30dBm.
ä Press OK to exit and save your changes.
If the level is still too soft, you can repeat the process of increasing the generator
level until it is at a comfortable audible level. If you get up to 0dBm and the level
is still too low, then you need to increase the volume control on the amplifier.
It is set too low.
Once you have a reasonable test level, press the RunTest button.
ä Press the Run Test button in the Tool Bar.
The data will probably be off the top of the graph, because the data is now SPL
units, rather than dBm. Use Scale Auto to let the system find the proper scale
for you.
ä Press the Scale Auto button in the Tool Bar.
Now you should see the bars moving. The lower frequency bars will be
constantly moving. This is because the averaging time is a very short 0.1 sec.
Try stopping the run, and then restarting it. Use the RightMouse button.
ä Press the RightMouse button a few times to Start and Stop.
Your display should look something like the one shown on the following page.
It will not look exactly the same, since your system and setup are different.
pcRTA - User Manual
53
Chapter 3
Tutorial
As you have probably noticed, each time you stop the measurement the
reading is different. This is because the averaging time is too short for
measuring pink noise, which randomly varies over time. For accurate
measurements, a 10 second averaging time would be more practical.
For an accurate measurement we will change the averaging time to 10
seconds, and save this new curve in entry number 6.
ä Press the Curve Library button in the Tool Bar.
ä Click the circle data marker on in entry number 6.
ä Click the square graph marker off in entry number 5.
ä Edit the name of entry 6 to "SPL Test / 10 sec ave".
ä Press the OK button to exit and keep your changes.
ä Press the Control Panel button in the Tool Bar.
ä Set the averaging time to 10.0 Seconds.
ä Press the OK button to exit and keep your changes.
54
pcRTA - User Manual
Chapter 3
Tutorial
ä Press the RightMouse button to take a measurement.
It will now take 10 seconds for the display to be updated, but after each update
the display will barely change. The measurement is very stable and accurate.
One thing you may wish to try, is moving the mic around at different positions
in front of the speaker. Try on-axis and off-axis. You will notice that the resulting
curves look very different at mid and high frequencies. This is due to the
directional response of the speaker at different frequencies, and room/
environment conditions. Where you place a microphone is crucial to the
response curve that is produced. Different positions will produce different
curves.
To save this new library data, the library name will be changed to EXAMPLE2.
ä Select File|SaveAs from the menu.
ä Enter EXAMPLE2.DB in the file dialog box and press OK.
pcRTA - User Manual
55
Chapter 3
Tutorial
56
pcRTA - User Manual
Chapter 3
Tutorial
3.4 Example #3: Measuring Impedance
This example will demonstrate how to use the pcRTA to measure impedance.
The pcRTA has a special mode for this, and provides all of the necessary
calculations internally to produce a final result curve in Ohms.
The generator output impedance is 500 Ohms. Since the impedance range of
devices such as loudspeakers is generally much lower, a voltage divider is
formed with the 500 ohm output impedance and the device. The software
measures the resulting voltage, and solves the divider for the load impedance.
Since an RTA has only 31 bands, the resolution of the impedance curve is
limited to 31 points. Moreover the test signal is noise averaged in 1/3 octave
bands. This is not enough resolution for producing speaker parameters, which
require extremely high detail and accuracy. A swept sine wave analyzer such
as LMS is ideal for this purpose.
However, even the ability to measure rough impedance curves can be very
useful if no other means is available. This enables transducers or passive
crossovers to be checked for shorts, opens, or other major defects very quickly.
These problems may show up under AC testing, but may not be visible under
DC testing with a simple DMM.
2-Wire and 4-Wire Methods
The basic idea of measuring impedance is to send the generator signal out to
the device, and measure the voltage at the device. This can be done using a
2-wire method for both purposes, or a 4-wire method which sends the signal
out on one pair and measures the voltage with the other pair of wires.
4-WIRE
1/4 INCH PLUG
SHIELDED CABLE
LINE IN
TEST CLIPS
1/4 INCH PLUG
SHIELDED CABLE
LINE OUT
The advantage of the 4-wire method is
that the cable resistance is not included in the measurement. This produces better accuracy at low impedance. This may also be necessary if the
cable length is relatively long.
2-WIRE
TEST CLIPS
1/4 INCH PLUG
LINE OUT
pcRTA - User Manual
SHIELDED CABLE
You will need to construct at least one
of these two cable arrangements. Alligator clips are best for clipping on to
the terminals of various devices.
57
Chapter 3
Tutorial
To start an impedance measurement, an impedance library must be
opened or created.
ä Select File|New from the menu and then Impedance.
The first test will be a simple open circuit test. We will change the name
of entry number 1 accordingly.
ä Press the Curve Library button on the Tool Bar.
ä Change the name of entry #1 to Open Circuit
Test.
ä Click OK to exit and save your changes.
Now we will need to set up the impedance control
panel.
ä Press the Control Panel button on the Tool Bar.
The impedance control panel is much simpler than
the amplitude control panel. There are far less
parameters to set.
For this example, set the generator to automatic, the averaging time to 5
seconds, and the testing mode to continuous.
If you have constructed a 2-wire cable, select that option. If you
are using a 4-wire cable, select that option.
ä Make your selections.
ä Click OK to exit and save your changes.
Now press the Run Test button to take a measurement. It will
take about 5 seconds for the screen to be updated. The scale
range may not be correct, so use Scale Auto to find the curve.
ä Press Run Test in the Tool Bar.
ä Press Scale Auto in the tool Bar.
58
pcRTA - User Manual
Chapter 3
Tutorial
The analyzer reaches a maximum of around
5k-10k Ohms when reading an open circuit.
Now we will test a short circuit, and save that
curve in entry number 2.
ä Press the Curve Library on the Tool Bar.
ä Click the circle marker ON in entry 2.
ä Click the square marker OFF in entry 1.
ä Change the name of entry #2 to Shorted
Cable Test.
ä Click OK to exit and save your changes.
Take another measurement, and rescale.
ä Press Run Test on the Tool Bar.
ä Press Scale Auto after a few seconds.
pcRTA - User Manual
59
Chapter 3
Tutorial
If you are using a 2-wire configuration, you will probably be measuring
around 1-3 ohms of resistance, depending on your cable length. For a 4wire configuration, the curve will be in the 0.2-0.3 Ohm range. These are
typical results for short circuit measurements.
Now we will measure a speaker. Connect a transducer to the test clips. We
will save this data in entry number 3.
ä Press the Curve Library on the Tool Bar.
ä Click the circle marker ON in entry 3.
ä Click the square marker OFF in entry 2.
ä Change the name of entry #3 to Speaker Test.
ä Click OK to exit and save your changes.
Take another measurement, and rescale.
ä Press Run Test on the Tool Bar.
ä Press Scale Auto after a few seconds.
60
pcRTA - User Manual
Chapter 3
Tutorial
The impedance response of the transducer
should look something like the curve shown
below. Your speaker is not the same, so the
curve will be different.
Measuring impedance with the pcRTA is very
quick and easy. Although the accuracy and
resolution is very limited due to the 31 points
and noise averaging, it can provide important
information for users without additional measurement equipment.
pcRTA - User Manual
61
Chapter 3
Tutorial
62
pcRTA - User Manual
Chapter 4
File Menu
File Menu
Chapter
4
pcRTA - User Manual
63
Chapter 4
File Menu
64
pcRTA - User Manual
Chapter 4
File Menu
4.1 New File
The New File menu option initializes a new library, and sets the measurement
mode for the analyzer. This option clears all data and sets default names for the
curve entries. The library is given the name Untitled. You will be required to
set a real name before the program will allow you to save the library file.
The New option has four sub menus for the library type: Amplitude, Impedance,
ReverbTime, and Noise Analysis. The type of data to be measured is solely
defined by the type of library being created.
If you attempt to exit the program with a library name Untitled, you will be
prompted to save the file first before exiting. You have the option of exiting the
program without saving the file explicitly, or assigning a file name and saving
the library under this new name. The pcRTA software always initializes the last
configuration from the PCRTA.INI file, and loads the last used library if possible,
each time the program is started.
pcRTA - User Manual
65
Chapter 4
File Menu
4.2 Open File
The Open File menu option loads a library file from disk into memory, and
configures the program for a specific type of measurement. When the
library has been loaded, the file name will appear in the top of the title bar,
along with the measurement mode. Depending on the type of library,
pcRTA files have the extension .DB, .Z, .RT, or .NA to indicate the type of
library and data contained. The measurement mode of the program will
be updated to match the type of library data required.
The Open option has four sub menus for the library type: Amplitude,
Impedance, ReverbTime, and Noise Analysis. The type of data to be
measured is solely defined by the type of library being opened.
Library files by default are located in one of the four data subdirectories
\DB, \Z, \RT, or \NA depending on the library type. However, you can save
and load files from other paths if desired.
66
pcRTA - User Manual
Chapter 4
File Menu
4.3 Save File
The Save File menu option saves the current library data in memory to the file
name and path currently assigned. If the current name is Untitled, then you will
be prompted to enter a real file name for the design. pcRTA library files have
the extension .DB, .Z, .RT, or .NA to indicate the type of data library.
It is not necessary to add the extension yourself, the pcRTA software will add
the correct extension automatically. If you do type in an extension, make sure
it is correct so you will be able to recognize the file in the future as a specific
library file.
Library files by default are located in one of the four data subdirectories \DB,
\Z, \RT, or \NA depending on the library type. However, you can save and load
files from other paths if desired.
To save a file quickly without having to go to the menu, use the accelerator key
CTRL-S (^S). This will update the library in memory to disk, providing the library
file name has already been set.
pcRTA - User Manual
67
Chapter 4
File Menu
4.4 SaveAs File
The SaveAs File menu option saves the library data file in memory to disk,
and prompts you to enter the new file name. pcRTA library files have the
extension .DB, .Z, .RT, or .NA to indicate that they are library data files. It
is not necessary to add the extension yourself, the pcRTA software will add
the correct extension automatically. If you do type in an extension, make
sure it is the correct type so you will be able to recognize the file in the future
as a library data file.
Library files by default are located in one of the four data subdirectories
\DB, \Z, \RT, or \NA depending on the library type. However, you can save
and load files from other paths if desired.
68
pcRTA - User Manual
Chapter 4
File Menu
4.5 Save Graph Display Set
The Save Graph Display Set menu option saves the current settings for the
display graphs to a file on disk, and prompts you to enter/select the file name
for the file. These files have an extension of GDS. It is not necessary to add the
extension yourself, the pcRTA software will add the correct extension automatically. If you do type in an extension, make sure it is the correct type so you will
be able to recognize the file in the future as a Graph DisplaySet data file.
Graph DisplaySet files store the colors, line styles, fonts, position, and scale
information currently in use by the program. This allows you to save your
current display settings, and later reload them to restore the previous settings
all at one time. This is much faster than editing all of the numerous colors and
fonts one at a time.
By default, GDS files are located in the main PCRTA subdirectory. However,
you can save and load files from other paths if desired.
pcRTA - User Manual
69
Chapter 4
File Menu
4.6 Load Graph Display Set
The Load Graph Display Set menu option loads a GDS file from disk, which
restores the graph display settings to the values in the GDS file. These files
have an extension of GDS. After the Graph DisplaySet file is loaded, the
screen will be redrawn with the new display values.
Graph DisplaySet files store the colors, line styles, fonts, position, and scale
information currently in use by the program. This allows you to save your
current display settings, and later reload them to restore the previous
settings all at one time. This is much faster than editing all of the numerous
colors and fonts one at a time.
By default, GDS files are located in the main PCRTA subdirectory. However, you can save and load files from other paths if desired.
70
pcRTA - User Manual
Chapter 4
File Menu
4.7 Save Control Panel Set
The Save Control Panel Set menu option saves the current settings for the
control panels to a file on disk, and prompts you to enter/select the file name
for the file. These files have an extension of CPS. It is not necessary to add the
extension yourself, the pcRTA software will add the correct extension automatically. If you do type in an extension, make sure it is the correct type so you will
be able to recognize the file in the future as a Control Panel Set data file.
Control Panel Set files store all of the parameters for all types of control panels
currently in use by the program. This allows you to save your current
measurement setups, and later reload them to restore the previous settings all
at one time. This is much faster than editing all of the numerous analyzer
parameters one at a time.
By default, CPS files are located in the main PCRTA subdirectory. However, you
can save and load files from other paths if desired.
pcRTA - User Manual
71
Chapter 4
File Menu
4.8 Load Control Panel Set
The Load Control Panel Set menu option loads a CPS file from disk, which
restores the control panel settings to the values in the CPS file. These files
have an extension of CPS. After the Control Panel Set file is loaded, all
control panel parameters will be reset to the values saved in the CPS file.
Control Panel Set files store all of the parameters for all types of control
panels currently in use by the program. This allows you to save your current
measurement setups, and later reload them to restore the previous settings
all at one time. This is much faster than editing all of the numerous analyzer
parameters one at a time.
By default, CPS files are located in the main PCRTA subdirectory. However,
you can save and load files from other paths if desired.
72
pcRTA - User Manual
Chapter 4
File Menu
4.9 Print
The Print menu option opens a dialog box for printing control. From here the
artwork generated in pcRTA can be printed to any output device currently
supported in your Windows system.
The graphs used in pcRTA have art boards of 10 inches wide by 8 inches high.
These are the full size dimensions. Printing at a scale factor of 100% will
generally require landscape orientation on 8½ x 11 letter size paper. For
portrait printing, use a reduced scale factor such as 80% or less.
Printer Configuration
This box displays the configuration for the currently selected printer. When you
start a print, this configuration will be used. To change the configuration use
the Setup button at the bottom of the dialog box.
pcRTA - User Manual
73
Chapter 4
File Menu
Printing Options
This group box provides several options which control how the graphics
are printed on the page. They are largely self explanatory.
-Align in Center of Page
This positions the artwork in the center of the available printing area. The
printing area is dependent on the page size selected for the printer.
-Align at Corner of Page
This positions the artwork at a corner of the available printing area. The
printing area is dependent on the page size selected for the printer, and the
specific corner will vary depending on whether landscape or portrait
orientation is in use.
-Scale Factor
This editing field allows you to specify the amount of enlargement or
reduction in the magnification of the printed image. The value is entered
in percent. A full size 100% plot represents an artwork width of 10 inches
and a height of 8 inches.
-Bar Width Factor
This editing field allows you to control the amount of gap between the bars
when printing bar graphs. The value can range from 1.0 down to 0.5. The
typical value is 0.9.
74
pcRTA - User Manual
Chapter 4
File Menu
-Print colors as Black/White
When this box is checked, all colors in the artwork graphics will be printed as
black or white. If this box is not checked and you are printing to a black & white
device, the colors in the artwork will be dithered to produce gray levels.
This is a very useful feature when printing to a dot matrix device. Gray halftones
of low resolution on small lines or fonts may often result in unreadable graphics.
Printing all colors as black/white will eliminate this problem and produce better
looking plots on low resolution devices.
For printing on laser printers where higher resolution is available, it may be a
matter of choice as to the representation of color. Gray lines of varying density
may help to produce more identity between multiple lines on the graphs.
Setup Button
Use this button when you wish to
change the selected printer, and/or
configuration. When this button is
pressed another dialog box will open
to change the printer/port selection.
This is shown below.
From the Printer Select dialog box,
you may also use the Configure button to fully configure the currently selected
printer. When this button is pressed another series of dialog boxes will appear
specific to the particular printer selected.
These dialog boxes are supplied by the Windows system. Consult your
Windows manual for more information on printer setup. Also, you may wish
to consult your printer manual for other details about your specific printer and
how to configure its options.
pcRTA - User Manual
75
Chapter 4
File Menu
4.10 Exit Program
The Exit menu option is used to terminate the program. When this option
is selected the system checks to see if any changes have been made since
the library data was last saved. If changes have been made, then a dialog
box will appear with three options for exiting the program. If the current
library name is Untitled you will always receive this message.
Use the YES button if you wish to save the library, and another dialog box
will appear to allow you to enter a new file name if the current name is
Untitled. If the current name is valid, the file will be updated. The program
will exit after saving the file.
Use the NO button if you do not wish to save the current library as a file,
or do not wish to update the existing file on disk. The program will exit after
pressing this button. The PCRTA.INI file is always updated with the current
system configuration data when the program is terminated.
Use the CANCEL button if you wish to abort the exiting process. You will
be returned to the pcRTA system after this button is pressed.
76
pcRTA - User Manual
Chapter 5
Edit Menu
Edit Menu
Chapter
5
pcRTA - User Manual
77
Chapter 5
Edit Menu
78
pcRTA - User Manual
Chapter 5
Edit Menu
5.1 Run/Stop Test
Choosing this menu option will start a measurement. This menu selection
toggles the analyzer measurement to start and stop. If the Tool Box is displayed,
the Run Test button will change to Stop Test after it has been pressed. This
button functions as a push-on/push-off, and toggles between these two states.
When it is pushed in, the analyzer is conducting a measurement, and placing
the data into the currently selected curve entry marked for data. When the
button is out, the measurement has stopped.
There are also two other means provided to activate this button: (1) the DELETE
key on the keyboard, and (2) the RightMouse button. Either of these controls
can be used to toggle the state of the Run/Stop Test button. Using the
RightMouse button is very convenient for remote control purposes.
pcRTA - User Manual
79
Chapter 5
Edit Menu
5.2 Gen On/Off
Choosing this menu option will turn on the generator output. This menu
selection toggles the generator output On and Off. If the Tool Box is
displayed, the Gen On button will change to Gen Off after it has been
pressed. This button functions as a push-on/push-off, and toggles between
these two states. When it is pushed in, the generator is producing an output
signal at the Line Output. When the button is out, the generator output is
turned off. The INSERT key on the keyboard can also be used to control
this button.
80
pcRTA - User Manual
Chapter 5
Edit Menu
5.3 Curve Library
The Curve Library menu option will open a dialog box which controls the
selection of curves for display on the graphs, as well as the data entry selection,
and editing of curve entry names. Additional commands are also provided for
moving, copying, and deleting entries within the current library.
This menu option can also be activated from the tool bar and the DoubleClick
zone in the graph area under Curve Legend.
The example below shows the various elements of the Curve Library dialog box.
Each of the key features are detailed.
Graphing Status
Data Curve Status
Library Name
Name Editing Box
Data Curve Indicators
Graphing Indicators
Function Buttons
Curve List Box
pcRTA - User Manual
81
Chapter 5
Edit Menu
Library Name
The group box displays the current name
of the library being edited. This is the
current library in memory.
Graphing Status
This box will display the word Graph if the
currently selected (highlighted) curve entry is selected for graph display. This status
box reflects the setting of the square markers.
Data Curve Status
This box will display the word Data if the
currently selected (highlighted) curve entry is selected as the data curve entry. This status box reflects the setting
of the circle markers. There can only be one entry selected as the data
curve. This is where the data from the next measurement will be placed.
Name Editing Box
This box is used to edit/enter the name for a curve entry. Whenever a curve
entry in the list box is highlighted (focused), the name is automatically
copied to the name editing box. If you wish to edit the name, simply click
your mouse in this box, and begin editing. To save your changes, simply
click the mouse back into the main list box, and the text from the editing
box will be copied to the list box.
This function can also be initiated by pressing the 'N' key while a curve entry
name is highlighted (focused).
Curve List Box
The large list box displays the curve entry names within the library. All
library types have 20 curve entries. Each entry in the list can be highlighted
(focused), by using the mouse and scroll bar, or by using the cursor keys
on the keyboard.
Each entry also has a square and circle marker which is used to select and
indicate the curve's status for graphing and data selection.
82
pcRTA - User Manual
Chapter 5
Edit Menu
Graphing Indicators (Square Markers)
Each curve entry in the list box has a small
square shown at the beginning of the line.
This square indicates whether or not the
curve is selected for display on the graph.
When the curve is selected for display, the
square will be filled in with the assigned
color for the curve. The curve line color is
set in the Graph Display dialog box.
The square markers also function as selection buttons. When the mouse is moved
over a square and clicked, the indicator will
change state.
The square graphing indicators can also be controlled by using the 'G' key on
the keyboard. Pressing the 'G' key will change the state of the graph indicator
on the currently selected entry.
Data Curve Indicators (Circle Markers)
Each curve entry in the list box has a small circle shown at the beginning of the
line. This circle indicates whether or not the curve is currently selected as the
data curve. Only one curve can be the data curve. When one circle is clicked
ON, the previous circle will be turned OFF.
When the curve is selected for data, the circle will be filled in with the assigned
color for the curve. The curve line color is set in the Graph Display dialog box.
The circle markers also function as selection buttons. When the mouse is
moved over a circle and clicked, the indicator will change state.
The circle data curve indicators can also be controlled by using the 'D' key on
the keyboard. Pressing the 'D' key will change the state of the data curve
indicator on the currently selected entry.
Selecting a curve as the data entry will also automatically turn on the graphing
indicator, since this is typically needed as well.
pcRTA - User Manual
83
Chapter 5
Edit Menu
Copy Curve
This function button is used to copy a
curve from one entry position to another.
Both the data and the curve name will be
copied. The original is not affected.
To use this function, first highlight/select
the entry to be copied before pressing the
button. Then press the Copy Curve button. Next highlight/select the entry position to place the copy.
If you wish to abort the command, simply
press the button again.
Move Curve
This function button is used to move a curve from one entry position to
another. Both the data and the curve name will be copied. The original
curve entry is cleared.
To use this function, first highlight/select the entry to be moved before
pressing the button. Then press the Move Curve button. Next highlight/
select the entry position to move the curve to.
If you wish to abort the command, simply press the button again.
Delete Curve
This function button is used to erase a curve from one entry position. Both
the data and the curve name will be erased. To use this function, first
highlight/select the entry to be deleted before pressing the button. Then
press the Delete Curve button.
Delete All
This function button is used to erase all curves from the library. Both the
data and the curve name will be erased for all entries. To use this function,
just press the Delete All button.
84
pcRTA - User Manual
Chapter 5
Edit Menu
Edit Data
This function button opens another dialog
box which allows the user to manually
enter/edit the actual data in the 32 bands.
Prior to pressing the button, the user should
highlight the curve entry for which the data
is to edited. The dialog box is self explanatory, with each band value displayed in its
own editing field. For dB data, the values
may be either positive, negative, or zero.
For impedance and time data, the values
must be greater than zero. Pressing Ok,
will keep your changes, while pressing
Cancel will abort any data changes.
pcRTA - User Manual
85
Chapter 5
Edit Menu
Show Info
This function button opens the Curve Information dialog box, which shows general text information about the curve entry.
Unlike the Library Notes/Comments fields
which provide text information on a library
basis, this dialog box provides for text to be
stored for each curve entry. Each time a
measurement is taken, the system automatically writes text into these fields which
record the settings and date/time of the
analyzer when the measurement was taken.
However, the user can edit and change
these text strings to reflect other information about the measurement as the user
desires. Pressing Ok will keep your changes,
while pressing Cancel will abort any information changes.
-Transfer to Notes
Pressing this button will automatically transfer the text from these curve information
lines, into the Notes/Comments lines of
the library for display on the graph charts.
OK
The OK button is common to most of the
dialog boxes throughout the program. Use
this button when you wish to Exit and save
any changes you have made in the dialog
box.
Help
The Help button is common to most of the dialog boxes throughout the
program. Use this button when you wish to open the help system, and
receive information about this specific dialog box and its controls or
parameters.
86
pcRTA - User Manual
Chapter 5
Edit Menu
5.4 Control Panel - Amplitude
This Control Panel menu option will be provided when the current library type
and measurement mode is Amplitude. This is the largest control panel in the
system, and handles virtually all aspects of the analyzer and software for
standard amplitude measurements.
This menu option can also be activated from the tool bar and the DoubleClick
zone in the graph area under System.
The example below shows the various elements of the Control Panel dialog
box. The dialog box is separated into several different regions. Each region
controls similar associated parameters.
pcRTA - User Manual
87
Chapter 5
Edit Menu
Automatic On/Off
This check box controls whether or not the generator output will be turned
on automatically whenever a measurement is in progress. When this box
is checked, the Gen On button in the tool bar will automatically be
depressed whenever the Run Test button is depressed.
Noise/Signal Selection
This list box provides selection for Pink Noise, White Noise, and square
waves at the 31 ISO standard center frequencies. The period cycle time
of the noise spectrums are 2.0 seconds, and the accuracy of the square
wave frequencies is typically ±0.5%.
Output Level Edit Box
The desired output level from the generator Line Output is entered and
shown here. The value is in dBm (0dBm=0.775Vrms). Regardless of the
type of output signal, the system correctly outputs this level in dBm.
Due to the nature of linear DAC attenuators, the resolution of the setting
will depend on the value. At high values such as 0dBm, the resolution is
very fine. At low values such as -50dBm the resolution will be coarse.
However, by closing the dialog box and reopening it, the exact value used
will be displayed.
The minimum output value is approximately -62dBm, and the maximum
value will depend on the particular signal. Typical values are: pink noise
=2.6dBm, white noise =8.6dBm, and square wave =9.6dBm.
Output Level Increment/Decrement Buttons
These buttons will change the displayed output level value by 0.1dBm. If
the level reaches the maximum or minimum capable values, the level will
not change. These buttons are type-a-matic and can be held down to
continuously step the value.
st
88
pcRTA - User Manual
Chapter 5
Edit Menu
Input Source
There are several selections provided in this list box which control the
input source selection for the analyzer measurement. Most of the
selections are clear and reflect the external connectors on the pcRTA
connector box.
The Generator selection allows direct measurement of the signal/noise
generator. This selection will follow the programmed output level, but
is always ON regardless of the Gen On button.
The MultiMic selection performs two different kinds of multiple
microphone measurement: Average and Multiplex. When this selection is chosen, the group box below is enabled. The microphone
enable check boxes control which microphones will be included in the
multimic measurement. This can be any combination of mic inputs
from 1 through 4.
In the Average mode, the enabled mic inputs will be RMS averaged into a single
data curve. The total averaging time will be multiplied by the number of mics
in use.
In the Multiplex mode, the enabled mic inputs will produce individual data
curves, one for each enabled mic. Since the system only provides selection of
one data curve at a time in the library, these multiple data curves are preassigned into special library entry positions. Mic-1 data is placed into entry #1,
and Mic-2 data is placed into entry #2, etc.. The total averaging time will be
multiplied by the number of mics in use plus about 1/2 second per mic for
settling time. The minimum screen update time in Multimic mode is approximately 2 seconds.
When the Normalized check box is on, the mic levels will be normalized to the
Full Range band level of Mic-1. For this reason, Mic-1 must always be enabled
for normalized measurements. The Full Range bands can of course have either
Flat, A, B, C, D, or E ANSI weighting applied. With Normalization, the Full Range
band level of each enabled microphone will be identical to the Full Range band
level of Mic-1.
pcRTA - User Manual
89
Chapter 5
Edit Menu
Detector
This group box provides four selections for the time weighting or time
averaging of the measured data. The detector values follow the requirements of ANSI S1.4-1983 etc. The Peak selection provides the fastest
measured response, and provides nominally 10 display updates per
second. The Fast selection is an exponential time average of 125mS, and
also provides 10 display updates per second. The Slow selection is an
exponential time average of 1000mS, and provides 10 display updates per
second. The Leq selection provides linear RMS time averaging with
selectable periods from 50 mS to 50 Sec. The display update period will
be equal to the Leq period.
When using the pcRTA to measure frequency response with pink noise
stimulus, the Leq detector should be used with a minimum averaging time
of 2 seconds. This will provide accurate and stable levels within 0.1dB
across all bands.
Note- Only Leq linear averaging can be used for the multi mic input selection.
90
pcRTA - User Manual
Chapter 5
Edit Menu
Full Band Response
This group box provides three selections: Flat, ANSI, and Sum. The full band
is the band displayed at the left of the graph, and represents a full range
frequency response, rather than a 1/3 octave RTA band response. This band
can be controlled separately from the 1/3 octave bands.
When set to FLAT, the Full Band will measure an unweighted response, and
ignores the setting of the weighting filter shown below. This selection includes
frequency content below 20Hz and above 20kHz. In this mode the correction
curve provided by any MDF file which has been loaded will not be included in
the measured Full Band level.
When set to ANSI, the Full Band will measure a weighted response as specified
by the weighting filter selected below. This selection includes frequency
content below 20Hz and above 20kHz, as allowed by the selected ANSI filter.
In this mode the correction curve provided by any MDF file which has been
loaded will not be included in the measured Full Band level.
When set to SUM, the Full Band will measure the total RMS sum of all of the
1/3 octave bands. This selection only includes frequency content between
20Hz-20kHz, and will follow the filtering selected for the RTA bands, and not
the Full band. In this mode the correction curve provided by any MDF file which
has been loaded will be included in the measured Full Band level.
RTA Bands Response
This group box provides two selections: Flat and ANSI. The RTA bands refer
to the 31- 1/3 octave bands displayed across the graphs. These bands can be
controlled as a group separately from the full range band.
When set to FLAT, the RTA bands will measure an unweighted response, and
ignores the setting of the weighting filter shown below.
When set to ANSI, the RTA bands will measure a weighted response as
specified by the weighting filter selected below.
pcRTA - User Manual
91
Chapter 5
Edit Menu
ANSI Filter
This list box provides six selections: Flat, ANSI-A, ANSI-B, ANSI-C, ANSI-D,
and ANSI-E. The Flat selection provides the ability to use the extra gain
block for measuring extremely low signal levels.
The response of the ANSI weighting filters is shown below. Filters A,B,C
were originally developed to simulate human hearing at various SPL levels
ranging from low (A) to high (C). The D and E filters were developed for
special acoustic testing relating to aircraft noise. All filters are designed for
a gain equal to 0dB at 1kHz.
15
ANSI Weighting Filter Response
dB
dB
15
10
10
ANSI-E
ANSI-D
5
5
ANSI-C
0
0
ANSI-B
-5
-5
-10
-10
ANSI-A
-15
-15
-20
-20
-25
20
92
Frequency
100
500
1k
Hz
5k
10k
-25
20k
pcRTA - User Manual
Chapter 5
Edit Menu
Type of Data
There are two possible choices: dBm, and SPL. The Type of Data
parameter is very important. When set to dBm, the analyzer
measures the simple voltage level of the selected input source
(0dBm=0.775Vrms). Even if the input is a microphone, the MDF data
is not used. The reading is exactly a measurement of the input source
voltage.
When set to SPL, the MDF data is used to produce a true SPL reading.
Sensitivity offset and microphone response correction is applied as
dictated in the loaded MDF mic setup. The pcRTA can measure very
accurate SPL levels with virtually any mic if correct MDF data is
loaded.
When the input is either the Line Output or Generator, both settings will
produce the same data values, since there are no MDF configurations applied
to these sources.
Dynamic Range Control
This group box allows you to select the dynamic range of the analyzer inputs.
In most cases the AutoRange selection can be used, and the analyzer will
automatically select the proper gain based on the amplitude of the input signal.
AutoRanging will produce an occasional pause in the measurements when the
input signal amplitude changes dramatically. The Fixed Range selections allow
you to manually lock the analyzer in a particular signal range. No AutoRanging
will be performed. If the input signal exceeds the selected range, an OVERLOAD indicator will flash on the graph. This means you will need to increase
the range setting or inaccurate measurements will result.
pcRTA - User Manual
93
Chapter 5
Edit Menu
Testing Mode
There are three basic types of testing modes which can be selected
when taking measurements: Continuous, Peak Hold, and Cycle Limit.
The edit box below is used to enter the number of measurement cycles
to execute when the Cycle Limit mode is chosen.
Continuous means that the measurements will continue as long as the
Run Test button in the Tool Bar is depressed. When the Stop Test button
is pressed, the last measurement data will be retained.
Peak Hold means that only the largest or peak values measured will be
retained after the measurement is stopped. When a measurement is
started by depressing the Run Test button in the Tool Bar, the data is
initialized. At the end of each averaging time period the new data is
compared with the previous values and updated if the value is higher.
When the measurement is stopped, the last values are retained.
Cycle Limit provides a finite number of measurement cycles. Each cycle is
one averaging time period. If 3 cycles are selected, with an averaging time
of 10 seconds, the measurement will last 30 seconds after which the Run
Test button will be automatically turned off, and the last data retained.
Measurement Data
This group box allows you to select the kind of measured data, whether it
be Absolute or Relative. Absolute data simply means that the values
displayed on the graph and stored in the library for the current data curve
entry will be the true dBm or dBspl values measured by the analyzer. This
is the normal operating mode. Relative data means that the displayed and
stored values for the data curve will be the difference in dB between the
actual measurements, and the previously measured values in a selected
curve entry of the curve library. The Relative mode is very useful when you
wish to show the changes between the current measurements being taken
in real-time, and a previously stored curve. This essentially normalizes all
new data to 0 dB if it has the same values as the previously stored relative
curve. The Relative curve to be used is selected in the list box below the
two mode selection buttons. This list box is disabled when the Absolute
mode is in use.
94
pcRTA - User Manual
Chapter 5
Edit Menu
OK
The OK button is common to most of the dialog boxes throughout the program.
Use this button when you wish to Exit and save any changes you have made in
the dialog box.
Cancel
The CANCEL button is common to most of the dialog boxes throughout the
program. Use this button when you wish to Exit and abort any changes you
have made in the dialog box.
Help
The Help button is common to most of the dialog boxes throughout the
program. Use this button when you wish to open the help system, and receive
information about this specific dialog box and its controls or parameters.
pcRTA - User Manual
95
Chapter 5
Edit Menu
96
pcRTA - User Manual
Chapter 5
Edit Menu
5.5 Control Panel - Impedance
This Control Panel menu option will be provided when the current library type
and measurement mode is Impedance. This control panel handles virtually all
aspects of the analyzer and software for standard impedance measurements.
This menu option can also be activated from the
tool bar and the DoubleClick zone in the graph
area under System.
The example here shows the various elements of
the Control Panel dialog box. The dialog box is
separated into several different regions. Each
region controls similar associated parameters.
For measuring impedance, two different test methods are provided: 2-wire, and 4-wire. The 2-wire
mode only uses the Line Output. The 4-wire mode
uses the Line Output and Line Input.
The 4-wire mode is more accurate and useful for
measuring low impedance, and removes the cable
resistance from the measurement. The wiring
methods for both modes is shown below.
4-WIRE
1/4 INCH PLUG
SHIELDED CABLE
LINE IN
TEST CLIPS
1/4 INCH PLUG
SHIELDED CABLE
LINE OUT
2-WIRE
TEST CLIPS
1/4 INCH PLUG
LINE OUT
pcRTA - User Manual
SHIELDED CABLE
97
Chapter 5
Edit Menu
Noise Generator
This group box controls whether or not the generator output will be turned
on automatically whenever a measurement is in progress. When this box
is checked, the Gen On button in the tool bar will automatically be
depressed whenever the Run Test button is depressed. When the manual
box is checked, the generator must be turned on by the user.
The noise signal for this test mode is fixed at Pink Noise, and the level is
preset to maximum output.
Averaging Time
There are several selections provided in this list box. The pcRTA performs
highly accurate true RMS averaging over time periods from 0.05 to 50
seconds. For typical measurements, an averaging time of 10 seconds
produces excellent results for Pink Noise. Shorter averaging times can be
used for less accurate but quicker measurement.
Testing Mode
There are three basic types of testing modes which can be selected when
taking measurements: Continuous, Peak Hold, and Cycle Limit. The edit
box below is used to enter the number of measurement cycles to execute
when the Cycle Limit mode is chosen.
Continuous means that the measurements will continue as long as the Run
Test button in the Tool Bar is depressed. When the Stop Test button is
pressed, the last measurement data will be retained.
Peak Hold means that only the largest or peak values measured will be
retained after the measurement is stopped. When a measurement is
started by depressing the Run Test button in the Tool Bar, the data is
initialized. At the end of each averaging time period the new data is
compared with the previous values and updated if the value is higher.
When the measurement is stopped, the last values are retained.
Cycle Limit provides a finite number of measurement cycles. Each cycle is
one averaging time period. If 3 cycles are selected, with an averaging time
of 10 seconds, the measurement will last 30 seconds after which the Run
Test button will be automatically turned off, and the last data retained.
98
pcRTA - User Manual
Chapter 5
Edit Menu
Impedance Test Method
There are two selections provided in this group box
which control the input source selection and testing
mode. Two different test methods are provided: 2wire, and 4-wire. The 2-wire mode only uses the Line
Output, and the 4-wire mode uses the Line Output and
Line Input.
OK
The OK button is common to most of the dialog boxes throughout the program.
Use this button when you wish to Exit and save any changes you have made in
the dialog box.
Cancel
The CANCEL button is common to most of the dialog boxes throughout the
program. Use this button when you wish to Exit and abort any changes you
have made in the dialog box.
Help
The Help button is common to most of the dialog boxes throughout the
program. Use this button when you wish to open the help system, and receive
information about this specific dialog box and its controls or parameters.
pcRTA - User Manual
99
Chapter 5
Edit Menu
100
pcRTA - User Manual
Chapter 5
Edit Menu
5.6 Control Panel - Reverb Time
This Control Panel menu option will be provided when the current library type
and measurement mode is Reverberation. This control panel handles virtually
all aspects of the analyzer and software for reverb time measurements.
This menu option can also be activated from the tool bar and the DoubleClick
zone in the graph area under System.
The example below shows the various elements of the Control Panel dialog
box. The dialog box is separated into several different regions. Each region
controls similar associated parameters.
Measuring reverberation can only be performed in relatively large rooms,
typically greater than 50,000 cubic feet (1,500 cubic meters). This would be a
room larger than 50ft x 50ft with a 20ft ceiling. Small rooms do not have enough
surface area and volume to produce high diffusion. In small rooms, all that can
be measured are standing wave patterns.
The process of measuring reverberation consists of detecting when the stimulus
noise has decayed by a finite amount, such as 60dB (RT60). The problem in
some rooms is that the background noise level may be quite high. This prevents
the decay time from being measured for typical RT60 values. Using less
demanding limits of RT40 or even RT20 can help solve the problem.
pcRTA - User Manual
101
Chapter 5
Edit Menu
Stimulus Time
This list box has several selections which can be used to control the length
of the stimulus time. The stimulus time is the amount of time that the
generator will be turned on to produce an output, and saturate the room
being tested. For very large rooms and auditoriums, several seconds of
stimulus time may be required before the room is fully saturated.
Output Level Edit Box
The desired output level from the generator Line Output is entered and
shown here. The value is in dBm (0dBm=0.775Vrms).
Due to the nature of linear DAC attenuators, the resolution of the setting
will depend on the value. At high values such as 0dBm, the resolution is
very fine. At low values such as -50dBm the resolution will be coarse.
However, by closing the dialog box and reopening it, the exact value used
will be displayed.
The minimum output value is approximately -62dBm, and the maximum
value will depend on the particular signal. Typical values are: pink noise
=2.6dBm, white noise =8.6dBm, and square wave =9.6dBm.
Output Level Increment/Decrement Buttons
These buttons will change the displayed output level value by 0.1dBm. If
the level reaches the maximum or minimum capable values, the level will
not change. These buttons are type-a-matic and can be held down to
continuously step the value.
st
Input Source
There are several selections provided in this list box which control the input
source selection for the analyzer measurement. Most of the selections are
clear and reflect the external connectors on the pcRTA connector box.
The Generator selection allows direct measurement of the signal/noise
generator. This selection will follow the programmed output level, but is
always ON regardless of the Gen On button.
102
pcRTA - User Manual
Chapter 5
Edit Menu
RT Test Limit
This group box handles the reverb time limits. The first three radio buttons
provide selection for either RT20, RT40, or RT60. These reflect the decay
threshold drop in dB. In some instances, background noise levels in a room may
be too high to permit RT60 measurements.
For example, assume that the background noise level in a room is 70dBspl. In
order to take an RT60 measurement, the stimulus test level would need to be
at least 60 dB higher, or 130dBspl. This is a very high SPL level, which may be
beyond the power capability of the audio speaker system to produce. In these
cases using a lower threshold such as RT40 or RT20 may be much more
practical. These would require a lower stimulus level, and the results can be
scaled accordingly to produce an estimate of the true RT60 value.
The Time Out parameter controls how long the system will wait for the
measurement level to decay to the RT threshold. If the SPL level never reaches
the RT limit after this amount of time, the measurement is concluded and the
resulting RT will be this timeout value.
Testing Mode
There are two basic types of testing modes which can be selected when taking
measurements: Continuous and Cycle Limit. The edit box below is used to
enter the number of measurement cycles to execute when the Cycle Limit
mode is chosen.
Continuous means that the measurements will continue as long as the Run Test
button in the Tool Bar is depressed. When the Stop Test button is pressed, the
last measurement data will be retained.
Cycle Limit provides a finite number of measurement cycles. Each cycle is one
averaging time period. If 3 cycles are selected, with an averaging time of 10
seconds, the measurement will last 30 seconds after which the Run Test button
will be automatically turned off, and the last data retained.
pcRTA - User Manual
103
Chapter 5
Edit Menu
OK
The OK button is common to most of the dialog boxes throughout the
program. Use this button when you wish to Exit and save any changes you
have made in the dialog box.
Cancel
The CANCEL button is common to most of the dialog boxes throughout
the program. Use this button when you wish to Exit and abort any changes
you have made in the dialog box.
Help
The Help button is common to most of the dialog boxes throughout the
program. Use this button when you wish to open the help system, and
receive information about this specific dialog box and its controls or
parameters.
104
pcRTA - User Manual
Chapter 5
Edit Menu
5.7 Control Panel - Noise Analysis
This Control Panel menu option will be provided when the current library type
and measurement mode is Noise Analysis. This is the largest control panel in
the system, and handles virtually all aspects of the analyzer and software for
complex noise analysis measurements.
The Noise Analysis mode provides recording of the measured levels in all bands
over a specific run of time. The time can range from only a few seconds to many
hours. Unlike the other measurement modes where the analyzer is started and
stopped randomly by the user, the NA mode has a specific run length where
the analyzer is started and stopped automatically. However, the measurement
process can be paused and resumed during the run by the user. The run may
also be aborted.
This menu option can also be activated from the tool bar and the DoubleClick
zone in the graph area under System.
The example below shows the various elements of the Control Panel dialog
box. The dialog box is separated into several different regions. Each region
controls similar associated parameters.
pcRTA - User Manual
105
Chapter 5
Edit Menu
Automatic On/Off
This check box controls whether or not the generator output will be turned
on automatically whenever a measurement is in progress. When this box
is checked, the Gen On button in the tool bar will automatically be
depressed whenever the Run Test button is depressed. In most NA
measurements the internal generator is not used.
Noise/Signal Selection
This list box provides selection for Pink Noise, White Noise, and square
waves at the 31 ISO standard center frequencies. The period cycle time
of the noise spectrums are 2.0 seconds, and the accuracy of the square
wave frequencies is typically ±0.5%.
Output Level Edit Box
The desired output level from the generator Line Output is entered and
shown here. The value is in dBm (0dBm=0.775Vrms). Regardless of the
type of output signal, the system correctly outputs this level in dBm.
Due to the nature of linear DAC attenuators, the resolution of the setting
will depend on the value. At high values such as 0dBm, the resolution is
very fine. At low values such as -50dBm the resolution will be coarse.
However, by closing the dialog box and reopening it, the exact value used
will be displayed.
The minimum output value is approximately -62dBm, and the maximum
value will depend on the particular signal. Typical values are: pink noise
=2.6dBm, white noise =8.6dBm, and square wave =9.6dBm.
Output Level Increment/Decrement Buttons
These buttons will change the displayed output level value by 0.1dBm. If
the level reaches the maximum or minimum capable values, the level will
not change. These buttons are type-a-matic and can be held down to
continuously step the value.
106
pcRTA - User Manual
Chapter 5
Edit Menu
ANSI Weighting Filter
This list box provides six selections: Flat, ANSI-A, ANSI-B, ANSI-C, ANSI-D,
and ANSI-E. The Flat selection provides the ability to use the extra gain
block for measuring extremely low signal levels.
The response of the ANSI weighting filters is shown on the following
page. Filters A, B, and C were originally developed to simulate human
hearing at various SPL levels ranging from low (A) to high (C). The D and
E filters were developed for special acoustic testing relating to aircraft
noise. All filters are designed for a gain equal to 0dB at 1kHz.
Full Band Response
This group box provides three selections: Flat, ANSI, and Sum. The full band is
the band displayed at the left of the graph, and represents a full range frequency
response, rather than a 1/3 octave RTA band response. This band can be
controlled separately from the 1/3 octave bands.
When set to FLAT, the Full Band will measure an unweighted response, and
ignores the setting of the weighting filter shown above. This selection includes
frequency content below 20Hz and above 20kHz. In this mode the correction
curve provided by any MDF file which has been loaded will not be included in
the measured Full Band level.
When set to ANSI, the Full Band will measure a weighted response as specified
by the weighting filter selected below. This selection includes frequency
content below 20Hz and above 20kHz, as allowed by the selected ANSI filter.
In this mode the correction curve provided by any MDF file which has been
loaded will not be included in the measured Full Band level.
When set to SUM, the Full Band will measure the total RMS sum of all the
1/3 octave bands. This selection only includes frequency content between
20Hz-20kHz, and will follow the filtering selected for the RTA bands, and not
the Full Band. In this mode the correction curve provided by any MDF file which
has been loaded will be included in the measured Full Band level.
pcRTA - User Manual
107
Chapter 5
Edit Menu
RTA Bands Response
This group box provides two selections: Flat and ANSI. The RTA bands refer
to the 31- 1/3 octave bands displayed across the graphs. These bands can
be controlled as a group separately from the full range band.
When set to FLAT, the RTA bands will measure an unweighted response,
and ignores the setting of the weighting filter shown above.
When set to ANSI, the RTA bands will measure a weighted response as
specified by the weighting filter selected below.
Type of Data
There are two possible choices: dBm, and SPL. The Type of Data parameter
is very important. When set to dBm, the analyzer measures the simple
voltage level of the selected input source (0dBm=0.775Vrms). Even if the
input is a microphone, the MDF data is not used. The reading is exactly a
measurement of the input source voltage.
When set to SPL, the MDF data is used to produce a true SPL reading.
Sensitivity offset and microphone response correction is applied as dictated in the loaded MDF mic setup. The pcRTA can measure very accurate
SPL levels with virtually any mic if correct MDF data is loaded.
When the input is either the Line Output or Generator, both settings will
produce the same data values, since there are no MDF configurations
applied to these sources.
Run Time
There are three radio buttons for selection of the base time unit as seconds,
minutes, or hours. The edit box allows you to enter the numeric value of
the total run time.
108
pcRTA - User Manual
Chapter 5
Edit Menu
Input Source
There are several selections provided in this list box which control the input
source selection for the analyzer measurement. Most of the selections are clear
and reflect the external connectors on the pcRTA connector box.
The Generator selection allows direct measurement of the signal/noise generator. This selection will follow the programmed output level, but is always ON
regardless of the Gen On button. The multimic mode is not possible in the NA
mode due to timing requirements.
Detector
This group box provides four selections for the time weighting or averaging of
the measured data. The detector values follow the requirements of ANSI S1.41983 etc. The Peak selection provides the fastest measured response, and
provides nominally 20 updates per second. The Fast selection is an exponential
time average of 125mS, and also provides 20 updates per second. The Slow
selection is an exponential time average of 1000mS, and provides 1 update per
second. The Leq selection provides linear RMS time averaging with a period
of 1 second, and updates of 1 second.
Dynamic Range Control
This group box allows you to select the dynamic range of the
analyzer inputs. In the NA mode no autoranging is possible due
to timing requirements. Each range provides 80dB of measurement capability. If an overrange condition occurs during the NA
run, the run will be aborted and an error meassge will appear. The
run will need to be restarted using a higher range. In order to
determine the best range some initial measurements should be
taken prior to starting the run.
pcRTA - User Manual
109
Chapter 5
Edit Menu
Offset Adjustments
For many types of environmental acoustical noise measurements, an
adjustment offset is applied to the data for various portions of time. Three
different offset periods can be defined using the features in this group box.
The features and descriptions of each offset period are identical.
The check box is used to enable/disable the offset, and the value of the
offset is entered in the edit box which follows. The next two edit boxes
specify the starting and ending times for which the offset is to be applied.
For example, a starting time of 0.0 means the offset will be applied from the
start of the run, and a value of 1.5 means that the offset will begin 1.5 time
units after the run is started. An ending time of 3.2 means that the offset
will be dropped after 3.2 time units from the beginning of the run.
OK
The OK button is common to most of the dialog boxes throughout the
program. Use this button when you wish to Exit and save any changes you
have made in the dialog box.
Cancel
The CANCEL button is common to most of the dialog boxes throughout
the program. Use this button when you wish to Exit and abort any changes
you have made in the dialog box.
Help
The Help button is common to most of the dialog boxes throughout the
program. Use this button when you wish to open the help system, and
receive information about this specific dialog box and its controls or
parameters.
110
pcRTA - User Manual
Chapter 5
Edit Menu
5.8 Graph Setup - Amplitude
This dialog box provides control over the appearace of the graphs in the
amplitude mode. There are three graphs used in the amplitude mode: Bar
Graph, Line Graph, and Text Chart.
pcRTA - User Manual
111
Chapter 5
Edit Menu
Bar Graph Display
The bar graph display provides the traditional method of RTA
data display. This graph can display multiple library curves in
a variety of different formats. Fully adjustable scale factors,
resolution and dynamic range are provided, including control
over the number of major and minor divisions.
Scale Top Value, dB/Div, Scale Type
The edit box is used to set the scale value at the top of the grid. The
increment and decrement buttons can be used to change the value in steps
of dB/Div. The dB/Div list box provides a wide selection of possible
resolutions for the major divisions. The type parameter controls how the
scale will be drawn. In the Absolute mode, the scale is drawn normally with
the largest value at the top, progressing to the smallest value at the bottom.
In the Relative mode, the center of the scale range is marked with the
absolute value, but the scale values given above or below this are derived
as relative offsets from this center value.
Major/Minor Divisions
These parameters refer to the number of major and minor division lines
used in the vertical graph grid.
Graph Bars
These parameters control the appearance of the actual bars. However, this
data is only used if a single library data curve is selected for display. For
multiple curve display, the colors assigned in the Global Graph Design will
be used for the bars as a set. The list box provides a variety of different
display options for the bars.
Data Display Format
These controls handle the display of data on the graphs. The Full Range
check box controls the display of the Full Range Band on the graph. When
checked, the full range band is displayed. When not checked, only the RTA
bands will be displayed in the grid, and the Full Range level will appear in
the upper left hand corner of the graph as a text value. This only affects 1/
3 octave or 1 octave multi band display. The next three radio buttons
provide selection for either 1/3 octave, 1 octave, or single band display. If
single band display is selected, the band to be displayed is chosen in the
list box below.
112
pcRTA - User Manual
Chapter 5
Edit Menu
Line Graph Display
The line graph display provides an improved method of data
display over the traditional RTA bar graph display. This graph
can display multiple library curves in a clearly visible fashion.
Fully adjustable scale factors, resolution and dynamic range
are provided, including control over the number of major and
minor divisions. Many different grid designs are also possible.
Scale Top Value, dB/Div, Scale Type
The edit box is used to set the scale value at the top of the grid. The increment
and decrement buttons can be used to change the value in steps of dB/Div. The
dB/Div list box provides a wide selection of possible resolutions for the major
divisions. The type parameter controls how the scale will be drawn. In the
Absolute mode, the scale is drawn normally with the largest value at the top,
progressing to the smallest value at the bottom. In the Relative mode, the center
of the scale range is marked with the absolute value, but the scale values given
above or below this are derived as relative offsets from this center value.
Major/Minor Divisions
These parameters refer to the major and minor division lines used in the vertical
graph grid.
Length of Hash/Dot
The graph grids contain small hash marks and dots which are used to indicate
the minor divisions between major divisions. These parameters control the
length of the hash and dot markers. If both lengths are set to zero, than the
minor divisions are drawn as solid lines. The line lengths are entered in mils (1/
1000 of an inch).
Data Display Format
These controls handle the display of data on the graphs. The Full Range check
box controls the display of the Full Range Band on the graph. When checked,
the full range band is displayed. When not checked, only the RTA bands will
be displayed in the grid, and the Full Range level will appear in the upper left
hand corner of the graph as a text value. This only affects 1/3 octave or 1 octave
multi band display. The next three radio buttons provide selection for either 1/
3 octave, 1 octave, or single band display. If single band display is selected, the
band to be displayed is chosen in the list box below.
pcRTA - User Manual
113
Chapter 5
Edit Menu
Reference Curves
This group box contains selections for various reference curves. Reference
curves are lines drawn on the Bar and Line graphs which allow you to
compare your measurements directly with those of standard reference or
alignment curves. Whether or not the curves actually appear on the grid,
will depend on the current position of the scale, and the values of the
reference curve. For example, if the reference curve has values in the 0dB
range, and the current scale is in the 100dB range, the reference curve will
not be visible since it would be far below the graph.
114
pcRTA - User Manual
Chapter 5
Edit Menu
Text Chart Display
The text chart display is used in the amplitude measurement mode to display
the data in a text format. Each text readout is provided in a rectangular box with
a title. The number of boxes will depend on the graphics display mode: 1/3
octave, 1 octave, or single band.
The text chart mode provides a means of very high precision display in 0.1dB
resolution. The values are displayed directly, and do not have to be interpreted
from the position of bars or curves on a grid.
The single band mode is also very useful for reading the screen from a far
distance. In this mode, any band can be selected for single display.
As with all of the display graphs the user has a high degree of control over many
of the artwork elements including fonts and color selections. The group box
shown here displays the various parameters for the text chart display.
Color Buttons
In many locations of the dialog box, small rectangular color patches are shown.
These are actually active buttons, and will respond to a mouse click. When the
mouse is clicked on one of these color pads, a color selection dialog box will
appear to select or change the color.
Font Buttons
In the lower left hand corner of the dialog box, a vertical array of rectangular
buttons is provided. Pressing one of these buttons will bring up a font selection
dialog box for changing the font parameters. A separate color pad is also
provided for changing the color directly.
pcRTA - User Manual
115
Chapter 5
Edit Menu
Box Background
This color pad allows selection of the color to be used for the rectangular
boxes which are used to display the text readouts.
Box Frame Line
Each readout box has a border which can be controlled with this parameter. The color pad is used to select the color, and the edit box is used to
enter the line width in mils (1/1000 of an inch).
Data Display Buttons
These controls handle the display of data on the Text Chart. The three radio
buttons provide selection for either 1/3 octave, 1 octave, or single band
display. If single band display is selected, the band to be displayed is
chosen in the list box below. In 1/3 Octave mode, there will be 32 boxes
in the chart with data from each of the 32 bands displayed in them. In 1
Octave mode, there are 11 boxes. In Single Band mode only one box is
displayed unless the MultiMic input mode is selected and set for multiplex
mode, then 4 boxes are displayed, one for each mic input.
116
pcRTA - User Manual
Chapter 5
Edit Menu
5.9 Graph Setup - Impedance
This dialog box provides control over the appearace of the graph in the
impedance mode. There is only a single line graph for the impedance mode.
Scale Control
The text box displays the value at the top of the graph.
Since the impedance graph is a log-log grid, the top
value follows a 1-2-5 sequence. The increment and
decrement buttons can be used to change the value in
the 1-2-5 steps. The list box provides selection of the
number of vertical cycles.
Length of Half Division Dots
The graph grid contains small hash marks or dots which
are used to indicate the minor divisions between major
divisions. This parameter controls the length of the dot
markers. If the length is set to zero, than the minor
divisions are drawn as solid lines. The line lengths are
entered in mils (1/1000 of an inch).
pcRTA - User Manual
117
Chapter 5
Edit Menu
118
pcRTA - User Manual
Chapter 5
Edit Menu
5.10 Graph Setup - Reverb Time
This dialog box provides control over the appearace of the graphs in the reverb
mode. There are two line graphs for the reverb mode: Reverb Time, and Decay
Time.
pcRTA - User Manual
119
Chapter 5
Edit Menu
Reverb Time Graph
This graph displays the time required in each band to fall
to the selected RT20, RT40, or RT60.
Scale Control
The Value at Top text box is used to display the reverb
time scale value at the top of the grid. Because of the
nature of log grids, this parameter cannot be edited
directly but must be changed using the increment decrement buttons. The vertical scale may be log or linear,
depending on the selection from the control panel.
In the log mode, the increment and decrement buttons are used to change
the value in a 1-2-5 sequence. The Cycles list box provides selection for the
total number of vertical log cycles.
In the linear mode, the number of seconds per division is produced
automatically since the bottom of the scale must be zero.
Major/Minor Divisions
These two parameters determine the number of major and minor divisions
when a linear vertical scale is used.
Length of Hash/Dot
The graph grids contain small hash marks and dots which are used to
indicate the minor divisions between major divisions. These parameters
control the length of the hash and dot markers. If both lengths are set to
zero, than the minor divisions are drawn as solid lines. The line lengths are
entered in mils (1/1000 of an inch).
120
pcRTA - User Manual
Chapter 5
Edit Menu
Decay Time Graph
This graph displays the actual decay vs. time in each of the
bands. The decay plots have many curves since there is
a set of 32 possible curves for each displayed library
entry. The Decay Band Display group box provides
control over these individual bands and how they are
displayed.
Scale Control
The text box shows the value at the top of the grid. The
increment and decrement buttons can be used to change
the value in steps of dB/Div. The dB/Div list box provides a wide selection of
possible resolutions for the major divisions. The Horizontal Time Scale edit box
sets the maximum range of the horizontal time axis in seconds. The beginning
value at the left of the axis is always zero.
Major/Minor Divisions
These four parameters determine the number of major and minor divisions for
both the vertical and horizontal axis.
Decay Band Display
Each of the 32 check boxes in the upper array of the group box enable or
disable the display of individual bands. The two buttons All On and All Off
can be used to change all the bands status at one time. The last check box
allows the use of curve entry color coding (off), or rainbow color coding (on)
for the bands. When off, the color used for all bands will be that of the
assigned global curve entry color. When on, the band colors of any
displayed curve entries will all have the same rainbow color sweep.
pcRTA - User Manual
121
Chapter 5
Edit Menu
Reference Curve
This group box contains selections for the standard theater RT reference
curve. The room volume can be entered in either cubic feet or cubic
meters, using the appropriate radio buttons. The reference curves will
appear on the Reverb Time Graph.
122
pcRTA - User Manual
Chapter 5
Edit Menu
5.11 Graph Setup - Noise Analysis
This dialog box provides control over the appearace of the graphs used in the
Noise Analysis mode. There are five line graphs and one text chart in the NA
mode: Amplitude Time, Probability Distribution, Cumulative Distribution, 3DFrequency Perspective, 3D-Time Perspective, and the Statistical Analysis Chart.
pcRTA - User Manual
123
Chapter 5
Edit Menu
Amplitude Time Graph
This graph displays amplitude measured in each band
vs. time. There are a large number of possible curves
in the plot, since each library entry displayed can
contain up to 32 curves.
dB Scale Control
The Value at Top text box is used to display the vertical
dB scale value at the top of the grid. The increment and
decrement buttons can be used to change the value in
steps of dB/Div. The dB/Div list box provides a wide
selection of possible resolutions for the major divisions.
Time Scale Control
The three radio buttons provide time base unit selections of seconds (S),
minutes (M), and hours (H). The two edit boxes control the start and ending
time limits for the graph display grid.
Major/Minor Divisions
These four parameters determine the number of major and minor divisions
for both the vertical and horizontal axis.
124
pcRTA - User Manual
Chapter 5
Edit Menu
Probability Distribution Graph
This graph displays the probability in % of a given dB
value occuring in the selected class intervals. This
graph can have many curves since there is a set of 32
possible curves for each displayed library entry.
dB Scale Control
The Value at Top text box is used to display the vertical
dB scale value at the top of the grid. The increment and
decrement buttons can be used to change the value in
steps of dB/Div. The dB/Div list box provides a wide
selection of possible resolutions for the major divisions.
Percent Scale Control
The upper list box provides a wide range of selections for the class interval. The
pcRTA has a maximum class resolution of 0.25dB. The lower list box allows you
to choose the maximum range for the horizontal axis.
Major/Minor Divisions
These four parameters determine the number of major and minor divisions for
both the vertical and horizontal axis.
pcRTA - User Manual
125
Chapter 5
Edit Menu
Cumulative Distribution Graph
This graph displays the cumulative probability measured for each band. There are a large number of
possible curves in the plot, since each library entry
displayed can contain up to 32 curves.
dB Scale Control
The Value at Top text box is used to display the vertical
dB scale value at the top of the grid. The increment and
decrement buttons can be used to change the value in
steps of dB/Div. The dB/Div list box provides a wide
selection of possible resolutions for the major divisions.
Major/Minor Divisions
These four parameters determine the number of major and minor divisions
for both the vertical and horizontal axis.
126
pcRTA - User Manual
Chapter 5
Edit Menu
3D-Perspective Graphs
This group box provides display control for the two
frequency and time 3D graphs. Full control is provided
for viewing the graphs from all possible sides, which
adjustable start and end time ranges.
dB Scale Control
The Value at Top text box is used to display the vertical
dB scale value at the top of the grid. The increment and
decrement buttons can be used to change the value in
steps of dB/Div. The dB/Div list box provides a wide
selection of possible resolutions for the major divisions.
Time Scale Control
The three radio buttons provide time base unit selections of seconds (S), minutes (M), and hours (H). The
two edit boxes control the start and ending time limits
for the graph display grid.
Major/Minor Divisions
These four parameters determine the number of major and minor divisions for
both the vertical and horizontal axis.
Wire frame, Solid surface, Forward/Reverse View
The wire frame selection will draw the 3D plots using only lines, while the solid
surface selection will draw the plots using polygon surfaces. The forward and
reverse selections allow you to view the 3D plot from either side.
pcRTA - User Manual
127
Chapter 5
Edit Menu
Statistics / Occupational Noise
This group box provides control over the generation of
the last column value in the Statistical Analysis chart.
For ISO, OSHA, and DOD selections, the threshold
and Q values are predefined and fixed. Using the
Other selection, you may enter your own customer
threshold and Q halving factor values. The data
generated in the last column of the chart will follow the
criteria selected here.
Band Display
Each of the 32 check boxes in the upper array of the group box enable or
disable the display of individual bands. The two buttons All On and All Off
can be used to change all the bands status at one time. The last check box
allows the use of curve entry color coding (off), or rainbow color coding
(on) for the bands. When off, the color used for all bands will be that of the
assigned global curve entry color. When on, the band colors of any
displayed curve entries will all have the same rainbow color sweep.
128
pcRTA - User Manual
Chapter 5
Edit Menu
5.12 Notes / Comments
The Notes and Comments menu option will open a dialog box which allows
you to enter notes and comments to be included on the graphs. There are eight
comment lines provided which will appear on each graph. The user can use
these comment lines to include additional information about the measurements, or any other additional information desired. The notes are saved in each
curve library.
It should also be noted that the editing box can also be activated one a single
line basis by using the DoubleClick zone in the Note region of the graph.
Comment Lines 1-8
Each of the eight lines provide approximately 40-60 characters of space for text
comment strings. Depending on the size and type of font used, the actual
display space may be different. It is up to the user to determine how much text
can be placed on a line, before the line length may overrun the available display
space.
pcRTA - User Manual
129
Chapter 5
Edit Menu
130
pcRTA - User Manual
Chapter 5
Edit Menu
5.13 Microphone Setup
The pcRTA system uses a Microphone Data Format (MDF) to provide the
necessary sensitivity and response curve information about a given microphone. The data contained in the MDF file contains all relevant information
about the microphone's electrical/acoustical performance, and other very
useful documentation information. This menu function loads the MDF data into
the software.
If you purchased M50 series mics with the analyzer, MDF files were provided
with them. The MDF files should be in the pcRTA subdirectory for your
particular microphone(s) serial number(s) if you followed the instructions
during the installation of the pcRTA software.
The pcRTA analyzer has five inputs; four Mic Inputs, and 1 Line Input. Each of
these inputs can be configured for an individual MDF file. Since every
microphone has unique characteristics which differ from others, the mic which
is setup for a specific input should always be used with that particular input.
pcRTA - User Manual
131
Chapter 5
Edit Menu
Load Mic Data File
This button starts the process of loading
an MDF file. After this button is pressed,
another dialog box will be presented for
selecting the MDF file. After the MDF file
is selected, the data will be scanned and
converted into the necessary calibration
information required by the pcRTA.
132
pcRTA - User Manual
Chapter 5
Edit Menu
Edit
This button opens another dialog box which
allows the user to manually enter/edit the
actual mic/line input error data used internally by the system to calibrate SPL levels.
This function can be used to create a custom
calibration or offset for special purposes, or to
modify the corrections produced from the
import of an MDF file. If MDF editing is the
intended purpose, the MDF file must first be
imported prior to editing the data. (Note: This
function does not create MDF files which are
entirely different.)
It is important to remember that the values
entered here represent error values, and are
subtracted from the measured data. For
example, to raise a measurement by 10dB, 10 would be entered here as the dB error
value. Also, these input corrections are of
course only applied when the SPL mode is in
use, and not in the dBm mode.
The dBspl and dBm values are used to produce a general offset which is applied equally
to all of the bands. The actual values for the
individual parameters (dBspl,dBm) are not
really important, since only the difference between these two is used to scale
the bands. For example, 90dBspl/-40dBm is equivalent to 70dBspl/-60dBm,
etc. Both will raise the readout level by 130dB. The difference between the two
is the important value.
The name and identification fields are also provided here for editing. These
should be modified with new labels or names which will be meaningful to the
user as reference purposes to identify what the new or modified data represents.
Pressing Ok will keep your changes, while pressing Cancel will abort any data
changes.
pcRTA - User Manual
133
Chapter 5
Edit Menu
Clear
This button will clear the information currently assigned to the input, and initialize
all parameters to zero.
Data Fields
There are several data fields shown in the
dialog box. These data fields reflect the
information read from the MDF file. The
Response Errors list box shows the errors
developed from the frequency response
data provided in the MDF file. The inverse
of these values will be subtracted from the
measurements to produce corrected data.
The microphone response data within the MDF file represents the true
response based on a high resolution swept sine wave measurement. It is
not merely 1/3 octave band data. The scanning process reads this data and
constructs a full frequency response curve from 10Hz-40kHz, regardless of
the frequency range covered in the MDF data. Interpolation and extrapolation is automatically used as needed.
Using this response curve, a weighting function representing the 2nd order
bandpass response of the RTA band filters is multiplied, and the result
integrated on a log frequency basis for each frequency band. Individual
error corrections for each band are then produced, relative to a pink noise
spectrum.
134
pcRTA - User Manual
Chapter 5
Edit Menu
Installing Multiple Microphones
If you have multiple mics to install, simply repeat the same process for the other
inputs as well. Since each input is configured for a specific mic, you will need
to keep track of which mics have been setup for which inputs. The mics should
always be used on the inputs for which they have been configured. This
provides for very high accuracy in SPL measurements.
Note- If you ever forget which mics are setup for which inputs, just check the
Microphone Setup dialog box for the inputs. The parameter fields include a serial
number that shows what MDF file was loaded for that input.
Using the same MDF on Multiple Inputs
If you have a single microphone, and wish to use it on different inputs, you can
of course setup the same MDF on more than one input. There is really no
difference between any of the inputs, but if you would like to use the same mic
on more than one input, this can be done.
Creating MDF files for other Microphones
In order to setup other brands of microphones, you will need to construct your
own MDF file for that microphone. The MDF format is a simple ASCII file, which
can be created with any standard text editor or word processing program. The
MDF file structure is described on the following page.
It should also be noted that the system allows you to setup a mic on the Line
Input. This will probably be the input source for a third party mic, since an
external preamp will likely be used. As an alternative, a special XLR connector
could also be wired to drop the +10V (pin 3) line of a mic input. Many other
mics/preamps would not necessarily use this voltage.
pcRTA - User Manual
135
Chapter 5
Edit Menu
MDF File Structure
The listing below shows an example of the lines in an MDF file. The first
line must start with MDF. The next seven lines are key words with equal
signs, followed by a parameter. The key words must be the same as shown
here, but they are not case sensitive. Most of the first five lines are selfexplanatory, and can contain any information you desire for documentation purposes.
The dBspl is the acoustic reference level, used to produce the dBm
electrical reference output level from the microphone. These two parameters define the sensitivity of the microphone. The next line reflects the
number of response data points given in the file.
MDF (Microphone Data File) Format
Author=LinearX Systems Inc
Date=Jul 13,1994 Wed 1:43AM
Model=M51
Serial=123456
dBspl= 94.00
dBm= -40.40
Points=552
Index
Freq(Hz)
dB
Deg
1
10.15
0.34
60.95
2
10.31
0.23
59.72
3
10.46
0.27
58.42
4
10.62
0.22
57.12
5
10.78
0.31
55.82
...
...
...
542
34414.88
0.73
77.30
543
34935.87
0.76
76.94
544
35464.76
0.79
76.57
545
36001.64
0.73
76.30
546
36546.66
0.68
76.03
547
37099.93
0.62
75.76
548
37661.57
0.65
75.31
549
38231.73
0.67
74.86
550
38810.50
0.70
74.37
551
39398.03
0.72
73.88
552
39994.48
0.72
73.58
End
136
Any number of points can be used, but there
should be at least three points in the range of
10Hz to 40kHz. For example, simple response curves representing no correction
could consist of merely three data points at
100Hz, 1kHz, and 10kHz all with 0db.
The next line must be included to hold the
column titles Index Freq etc...
The response data points consist of rows with
four data columns. The first column is the
point index, then the frequency of the point,
the amplitude error in dB, and last the phase
error in degrees.
The last line of the file is simply End.
The phase data is not used by the pcRTA and
can be a column of zeros. It is described and
included here simply as a complete format
which may be used by other analyzers performing phase correction as well.
It is typical for the response curve to be
normalized to a level of 0dB at 1kHz.
pcRTA - User Manual
Chapter 5
Edit Menu
5.14 MDF Convert
The MDF Convert option provides the means to convert the default on-axis
MDF microphone response files, into their equivalent random pressure response files. By default, all MDF files produced by LinearX are calibrated for onaxis free-field response. This type of calibration is utilized when the mic is
directly on-axis with the sound source. However, for reverberant field measurements or for other applications where the sound source is not localized, a
random pressure measurement is typically performed. In this case the mic is
generally pointed upwards, and the calibration data is referenced to a 90 degree
off-axis type measurement.
After selecting the MDF Convert menu option, you will be prompted to choose
the MDF file you wish to convert. The default path is the program sub-directory,
where the MDF files are typically located. The source MDF file will be of the
form "SNnnnnnn.MDF", where nnnnnn is the 6 digit serial number of the mic.
The converted output file will be placed into the same sub-directory and have
a new name of the form "SRnnnnnn.MDF", where the SN has been replaced by
SR (meaning random calibration). This makes it easy to tell the original on-axis
MDF file from the new random MDF file of the same serial number.
If you are using multiple microphones for
spatial averaging, you will need to convert
the MDF file for each microphone to be
used.
After you have converted the MDF file(s) as
needed, you can load these in the usual
manner via the Microphone Setup / Load
MDF File menu option. You will of course
want to load the SR MDF file name(s),
rather than the SN file name(s).
The MDF Convert option can only be used
with MDF files generated for LinearX microphones. The convert routine checks the
model name (M31,M51,M52,M53) and
appropriately applies the correct transfer
function to produce the new random calibration data. This function will not
work for MDF files created by the user to represent other 3rd party microphones.
pcRTA - User Manual
137
Chapter 5
Edit Menu
138
pcRTA - User Manual
Chapter 5
Edit Menu
5.15 Global Graph Design
This dialog box provides many controls which determine the global characteristics of all graphs used throughout the program. The features and parameters
set in this dialog box will be applied to all graphs. As with all of the display graphs
the user has a high degree of control over many of the artwork elements
including fonts and color selections.
pcRTA - User Manual
139
Chapter 5
Edit Menu
Color Buttons
In many locations of the dialog box, small rectangular color patches are
shown. These are actually active buttons, and will respond to a mouse click.
When the mouse is clicked on one of these color buttons, a color selection
dialog box will appear to select or change the color.
Font Buttons
In the lower left hand corner of the dialog box, a vertical array of rectangular
buttons is provided. Pressing one of these buttons will open a font
selection dialog box for changing the font parameters. A separate color
pad is also provided for changing the color directly.
Frame Selection Parameters
This group of fields control parameters which affect the
overall design of the graphs or charts.
Main Background
This color pad allows selection of the color to be used for
the background of the graph.
Large Frame Line
The main boarder around the graph is the large frame line.
The color pad is used to select the color, and the edit box
is used to enter the line width in mils (1/1000 of an inch).
Small Frame Line
The inner portion of the graph is divided into different areas with a smaller
frame line. The color pad is used to select the color, and the edit box is used
to enter the line width in mils (1/1000 of an inch).
Note Guide Line
The note area has eight possible text lines. This parameter controls the
characteristics of the lines used to underline these text notes. The color pad
is used to select the color, and the edit box is used to enter the line width
in mils (1/1000 of an inch).
140
pcRTA - User Manual
Chapter 5
Edit Menu
Grid Selection Parameters
This group of fields control parameters which
affect the grid data display area of the graphs.
Grid Background
This color pad allows selection of the color to be
used for the background behind the bar grid.
Note- If your system uses 256 colors or less (palette
color), then choosing a black background is recommended. In color limited systems, the animation process may not be able to correctly represent
the selected color.
Grid Frame Line
This parameter refers to the border of the inner grid of the graph. The color pad
is used to select the color, and the edit box is used to enter the line width in mils
(1/1000 of an inch).
Major Div Line
This parameter refers to the major division lines used in the graph grid. The color
pad is used to select the color, and the first edit box is used to enter the line width
in mils (1/1000 of an inch). The second edit box is used to set the number of
major divisions, and must be greater than 0.
Minor Div Line
This parameter refers to the minor division lines used in the graph grid. The
color pad is used to select the color, and the first edit box is used to enter the
line width in mils (1/1000 of an inch). The second edit box is used to set the
number of minor divisions, and must be greater than 0.
pcRTA - User Manual
141
Chapter 5
Edit Menu
Line Color/Style Selection Parameters
This group of fields control parameters which affect the color and line style
of curve data, reference curves, and 3-D graph lines.
Curve Color and Line Controls
These parameters control the appearance of the data curve lines displayed
on the grid. They are selected and assigned by curve library entry through
the list box shown here above. The controls following the list box display
the color, line width, and line style for the selected curve.
After selecting a curve, the attributes will be updated and displayed for that
curve. These parameters can be changed as desired for each curve.
Note- the Windows 3.1 GDI only supports solid line styles of specific line
widths. Dot or Dash type line styles will appear on the screen as only 1 pixel
wide. However, if you are printing to a PostScript printer they will be printed
correctly with the full line width.
142
pcRTA - User Manual
Chapter 5
Edit Menu
Font Selections
This array of parameters is used to control the appearance and selection of fonts
used in the graphs.
Most of the parameters are self-explanatory, and the text items are displayed
on the selection buttons themselves.
The first column provides an array of buttons which display the text items which
are controlled. Pressing one of the buttons will open a font selection dialog box.
The TypeFace column shows the typeface currently assigned to each text item.
The Style column shows the font style currently assigned to each text item. The
Size column shows the font size in points currently assigned to each text item.
The Color column shows the font color currently assigned to each text item.
These color pads can also be used to change the color.
pcRTA - User Manual
143
Chapter 5
Edit Menu
Color Selection
When a color pad is clicked by the mouse, this dialog box will
appear to select a new color. Full support for true 24 bit color
is provided, along with convenient handling of dithered or
solid palette color.
At the top of the dialog box, a large sample is shown of the
currently selected color. Below this, the number of currently
available colors in the system is given. This is controlled by
your video system.
The check box for Solid Color controls the use of dithered
colors. The three scroll bars below are used to mix the
primary Red, Green, Blue components. If your system has
more than 256 colors, all colors will be solid regardless of the
check box.
Font Selection
When a font selection button is clicked by
the mouse, this dialog box will appear to
select the desired font. This dialog box
allows selection of the typeface, size, style,
and color to be used for the font.
Only vector type fonts will appear in the list.
These are generally TrueType or Adobe
fonts. A sample of the type as it will appear
is provided in another window just below.
The type of font is also shown in a text box
at the top.
Choosing a font and its size is completely
up to the user. It is certainly possible to
select a font and/or its size that is too large
for the available space in the graphics. However, with a little experimentation you will quickly see what is possible and what will actually work. The
program positions text items automatically either left, right or center
justified depending on the particular item. By changing the size of a font
you can easily see how the program will justify the text.
144
pcRTA - User Manual
Chapter 5
Edit Menu
5.16 System Options
This dialog box provides several selections to control various system wide
features and parameters.
Tool Box
The Tool Box type and position can be selected using the radio
buttons in this group box. The Floating selection provides a tool
box that can be dragged anywhere on the screen, and floats on
top of the other graph windows. The Fixed selections lock the
Tool Box along one of the four edges of the frame window.
Depending on the resolution of your display, it is possible that
all of the buttons may not be able to fit across the screen for
some of the selections. Choose an appropriate selection for
your purposes and screen resolution.
Artwork View
The artwork board in each graph can be sized differently using
one of the two selections in this group box. The Full Graph
selection makes all of the artwork features visible including the
lower regions of the graphs containing the Curve Legend,
System, and Note/Comment areas. The Data Area selection
adjusts the graph size to show the graph grid area only in the window view. This
mode is helpful if your display resolution is limited.
Window Update
This group box controls the redraw behavior of the graph windows. In the
Single Mode, only the window which has the current focus will be updated or
redrawn. In the Multi Mode all of the currently visible windows will be redrawn
or updated.
Cursor Control
This group box controls the appearance of the data cursor. Several different
bitmap selections are provided, and the blink rate can be set to several different
speeds.
Right Mouse Button Analyzer Control
When this box is checked, the right mouse button can be used to toggle the Run
Test function On/Off. If the box is unchecked, then the right mouse button is
not used by the program. This permits use by other Windows system functions.
pcRTA - User Manual
145
Chapter 5
Edit Menu
146
pcRTA - User Manual
Chapter 6
Processing Menu
Processing Menu
Chapter
6
pcRTA - User Manual
147
Chapter 6
Processing Menu
148
pcRTA - User Manual
Chapter 6
Processing Menu
6.1 Scale Curve
It is very common to run into situations where scaling a curve up or down in
magnitude is necessary. This can be useful for correcting curves from other
imported data or conversion shifts between different measurements.
The dialog box for this processing operation is shown below. Two selections
are provided for the scaling factor: dB ratio, or linear ratio. Either of these two
scaling factors can be used regardless of the type of curve data. The curve entry
to be scaled is selected in the list box.
To scale a curve, select the curve to be scaled in the list box. Next, check the
type of scaling factor you wish to use. Last, enter the appropriate scaling value
and then press OK. If you wish to exit without scaling press CANCEL.
If your units are dB, a positive value like +20dB will move the curve up, while
a negative value like -20dB will move the curve down. 0 dB is no change. If you
are entering a linear scaling factor ratio, its value must always be positive.
Entering 10.0 would move the curve up, and entering 0.10 would move the
curve down. Entering 1.00 is no change.
Whether or not the data is actually in dB or linear units is unimportant. The data
will still be scaled properly for either type of scaling factor units, or curve units.
An example of this operation is shown in the graphs on the following page.
pcRTA - User Manual
149
Chapter 6
Processing Menu
Original Curve
Curve scaled down -15dB
150
pcRTA - User Manual
Chapter 6
Processing Menu
6.2 Invert Curve
In some cases it is necessary to invert a curve. This can be useful for equalizing
systems and for other purposes. The process of inverting a curve is the result
of dividing a reference level by the curve data. This reference level can be
chosen by the user, and controls where the curve will be positioned.
The dialog box for this processing operation is shown below. An edit box is
provided to enter the reference level. The units shown for the value will change
depending on the type of data. The curve entry to be inverted is selected in the
list box.
To invert a curve, select the curve to be inverted in the list box. Next, enter the
reference level for the inversion, and press OK. If you wish to exit without
inverting press CANCEL.
Whether or not the data is actually dB or linear units is unimportant. The data will
still be inverted properly for either type of curve units.
An example of this operation is shown in the graphs on the following page.
pcRTA - User Manual
151
Chapter 6
Processing Menu
Original Curve
Curve inverted at -20dB
152
pcRTA - User Manual
Chapter 6
Processing Menu
6.3 Multiply Curves
This operation will produce a new curve by multiplying one curve by another
curve. Multiplying two curves is equivalent to adding their magnitudes in dB.
The curves may be either dB or linear units. The software will automatically take
care of the necessary conversions internally. This can be a very useful operation
for a variety of applications, such as combining two response curves into one.
Also EQ or weighting functions can be multiplied into another curve.
The dialog box for this processing operation is shown below. Three list boxes
are shown for the selection of the two operand entries, and the location of the
result. You can set the name for the result curve before or after this operation,
in the usual manner using the Curve Library edit dialog box.
To multiply curves, select the operand A and B curve entries in the two top list
boxes. Next, select the result curve entry and press OK. If you wish to exit
without performing the operation press CANCEL.
Whether or not the data is actually dB or linear units is unimportant. The data will
still be multiplied properly for either type of curve units.
An example of this operation is shown in the graphs on the following page.
pcRTA - User Manual
153
Chapter 6
Processing Menu
Original Curves A,B
Multiplied Result
154
pcRTA - User Manual
Chapter 6
Processing Menu
6.4 Divide Curves
This operation will produce a new curve by dividing one curve by another
curve. Dividing two curves is equivalent to subtracting their magnitudes in dB.
The curves may be either dB or linear units. The software will automatically take
care of the necessary conversions internally. This can be a very useful operation
for a variety of applications, such as combining two response curves into one.
Also EQ or weighting functions can be divided from one and another curve.
The dialog box for this processing operation is shown below. Three list boxes
are shown for the selection of the two operand entries, and the location of the
result. You can set the name for the result curve before or after this operation,
in the usual manner using the Curve Library edit dialog box.
To divide curves, select the operand A and B curve entries in the two top list
boxes. Next, select the result curve entry and press OK. If you wish to exit
without performing the operation press CANCEL.
Whether or not the data is actually dB or linear units is unimportant. The data will
still be divided properly for either type of curve units.
An example of this operation is shown in the graphs on the following page.
pcRTA - User Manual
155
Chapter 6
Processing Menu
Original Curves A,B
Divided Result
156
pcRTA - User Manual
Chapter 6
Processing Menu
6.5 Add Curves
This operation will produce a new curve by adding one curve to another curve.
This method provides simple addition, and not RMS. For RMS use the
Summation operation. The curves may be either dB or linear units. The
software will automatically take care of the necessary conversions internally.
This can be a very useful operation for a variety of applications, such as adding
impedance curves.
The dialog box for this processing operation is shown below. Three list boxes
are shown for the selection of the two operand entries, and the location of the
result. You can set the name for the result curve before or after this operation,
in the usual manner using the Curve Library edit dialog box.
To add curves, select the operand A and B curve entries in the two top list boxes.
Next, select the result curve entry and press OK. If you wish to exit without
performing the operation press CANCEL.
Whether or not the data is actually dB or linear units is unimportant. The data will
still be added properly for either type of curve units.
An example of this operation is shown in the graphs on the following page.
pcRTA - User Manual
157
Chapter 6
Processing Menu
Original Curves A,B
Addition Result
158
pcRTA - User Manual
Chapter 6
Processing Menu
6.6 Subtract Curves
This operation will produce a new curve by subtracting one curve from another
curve. This method provides simple subtraction. The curves may be either dB
or linear units. The software will automatically take care of the necessary
conversions internally. This can be a very useful operation for a variety of
applications, such as subtracting impedance curves.
The dialog box for this processing operation is shown below. Three list boxes
are shown for the selection of the two operand entries, and the location of the
result. You can set the name for the result curve before or after this operation,
in the usual manner using the Curve Library edit dialog box.
To subtract curves, select the operand A and B curve entries in the two top list
boxes. Next, select the result curve entry and press OK. If you wish to exit
without performing the operation press CANCEL.
Whether or not the data is actually dB or linear units is unimportant. The data will
still be subtracted properly for either type of curve units.
An example of this operation is shown in the graphs on the following page.
pcRTA - User Manual
159
Chapter 6
Processing Menu
Original Curves A,B
Subtracted Result
160
pcRTA - User Manual
Chapter 6
Processing Menu
6.7 Curve Averaging
It is sometimes desirable to be able to average multiple measurements to come
up with a single representative curve. This processing feature can mathematically average up to 20 curves and store the data in a separate Curve Library entry
or on top of one of the data curves being averaged.
If you do not have multiple microphones, this utility can perform essentially the
same function with a single mic, and taking multiple measurements at different
locations.
A common use for this utility is generating a true power response curve from
multiple curves taken at different off axis angles around a transducer, or at
different positions in an environment.
When averaging the curves, equal weighting is applied to each curve and a true
RMS method is used. The large list box shown below provides for multiple
selection of curves in the library. Click your mouse on a curve name to toggle
its selection as a curve to be averaged. The smaller list box is used to select the
location for the result.
The result curve entry can be
the same as one of the data
curves used to construct the
average. However, the original data will be overwritten
when the operation is completed.
An example of this operation is shown in the graphs
on the following page.
pcRTA - User Manual
161
Chapter 6
Processing Menu
Original Curves A,B
Averaged Result
162
pcRTA - User Manual
Chapter 6
Processing Menu
6.8 Curve Summation
It is sometimes desirable to be able to sum multiple measurements to come up
with a single total equivalent curve. This processing feature can mathematically
RMS sum up to 20 curves and store the data in a separate Curve Library entry
or on top of one of the data curves being summed.
This operation can be used to sum separate sectional measurements of a multiway crossover based system. Since this is an RMS summation, the result
represents non-correlated signal combination which may or may not be true.
Since RTA measurements are noise, they do not include phase information.
This function is very similar to averaging, with the exception that the result is not
divided by the total number of curves. It is pure RMS summation of the curve
data. The large list box shown below provides for multiple selection of curves
in the library. Click your mouse on a curve name to toggle its selection as a
curve to be summed. The smaller list box is used to select the location for the
result.
The result curve entry can
be the same as one of the
data curves used to construct
the sum. However, the original data will be overwritten
when the operation is completed.
An example of this operation is shown in the graphs
on the following page.
pcRTA - User Manual
163
Chapter 6
Processing Menu
Original Curves A,B
Summation Result
164
pcRTA - User Manual
Chapter 7
Utilities Menu
Utilities Menu
Chapter
7
pcRTA - User Manual
165
Chapter 7
Utilities Menu
166
pcRTA - User Manual
Chapter 7
Utilities Menu
7.1 Export ASCII Data
The Export ASCII Data menu option will open a dialog box for exporting the
curve as an ASCII text file. The frequency range is 20Hz-20kHz and the number
of data points is 31.
Select Library Entry
This list box contains the names of the curves currently present in the system.
Select the desired curve to export here.
After you have made your selections, press the Ok
button. Another dialog box will open to set the file
name and path where you wish the file to be placed.
The default path is the PCRTA\EXPORT subdirectory,
but another may be chosen as desired. The default
file extension is DAT for data.
pcRTA - User Manual
167
Chapter 7
Utilities Menu
Data File Format
The ASCII text data file format is essentially a spread sheet type format. It
consists of a header line, with the column heading text, and an array of text
lines following with the actual data.
Each line is a different frequency point. A comma is placed between each
line parameter. Floating point notation will be used for the frequency
values consisting of an E followed by the exponent power of ten.
Frequency(Hz)
+2.0000000E+001,
+2.5178508E+001,
+3.1697864E+001,
+3.9905246E+001,
+5.0237729E+001,
+6.3245553E+001,
+7.9621434E+001,
+1.0023745E+002,
+1.2619147E+002,
+1.5886565E+002,
+2.0000000E+002,
+2.5178508E+002,
+3.1697864E+002,
+3.9905246E+002,
+5.0237729E+002,
+6.3245553E+002,
+7.9621434E+002,
+1.0023745E+003,
+1.2619147E+003,
+1.5886565E+003,
+2.0000000E+003,
+2.5178508E+003,
+3.1697864E+003,
+3.9905246E+003,
+5.0237729E+003,
+6.3245553E+003,
+7.9621434E+003,
+1.0023745E+004,
+1.2619147E+004,
+1.5886565E+004,
+2.0000000E+004,
168
Magnitude(dB)
55.760,
64.894,
72.137,
78.470,
78.816,
79.534,
77.765,
76.494,
78.693,
78.837,
79.936,
82.776,
83.080,
82.715,
84.383,
85.288,
84.931,
85.141,
84.647,
85.698,
85.628,
85.391,
85.907,
87.179,
87.318,
86.566,
84.742,
82.024,
78.988,
76.372,
72.323,
Phase(Deg)
0.000
0.000
0.000
0.000
0.000
0.000
0.000
0.000
0.000
0.000
0.000
0.000
0.000
0.000
0.000
0.000
0.000
0.000
0.000
0.000
0.000
0.000
0.000
0.000
0.000
0.000
0.000
0.000
0.000
0.000
0.000
pcRTA - User Manual
Chapter 7
Utilities Menu
7.2 Import ASCII Data
The Import ASCII Data menu option will open a dialog box for importing an
ASCII text data file curve. The library curve to hold the imported data is selected
in the list box.
File Data Frequency Range
The frequency range and number of data points is controlled by the program,
and not by the file data itself. The import system has extensive frequency
interpolation and extrapolation processing, and will translate the data file
frequency points, into the frequency data points required by the pcRTA system.
The system only retains 31 data points between 20Hz and 20kHz.
When you have made your choice for the curve
entry to hold the data, press Ok. Another dialog
box will open for choosing the data file to be
imported. The default path is PCRTA\EXPORT,
but you may choose another as needed.
pcRTA - User Manual
169
Chapter 7
Utilities Menu
Importing the File
When the import process begins, a dialog
box as shown here will appear. This
dialog box displays the decoding process
on a line by line basis. As each line in the
file is read and decoded, you will be able
to see how the program is interpreting the
text data. If you have a problem, this
display can be very helpful in diagnosing
the problem.
The format of an example DAT file is shown below. If the phase column
is not present, zero values will be used in place.
Frequency(Hz)
+2.0000000E+001,
+2.5178508E+001,
+3.1697864E+001,
+3.9905246E+001,
+5.0237729E+001,
+6.3245553E+001,
+7.9621434E+001,
+1.0023745E+002,
+1.2619147E+002,
+1.5886565E+002,
+2.0000000E+002,
+2.5178508E+002,
+3.1697864E+002,
+3.9905246E+002,
+5.0237729E+002,
+6.3245553E+002,
+7.9621434E+002,
+1.0023745E+003,
+1.2619147E+003,
+1.5886565E+003,
+2.0000000E+003,
+2.5178508E+003,
+3.1697864E+003,
+3.9905246E+003,
+5.0237729E+003,
+6.3245553E+003,
+7.9621434E+003,
+1.0023745E+004,
+1.2619147E+004,
+1.5886565E+004,
+2.0000000E+004,
170
Magnitude(dB)
55.760,
64.894,
72.137,
78.470,
78.816,
79.534,
77.765,
76.494,
78.693,
78.837,
79.936,
82.776,
83.080,
82.715,
84.383,
85.288,
84.931,
85.141,
84.647,
85.698,
85.628,
85.391,
85.907,
87.179,
87.318,
86.566,
84.742,
82.024,
78.988,
76.372,
72.323,
Phase(Deg)
0.000
0.000
0.000
0.000
0.000
0.000
0.000
0.000
0.000
0.000
0.000
0.000
0.000
0.000
0.000
0.000
0.000
0.000
0.000
0.000
0.000
0.000
0.000
0.000
0.000
0.000
0.000
0.000
0.000
0.000
0.000
pcRTA - User Manual
Chapter 7
Utilities Menu
7.3 Clipboard Export
The Clipboard Export menu option will transfer the graphics from the pcRTA
main window to the MS-Window's clipboard system. This can be a handy
feature when you wish to Paste a graphics item from this program, into another
MS-Windows application directly.
However, other applications may or may not be able to handle all of the GDI
elements used by the pcRTA graphics images. If you experience problems, try
using one of the Graphics Export formats instead.
Before the process begins, a dialog box will
open to confirm that you wish to transfer
the graphics of the window. Press Ok to
transfer the graphics.
The transfer takes only a few seconds. When
completed you can view the contents of the
clipboard by using the Clipboard Viewer in the
Start|Programs|Accessories folder, shown here.
pcRTA - User Manual
171
Chapter 7
Utilities Menu
A sample of the clipboard viewer is shown below, with a graph image from
the pcRTA system. If you paste the item into your other application and
the image is not correct, or not recognized by the application, you will need
to use one of the Graphics Export formats.
172
pcRTA - User Manual
Chapter 7
Utilities Menu
7.4 Graphics Export
The Graphics Export menu option will open a dialog box for choosing various
options for exporting graphics from the program. This utility provides the most
versatile and powerful means of transferring graphics from the pcRTA system
to other desktop publishing programs.
Raster Images
Raster images are bitmap representations of the artwork. They are formed by
rows of pixels. They can be color or black & white. The resolution of the image
is fixed at the time it is created. While raster images are probably the most
portable form of graphic representation, they are very bulky and inefficient for
high quality resolution. The following industry standard raster formats are
supported:
BMP-Windows BitMap Format
GIF-Graphics Interchange File
JPG-Joint Photo Experts Group
PCT-Macintosh Picture Format
PCX-ZSoft Picture Format
TGA-Targa Picture Format
TIF-Tagged Image File Format
When using raster images, you must choose a DPI (dots per inch) value which
will determine the resolution. With raster images it is very easy to produce
extremely large files. Be careful to note the Image Size parameter value given
on the last line of the group box list. If you attempt to construct an image size
that is larger than your available resources permit, you will receive an error
message or your system may lock up.
Vector Images
Vector images are mathematic formula representations of the artwork. They
contain coordinates and special commands unique to each format. They can
be both color or black & white. The resolution of the image is virtually infinite,
and will print with the full resolution of the final printing device. While vector
images are probably a less portable form of graphic representation, they are
extremely efficient and provide the highest quality resolution. The following
industry standard vector formats are supported:
WMF-Windows Metafile Standard
WMF-Windows Metafile Placeable
AI -Adobe Illustrator v3.0
EPS-EncapPostScript B&W & TIF
EPS-EncapPostScript CMYK & TIF
pcRTA - User Manual
173
Chapter 7
Utilities Menu
When Raster Image is selected, the resolution, color, and compression dialog
controls will be active. When Vector
Image is selected, the only active control will be the Graphics File Format list
box.
Graphics File Format
This list box is where the specific file
format is chosen. For raster images, set
this parameter first before choosing color
or compression.
Resolution DPI
Use the two stepper buttons to increase
or decrease this value. The value will be
changed in units of 8.
Color Format
The possible color choices are: B&W,
16 Color, 256 Color, 16M Color, 16
Gray, 256 Gray. Depending on the file
format, not all color choices may be
available.
Compression
Some of the raster file formats have optional compression. If so, you will
be able to choose either compressed or uncompressed. For other file
formats this selection will be chosen for you.
Image Specification List
The group box at the bottom of the dialog box displays four parameter
lines. These are only relevant to raster images, and not vector images.
The first two parameters display the total pixel width and height. The bits
per pixel is controlled by the color mode, and the last line provides the total
image size in bytes. With high color resolution, such as 16 million colors,
the image size can become very large even at moderately low DPI values.
You must have enough virtual memory for the system to be able to
construct the full image, and enough disk space for the exported file.
174
pcRTA - User Manual
Chapter 7
Utilities Menu
Exporting the File
Once you have specified the options as desired, press the Ok button and
another dialog box will open to set the export file name and path. The file name
extension will be set based on your choice for the file format. The default path
is PCRTA\EXPORT, but you may change this as required.
Once you have entered the file name, click the Ok button and the export
process will begin. One or more meter displays will be shown which indicate
the progress of the graphics conversion. You may abort the export operation
by clicking the Abort button.
pcRTA - User Manual
175
Chapter 7
Utilities Menu
Notes on Raster Formats
Of the seven supported formats, only the TIF and BMP will contain accurate
DPI values in the files. Many of the raster image formats do not allow for
absolute size information. If you need to maintain accurate absolute image
size for importation into another application, use the TIF or BMP formats.
Notes on Vector Formats
If you are importing WMF files into Quark XPress or PageMaker, you must
use the WMF-Placeable format, and not the WMF-Standard. Both WMF
formats contain full RGB color information. The EPS formats can also be
used for this purpose, and contain a preview raster image built into the
vector files. The two EPS formats are more tightly controlled and defined
for B&W and CMYK color. Use the CMYK EPS format for 4-color
separations.
If you wish to use a graphics illustration program such as Adobe Illustrator,
Micrografx Designer, or CorelDraw for editing the artwork, use the AI or
WMF formats. However, many programs handle vector files in strange
ways and a variety of problems with text often result. Most require
additional work in the graphics program itself to modify the images back
to their correct form. For best results, use the AI format and Adobe
Illustrator. This is also directly transportable to the Macintosh environment
as well.
The AI format technically requires Adobe fonts. If you have assigned
TrueType fonts in the program to some text items, you will receive a
warning message when you open the AI file in Adobe Illustrator of an
unknown font. However, you can easily reassign the font as needed in
Illustrator. Other graphics programs ignore the font name information
altogether.
Vector formats provide the most powerful editing abilities, and the highest
quality resolution. Unfortunately, they also produce the most trouble and
have a nasty habit of locating any and all bugs in other application's import
filters. However, with a little experimentation and testing you should be
able to determine which formats and applications will achieve the desired
results.
176
pcRTA - User Manual
Chapter 7
Utilities Menu
7.5 IASCA Scoring
This utility provides a special automated algorithm for producing a comparison
score according to the International Auto Sound Challenge Association (IASCA).
This is a revised scoring routine based on the new standard effective Jan 1, 1997.
Further information about the judging and test setups can be obtained directly
from IASCA.
There are two tests defined which constitute the objective portion of the sound
quality judging: SPL and RTA. The maximum number of points for the SPL
portion is unlimited, the RTA portion is 20.
The measurement microphone must be positioned in the driver's seat, at
roughly ear level, pointed toward the dash. Use of a microphone stand 26
inches high above the center of the seat is recommended. All windows, doors,
sun roofs, and trunk must be closed. The engine must be off during RTA testing,
but may be running during SPL testing.
This utility is designed to perform repeated tests, each time allowing the user
to enter a contestant name while saving each measurement into a curve library
entry automatically. A library called IASCAnnn is automatically created, and the
entry numbers incremented as the tests are performed.
The result curves for each contestant are permanently saved in the library
entries, and can also be printed after each test cycle automatically.
pcRTA - User Manual
177
Chapter 7
Utilities Menu
As shown in the dialog box here, there is a
check box which controls printing of the test
results. This box should be either checked or
unchecked as required before the scoring
session begins.
Note that a special text box is provided
below the contestant name field where various instructions and the scores will appear.
Note: If your printer driver has spooling enabled, DO NOT start another test until the previous score has been
completely printed. The print spooler consumes much of the CPU time, and
this will cause errors in the time dependent testing algorithms. Disabling
print spooling is another means to eliminate this potential problem.
Parameters to Set before Testing Begins
The microphone input source to be used during the testing is set in the
control panel prior to the start of the scoring session. Also, the MDF file
for the microphone to be used must be already loaded into the system prior
to testing to provide accurate SPL calibration. During the testing, you can
select different input sources which allow for multiple testing stations to be
utilized. If you will be using the pcRTA internal Pink Noise Generator, you
may also wish to set the generator level to an appropriate value. However,
IASCA testing generally uses a CD with Pink Noise as the source for the car
stereo system. Most of the other control panel parameters will be
automatically set by the scoring utility.
The scoring system uses the Bar Graph display mode. You do have the
option to select the dB value per division, and the number of major and
minor divisions to be shown on the graph. The scoring routine will use
these values, and will only adjust the top SPL value of the scale as needed.
Starting a Session
178
pcRTA - User Manual
Chapter 7
Utilities Menu
To begin a scoring session, press the Start
Testing button, and then enter the event
name.
The first step in each of the scoring cycles
is to enter the contestant name.
The Testing Controls group box provides 4
buttons for conducting various tests involved with the scoring cycle. Each can be
operated individually or repeated as necessary. They are generally executed in order
from top to bottom for each contestant.
The first test is for adjusting the level for the
actual RTA measurement. Press the Level
Setting Test, and adjust your car audio
system for 90dB in the Full band. (If you are
using the pcRTA as the noise source, the
generator level will be that which was set in
the control panel before the scoring session began.) When done, press the button
again to stop the adjustment cycle.
The next test is the actual measurement of
the frequency response RTA. Press RTA
Response Test button (after you have turned
on your pink noise source if external). The
system will perform a 10 second high precision average.
The last test is for maximum SPL. Press the
SPL Max Test button, and the analyzer will
measure the maximum SPL over a 10 second period with peak hold. The standard
IASCA test uses a compact disk with predetermined program material.
pcRTA - User Manual
179
Chapter 7
Utilities Menu
The graph display will show the full RTA
response in addition to the Full range level.
However, only the Full range band data is
retained. This test is unlimited with respect
to maximum SPL, and points are based on
the Full band SPL. When using an M51 mic,
the maximum SPL level which can be measured is 150dB, and when using the M52
mic the maximum SPL is 170dB. After the
test is finished, you can repeat any of the
above tests again if necessary.
When completed, press the Produce IASCA Score button and the data will
be written to the note fields in the screen, and printed if you have selected
that option as well.
For the next contestant, enter in the new contestant name and repeat the
process.
180
pcRTA - User Manual
Chapter 7
Utilities Menu
7.6 USAC Scoring
This utility provides a special automated algorithm for producing a comparison
score according to the United States AutoSound Competition (USAC). Further
information about the judging and test setups can be obtained directly from
USAC.
There are two tests defined which constitute the objective portion of the sound
quality judging: SPL and RTA. The maximum number of points for the SPL
portion is actually unlimited, but the RTA portion maximum is 20.
The measurement microphone must be positioned in the driver's seat, at
roughly ear level, pointed toward the dash. Use of a microphone stand 26
inches high above the center of the seat is recommended. All windows, doors,
sun roofs, and trunk must be closed. The engine must be off during testing.
This utility is designed to perform repeated tests, each time allowing the user
to enter a contestant name while saving each measurement into a curve library
entry automatically. A library called USACnnnn is automatically created, and
the entry numbers incremented 1 through 20 as the tests are performed.
The result curves for each contestant are permanently saved in the library
entries, and can also be printed after each test cycle automatically.
pcRTA - User Manual
181
Chapter 7
Utilities Menu
As shown in the dialog box here, there
is a check box which controls printing
of the test results. This box should be
either checked or unchecked as required before the scoring session begins.
Note that a special text box is provided below the contestant name field
where instructions will appear.
Note: If your printer driver has spooling enabled, DO NOT start another test
until the previous score has been completely printed. The print spooler
consumes much of the CPU time, and this will cause errors in the time
dependent testing algorithms. Disabling print spooling is another means to
eliminate this potential problem.
Parameters to Set before Testing Begins
The microphone input source to be used during the testing is set in the
control panel prior to the start of the scoring session. Also, the MDF file
for the microphone to be used must be already loaded into the system prior
to testing to provide accurate SPL calibration. During the testing, you can
select different input sources which allow for multiple testing stations to be
utilized. If you will be using the pcRTA internal Pink Noise Generator, than
you may also wish to set the generator level to an appropriate value.
However, typical USAC testing generally uses a CD with Pink Noise as the
source for the car stereo system. Most of the other control panel
parameters will be automatically set by the scoring utility.
The scoring system uses the Bar Graph display mode. You do have the
option to select the dB value per division, and the number of major and
minor divisions to be shown on the graph. The scoring routine will use
these values, and will only adjust the top SPL value of the scale as needed.
182
pcRTA - User Manual
Chapter 7
Utilities Menu
Starting a Session
To begin a scoring session, press the Start
Testing button, and then enter the event
name.
The first step in each of the scoring cycles is
to enter the contestant name. The Testing
Controls group box provides 4 buttons for
conducting various tests involved with the
scoring cycle. Each can be operated individually or repeated as necessary. They are
generally executed in order from top to
bottom for each contestant.
The first test is for maximum SPL. Press the SPL Max Test button, and the
analyzer will measure the maximum SPL over a 45 second period with peak
hold. The standard USAC test uses a compact disk with predetermined
program material (FlashDance).
The next test is for adjusting the level for the
actual RTA measurement. Press the Level
Setting Test, and adjust your car audio system for 90dB in the Full band. (If you are
using the pcRTA as the noise source, the
generator level will be that which was set in
the control panel before the scoring session
began.) When done, press the button again
to stop the adjustment cycle.
The last test is the actual measurement of the
frequency response RTA. Press RTA Response Test button (after you have turned on your pink noise source if external).
The system will perform a 30 second high precision average.
pcRTA - User Manual
183
Chapter 7
Utilities Menu
The graph display will show the full RTA response in addition to the Full
range level. However, only the Full range band data is retained. This test
is unlimited with respect to maximum SPL, and points are based on the Full
band SPL over 100dB. When using an M51 mic, the maximum SPL level
which can be measured is 150dB, and when using the M52 mic the
maximum SPL is 170dB. After the test is finished, you can repeat any of the
above tests again if necessary.
When completed, press the Produce USAC Score button and the data will
be written to the note fields in the screen, and printed if you have selected
that option as well.
For the next contestant, enter in the new contestant name and repeat the
process.
184
pcRTA - User Manual
Chapter 7
Utilities Menu
7.7 Outlaw SPL Scoring
This utility provides a special automated algorithm for producing a comparison
score for maximum SPL. The maximum number of points for the SPL portion
is unlimited, and is simply the SPL value - 100dB.
The measurement microphone must be positioned in the driver's seat, at
roughly ear level, pointed toward the dash. Use of a microphone stand 26
inches high above the center of the seat is recommended. All windows, doors,
sun roofs, and trunk must be closed. The engine must be off during testing.
This utility is designed to perform repeated tests, each time allowing the user
to enter a contestant name while saving each measurement into a curve library
entry automatically. A library called OUTLAWnn is automatically created, and
the entry numbers incremented 1 through 20 as the tests are performed.
The result curves for each contestant are permanently saved in the library
entries, and can also be printed after each test cycle automatically.
pcRTA - User Manual
185
Chapter 7
Utilities Menu
As shown in the dialog box here,
there is a check box which controls
printing of the test results. This box
should be either checked or unchecked as required before the
scoring session begins.
Note that a special text box is provided below the contestant name
field where instructions will appear.
Note: If your printer driver has spooling enabled, DO NOT start another test until the previous score has been
completely printed. The print spooler consumes much of the CPU time, and
this will cause errors in the time dependent testing algorithms. Disabling
print spooling is another means to eliminate this potential problem.
Parameters to Set before Testing Begins
The microphone input source to be used during the testing is set in the
control panel prior to the start of the scoring session. Also, the MDF file
for the microphone to be used must be already loaded into the system prior
to testing to provide accurate SPL calibration. If you will be using the
pcRTA internal Pink Noise Generator, than you may also wish to set the
generator level to an appropriate value. However, a CD , tape, etc. can
also be used with Pink Noise or music as the source for the car stereo
system. Most of the other control panel parameters will be automatically
set by the scoring utility.
The scoring system uses the Text Chart display mode. The single value for
the full range SPL will be displayed.
186
pcRTA - User Manual
Chapter 7
Utilities Menu
Starting a Session
To begin a scoring session, press the Start
Testing button, and then enter the event
name.
The first step in each of the scoring cycles
is to enter the contestant name. The Testing Controls group box provides 2 buttons
for conducting various tests involved with
the scoring cycle. Each can be operated
individually or repeated as necessary. They
are generally executed in order from top to
bottom for each contestant. There is also
an edit box which allows you to enter the
test time in seconds.
The first test is for maximum SPL. Press the
SPL Max Test button, and the analyzer will
measure the maximum SPL over the time
period with peak hold. When using an M51
mic, the maximum SPL level which can be
measured is 150dB, and when using the
M52 mic the maximum SPL is 170dB. After
the test is finished, you can repeat it if you
need to.
pcRTA - User Manual
187
Chapter 7
Utilities Menu
When completed, press the Produce SPL Score button and the data will be
written to the note fields in the screen, and printed if you have selected that
option as well.
For the next contestant, enter in the new contestant name and repeat the
process.
188
pcRTA - User Manual
Chapter 7
Utilities Menu
7.8 Drag Racing Scoring
This utility provides a special routine for driving a dual column tree light display.
This routine assumes that there is an additional interface card installed in the
same computer which contains an array of register latches located at two
different I/O port base addresses. The user can enter the location of the two
base address locations in the dialog box. The routine is capable of handling any
number of light segments from 8 to 128. Each bit represents one light, the LSB
corresponds to the lowest light, and the MSB the top light. The number of
consecutive I/O ports present at each base address is the number of bits divided
by 8. The interface card outputs can then be used to control a bank of solid state
relays or similar devices which are used to drive the tree lights.
This routine uses two mic channels (1 & 2), each representing one contestant.
The run time of the contest can be specified for any number of seconds, and
a variety of different display types are provided. During the measurement run,
the analyzer updates the display once per second.
The display tree is driven in a fasion to produce an equivalent display
range matching that of the Bar Graph window. This means that the top
light is equal to the top of the scale, and the bottom light is equal to the
bottom of the scale. The Scale top value is set in the dialog box prior to
beginning the run. The number of major divisions, and the dB value per
division is controlled via the normal Graph Setup dialog box. The use of
these features enable any display range to be created, producing any
degree of resolution or range for the tree light display. Also, the Text
Chart window can be used to view the Full Range band levels of each of
the two mic channels in precise dB values. A wide vareity and unlimited
number of display combinations are possible.
Additionally, a test pattern is provided to check the lights in the tree for
any non-functioning bulbs or other problems prior to use. The test
pattern can be aborted at any time to freeze the display for evaluation.
The measurement data is written into the first and second library entries,
of the currently loaded library. The settings in the Control Panel have no
effect, and all control panel parameters are controlled internally by the
routine.
pcRTA - User Manual
189
Chapter 7
Utilities Menu
Parameters to Set before Testing Begins
The MDF files for the two microphones to be used must be already
loaded into the system on Mic Inputs 1 & 2 prior to testing to provide
accurate SPL calibration. For this routine, the Noise Generator is not
used, and is forced off automatically. The user should also press the
Setup button and enter any specific parameters as required for the
configuration.
As for the graph setup, you will probably want to set up the bar graph
display with the desired range (dB/div) and the number of major
divisions. The tree display will have this same range. In most cases the
Line Graph window will probably not be important.
Starting a Session
After the desired settings for the Control Panel and Graph Setup have
been made, select the Utilities|Scoring|Drag Racing selection from
the main menu. Enter or edit any changes necessary for the base port
locations, bits, runtime, and SPL Top value. Next, you may wish to
select different types of display options given in the lower region of the
dialog box. The tree display can
be tested first by pressing the
Test Display Tree button.
190
pcRTA - User Manual
Chapter 7
Utilities Menu
When ready, simply press the Start Drag Race button to begin the contest.
When the run is completed the winner will be indicated with a modulated
display. If there is a tie, caused by identical tree levels, then both displays will
be modulated. The modulated display will continue until terminated by the
operator by pressing the button again. The run can also be aborted at any time
by pressing the button.
pcRTA - User Manual
191
Chapter 7
Utilities Menu
192
pcRTA - User Manual
Chapter 7
Utilities Menu
7.9 True Sound Quality Scoring
This utility provides a special automated algorithm for producing a comparison
score reflecting the true sound quality of a car audio system. This routine was
developed by LinearX during August of 1996 to solve some of the present
problems associated with existing car audio scoring formulas. There are two
principal problems which this scoring system resolves: (1) the score will more
accurately reflect the true sound quality of the system, and (2) there are no hard
threshold ranges which cause scoring variability.
It is well known that car audio systems scored under existing methods can have
a wide range of system frequency response, while all may be producing nearly
identical scores. This is due to the 3dB band/pair minor deviation requirement.
Many systems using these older scoring formulas could have response characteristics with substantial differences in level between the low and high frequency ends of the spectrum. While the actual difference between any band/
pair may be less than 3dB, producing a relatively high score, the overall system
frequency response is extremely poor. In spite of these systems producing a
seemingly high score, there was very little correlation between the score and
actual real listening quality.
pcRTA - User Manual
193
Chapter 7
Utilities Menu
The second problem has to do with the repeatability of the scoring process
itself. In the old scoring formulas, if a band/pair is less than 3dB no point
is deducted, and a difference of greater than 3dB causes a whole point
deduction. Any particular measurement of a given system can produce a
number of band/pair differences which are right on the edge of the 3dB
threshold. For example, the difference between a given band/pair may be
2.9dB on one measurement. During another measurement of the same
system, the difference on the same band/pair may be 3.1dB. Even though
the measurement changed by only 0.2dB, the score changes by one whole
point. It is very possible that there may be several band/pairs in a system
which are right on the edge of the 3dB threshold. This can cause the score
to change by several points during repeated measurements due to the
various band/pairs toggling at the 3dB thresholds.
The TSQ formula solves both of these serious problems, but also goes
further. Many of the old scoring formulas use bands from 25Hz to 20kHz
in the scoring computation. The pink noise source generally used for
scoring is generated from a CD. The CD process cannot record frequencies above 20kHz. A bandpass filter centered at 20kHz has one-half of its
effective pass band above 20kHz. Any measurement using pink noise from
a CD will show about a 2dB loss in the 20kHz band, solely from the CDDSP processing itself. For this reason the TSQ scoring formula does not use
the 20kHz band.
Many of the competitors utilize 1/3 octave graphic equalizers with 28
bands, ranging from 31.5Hz to 16kHz. To match this equalization range
the TSQ formula also only uses low frequency bands down to 31.5Hz.
Scoring Formula
The TSQ scoring formula is straight forward and easy to compute.
Essentially the response of the system is scored based on its relative
flatness, or reproduction quality. The scoring computation steps are:
(1) Find the median level. Add the dB levels of the 28 bands from 31.5Hz
to 16kHz, and divide by 28.
(2) Find the total deviation. Add the 28 absolute value differences between
each of the band's level and the median level.
194
pcRTA - User Manual
Chapter 7
Utilities Menu
(3) Find the total score. Score is equal to 40 minus the total deviation divided
by 6. Round to whole number.
For the maximum SPL test, simply subtract 100 from the maximum SPL reached,
and round to the nearest whole number.
For user information purposes, the computed median level is displayed, along
with a list of the bands which deviate by more than 3dB, 6dB, 9dB, or 12dB from
the median level.
Testing Procedure
There are two tests defined which constitute the objective portion of the sound
quality judging: RTA and SPL. The maximum number of points for the SPL
portion is unlimited, and the RTA portion is 40.
The measurement microphone must be positioned in the driver's seat, at
roughly ear level, pointed toward the dash. Use of a microphone stand 26
inches high above the center of the seat is recommended. All windows, doors,
sun roofs, and trunk must be closed. The engine must be off during testing.
This utility is designed to perform repeated tests, each time allowing the user
to enter a contestant name while saving each measurement into a curve library
entry automatically. A library called TSQnnnnn is automatically created, and
the entry numbers incremented 1 through 20 as the tests are performed.
The result curves for each contestant are permanently saved in the library
entries, and can also be printed after each test cycle automatically.
pcRTA - User Manual
195
Chapter 7
Utilities Menu
As shown in the dialog box here, there is a
check box which controls printing of the
test results. This box should be either
checked or unchecked as required before
the scoring session begins.
Note that a special text box is provided
below the contestant name field where
instructions will appear.
Note: If your printer driver has spooling
enabled, DO NOT start another test until the
previous score has been completely printed. The print spooler consumes
much of the CPU time, and this will cause errors in the time dependent
testing algorithms. Disabling print spooling is another means to eliminate this
potential problem.
Parameters to Set before Testing Begins
The microphone input source to be used during the testing is set in the
control panel prior to the start of the scoring session. Also, the MDF file
for the microphone to be used must be already loaded into the system prior
to testing to provide accurate SPL calibration. During the testing, you can
select different input sources which allow for multiple testing stations to be
utilized. If you will be using the pcRTA internal Pink Noise Generator, than
you may also wish to set the generator level to an appropriate value.
However, typical testing generally uses a CD with Pink Noise as the source
for the car stereo system. Most of the other control panel parameters will
be automatically set by the scoring utility.
The scoring system uses the Bar Graph display mode. You do have the
option to select the dB value per division, and the number of major and
minor divisions to be shown on the graph. The scoring routine will use
these values, and will only adjust the top SPL value of the scale as needed.
196
pcRTA - User Manual
Chapter 7
Utilities Menu
Starting a Session
To begin a scoring session, press the Start
Testing button, and then enter the event
name.
The first step in each of the scoring cycles
is to enter the contestant name. The Testing Controls group box provides 4 buttons
for conducting various tests involved with
the scoring cycle. Each can be operated
individually or repeated as necessary. They
are generally executed in order from top to
bottom for each contestant.
The first test is for adjusting the level for the
actual RTA measurement. Press the Level
Setting Test, and adjust your car audio
system for 90dB in the Full band. (If you are
using the pcRTA as the noise source, the
generator level will be that which was set in
the control panel before the scoring session began.) When done, press the button
again to stop the adjustment cycle.
The next test is the actual measurement of
the frequency response RTA. Press RTA
Response Test button (after you have turned
on your pink noise source if external). The
system will perform a 10 second high precision average.
The last test is for maximum SPL. Press the
SPL Max Test button, and the analyzer will
measure the maximum SPL over a 10 second period with peak hold. The standard
test uses a compact disk with predetermined program material.
pcRTA - User Manual
197
Chapter 7
Utilities Menu
The graph display will show the full RTA response in addition to the Full
range level. However, only the Full range band data is retained. This test
is unlimited with respect to maximum SPL, and points are based on the Full
band SPL over 100dB. When using an M51 mic, the maximum SPL level
which can be measured is 150dB, and when using the M52 mic the
maximum SPL is 170dB. After the test is finished, you can repeat any of the
above tests again if necessary.
When completed, press the Produce Score button and the data will be
written to the note fields in the screen, and printed if you have selected that
option as well.
For the next contestant, enter in the new contestant name and repeat the
process.
198
pcRTA - User Manual
Chapter 7
Utilities Menu
7.10 Programmable EQ - PA-422
The PA-422 interface is a serial port protocol standard which is used by several
different audio manufacturers for their programmable signal processing equipment. This routine was characterized with the MicroAudio 2.2CQ and White
4700-2 1/3 octave stereo equalizer units. While the PA-422 spec defines the
protocol of communication, most PA-422 equalizers will generally still require
specific configuration due to their unique parameter tables. Please contact
LinearX for support of other equalizer brands or models.
This dialog box provides the means to remotely control many of the functions
of 1/3 octave equalizers, and also provides automatic control and optimization
of the equalizer bands to achieve a predetermined target response curve.
Manual control of the EQ is also possible, as well as manual operation of the
pcRTA analyzer.
pcRTA - User Manual
199
Chapter 7
Utilities Menu
Serial Port Selection
The group box in the upper left hand corner
displays the possible selection for the serial
(COM) port to be used to communicate
with the PA-422 equalizer. The equalizer
must be connected to one of the PC's serial
ports. The type of UART in the PC is also
displayed. If a particular serial port is not
present or unavailable in the PC, certain
selections may be grayed out. You must
choose the same serial port here as is
physically connected to the EQ.
Note- If you are using the PAC interface for the pcRTA, you will need an
additional serial port for the EQ.
Start Link Button
Once the serial port selection has been made, this button should be clicked
to initialize communication with the EQ. A search of all possible PA-422
ID (device address) values is performed to locate any EQ's attached to the
serial port. When a suitable EQ is found, the Device Address, Model, and
Brand fields will be filled in with the unit's data. Additionally, the current EQ
settings will be read from the unit and used to update the band levels, and
filter selections. The EQ unit is now ready for operation, and the other
buttons at the bottom of the dialog box will be activated.
EQ Controls: HighPass, LowPass, Memory, Channel, and Band Levels
These dialog box elements mirror the settings of the EQ unit. To manually
program any of these settings to the EQ, simply modify the desired band
levels or selections, and click the Program button. This updates the EQ unit
to match those settings.
To read the current settings of the EQ unit, and recall the settings of a
particular memory location or channel, first select the desired memory and
channel, and click the Recall button. The operating parameters of the EQ
will cause the dialog box controls to match those values.
For more information on the EQ parameters, and their meaning or
operation, please consult the EQ manufacturer's documentation.
200
pcRTA - User Manual
Chapter 7
Utilities Menu
Automatic Optimization of Response
The pcRTA can be used to automatically adjust the EQ band levels to match the
response measurement to a previously defined target curve entry. In order to
perform this function, you must have previously setup an appropriate target
curve in one of the library entries. The curve entry to be used as the target is
selected in the Library Curve Entry for Target list box. This could be a flat line,
or any other shape desired.
Note- The data curve entry must NOT be the same as the target curve, or new
measurement data will overwrite your target response.
It is also important to understand that the absolute target level must be in the
same range as the expected measured RTA data. For example, if the measured
SPL response is in the 90dB range, a target that is a flat line at 0dB would be
impossible. The optimizer would attempt to reduce the band levels by 90dB,
clearly out of the adjustment range of ±12dB bands. The correct target would
be a flat line in the 90dB range.
When the target curve and data curve have been setup, the Optimize button
is clicked to begin the process. The pcRTA will perform a measurement, using
the current existing control panel parameters, and then compare this data to the
target curve data. The EQ band values will be adjusted to minimize the
difference between the new RTA data and the target. The process may iterate
several times until a suitable match is obtained, or until no further improvement
can be produced. This occurs when one or more bands are driven to the top
or bottom of their maximum range.
It should be noted that a suitable averaging time should be employed to yield
stable measurements at low frequencies. Typically, a 2-10 second Ave Time will
produce good results.
If you wish to take manual RTA measurement, the Run RTA button can be used
for this purpose. Clicking the button will start/stop the manual RTA measurement.
When the EQ operations are completed, press the End Link button to terminate
the communication. The Exit button will then be activated.
pcRTA - User Manual
201
Chapter 7
Utilities Menu
202
pcRTA - User Manual
Chapter 7
Utilities Menu
7.11 Programmable EQ - RW-232
The RW-232 interface is a serial port protocol standard which is used by RANE
and possibly other audio manufacturers for their programmable signal processing equipment. This routine was characterized with the RANE RPE-228 1/3
octave stereo equalizer units.
This dialog box provides the means to remotely control many of the functions
of 1/3 octave equalizers, and also provides automatic control and optimization
of the equalizer bands to achieve a predetermined target response curve.
Manual control of the EQ is also possible, as well as manual operation of the
pcRTA analyzer.
pcRTA - User Manual
203
Chapter 7
Utilities Menu
Serial Port Selection
The group box in the upper left hand
corner displays the possible selection for
the serial (COM) port to be used to communicate with the RW-232 equalizer. The
equalizer must be connected to one of the
PC's serial ports. The type of UART in the
PC is also displayed. If a particular serial
port is not present or unavailable in the
PC, certain selections may be grayed out.
You must choose the same serial port here
as is physically connected to the EQ.
Note- If you are using the PAC interface for the pcRTA, you will need an
additional serial port for the EQ.
Start Link Button
Once the serial port selection has been made, this button should be clicked
to initialize communication with the EQ. A search of all possible RW-232
ID (device address) values is performed to locate any EQ's attached to the
serial port. When a suitable EQ is found, the Device Address, Model, and
Brand fields will be filled in with the unit's data. Additionally, the current EQ
settings will be read from the unit and used to update the band levels, and
filter selections. The EQ unit is now ready for operation, and the other
buttons at the bottom of the dialog box will be activated.
EQ Controls: HighPass, LowPass, Memory, Channel, and Band Levels
These dialog box elements mirror the settings of the EQ unit. To manually
program any of these settings to the EQ, simply modify the desired band
levels or selections, and click the Program button. This updates the EQ unit
to match those settings.
To read the current settings of the EQ unit, and recall the settings of a
particular memory location or channel, first select the desired memory and
channel, and click the Recall button. The operating parameters of the EQ
will cause the dialog box controls to match those values.
For more information on the EQ parameters, and their meaning or
operation, please consult the EQ manufacturer's documentation.
204
pcRTA - User Manual
Chapter 7
Utilities Menu
Automatic Optimization of Response
The pcRTA can be used to automatically adjust the EQ band levels to match the
response measurement to a previously defined target curve entry. In order to
perform this function, you must have previously setup an appropriate target
curve in one of the library entries. The curve entry to be used as the target is
selected in the Library Curve Entry for Target list box. This could be a flat line,
or any other shape desired.
Note- The data curve entry must NOT be the same as the target curve, or new
measurement data will overwrite your target response.
It is also important to understand that the absolute target level must be in the
same range as the expected measured RTA data. For example, if the measured
SPL response is in the 90dB range, a target that is a flat line at 0dB would be
impossible. The optimizer would attempt to reduce the band levels by 90dB,
clearly out of the adjustment range of ±12dB bands. The correct target would
be a flat line in the 90dB range.
When the target curve and data curve have been setup, the Optimize button
is clicked to begin the process. The pcRTA will perform a measurement, using
the current existing control panel parameters, and then compare this data to the
target curve data. The EQ band values will be adjusted to minimize the
difference between the new RTA data and the target. The process may iterate
several times until a suitable match is obtained, or until no further improvement
can be produced. This occurs when one or more bands are driven to the top
or bottom of their maximum range.
It should be noted that a suitable averaging time should be employed to yield
stable measurements at low frequencies. Typically, a 2-10 second Ave Time will
produce good results.
If you wish to take manual RTA measurement, the Run RTA button can be used
for this purpose. Clicking the button will start/stop the manual RTA measurement.
When the EQ operations are completed, press the End Link button to terminate
the communication. The Exit button will then be activated.
pcRTA - User Manual
205
Chapter 7
Utilities Menu
206
pcRTA - User Manual
Chapter 7
Utilities Menu
7.12 PAC Interface
The PAC (Portable Analyzer Chassis) interface allows you to setup and establish
the communications link between the pcRTA software, and a pcRTA analyzer
card located in the PAC unit. The PAC unit communicates over a serial port with
your computer which eliminates the requirement of mounting the analyzer
card in your computer.
Defective Win3.x and Win95 Serial Port Drivers
Many if not all versions of the Window's COMM.DRV serial port drivers
produced with date codes of 1993 or higher have a CTS handshaking bug in
them. We have found this to be true as well of the initial releases of Windows95. Because of this problem, we have provided a correct serial port driver
(COMM31.DRV) which the pcRTA installer (version 1.76 or higher) can install
automatically into your Windows system. Because many modem control
programs have also taken this approach, it is impossible to know if the current
driver in your system has this bug or not. We suggest you choose the
replacement option provided by the installer to eliminate any possibility of your
current driver being defective. If your present driver has this bug, and you do
not choose the replacement option, you will receive a "CTS-Timeout" error
message during linking to the PAC.
pcRTA - User Manual
207
Chapter 7
Utilities Menu
Windows Serial Port Configuration
Window's provides the drivers for communication
with serial ports. The correct settings must be
established for the serial port to be used. If you have
never used this serial port before for other purposes, it may or may not be setup correctly. It is a
good idea to verify the settings before attempting to
use the PAC. The IRQ selection must be correct for
the port to function properly.
To check and/or edit the serial port configuration,
go to the Start Menu|Settings and double click on
the Control Panel icon. Now, double click on the
System icon. Under the Device Manager tab,
double-click the Ports (COM & LPT) item. There will
be a listing for each COM port that exists on the
computer. COM1 is usually used for the mouse.
Choose an unused port for operation with the PAC,
and double-click on that port. Then click the Port
Settings tab.
The parameters shown under the Port Settings tab for Bits per
second, Parity, etc. are not important. These values are used
by Windows for printing, but the PAC routines control these
parameters directly and will be adjusted as needed automatically. Click on the Resources tab. Two parameters are now
shown: Interrupt Request and Input/Output Range. The Use
automatic settings box should be checked. Windows uses
default settings for the COM ports which will work in most
cases. The Interrupt Request MUST be set correctly, and this
selection must match the IRQ jumper setting of the COM port
card. For COM1 IRQ=4 is normal, and for COM2 IRQ=3 is
normal. There are no rigid industry standards for the IRQ
settings for COM3 and COM4 use.
208
pcRTA - User Manual
Chapter 7
Utilities Menu
Also, if you have other cards in your computer which use interrupts (IRQ's),
these should not be selected at the same IRQ as the COM port. Network cards,
sound cards, etc. may all use IRQ's as well, and if you choose the same IRQ for
more than one device, a conflict will result causing corrupted communication.
You may need to determine first where the com port IRQ in your computer is
currently set by inspecting the jumpers on the motherboard or I/O card. If you
have other cards installed as well, you may need to do the same for them. It
is very important that no IRQ conflicts exist with the COM port!
When you have made your selections, press the OK button. If you have made
changes, Windows will ask you if you wish to restart at this time. Restarting
Windows is necessary before the changes will take effect.
UART Chips and your Computer Speed
The PAC interface is designed to operate at high baud rates. Because of this,
it is possible for overrun errors to occur depending on the speed of your
computer, and the type of UART (Universal Asynchronous Receiver Transmitter) chip contained in your serial port hardware. There are two types of UART
chips: the 16450(8250), and the 16550. The 16450 type part is older, and only
has a 2 byte buffer. The 16550 is newer and has a 16 byte buffer. If your
computer cannot read the bytes coming in from the PAC before the UART
buffer fills up, then an overrun error occurs. With the 16550 UART, the larger
16 byte buffer allows more time for the CPU in the computer to read the bytes
before an overrun occurs. With the older 16450 UART, the CPU must keep up
with the serial port data speed or an overrun error will occur almost immediately.
Whether or not an overrun error occurs depends on a lot of different
factors. One of the primary factors is your computer's CPU speed.
A computer with a 386 CPU will overrun much easier than a 486 or
a Pentium. Also, the speed of other elements in your system (such
as the video card) can also play a major roll in how much time your
CPU must spend on other duties. Be aware of these factors, and if
you wish to check which kind of UART is installed in your serial port,
the PAC interface dialog will display them when you first open it.
pcRTA - User Manual
209
Chapter 7
Utilities Menu
Window's Multi-Tasking and Screen Saver Issues
There are many tasks which the Windows system is expected to carry out
in a more or less simultaneous fashion. As well, there can be multiple
applications open at one time in the system. All of these factors affect the
amount of time Windows can spend servicing any
one application. If you are running a measurement in the pcRTA, minimize it, and open another
application, the CPU may not be able to handle all
of the tasks fast enough, and an overrun will
occur.
Another consideration is screen savers. If you are
running a long term or continuous measurement,
such as in the case of Noise Analysis, the screen
saver may pop in to blank the screen with some
other moving image. While the screen saver is
working, the CPU must also be handling the
incoming data from the pcRTA in the PAC unit.
This can be too much processing for the CPU to
handle, and an overrun may occur. If you are
taking a long term measurement, it is best to
disable the screen saver from popping in during
the course of the measurement.
Selecting the PAC Baud Rate
Probably the best way to approach this parameter is to select the top baud
rate of 57,600 as an initial value, and see if errors occur. If errors occur at
this speed, try the next lower speed and repeat the testing. If errors persist,
continue reducing the baud rate. If errors are still present at 9600 baud,
then it is very possible that something is wrong with the IRQ setup for the
COM port, and/or that a conflict exists with some other card in the
computer. This problem will have to be investigated and corrected before
the serial port will operate correctly.
210
pcRTA - User Manual
Chapter 7
Utilities Menu
General Operating Instructions and Setup
The first step is to mount the pcRTA analyzer card into the PAC unit. With the
PAC power OFF, remove the screws on the cover of the unit, and remove the
cover. Mount the pcRTA analyzer card into one of the slots. Replace the PAC
cover, and then fasten again with the screws.
Note- Verify that the Voltage Selector switch is in the correct position for your
local power (110VAC or 220VAC) before connecting the AC power cord.
The next step is to connect the serial port cable to your computer. You will need
a free serial port. Your mouse may be already using a port such as COM1, so
you will need to use one of the other three serial (COM) ports 2, 3, or 4.
Depending on whether your computer's connector is a DB25 pin male or a DB9
pin male, you may or may not need to use an adapter on the line.
Turn on the power to the PAC unit (either battery or external), and after a few
seconds the unit will beep to let you know it is ready for operation. Start the
pcRTA software, and then go to the Utilities Menu and select the PAC Interface
item. The following paragraphs describe the operation and features contained
in the interface dialog box.
Note- After you have setup and activated the link for the first time, you MUST run
the Calibration routine to establish the correct operating parameters for the
pcRTA, even if you have previously done this already when the analyzer was
mounted in your computer. Moving the analyzer to the PAC unit is equivalent
to moving the analyzer to a different computer, where the bus clocks may not be
the same.
Serial Port Select
This group box contains buttons for selecting the serial port to
which the PAC unit is connected. This group box is only enabled
when the PAC link is NOT active. The selection cannot be
changed while the link is active, and can only be changed when
the link is OFF.
(Note- If you choose a wrong COM port where another device such as the mouse
is already connected, when you press the Activate Link button the mouse may
malfunction, requiring a re-boot to restore mouse operation.)
pcRTA - User Manual
211
Chapter 7
Utilities Menu
Baud Rate Select
This group box contains buttons for selecting the speed of communication
over the serial port to the PAC unit. This group box is only enabled when
the PAC link is NOT active. The selection cannot be changed while the link
is active, and can only be changed when the link is OFF. The PAC unit has
a built in feature of AutoBaud detection, and will automatically lock on to
the baud rate chosen here. No jumper or switch changes in the PAC unit
are required.
It is best to always use the highest baud rate of 57,600 unless other
circumstances do not permit this. Generally the only problem with using
high baud rates occurs when long cables are used between the computer
and PAC unit. For typical applications where the serial port cable is 10ft
or less, using 57,600 should be no problem. If longer cables are needed,
and errors occur during general operation, then it may be necessary to
choose a lower baud rate.
Start Link / Automatic Link
The Start Link button is used to manually open and close the
communication link between the computer and PAC. When the
link is active, the text in the button will change to End Link. When
the button is pressed with the link active, the link will be closed.
Therefore, this button is used to manually toggle the link ON and
OFF.
The Automatic Link check box provides the means to allow the software
to establish the link automatically each time the software is started. Using
this feature eliminates the need of using this dialog box each time to open
the link. The software automatically closes the link upon exit. In order to
use this feature, you must have the PAC unit connected and with power
ON before starting the software.
When the link is activated or deactivated, the PAC unit will produce a
confirmation beep to acknowledge the status change.
212
pcRTA - User Manual
Chapter 7
Utilities Menu
Battery Status
This group box contains a number of readouts which display the current status
of the battery inside the PAC3 unit. This data is updated each time the link is
activated, or when the dialog box is re-displayed.
Note- These indicators apply only to the PAC3. If you have a PAC4, the Battery
Status will always indicate Fully Charged with ChrgAmps at 0.000 when the link
is active.
-Fully Charged means that the battery is at full charge. This corresponds to the
Battery Charge LED on the control panel of PAC in the OFF condition.
-Over Charging means that the battery is currently having its charge topped off
by a controlled over charging cycle. This corresponds to the Battery Charge
LED on the control panel of PAC in the ON condition.
-Fast Charging means that the battery is currently in the bulk charge cycle. This
corresponds to the Battery Charge LED on the control panel of PAC in the
Flashing-Fast condition.
-Slow Charging means that the battery is currently in the conditioning charge
cycle. This corresponds to the Battery Charge LED on the control panel of PAC
in the Flashing-Slow condition. In this state, the battery voltage is very low, and
must first be brought up to a reasonable voltage before fast charging is possible.
If the charger never comes out of this state on an old battery, then the battery
probably needs to be replaced.
-Discharging means that the battery is currently being discharged by the
operation of the unit from battery power.
The ChrgAmps text box shows the current in amps being used to charge the
battery. Maximum charging current is about 1.25 amps. To fully recharge a
heavily drained battery will typically take about 5 hours. When the battery is
in discharge, this field will display 0.0 amps.
Note- Never leave the battery in a heavily discharged condition for long periods
of time, as this will greatly reduce battery life. The battery should be recharged
as soon as possible to at least a resonable level.
pcRTA - User Manual
213
Chapter 7
Utilities Menu
System Status
This group box contains a number of readouts which display the current
system status within the PAC unit. This data is updated each time the link
is activated, or when the dialog box is re-displayed.
-Link Status displays verification of whether or not the PAC link is active.
-Baud displays verification of the baud rate detected in the PAC unit.
-Rev displays the revision code of the PAC internal computer.
-pcRTA Port displays the port address of the pcRTA card installed in the PAC
unit, if one is found. This field will show 0 if no pcRTA card is installed in
the PAC unit.
+12V Bus Voltage, -12V Bus Voltage, +5V Bus Voltage, -5V Bus Voltage
displays the actual measured supply voltages inside the PAC unit.
Battery Voltage displays the actual measured battery voltage inside the PAC
unit.
External Voltage displays the actual measured DC voltage inside the PAC
unit, produced from the external power source. This could be either from
the AC line, or from the 12VDC auto power connector.
Power Source
This group box contains two readouts which display the origin of the
operating power. It shows if the unit is running off the internal battery, or
if the unit is running off external power (AC line or 12VDC auto).
Exit / Help
The Exit button is used to close the dialog box, and the Help button is used
to open the Windows help system, and display help information on this
dialog box.
214
pcRTA - User Manual
Chapter 7
Utilities Menu
7.13 Analyzer Calibration
This utility is used to align the analyzer to your particular computer. It also serves
as a good test to verify that your system and the analyzer is working correctly.
I/O port address conflicts usually produce failed tests here. If this occurs change
the P1,P2 jumpers to assign a different port address.
The calibration utility can be run at any time, and must be run at least once on
a newly installed computer, or if the analyzer is moved to a different computer.
From then on, re-calibration should not be necessary unless substantial
temperature changes occur, or other hardware modifications to the computer
have been made.
To start the calibration routine, press the Run Calibration button. The entire
calibration algorithm will take approximately 4 minutes to complete. If all tests
pass the new data will be automatically written to the E²PROM.
pcRTA - User Manual
215
Chapter 7
Utilities Menu
Note- Before running the calibration routine, always allow your computer to warm
up and stabilize for at least 15 minutes. This
will provide the best accuracy.
About the Calibration Process
The top area of the dialog box displays the parameters which are stored
within the analyzer E²PROM. The lower area shows other additional results
of the calibration process. When the calibration begins, a message box will
appear that displays the tests currently being performed. If any test fails,
an error message box will appear.
The pcRTA uses the bus clock of the computer for many purposes. Each
computer may have a different bus clock speed. The calibration routine
measures the clock speed, along with extensive testing and alignment of
the analyzer circuitry.
All of the parameter fields shown in the dialog box are largely selfexplanatory, and require no intervention on the part of the user. They are
provided for diagnostic information if tests fail. However, user adjustment
of absolute level is provided in the top edit box for the OSC square wave
level if necessary.
The absolute levels are measured based on the +5V logic power supply of
the computer. This voltage is controlled quite tightly, and no adjustment
is normally required. If you wish to adjust this level, you must measure the
full RMS square wave output voltage with a true RMS meter. The value is
then entered in dBm (0dBm=0.775Vrms).
You do not need to change or adjust this 9.6dBm level, unless you have the
proper equipment and are confident that your measurements are very
accurate.
216
pcRTA - User Manual
Chapter 8
View Menu
View Menu
Chapter
8
pcRTA - User Manual
217
Chapter 8
View Menu
218
pcRTA - User Manual
Chapter 8
View Menu
8.1 Zoom In / Zoom Out
The Zoom In and Zoom Out menu options can be used to control the
magnification factor of the large window. The minimum zoom level is 100%
which is full view, and the maximum zoom level is 800%. These commands can
also be activated from the Tool Bar using the Zoom In and Zoom Out buttons.
The zoom magnification increment/decrement is 141% and 71% respectively.
These values were chosen to produce a doubling or halving of the magnification level for every two clicks. These menu items can also be activated by
pressing the Zoom buttons on the Tool Bar or CTRL-PLUS (^+) and CTRLMINUS (^-) on the keyboard.
400% Zoom Level
100% Zoom Level
pcRTA - User Manual
219
Chapter 8
View Menu
8.2 1X / 2X / 4X / 8X
These four menu options can be used to set a specific magnification level
directly. They are largely self explanatory. 1X is 100%, 2X is 200%, 4X is 400%
and 8X is 800%. The 1X command can also be activated from the Tool Bar using
the ZoomFull button or by pressing ALT-1 on the keyboard. The 2X, 4X, and 8X
levels can be activated by pressing ALT-2, ALT-4, and ALT-8 on the keyboard.
1X - 100% Zoom Level
4X - 400% Zoom Level
220
2X - 200% Zoom Level
8X - 800% Zoom Level
pcRTA - User Manual
Chapter 8
View Menu
8.3 Redraw Screen
This menu option can be used to redraw the main graph window. It is
sometimes necessary to refresh the window manually when making changes
to the data curves or font selections.
The command is largely self explanatory. This command can also be activated
from the Tool Bar using the Rdrw Scrn button or by pressing CTRL-R (^R) on the
keyboard.
pcRTA - User Manual
221
Chapter 8
View Menu
8.4 Scale Up / Scale Auto / Scale Down
Scale Up
The Scale Up menu option increases the value at the top of the graph scale by
one major division. Note- this is moving the scale up, so the data being displayed
moves down. The exact amount of the increase will depend on the type of scale,
and/or the dB per division. For log scales such as impedance, the increase will
conform to a 1-2-5 sequence. The screen will be automatically redrawn after
the operation. This command can also be activated from the Tool Bar using the
↑) on the keyboard.
Scale Up button or by pressing CTRL-UP (^↑
Scale Auto
The Scale Auto menu option is used to allow the system to automatically adjust
the scale. When pressed, the program scans the data in the curves currently
being displayed, and determines the necessary top scale value.
This function is very useful for quickly locating the position of curves which are
currently not visible on the graph. The screen will be automatically redrawn
after the operation. This command can also be activated from the Tool Bar using
the Scale Auto button or by pressing CTRL-A (^A) on the keyboard.
Scale Down
The Scale Down menu option decreases the value at the top of the graph scale
by one major division. Note- this is moving the scale down, so the data being
displayed moves up. The exact amount of the decrease will depend on the type
of scale, and/or the dB per division. For log scales such as impedance, the
increase will conform to a 1-2-5 sequence. The screen will be automatically
redrawn after the operation. The screen will be automatically redrawn after the
↓) on
operation. This button can also be activated by pressing CTRL-DOWN (^↓
the keyboard.
222
pcRTA - User Manual
Chapter 8
View Menu
8.5 Show/Hide Tool Bar
The Show/Hide Tool Bar menu option is used to control the display of the Tool
Bar. This bar is a floating window which provides quick access to commonly
used functions.
The menu text will toggle between Show... and Hide... to display the current
available and relevant operation. The position of the window is persistent,
which means that the bar will appear at its last position when the show
command is again used. The accelerator key CTRL-T (^T) can also be used to
activate the command.
If you change your video hardware and reduce your video system resolution,
the tool bar may disappear. To find it, simply hide the bar and then show it again.
The position will be updated to the new video limits.
pcRTA - User Manual
223
Chapter 8
View Menu
8.6 Show/Hide Curve Box
The Show/Hide Curve Box menu option is used to control the display of the
Curve Box. This box is a floating window which provides quick access to the
Curve Library.
The menu text will toggle between Show... and Hide... to display the current
available and relevant operation. The position of the window is persistent,
which means that the box will appear at its last position when the show
command is again used. The accelerator key CTRL-C (^C) can also be used to
activate the command.
If you change your video hardware and reduce your video system resolution,
the Curve Box may disappear. To find it, simply hide the box and then show
it again. The position will be updated to the new video limits.
224
pcRTA - User Manual
Chapter 9
Help Menu
Help Menu
Chapter
9
pcRTA - User Manual
225
Chapter 9
Help Menu
226
pcRTA - User Manual
Chapter 9
Help Menu
9.1 Contents
The Contents menu option will open the pcRTA Help system, and display a
large window with the table of contents for the help file. The underlined list of
topics can be jumped to directly simply by clicking on the desired item.
The other Windows help system general commands can also be used to aid you
in your use of help including Search, Back, and History.
pcRTA - User Manual
227
Chapter 9
Help Menu
9.2 Search
The Search menu option will open the pcRTA Help system, and display a large
window with an edit box for a topic search. You have the choice of using the
list box to scroll through the list to find a topic, or by typing in a topic name and
allowing the system to search for a matching name. To jump to the selected
topic press the GoTo button.
The other Window's help system general commands can also be used to aid you
in your use of help including Contents, Back, and History.
228
pcRTA - User Manual
Chapter 9
Help Menu
9.3 About pcRTA
The About pcRTA menu option will open a dialog box containing various
system statistics, information from the analyzer hardware, as well as your
registration data. The system statistics are largely self explanatory by their
names and values. Some of this information may be asked for when you call
for technical support.
The analyzer data box gives your I/O port address, the ISA bus clock speed in
your computer, the serial number of your board, revision level, the production
date, and the last calibration date.
pcRTA - User Manual
229
Chapter 9
Help Menu
230
pcRTA - User Manual
Chapter 10
Cinema Applications
Cinema Applications
Chapter
10
pcRTA - User Manual
231
Chapter 10
Cinema Applications
232
pcRTA - User Manual
Chapter 10
Cinema Applications
10.1 Introduction
This chapter covers the measurement and adjustment of commercial cinema
surround sound systems. The information is presented in a way that allows the
installer/service technician to perform a specific procedure without reading the
entire text in detail. Every effort has been made to minimize the time spent
reading the manual.
The information is generic, meaning that it should be useful no matter which
cinema processor is being used.
Some of the steps shown for each type of measurement will not need to be
completed each time a measurement is made. For example, each procedure
shows the process of creating a new curve library. Since each curve library can
hold 20 data curves, the amplitude measurements (A-Chain alignment, B-Chain
alignment, Noise Criteria) could all be saved to a single amplitude library. This
would eliminate the first step in most of the procedures. Reverb Time measurements require a separate library.
Organization
The sections of this chapter that deal with the various types of measurements
have a common structure. The first part of each section shows the setup of the
software. Next, there is a generalized procedure for measurement and adjustment. Finally, each section contains some notes about issues that pertain to that
type of measurement and how the settings in the software will affect the results.
Control Panel Settings and Graph Display Settings
Given the broad range of applications that pcRTA can perform, it is not
surprising that there are many, many features and functions in the software that
must be taken into account when setting up for measurements. This has led to
the development of what we call settings files. These are files that 'remember'
the control panel settings and the graph display settings that were in use for a
particular test. Several of these files are provided with the software as templates
to allow for quick setups when taking measurements.
This chapter will make extensive use of these settings files. After the files have
been loaded, you can make changes to the control panel and graph display
parameters and then simply save new files so that you can always recall the
exact settings used for any given test. (It is recommended that you keep copies
of the default files.)
pcRTA - User Manual
233
Chapter 10
Cinema Applications
234
pcRTA - User Manual
Chapter 10
Cinema Applications
10.2 General Setup
The figure below is the opening screen of the pcRTA. This is what you will see
when you first open the program.
There are some things you can do now to clarify the information shown on the
screen.
Curve Box
First, hide the Curve Box. Go to the
View menu and click on Hide Curve
Box.
Click here to
hide the Curve
Box
pcRTA - User Manual
235
Chapter 10
Cinema Applications
Line Graph
Maximize Button
Tool Bar
Your screen should now look like the figure above. The Line Graph will be used
to display the data for frequency response measurements in this text. Click on
the Line Graph Maximize button.
Your screen should
look like this.
236
pcRTA - User Manual
Chapter 10
Cinema Applications
Connecting to the pcRTA
You will be using the Line Input of the pcRTA to perform A-chain
measurements. You may also need the Line Output to inject pink noise
into the processor for B-chain measurements. These are unbalanced
connections, and shielded cable must be used to connect to them.
The pcRTA 100 ft. snake was developed specifically for cinema installers.
It provides a means to bring the signals of four discrete microphones from
the floor of the house up to the projection booth through a single cable.
If you have the pcRTA Snake (as shown in the figure below), you will use
the black RCA plug to connect to the Line Input of the pcRTA and the red
RCA plug to connect to the Line Output of the pcRTA.
DB15F
Red RCA Plug
LINE OUT
To pcRTA
Black RCA Plug
LINE IN
Mic Inputs 1-4
pcRTA 100ft. Snake
pcRTA - User Manual
237
Chapter 10
Cinema Applications
If you do not have the pcRTA 100ft. Snake, you will use the pcRTA
connector box as shown in the figure below. To connect to the Line Input
and Line Output on this box, you will need 1/4 inch Phone plugs.
Line In connector
DB15F
pcRTA Connector Box
DB15M
M I C R O P H O N E
I N P U T S
LINE IN
To pcRTA
MIC 1
MIC 2
MIC 3
MIC 4
LINE OUT
Line Out connector
Center Conductor
1/4 INCH PLUG
SHIELDED CABLE
Shield
238
pcRTA - User Manual
Chapter 10
Cinema Applications
10.3 Microphones
The microphones that are designed to function with pcRTA are all calibrated to
a single reference microphone for frequency response correction in the range
from 10Hz to 40kHz. This correction is applied to the measured response by
the pcRTA during measurements. This technique results in a microphone
response accuracy of ±1dB from 10Hz to 40kHZ.
Each LinearX microphone is provided with a calibration file on a 3.5" floppy
known as an MDF (Microphone Data File). The pcRTA system uses MDF's to
obtain the necessary sensitivity and response curve information about a given
microphone. The MDF consists of an ASCII text file with 552 data points
arranged in four columns; index, frequency, magnitude and phase. The open
format of this file allows the user to easily edit an existing MDF, or create their
own MDF for mics made by other manufacturers.
It is very important that the MDF files for each microphone are loaded correctly
and that the microphones are connected to the proper inputs. If this is not done
correctly, it can introduce errors in the measurements.
pcRTA - User Manual
239
Chapter 10
Cinema Applications
Microphone Mounting
When choosing a mounting method for the mics, it is important to keep
reflecting surfaces to a minimum. Some mic clips have flat surfaces which
can cause measurement artifacts in the high frequencies. The best possible
shape to have near the mic is a small cylinder, because the reflections are
directed away from the mic capsule.
One technique that has been used successfully to reduce early reflections
at high frequencies is to mount the microphone inside a hollow tube or
pipe with a diameter slightly larger than the mic. This provides an extension
that does not significantly impact the acoustic signature of the microphone's
body. Care must be taken not to obstruct the capsule in any way.
The microphones should be pointed at the ceiling because of the nondirectional nature of the source, and the reverberant quality of the larger
rooms that are typical of cinemas. This type of mounting requires the MDF
files to be converted from the on-axis type to the random pressure field type
as discussed in later paragraphs.
Speaker(s)
On-Axis
Pressure Field
On-axis vs. Pressure Field
240
pcRTA - User Manual
Chapter 10
Cinema Applications
Microphone Placement
Microphones should not be placed directly on the center lines of the cinema.
The mics should be in an asymmetrical pattern. They should also be at least 6
inches above the top of the seats to avoid any grazing effects.
According to ANSI/SMPTE 202M-1991:
"It is recommended that measurements be made at a normal seated ear height
between 1.0 m and 1.2 m (3.3 ft. and 4.0 ft.), but not closer than 150 mm (6 in)
from the top of a seat, and not closer than 1.5 m (4.9 ft.) to any wall and 5.0 m
(16.4 ft.) from the loudspeaker(s)."
"Microphone positions employed in a spatial average shall be distributed
among a range of positions in lateral and transverse directions to minimize the
influence of any particular room mode. The minimum spacing of the microphones in an average shall be 1.0 m (3.3 ft.)."
Microphone Placement For
RT60, NC, and B-Chain Alignment
Screen
pcRTA - User Manual
241
Chapter 10
Cinema Applications
On-Axis vs. Random Pressure Field Calibration and Conversion
By default, all MDF files produced by LinearX are calibrated for on-axis free
field response. This type of calibration is utilized when the mic is directly
on-axis with the sound source. However, for reverberant fields such as
large cinemas where the sound source is not localized, a random pressure
field measurement is typically performed. In this case the mic is generally
pointed upwards, and the calibration data is referenced to a 90 degree offaxis measurement. The MDF Convert option provides the means to
convert the default on-axis MDF microphone response files into their
equivalent random pressure field response files.
Go to the Edit menu and choose Microphone Setup, then
choose MDF Convert.
A dialog box opens with the title: Select OnAxis MDF file to
convert to Random MDF file. This box allows you to browse
for the MDF file you wish to convert. The default path is the
program sub-directory, where the MDF files are typically
located. The source MDF file will be of the form
"SNnnnnnn.MDF", where nnnnnn is the six digit serial number
of the mic.
The converted output file will be placed into the same subdirectory and have a new name of the form "SRnnnnnn.MDF",
where the SN has been replaced by SR (meaning random
calibration). This makes it easy to tell the original on-axis MDF
file from the new random MDF file of the same serial number.
After you have converted the MDF file(s), you can load them
into the mic inputs as shown on the next page.
The MDF Convert option can only be used with MDF files
generated for LinearX microphones. The convert routine checks the model
name (M31, M51, M52, M53) and appropriately applies the correct
transfer function to produce the new random pressure field calibration
data. This function will not work for MDF files created by the user to
represent other 3rd party microphones.
242
pcRTA - User Manual
Chapter 10
Cinema Applications
Installing the MDF Files
You may have already completed this procedure when installing the pcRTA. If
so, you can skip this step. However, before measuring you should verify that the
MDF's for each input match the microphones connected to that input. Failure
to do so can result in significant errors in the measured data.
Go to the Edit menu and choose Microphone Setup, then
choose Mic Input 1. The Microphone Setup dialog box opens
which shows the current parameters assigned to mic input 1.
The parameters at this time will be blank, or zero.
Press the Load MDF File button in the Microphone Setup dialog
box.
The Load Mic Data dialog
box will appear. This dialog
box allows you to browse for
MDF files. When you have
selected a file, click OK.
NOTE: If you do not see any files with the MDF
extension in the pcrta directory, you should copy them
from the 3.5" floppy disks provided with the mics into
the pcrta directory on the hard drive using Windows File
Manager or an equivalent program before proceeding.
pcRTA - User Manual
243
Chapter 10
Cinema Applications
The system will then read the file and derive the necessary parameters.
When completed, the setup parameter fields will be filled in as shown in
the dialog box below.
Close the Microphone Setup dialog box by pressing OK. If you use Cancel
to close this box, the MDF information will be discarded and you will have
to load it again.
Repeat the above process for the other inputs. Since each input is
configured for a specific mic, you will need to keep track of which mics
have been setup for which inputs. If you ever forget which mics are setup
for which inputs, just check the Microphone Setup dialog box for each
input. The parameter fields include a serial number that shows what MDF
file was loaded for that input.
244
pcRTA - User Manual
Chapter 10
Cinema Applications
10.4 A-Chain Alignment
The A-chain is the source side of the system. The audio signal that is recorded
in the dubbing studio is first reproduced thru the A-chain. It may consist of an
optical preamplifier using a soundtrack recorded on the film, or it may be a
magnetic preamplifier playing a tape that syncs to the film.
Alignment of the A-chain normally involves the use of an oscilloscope and a real
time analyzer. This procedure shows the use of the pcRTA to measure the
frequency response of the optical preamplifier during the adjustment process.
There is a description in the notes portion of this section of an alternative
method for measuring azimuth adjustment that eliminates the need for an
oscilloscope.
pcRTA - User Manual
245
Chapter 10
Cinema Applications
STEP 1 Open a new AMPLITUDE MODE curve library.
Go to the File menu and choose New, then choose Amplitude. The
program creates a new amplitude library with the name: Untitled.db.
To give it a different name, go to the File menu
and choose SaveAs.
A dialog box with the title Save Amplitude(dB) File opens. Type in the
name you want to give the file and click OK.
You now have a new
amplitude curve library with 20 blank
entries ready to receive data.
246
pcRTA - User Manual
Chapter 10
Cinema Applications
STEP 2
Select and name a curve to receive the measured A-Chain data.
Click on the Curve Library button on the Tool Bar. The Curve Library dialog
box opens.
Curve Library
Button
In the figure below, curve 1 is currently selected for saving the data and
displaying it. Before each measurement, another curve must be selected in the
Curve Library as the data curve, or the previous test will be overwritten.
Curve Name
Edit Box
To select another curve for display, click on the oval to the right of the curve
number. This will set that curve to save the data from the next test and to display
on the graph.
To name a curve, click inside the curve name edit box, and type in the new
name.
Click OK to close the Curve Library dialog box and save any changes you have
made.
pcRTA - User Manual
247
Chapter 10
Cinema Applications
STEP 3
Load A-Chain Control Panel Settings and Graph Display Settings.
Go to the File menu and select Load Graph Display Set. A dialog box
titled Load Graph Display Set File opens.
Load the file CINE_ACH.GDS. This file will set all of the characteristics of the display.
Click OK to close the dialog box.
Go to the File menu and select Load Control Panel Set. A dialog box
titled Load Control Panel Set File opens.
Load the file CINE_ACH.CPS. This file will set all of the parameters
of the control panel.
Click OK to close the dialog box.
248
pcRTA - User Manual
Chapter 10
Cinema Applications
The Line Graph should look like the one shown here.
There is a data curve on this graph showing the ideal response of the optical
preamp before adding the slit loss high frequency EQ.
You are now ready to start measuring the frequency response of the optical
(and/or magnetic) preamplifier(s).
pcRTA - User Manual
249
Chapter 10
Cinema Applications
General procedure for A-chain Alignment
The mechanical and optical checks of the A-chain should be completed
before this procedure is started. Consult the manufacturer's documentation.
Run Test Button
Load the pink noise film loop. Connect the oscilloscope's X input to the left
channel of the cinema processor, and it's Y input to the right channel of the
cinema processor. Connect the Line In of the pcRTA to the left channel.
Press the Run Test button on the Tool Bar to view the signal on the pcRTA.
If you do not see the changing data, you may need to press the Auto Scale
button on the Tool Bar.
Adjust the azimuth of the projector optics for the narrowest diagonal trace
on the oscilloscope. Adjust the focus for the best high frequency response
on the pcRTA.
The azimuth and focus adjustments are interdependent and you must
alternate between these measurements until the best results are achieved.
When the azimuth and focus adjustments are complete, adjust the high
frequency slit loss equalizer for optimal flat response as viewed on the
pcRTA.
Auto Scale Button
Connect the pcRTA to the right channel and repeat the adjustments.
250
pcRTA - User Manual
Chapter 10
Cinema Applications
Notes for A-chain Alignment
Here are the Control Panel settings saved in the Control Panel Set file
CINE_ACH.CPS:
Control Panel Parameters
Parameter
Value
Parameter
Value
Gen Auto On/Off
Gen Output Level
Input Source
MultiMic Select
Detector
Averaging Time
Full Band
Off
N/A
Line Input
N/A
Leq(s)
1.00 Sec
N/A
RTA Bands
ANSI Filter
Type of Data
Dynamic Range
Testing Mode
Measurement Data
Flat
N/A
SPL
Auto
Continuous
Absolute
pcRTA - User Manual
251
Chapter 10
Cinema Applications
Notes for A-chain Alignment (continued)
Here are the Graph Setup settings saved in the Graph Display Set file
CINE_ACH.GDS:
Graph Setup Parameters
Bar Graph Settings
Parameter
Value
Parameter
Value
Scale Top Value
dB/Div
Type:
Major / Minor Div
Graph Bars
Full Rng Band Display
1/3 Octave
1 Octave
Single Band
10
5
Absolute
4, 5
Dot-Rainbow
Off
On
Off
Off
Scale Top Value
dB/Div
Type:
Major / Minor Div
Length of Hash, Dot
Full Rng Band Display
1/3 Octave
1 Octave
Single Band
10
5
Absolute
4, 5
30, 10
Off
On
Off
Off
Amplitude Reference Curves
Noise Contours
SMPTE N-Curve
SMPTE X-Curve
Surround Curve
252
Line Graph Settings
Off
Off
Off
Off
Text Chart Settings
All Parameters
N/A
pcRTA - User Manual
Chapter 10
Cinema Applications
Notes for A-chain Alignment (continued)
If you do not have an oscilloscope, or want to avoid taking it up to the projection
booth, you can set the azimuth by adding the right and left signal electrically and
observing the high frequency response. The signals should have a series
resistance added to avoid damaging the processor's output circuitry. The
diagram below shows the connection method for this technique.
2kΩ
From Processor Left Output
To pcRTA Line Input
2kΩ
From Processor Right Output
The graph will display a single curve which is a composite of the left and right
channels. The azimuth is adjusted for minimum loss in the high frequency
region. This setup uses the standard CPS and GDS files used for the A-chain
alignment.
Note: It is important to check that the optical head is perpendicular to the surface
of the film after adjustment. It is possible to get a false 'good' reading when the
azimuth adjustment is very skewed. When it is near perpendicular, however,
there will be only one best response position.
pcRTA - User Manual
253
Chapter 10
Cinema Applications
Notes for A-chain Alignment (continued)
It is possible using the pcRTA to view both the left and right channels of the
optical preamp simultaneously for easier adjustment of the optics and slit
loss eq. The procedure requires the user to build two adaptors to attach the
left and right signals to the Mic-1 and Mic-2 inputs on the pcRTA. The wiring
of the adaptors is shown in the figure below.
Pin 1
(Common)
Pin 3
(Not Used)
Pin 2
(Signal)
MALE XLR PLUG
Shield
SHIELDED CABLE
Center Conductor
NOTE: Nothing should be tied to pin 3 of the XLR. Pin 3 carries the 10VDC
power supply for the microphones. Connecting this pin to anything other
than a LinearX microphone can result in severe damage to the pcRTA.
The units of measure on the Control Panel must be set to dBm, so that the
microphone calibration files do not affect the measurements. The Input
Source must be set to MultiMic, with only mics 1 and 2 enabled for
measurement. The Multiplex button must be pressed instead of the
Average button, so that pcRTA will display two separate curves rather than
one average curve of the two inputs. These control panel settings are
contained in the Control Panel Settings file CINE_AC2.CPS.
When the MultiMic mode is selected, the data curves will always be in the
first four curve entries of the curve library. Data from Mic-1 will be stored
in curve 1, Mic-2 in curve 2, and so on. If you have measurement data in
the first four curve entries that you want to save, move the data to another
curve entry or create a new library.
Press the Start Test button on the Tool Bar. The Line Graph should have
two nearly identical lines on it, one for each mic.You can now adjust the
optics and slit loss eq's while observing the changes on both channels at
the same time. See the next page for the Control Panel settings used to
make this measurement.
254
pcRTA - User Manual
Chapter 10
Cinema Applications
Notes for A-chain Alignment (continued)
Here are the Control Panel Setup settings saved in the Control Panel Set file
CINE_AC2.CPS:
Control Panel Parameters
Parameter
Value
Parameter
Value
Gen Auto On/Off
Gen Output Level
Full Band Response
RTA Bands Resp.
Weighting Filter
Type of Data
Averaging Time
Input Source
Enable Mic1
Enable Mic2
Off
N/A
N/A
Flat
N/A
dBm
1.00 Sec
MultiMic
On
On
Enable Mic3
Enable Mic4
Average
Multiplex
Normalized
Dynamic Range
Testing Mode
Measurement Data
Off
Off
Off
On
Off
Auto
Continuous
Absolute
pcRTA - User Manual
255
Chapter 10
Cinema Applications
10.5 B-Chain Alignment
Alignment of the B-chain can be done entirely with the pcRTA and your
ears. The process involves measuring full band, C-weighted SPL to set the
outputs of the individual channels to the same level and then equalizing
each channel while viewing the frequency response.
The Normalized option will be turned on in the Control Panel for these
measurements. This feature normalizes the sensitivity of all the mics at
1kHz so that they will each have equal weighting in the 4 mic average. This
is essential for proper adjustment of the equalizer.
There are many display options for viewing the full band SPL. You can
switch between a text display of the full band SPL and a graph of frequency
response using the Window menu. The Bar Graph and Line Graph each
have the option of showing the full band SPL as a part of the curve or as
a small text display in the upper left corner. Using the multiple windows,
you can display the full band SPL with ANSI C weighting while simultaneously displaying the 1/3 octave bands unweighted as bars or a line .
This text will show two specific methods of viewing the full band SPL. Both
methods will use the multiple windowing capability. The first involves
maximizing the graphs, then switching between a line graph and a full band
SPL text chart. This method is recommended for displays with a resolution
of 640x480(VGA) or 800x600(SVGA). The second method, recommended
for resolutions of 1024x768 or higher, is to place a small copy of the text
chart with full band SPL displayed in the corner of the screen, while having
a larger line or bar graph covering most of the rest of the screen.
256
pcRTA - User Manual
Chapter 10
Cinema Applications
STEP 1 Open a new AMPLITUDE MODE curve library.
Go to the File menu and choose New, then choose Amplitude. The program
creates a new amplitude library with the name: Untitled.db.
To give it a different name, go to the File menu and
choose SaveAs.
A dialog box with the title Save Amplitude(dB) File opens. Type in the name
you want to give the file and click OK.
You now have a new
amplitude curve library with 20 blank
entries ready to receive data.
pcRTA - User Manual
257
Chapter 10
Cinema Applications
STEP 2
Select and name a curve to receive the measured B-Chain data.
Click on the Curve Library button on the Tool Bar. The Curve Library
dialog box opens.
Curve Library
Button
In the figure below, curve 1 is currently selected for saving the data and
displaying it. Before each measurement, another curve must be selected in
the Curve Library as the data curve, or the previous test will be overwritten.
Curve
Name
Edit Box
To select another curve for display, click on the oval to the right of the curve
number. This will set that curve to save the data from the next test and to
display on the graph.
To name a curve, click inside the curve name edit box, and type in the new
name.
Click OK to close the Curve Library dialog box and save any changes you
have made.
258
pcRTA - User Manual
Chapter 10
Cinema Applications
STEP 3
Load B-Chain Control Panel Settings and Graph Display Settings.
Go to the File menu and select Load Graph Display Set. A dialog box
titled Load Graph Display Set File opens.
Load the file CINE_BCH.GDS. This file will set all of the characteristics of the display.
Click OK to close the dialog box.
Go to the File menu and select Load Control Panel Set. A dialog box
titled Load Control Panel Set File opens.
Load the file CINE_BCH.CPS. This file will set all of the parameters
of the control panel.
Click OK to close the
dialog box.
pcRTA - User Manual
259
Chapter 10
Cinema Applications
The Line Graph should look like the one shown here.
There are no data curves on this graph, only the grid and the SMPTE-X
curves overlay.
You will see three high frequency rolloff curves in the high end of the
SMPTE-X reference curve. These curves reflect the fact that the highfrequency roll-off characteristics change for different room sizes. The
reference curves correspond to rooms with 30 seats, 500 seats, and 2000
seats.
260
pcRTA - User Manual
Chapter 10
Cinema Applications
Run Test Button
General procedure for B-chain Alignment
The settings you have loaded include a 10 second averaging time. This means
that the pcRTA will collect measurements for 10 seconds and then display the
average of all measurements taken during that time. The process then repeats,
with all new data. The curve will only change once every 10 seconds.
For coarse adjustments, you could use a faster averaging time. This way, the
effects of your adjustments to the system become visible more quickly. At the
low frequencies, you will have trouble using faster averaging, so this technique
is mainly useful for the mid and high frequencies. The fine adjustments should
be done with 10 second averaging or longer for the highest accuracy.
Click the Run Test button on the Tool Bar to begin. The Run Test button
changes to the Stop Test button while a test is running. You can leave the test
running as long as required to set the channel gains and adjust the equalizers.
The typical adjustment process calls for setting the gain of each channel to
85db, C-weighted and then adjusting the eq for a flat response. The software
settings that are loaded provide C-weighting on the full band readout and no
weighting on the RTA response readout. See the Notes section for information
about switching the display between full band SPL text chart display and RTA
response line graph or bar graph.
Before adjusting the equalization on each channel, it is a good idea to check
for a similar response from each channel and for even coverage throughout the
room. If one channel has a drastically different response, it may have a blown
driver or crossover problem. Checking the response at each mic individually
will indicate any problems with severe standing waves at one mic position. This
can cause misrepresentative readings when averaging four mics, and the
microphone should be moved.
When you are finished adjusting each channel of the system, you can save the
curve for future reference or to provide the customer with hard copy of the final
response curves. Simply click the Stop Test button when a channel is complete,
then go to the Curve Library and designate a new entry to receive the data. Save
the library when finished and you will have a record on the hard disk of the
installation. This information can be very valuable when returning to the theater
for realignment of the system.
pcRTA - User Manual
261
Chapter 10
Cinema Applications
Notes for B-chain Alignment
Here are the Control Panel settings saved in the Control Panel Set file
CINE_BCH.CPS:
Control Panel Parameters
262
Parameter
Value
Parameter
Value
Gen Auto On/Off
Gen Output Type
Gen Ouput Level
Full Band Response
RTA Bands Resp.
Weighting Filter
Type of Data
Averaging Time
On
Pink Noise
0.00 dBm
ANSI
Flat
ANSI-C Filter
SPL
10.00 Sec
Input Source
Enable Mic 1-4
Average
Multiplex
Normalized
Dynamic Range
Testing Mode
Measurement Data
MultiMic
On
On
Off
On
Auto
Continuous
Absolute
pcRTA - User Manual
Chapter 10
Cinema Applications
Notes for B-chain Alignment (continued)
Here are the Graph Setup settings saved in the Graph Display Set file
CINE_BCH.GDS:
Graph Setup Parameters
Bar Graph Settings
Line Graph Settings
Parameter
Value
Parameter
Value
Scale Top Value
dB/Div
Type:
Major / Minor Div
Graph Bars
Full Rng Band Display
1/3 Octave
1 Octave
Single Band
80
5
Absolute
8, 5
Dot-Rainbow
Off
On
Off
Off
Scale Top Value
dB/Div
Type:
Major / Minor Div
Length of Hash, Dot
Full Rng Band Display
1/3 Octave
1 Octave
Single Band
80
5
Absolute
8, 5
30, 10
Off
On
Off
Off
Amplitude Reference Curves
NC Off
SMPTE N Off
SMPTE X On
Surround Off
Level(dB) 70.0
Text Chart Settings
Parameter
Value
Parameter
Value
Single Title Font Size
Single Readout Font Size
All Other Font Settings
Box Background Color
19.0
212.0
As Desired
As Desired
1/3 Octave
1 Octave
Single Band
Band to Display
Off
Off
On
Full Hz
pcRTA - User Manual
263
Chapter 10
Cinema Applications
Click here to display
Text Chart
Notes for B-chain Alignment (continued)
With the settings you have loaded, you can switch to a text chart view of
the full band SPL using the Window menu or the CTRL-TAB keys. Click 1
Text Chart on the Window menu or press CTRL-TAB until the text chart
appears as the focused window.
NOTE: The CTRL-TAB method will only work when the
graph window is maximized.
You will now see a full screen Text Chart as shown above. This graph is
displaying the C-Weighted full band SPL in large digits.
Now you can resize the Text Chart to a small window in the corner and view
the line graph as a large window taking up most of the screen. This allows
you to see the full band SPL and the real time response curve simultaneously. This mode is recommended for higher video resolutions and large
screen monitors. See the figure on the next page.
264
pcRTA - User Manual
Chapter 10
Cinema Applications
To use this mode, the software must be set to update both windows at the same
time. Go to the Edit menu and click on System Options (F10). Set the Window
Update to Multi Mode.
Multi Mode Button
System Options
pcRTA - User Manual
265
Chapter 10
Cinema Applications
10.6 Noise Criteria (NC) Measurement
Noise floor measurements characterize the steady-state background noise
level in an acoustic space. The pcRTA has built-in reference curve overlays
for NC responses.
The microphone that you use will affect your ability to measure low-noise
environments. For applications in which you only need to verify that the
house meets the NC-35 criteria or higher, the M51 mic will suffice. If you
need to measure as low as NC-15, you will need the M53 low-noise
microphone.
Noise measurements may be taken from one microphone at a time to
eliminate the electronic switching noise present in all multiplexed systems.
This should only be a concern when using a fast averaging time. When
using a longer averaging time (10 seconds or more), you can measure each
of the four microphones automatically, and without leaving the measurement position. You can then average the curves from each location to
produce a measurement that represents the background noise of the entire
room.
Measuring noise is also an important first step to making Reverb Time
measurements. This will be explained in greater detail in the RT section of
this chapter.
266
pcRTA - User Manual
Chapter 10
Cinema Applications
STEP 1 Open a new AMPLITUDE MODE curve library.
Go to the File menu and choose New, then choose Amplitude. The program
creates a new amplitude library with the name: Untitled.db.
To give it a different name, go to the File menu and
choose SaveAs.
A dialog box with the title Save Amplitude(dB) File opens. Type in the name
you want to give the file and click OK.
You now have a new
amplitude curve library with 20 blank
entries ready to receive data.
pcRTA - User Manual
267
Chapter 10
Cinema Applications
STEP 2
Select and name a curve to receive the measured data.
Click on the Curve Library button on the Tool Bar. The Curve Library
dialog box opens.
Curve Library
Button
In the figure below, curve 1 is currently selected for saving the data and
displaying it. Before each measurement, another curve must be selected as
the data curve or the previous test will be overwritten.
Curve Name
Edit Box
To select another curve for display, click on the oval to the right of the curve
number. This will set that curve to save the data from the next test and to
display on the graph.
To name a curve, click inside the curve name edit box, and type in the new
name.
Click OK to close the Curve Library dialog box and save any changes you
have made.
268
pcRTA - User Manual
Chapter 10
Cinema Applications
STEP 3
Load Noise Criteria Control Panel Settings and Graph Display Settings.
Go to the File menu and select Load Graph Display Set. A dialog box
titled Load Graph Display Set File opens.
Load the file CINE_NC.GDS. This file will set all of the characteristics
of the display.
Click OK to close the dialog box.
Go to the File menu and select Load Control Panel Set. A dialog box
titled Load Control Panel Set File opens.
Load the file CINE_NC.CPS. This file will set all of the parameters of
the control panel.
Click OK to close the dialog box.
pcRTA - User Manual
269
Chapter 10
Cinema Applications
The Line Graph should look like the one shown here.
The data curve on this graph would pass the NC-20 criteria, but would not
meet NC-15.
You are now ready to take an NC measurement.
270
pcRTA - User Manual
Chapter 10
Cinema Applications
Run Test Button
General procedure for Noise Criteria Measurements
The settings you have loaded include a 10 second averaging time and a four mic
multiplexing arangement. This means that the pcRTA will collect measurements
from Mic Input 1 for 10 seconds, then display the average of all measurements
taken during that time and store that data in curve entry number 1. The process
then repeats at Mic Input 2, storing the data in curve entry 2. When all four mic
inputs have been measured, the test will stop. If you start the test again, the data
in curves 1-4 will be overwritten.
Click the Run Test button on the Tool Bar to begin. Wait for the pcRTA to
complete the measurement cycle (total of 40 seconds). The Run Test button
changes to the Stop Test button when a test is running, but the software will not
allow you to interrupt the test.
The data from the test is stored in the Curve Library in entries 1 through 4,
corresponding to mic inputs 1 through 4. If you wish, you can use the
Averaging Process to produce a single averaged noise curve from the four
stored curves.
pcRTA - User Manual
271
Chapter 10
Cinema Applications
Notes for Noise Criteria Measurements
Here are the Control Panel settings saved in the Control Panel Set file
CINE_NC.CPS:
Control Panel Parameters
272
Parameter
Value
Parameter
Value
Gen Auto On/Off
Gen Output Level
Input Source
MultiMic Select
Detector
Averaging Time
Full Band Response
Off
N/A
Mic Input-1
N/A
Leq(s)
10.0 Sec
ANSI
RTA Bands Resp.
ANSI Filter
Type of Data
Dynamic Range
Testing Mode
Measurement Data
Flat
ANSI-C
SPL
Auto
Continuous
Absolute
pcRTA - User Manual
Chapter 10
Cinema Applications
Notes for Noise Criteria Measurements (continued)
Here are the Graph Setup settings saved in the Graph Display Set file
CINE_NC.GDS:
Graph Setup Parameters
Bar Graph Settings
Line Graph Settings
Parameter
Value
Parameter
Value
Scale Top Value
dB/Div
Type:
Major / Minor Div
Graph Bars
Full Rng Band Display
1/3 Octave
1 Octave
Single Band
80
10
Absolute
8, 5
Dot-Rainbow
Off
On
Off
Off
Scale Top Value
dB/Div
Type:
Major / Minor Div
Length of Hash, Dot
Full Rng Band Display
1/3 Octave
1 Octave
Single Band
80
10
Absolute
8, 5
30, 10
Off
On
Off
Off
Amplitude Reference Curves
Noise Contours
SMPTE N-Curve
SMPTE X-Curve
Surround Curve
Level (dB)
pcRTA - User Manual
On
Off
Off
Off
N/A
Text Chart Settings
All Parameters
N/A
273
Chapter 10
Cinema Applications
10.7 Reverb Time (RT60) Measurement
Reverb Time (RT) measurements characterize the reverberant properties
of an acoustic space. The graphs of RT display the amount of time it takes
for acoustic energy to decay by a preset amount in dB at each frequency.
The process of measuring reverberation consists of generating a stimulus
noise for a length of time sufficient to excite any reverberant modes in the
space. The stimulus is then cut off, and the analyzer detects when the noise
has decayed by a finite amount, such as 60dB (RT60). The pcRTA has builtin reference curves for measuring RT.
Measuring RT60 can be somewhat problematic, because it requires that
the sound system be capable of producing a signal that is at least 60dB
higher than the noise floor. For this reason, the pcRTA includes the ability
to measure to the less demanding limits of RT40 and RT20. Once the
measurement is made using RT40 or RT20, you can extrapolate the data
to represent RT60 by scaling the curves. If the noise floor is only a problem
at low frequencies, you can take an RT60 measurement and allow the
analyzer to time out at the low frequencies where the data is not needed
for verification of the cinema. This is explained in greater detail in the notes
section.
RT measurements are taken from one microphone at a time. The mics
cannot be multiplexed in the RT measurement mode.
To get an accurate RT60 curve for a room, it is necessary to take at least
two measurements from each microphone and then average all of the
curves.
274
pcRTA - User Manual
Chapter 10
Cinema Applications
STEP 1 Open a new Reverberation Mode curve library.
Go to the File menu and choose New, then choose Reverberation. The
program creates a new reverb time library with the name: Untitled.db.
To give it a different name, go to the File menu and
choose SaveAs.
A dialog box opens with the title Save ReverbTime(RT) File. Type in the name
you want for the file and click OK.
You now have a new reverb
time curve library with 20
blank entries ready to receive data.
pcRTA - User Manual
275
Chapter 10
Cinema Applications
STEP 2
Select and name a curve to receive the measured RT data.
Click on the Curve Library button on the Tool Bar. The Curve Library
dialog box opens.
Curve Library
Button
In the figure below, curve 1 is currently selected for saving the data and
displaying it. Before each measurement, another curve must be selected in
the Curve Library as the data curve or the previous test will be overwritten.
To select anCurve Name
Edit Box
other curve for display, click on the oval to the right of the curve number.
This will set that curve to save the data from the next test and to display on
the graph.
To name a curve, click inside the curve name edit box, and type in the new
name.
Click OK to close the Curve Library dialog box and save any changes you
have made.
276
pcRTA - User Manual
Chapter 10
Cinema Applications
STEP 3
Load Reverb Time Control Panel Settings and Graph Display Settings.
Go to the File menu and select Load Graph Display Set. A dialog box
titled Load Graph Display Set File opens.
Load the file CINE_RT.GDS. This file will set all of the characteristics
of the display.
Click OK to close the dialog box.
Go to the File menu and select Load Control Panel Set. A dialog box
titled Load Control Panel Set File opens.
Load the file CINE_RT.CPS. This file will set all of the parameters of
the control panel.
Click OK to close the
dialog box.
pcRTA - User Manual
277
Chapter 10
Cinema Applications
The Line Graph should look like the one shown here.
There are no data curves on this graph, only the grid and the RT curves
overlay.
You are now ready to start measuring Reverb Time.
278
pcRTA - User Manual
Chapter 10
Cinema Applications
General procedure for Reverb Time Measurements
The settings you have loaded include a 5 second stimulus time and a 5 second
time out. This means that the pcRTA will generate pink noise for 5 seconds and
then collect measurements for 5 seconds. It will then display a graph of time vs
frequency and a graph of decay rate (amplitude vs time). This will only happen
once unless you hit Run Test again.
Run Test Button
Control
Panel Button
Click the Run Test button on the Tool Bar to begin. Wait for the pcRTA to
complete it's measurement cycle (10 seconds). The Run Test button changes
to the Stop Test button while the test is running, but the pcRTA will not allow
you to interrupt this type of test.
Go to the Curve Library and select the next curve in the list to receive data. Run
the test again with the Mic-1 Input selected.
Curve Library
Button
Go to the Curve Library and select the next curve in the list to receive data. Go
to the Control Panel and change the Input Source to Mic-2 Input. Repeat the
test twice for mic 2.
Continue through all four microphones and save the data from each mic to a
different curve entry. When you are finished, use the Averaging Process to
produce a single averaged RT curve from the two sets of curves taken at four
different positions.
You may wish to use the Scale process to change an RT40 or RT20 curve to
represent an RT60 indication. Use a linear ratio of 1.5 to convert RT40 to RT60
and a linear ratio of 3.0 to convert RT20 to RT60.
pcRTA - User Manual
279
Chapter 10
Cinema Applications
Notes for Reverb Time Measurement
Here are the Control Panel settings saved in the Control Panel Set file
CINE_RT.CPS:
Control Panel Parameters
280
Parameter
Value
Gen Stimulus Time
Gen Output Level
Testing Mode
Input Source
RT Test Limit
TimeOut
5 Sec
-20.00 dBm
Cycle= 1
MicInput-1
RT60
5 Sec
pcRTA - User Manual
Chapter 10
Cinema Applications
Notes for Reverb Time Measurement (continued)
Here are the Graph Setup settings saved in the Graph Display Set file
CINE_RT.GDS:
Graph Setup Parameters
pcRTA - User Manual
Parameter
Value
RT Value at Top
RT Log Cycles
RT Major/Minor Div.
RT Length Hash/Dot
Decay Time Graph
Decay Band Display
2.0
2
8, 5
25, 15
N/A
N/A
281
Chapter 10
Cinema Applications
Notes for Reverb Time Measurement (continued)
In some rooms it may not be possible to achieve the low noise floor
necessary to take true RT60 measurements down to the 20Hz band and
up to the 20kHz band. Since most RT60 specifications are listed only from
125Hz to 8kHz, you can measure in the RT60 mode and ignore timeouts
in the low and high frequencies (below 125Hz and above 8kHz).
The curve shown here has good RT60 data within the 125Hz - 8kHz region,
while the very low and very high frequencies timed out during the
measurement. It is common to see a higher noise floor in the low frequency
region, which caused this result in the measurement.
282
pcRTA - User Manual
Chapter 10
Cinema Applications
Notes for Reverb Time Measurement (continued)
If you want to measure Reverb Time at all frequencies without timeouts, you
need to consider the size of the room, the background noise level, and the
output capability of the sound system. In the control panel, you can choose a
stimulus time, an RT test limit, and a time out (measurement cutoff time).
The stimulus time should be long enough to fully excite the reverberant modes
of the room. 5 seconds is a good starting point for this parameter.
The RT test limit should be set according to the dynamic range available. This
can be thought of as the signal to noise ratio of the room. The maximum output
of the system divided by the noise floor will give the maximum RT limit that can
be measured.
Required System Output
for RT60 Measurement
Required System Output
for RT40 Measurement
Required System Output
for RT20 Measurement
Measured Noise Floor
The graph above shows a noise floor curve that was scaled up by 20dB, 40dB,
and 60dB. This gives a graphic indication of the required output level from the
system to perform RT testing to each of the limits (RT60, RT40, RT20).
pcRTA - User Manual
283
Chapter 10
Cinema Applications
Notes for Reverb Time Measurement (continued)
The next graph shows a system's maximum output, the noise floor, and the
ratio of the two. From this, you can directly read the maxmium RT limit as
being RT40, since the signal to noise curve is above 40dB at all frequencies.
Maximum System Output
Signal to Noise Ratio
Noise Floor
The time out determines how long the pcRTA will continue before it cuts
off the measurement. In the RT60 mode, for example, when the stimulus
signal stops, the pcRTA measures the decaying signal at each frequency
until it drops by 60dB. When the time out is reached, the measurement
stops. Any bands which did not drop by 60dB will display the time out value
on the RT graph. If the stimulus signal was not 60dB above the noise floor
at any given band, that band will never fall below the RT limit, and it will time
out. If you observe bands timing out even though the dynamic range is
sufficient, increase the time out value.
284
pcRTA - User Manual
Chapter 11
Car Audio Applications
Car Audio Applications
Low Frequency Pressurization
dBspl
dBspl
18
18
15
15
12
12
9
9
6
6
3
3
0
0
-3
-3
-6
20
Hz
50
100
200
pcRTA - User Manual
500
1k
2k
5k
10k
Chapter
11
-6
20k
285
Chapter 11
Car Audio Applications
286
pcRTA - User Manual
Chapter 11
Car Audio Applications
11.1 Measuring System Response
This section of the manual assumes that the installation is complete. All
components of the system should be in place and functioning before you begin
system measurements.
There are many different ways to think about the installation of a system in a car.
The most important consideration is what you want the end result to be. Some
people want to reproduce exactly what the mixing engineer heard in the
control room when the recording was made. Others want the car to vibrate the
pavement as much as possible. Some may try to achieve a happy medium
between these two extremes.
When your goal is to realistically reproduce the orginal recording, you will want
to spend most of your time working towards a flat frequency response with
good balance between the left and right channel.
When dynamic music is being played, such as classical or jazz, the noise floor
of the system becomes very critical. Special attention should be paid to road
noise and the noise of the system with no music playing.
If you want to win a high SPL competition, you will want to create a curve with
most of it's energy in the low frequencies, because you can take advantage of
the low frequency pressurization effect that occurs in small acoustic spaces to
generate higher SPL scores.
Whether you want a ground-pounding bass generator or an audiophile dream
vehicle, the measurement process includes the same basic steps. For system
measurements, the process is simple. Make noise with the system and measure
it with pcRTA.
With the real time measurements being displayed on the screen, you can adjust
the electrical components and/or the acoustic environment and watch the
changes appear as you make them.
pcRTA - User Manual
287
Chapter 11
Car Audio Applications
Pink Noise
The most common noise source used is Pink Noise. You may be asking:
What is Pink Noise and Why Should I Use It? The simple answer is that pink
noise will produce a flat line on the pcRTA when averaged over time. Pink
noise is equal energy vs. log frequency and white noise is equal energy vs.
linear frequency. The pcRTA displays log frequency, so a pink noise signal
produces a flat line, while a white noise signal produces a line that rises with
frequency.
10
Pink Noise Spectrum
dBspl
dBspl
10
5
5
0
0
-5
-5
-10
-10
-15
-15
-20
The ocean produces a
natural pink noise. White
noise is the sound you
hear from the electronic
components in a sound
system when no music is
playing.
These graphs show what
pink noise and white
noise look like on the
pcRTA screen.
-20
25
20
40
31.5
63
50
80
100
160
250
400
630
1k
1k6
2k5
4k
6k3
10k
16k
125
200
315
500
800 1k25
2k
3k15
5k
8k
12k5 20k
0
White Noise Spectrum
dBspl
dBspl
-5
-5
-10
-10
-15
-15
-20
-20
-25
-25
-30
-30
25
20
288
0
40
31.5
63
50
80
100
160
250
400
630
1k
1k6
2k5
4k
6k3
10k
16k
125
200
315
500
800 1k25
2k
3k15
5k
8k
12k5 20k
pcRTA - User Manual
Chapter 11
Car Audio Applications
You can use the internal generator in pcRTA, or an external source such as a
CD or tape with pink noise on it. Using the internal pink noise source is highly
recommended, because it is very precise (repeatable). Using any other pink
noise source can give misleading results. Test disks may not have true pink noise
on them, they may have just a close approximation.
If you want to verify the precision of any pink noise source, you can measure
it with pcRTA. To measure an external source, plug it into the Line Input. Set
the Input Source on the Control Panel to Line Input. Set the Detector on the
Control Panel to Leq with an averaging time of at least 5.00 Seconds. Longer
average times will yield more accurate results. When you run a test with these
settings, you should see a flat line across the
screen. The flatter the line, the more precise
the pink noise source.
If you must use an external pink noise source,
you can use the relative measurement mode
to compensate for any problems in the response of the source. To do this, store the
measurement of the pink noise source in one
of the curve library entries. Go to the Control
Panel and set the Measurement Data to Relative. Click on the list box in the Measurement
Data section of the Control Panel and select
the library entry that contains your measurement of the external pink noise source. This
curve becomes the reference for any measurements taken while in the relative mode. Click
OK.
The measurements taken under these conditions will respond as if the external
pink noise source is flat, even if it isn't. Keep in mind that these measurements
do not relate to absolute SPL values, but are related to the original signal level
of the external pink noise source.
An alternative to using the relative measurement mode is to divide the
measured curve that you want to correct by the stored measurement of the
external pink noise source. This will remove any variations in frequency
response that were present in the external pink noise source.
pcRTA - User Manual
289
Chapter 11
Car Audio Applications
Setting Up For Measurements
The first step is to connect a noise source to the system. If you are going
to use the internal Pink Noise source, you will need to find a place to 'patch'
into the system. Usually, you can just disconnect the head unit and plug the
pcRTA into the cable that leads to the rear of the car. Make sure that the
total cable length from the pcRTA to the first piece of electronics in the
system is no longer than 100 feet.
The next step is to set up the microphone. The microphone should be
placed in the approximate position of the driver's head. The mic stand
should be a cylinder with the smallest possible diameter. Any flat surface
near the microphone will cause a reflection at some high frequency.
When running cables into and out of the vehicle, you should use a part of
the window, door or trunk that has a rubber seal on it. This will provide
some measure of padding to prevent damage to the cables.
NOTE: Care should be taken to start with a low level of output from the
internal noise source, because it is very easy to send a full level signal into the
amplifier(s). This could be dangerous to loudspeakers and human ears.
290
pcRTA - User Manual
Chapter 11
Car Audio Applications
11.2 Measuring SPL
There are two major types of car audio competitors, those that want the highest
fidelity of sound reproduction (sound quality) and those that want to create the
loudest levels ever experienced (SPL). This section provides details to help the
SPL competitor get the most accurate readings possible.
All sound level meters have the same goal, but get there in different ways. There
are many variables involved in SPL measurements that can cause various
meters to read differently. Here, we will discuss the most important variables
and show how to setup the pcRTA for these measurements.
Microphones
The measurement microphone is argueably the most important variable in the
measurement chain. The mic translates the acoustic level in the vehicle into an
electrical voltage that the meter can read. If the mic cannot provide a linear
change in voltage as the SPL increases, the meter will display a level that is not
accurate. There are two properties that the mic must have to produce the
correct output voltage for a given SPL. The first is the excursion capability of the
diaphragm. The diaphragm is a stretched material that vibrates with the
acoustic pressure in the environment. Excursion is the movement of the
diaphragm. If the acoustic pressure causes the diaphragm to move far enough,
it can 'bottom out', where further movement is not possible with increased SPL.
The second property is the maximum voltage swing of the mic preamp. As the
voltage from the capsule increases, the preamp can become overloaded and
start 'clipping' or flattening the top and bottom of the waveform resulting in nonlinear increases of the preamp's output voltage. See the figure below.
Normal (Linear) Sine Wave
pcRTA - User Manual
Clipped (Non-Linear) Sine Wave
291
Chapter 11
Car Audio Applications
Meters
Every SPL meter has different electrical characteristics and possible configurations. The main points of interest are the type of response that the
detector uses, the reponse time of the detector, and the bandwidth of the
signal reaching the detector. The detector is the circuit that converts the
electrical voltage from the mic into a numerical or graphical readout of the
actual level.
There are three types of detection: True RMS, Average, and Peak. RMS
detectors are the only type that gives a true indication of the power of the
signal no matter what the waveform (sine wave, square wave, noise or
music). The pcRTA uses true RMS detectors. Average detectors are less
expensive, and use a simple rectifier circuit. With sine waves, an average
detector will produce the same results as an RMS detector. When
measuring complex signals (distorted sine waves, noise, etc.), averaging
detectors will usually read 1 or 2 dB lower than RMS types. Peak detectors
have a very fast time constant and will indicate the peak voltage of a
waveform. When measuring noise or music, a peak detector will read high
compared with RMS. These types are useful for measuring 'headroom' or
the ability of a system to reproduce high amplitude transients of short
duration. For measuring the amount of power a system will produce, the
RMS detector is the best.
The response time of the detector should correspond to the frequency
being measured. When measuring low frequencies, the detector circuit
must have a longer reponse time in order to accurately read the level of the
signal. In the case of a full range SPL meter, the response time must be long
enough to read the lowest frequency that the meter can measure. In the
case of a 1/3 octave real time analyzer, a faster response time can be used
if the lower frequencies are not of concern. Some meters can be switched
between 'Fast' and 'Slow' response times. pcRTA can measure in 'Peak'
(ultra-fast response), 'Fast', 'Slow' and Leq (linear averaging over time). The
Leq type allows selection of the averaging time and should always be used
unless you are trying to emulate another meter. To accurately read signals
down to 10Hz, an averaging time of at least 0.2 second is required (the time
it takes for two cycles to pass through the detector)
292
pcRTA - User Manual
Chapter 11
Car Audio Applications
Bandwidth is the frequency range being measured. The desired bandwidth
encompasses at least the audible spectrum (20Hz to 20kHz), and does not have
any weighting applied. Weighting filters are included in most SPL meters. They
will add rolloffs to the high and low extremes of the frequency range to simulate
the sensitivity of the human ear to different loudness levels. These filters will
reduce the SPL readings especially when using sine waves at low frequencies.
Another factor that should be considered is whether the meter has auto-ranging
gain circuitry. It is common for SPL meters to have several gain ranges, since the
dynamic range of acoustic signals is so wide. If the meter has an automatic
circuit to change the gain, this should be disabled. High amplitude transients
can be lost if the meter is trying to change gain ranges during measurement.
pcRTA - User Manual
293
Chapter 11
Car Audio Applications
With all of these variables, it is important to have the correct settings on
your meter if you want accurate SPL readings. Here are the settings most
commonly used at competitions where pcRTA is the meter:
Control Panel Parameters
294
Parameter
Value
Parameter
Value
Gen Auto On/Off
Gen Output Level
Full Band Response
RTA Bands Resp.
ANSI Filter
Type of Data
Detector
Averaging Time
Off
N/A
Sum
Flat
Flat
SPL
Leq(S)
0.50 Sec
Input Source
MultiMic Select
Dynamic Range
Testing Mode
Measurement Data
Mic Input-1
N/A
Fixed (Highest)
Peak Hold
Absolute
pcRTA - User Manual
Chapter 11
Car Audio Applications
11.3 Vehicle Acoustics
The goal of this discussion is to point out the major aspects of vehicle acoustics.
Later sections will show you how to measure them with the pcRTA.
The acoustic space inside a vehicle is one of the most difficult and demanding
environments in which to install a sound system. The small size of the space and
the varying reflective and absorptive surfaces within it create many problems
when optimizing a system for sound quality.
On the other hand, the small size makes it possible to create Sound Pressure
Levels (SPL) at low frequencies that would require much more power and many
more speakers in a larger space.
Standing Waves
When designing a car audio system, you must take into consideration the effect
of standing waves. Sometimes known as 'modes', they are a major problem in
car audio situations.
Whenever there is sound in an enclosed environment, there will be standing
waves within that environment. Standing waves occur at frequencies whose
wavelengths correspond to twice the distance between the walls of the space.
In cars, standing waves typically occur between 50Hz and 200Hz depending
on the size of the vehicle.
It is important to understand that there are several modes (standing waves) in
any car, and when these modes are combined they can cause large peaks or
dips in the frequency response curve. This is because the standing waves will
be at different phase angles. When two waves at the same frequency and equal
phase combine, they increase the SPL at that frequency. When two waves at
the same frequency and opposite phase combine, they decrease the SPL at that
frequency.
Standing waves are very apparent when measuring at a single point in space.
As the point of measurement is changed, the peaks and dips caused by the
standing waves will appear at different frequencies across the spectrum. For this
reason it is recommended that measurements be taken at several different
points in space and then averaged. This technique is called spatial averaging, and
is explained in greater detail in a later section.
pcRTA - User Manual
295
Chapter 11
Car Audio Applications
Low Frequency Pressurization
Another major factor affecting low frequency response in vehicles is the
pressurization caused by the speakers being in an enclosed environment.
When a volume of air is sealed, it will have an effect on the low frequency
response of speakers in that space.
The effect of this sealed environment is a dramatic boost of sound at the
lowest frequencies. This rising response can be used to help flatten the low
frequency rolloff of a cabinet.
The extent of the effect depends on the size of the passenger compartment
and how much leakage there is. Leakage is the amount of pressure which
escapes to the outside, and is caused by the sheet metal of the body flexing
and other leaks such as open windows and holes.
The volume (cone area) of the speakers used to pressurize the space will
also have an effect on the amount of low frequency boost. A large cone
area will create more boost than a small one. This is true whether you are
using a single very large speaker or a number of smaller speakers.
This graph shows the response change caused by a 110ft³ space with 20in²
of leakage using a single 15" speaker. This curve does not include any
changes caused by standing waves.
Low Frequency Pressurization
dBspl
18
15
15
12
12
9
9
6
6
3
3
0
0
-3
-3
-6
20
296
dBspl
18
Hz
50
100
200
500
1k
2k
5k
10k
-6
20k
pcRTA - User Manual
Chapter 11
Car Audio Applications
External Noise
Noise from outside the vehicle's compartment has a negative effect on the
listening experience. Road noise and engine noise can become a very significant part of the sound inside the vehicle. This noise can be reduced greatly by
the use of dampening materials in the doors and on the surfaces of the
passenger compartment.
Electrical Noise
Noise from the ignition system and electro-mechanical devices such as heater
fans can be extremely annoying even at very low levels. These noises are usually
present only when some part of the system is improperly grounded.
Calculation vs. Measurement
While it is possible to estimate the effects of standing waves and closed-field low
frequency pressurization mathematically, the results would be only an approximation. Accurate calculation of these effects would require so much raw data
about the vehicle that it would not be practical. Also, there is no way to predict
the amount of external noise and electrical noise you will observe.
The fastest, easiest and most accurate way to account for all factors in the
vehicle's environment is to measure them. Standing waves and closed-field
pressurization can be measured together as a single transfer function. Troubleshooting noise problems is much easier when you can check your progress
against a reference measurement.
pcRTA - User Manual
297
Chapter 11
Car Audio Applications
11.4 Measuring Transfer Function
What is Transfer Function?
Transfer function is the ratio of two measurements. It can be determined by
dividing one measurement by another. Commonly the transfer function of a
device is simply the output divided by the input. Crossovers, equalizers, amps,
speakers, wires, and acoustic environments all have transfer functions. Some of
these devices have transfer functions which can be ignored, such as large gauge
speaker wire and high quality amplifiers.
Measuring the transfer function of a passive crossover can be very useful when
designing a system. It will show you if your crossover is working correctly, and
what the crossover is doing to the signals fed to it.
Knowing the transfer function of the acoustic environment of the vehicle is
extremely helpful when designing woofer enclosures. With a measured curve
of a vehicle's transfer function, you can accurately predict the response of a
cabinet in a vehicle before you actually install it. This can save enormous
amounts of time and money.
If you know that the frequency response being fed to a device is flat, you can
just measure the output of the device to determine it's transfer function. The
difference that the device causes is then directly measured. If the response
being fed to a device is not flat, then that response must be saved for later use
in a division process to determine the transfer function through the device.
Pink Noise Source
Transfer Function
of Equalizer
Transfer Function
of Crossover
Equalizer
Crossover
Transfer Function
of Equalizer and
Crossover
Measurement at Input
of Equalizer Divided by
Measurement at Output
of Crossover
298
pcRTA - User Manual
Chapter 11
Car Audio Applications
Transfer Function of Acoustic Environments
To measure the transfer function of the acoustic environment inside the
vehicle, you will need a test cabinet and an amplifier. It is not necessary for
the test cabinet to have an extremely flat response, because it will be used
as a relative reference only. The test cabinet should, however, have about
the same volume of speakers as the final installation. This will assure
accuracy of the low frequency pressurization.
This technique will not provide much valuable information at the higher
frequencies, because you cannot place the midrange drivers and tweeters
where they will be in the final installation. For this reason, you may elect to
use just a woofer cabinet and concentrate on the frequencies below
200Hz.
You must first measure the reference cabinet in a free field environment.
The recommended method is to take a ground-plane measurement. This
means to place the reference cabinet on the ground and the microphone
on the ground 1 meter away. Using a low output level (about 1 Watt),
measure the speaker with pink noise. Save the response curve as a
reference.
Reference Cabinet
Microphone
Ground Plane Measurement
pcRTA - User Manual
299
Chapter 11
Car Audio Applications
Next, place the reference cabinet inside the vehicle (closed field) and measure
it again with the same pink noise signal at the same level. Save the response
curve for comparison.
Bandpass in Free Field
dBspl
dBspl
105
105
100
100
95
95
90
90
85
85
80
80
75
75
70
70
65
20
Hz
50
100
200
500
1k
2k
5k
10k
65
20k
Bandpass in Closed Field
dBspl
dBspl
105
105
100
100
95
95
90
90
85
85
80
80
75
75
70
70
65
20
Hz
50
100
200
500
1k
2k
5k
10k
65
20k
These graphs show the response curves of a bandpass cabinet in free field and
inside the car. Note the extreme SPL boost at 50Hz on the closed field response.
This is typical of bandpass cabinets in cars.
300
pcRTA - User Manual
Chapter 11
Car Audio Applications
Now, go to the Processing menu of the pcRTA software and select Divide.
Divide the reference (free field) curve by the comparison (closed field) curve.
The result is the transfer function of the vehicle. This is the change in response
that any speaker of the same volume as the reference will exhibit when placed
in this particular vehicle. It includes the closed field pressurization and the
standing waves that are present in the vehicle's acoustic environment.
This transfer function can be saved for
future reference when designing systems for the same type of vehicle. To
see the response of any woofer cabinet with the same volume of speakers
in this particular vehicle, simply measure the cabinet in a free field environment and then multiply the measured
curve by the previously saved transfer
function curve.
The graph below shows the transfer
function that resulted from the two
bandpass cabinet measurements
shown on the previous page.
Transfer Function
dBspl
dBspl
20
20
15
15
10
10
5
5
0
0
-5
-5
-10
-10
-15
-15
-20
20
pcRTA - User Manual
Hz
50
100
200
500
1k
2k
5k
10k
-20
20k
301
Chapter 11
Car Audio Applications
Transfer Function of Passive Crossovers
To measure the transfer function of a passive crossover, you need a power
amplifier and the speaker(s) that the crossover will be attached to.
Passive crossovers should be measured with the speaker load. The speaker
presents a reactive load, meaning that the impedance of the speaker
changes depending on frequency. When measured with a resistive load,
you will see the thoerectically 'perfect' response from the textbook as
demonstrated in the top graph.
Because speakers are not purely
resistive loads, this type of measurement is not very useful. The
bottom graph shows the same
crossover with an 8 ohm speaker
load.
NOTE: When measuring the output of a power amplifier, be very
careful not to exceed the maximum input voltage of the pcRTA.
Voltages in excess of 5.8VRMS
will DESTROY the electronics.
Connect the Line Out of pcRTA
to the input of the amplifier. If
you are using an amplifier that is
known to have flat frequency
response, connect the Line In of
pcRTA to the speaker terminals.
The resulting measured curve will
be the transfer function of the
crossover. This is the voltage input to the speaker after the crossover.
302
pcRTA - User Manual
Chapter 11
Car Audio Applications
If you suspect that your power amplifier does not have a flat frequency
response, you should measure the output of the amplifier. Set the amplifier's
gain control to a low setting. Connect the pcRTA's Line Out to the amplifier's
input and the Line In to the amplifier's output. The resulting curve will be the
transfer function of the amplifier. If you find that the amplifier does not have a
flat frequency response, divide the measured curve of the amp by the measured
curve of the crossover to correct for the error introduced by the amplifier.
NOTE: It is important to observe the maximum input voltage of the pcRTA.
NEVER allow the voltage at the Line Input to exceed 5.8VRMS or severe damage
will result.
pcRTA - User Manual
303
Chapter 11
Car Audio Applications
11.5 Measuring Road Noise
Road noise is the background noise level caused by the tires against the
road, the air flowing over the car, and mechanical noises from the engine
and drive train. These noises must be measured while the vehicle is being
driven.
To measure road noise inside the vehicle you will need a portable
computer and the PAC4 (Portable Analyzer Chassis - 4 slot) from LinearX.
The PAC4 is a slot card holder which interfaces with the serial port on PC
compatible computers. It requires AC power which can be generated with
an invertor connected to the vehicle's battery.
Characterizing Road Noise
You can localize the source of various road noises by moving the
microphone to different locations in the vehicle while it is being driven. If
you save the measurements with a note about where each was taken, you
can compare them to measurements after adding dampening materials to
the passenger compartment.
With an RTA, you can get an idea not only of where the noise is, but what
is causing it. If you see a peak in the high frequencies, it might be wind
coming through a leak in the weatherstripping. A constant low frequency
peak is probably caused by the drive train and the tires moving on the
pavement. A mid-low peak that changes in frequency when you rev up the
engine is probably mechanical engine noise.
304
pcRTA - User Manual
Chapter 11
Car Audio Applications
11.6 Measuring Electrical Noise
Electrical noise is the background noise level caused by the electrical
energy generated by the car's engine and other electrical devices. This type
of noise is only present while the engine is running or while one of the other
devices is running.
To measure electrical noise, connect the output of the power amplifier to
the Line Input of the pcRTA. Measure the system noise with the engine off
by turning the volume all the way up with no signal. Use a long averaging
time (at least 5 Seconds). This is the background noise or noise floor of the
electronic components in the system.
CAUTION: NEVER allow the voltage at the Line Input to exceed 5.8VRMS
or severe damage will result.
Start the engine and take another measurement. You can use the relative
mode, or divide the measured curve by the stored curve of the noise floor.
Any difference observed is the noise caused by the engine's electrical
system.
It is usually very easy to determine which device is causing the noise,
because the noise will have a frequency which corresponds to the
frequency of the device. For instance, if the noise has a higher frequency
when you rev up the engine, it is ignition noise. If the noise changes when
you change the heater fan from low to high, it is noise from the fan.
Electrical noises in cars are usually due to improper grounding schemes in
the stereo installation. The solutions for these problems is beyond the
scope of this manual.
pcRTA - User Manual
305
Chapter 11
Car Audio Applications
11.7 Adjusting With an Equalizer
Equalizers
The ideal equalizers for tuning with pcRTA will be stereo (or two separate
mono) 1/3 octave units, meaning that they have two sets of 31 adjustments.
Most equalizers of this type have their bands centered at the same frequencies
as pcRTA, which makes adjustment very easy. If your equalizer has less than 31
bands you can still measure and adjust it with pcRTA.
Another feature to look for in an equalizer is the 'graphic' style of adjustment.
This simply means that the unit has linear sliders instead of rotary knobs. When
you make an adjustment on such a unit, it leaves a 'graphic' representation of
the frequency response change being added by the equalizer. This is much
more intuitive than several rows of round knobs.
+12
+8
+4
0
-4
-8
-12
20
25
31.5
40
50
63
80
100
125
160
200
250
315
400
500
630
800
1K
1.25K
1.6K
2K
2.5K 3.15K
4K
5K
6.3K
8K
10K
12.5K
16K
20K
+12
+8
+4
0
-4
-8
-12
Stereo 1/3 Octave Graphic Equalizer
Programmable Equalizers
In recent years, equalizers have been developed that can be adjusted by a
computer. These equalizers typically do not have any controls on the front
panel with the occasional exception of a few buttons which allow for adjustment if no computer is present. These equalizers can be automatically
programmed by pcRTA while measurements are being taken, so that pcRTA
actually adjusts the eq to achieve the operator's ideal target response. This
process is called optimization. For more information, see the Utilities chapter.
306
pcRTA - User Manual
Chapter 11
Car Audio Applications
Adjusting for Flatness
Set the volume of the system to a moderate level, around 90dB SPL on the
full range band of the pcRTA. Turn off the right channel of the system by
using the balance control or disconnecting the signal. Adjust the equalizer
on the left channel for a smooth, flat response from 20Hz on up to 20kHz.
Frequencies below 200Hz require special attention because of the unique
demands of the acoustic environment of vehicles, as discussed in an earlier
section. Save the curve now for use when tuning the right channel of the
system.
Turn off the left channel of the system and turn on the right channel . Using
the saved curve from the left channel as a reference, adjust the right
channel until the left and right channels are as close to identical as possible.
It will require different settings on the equalizer's left and right channels to
make the two channels match on the pcRTA display.
Now turn on the left and right channels together. Adjust the equalizer for
a flat response again, making the same relative changes on both channels.
For example, if you move the left channel's 1kHz band down 3dB from 0dB
to -3dB and the right channel's 1kHz band is at -2dB, move the right
channel's 1kHz band down 3dB also to -5dB. This will maintain the relative
flatness between the left and right channels.
It is best to keep the bands of the equalizer as close to 0dB as possible, and
not to have any drastic changes between one band and the next. If your
system requires drastic equalization, chances are that something in the
system needs to be reworked. Check for major problems in the installation.
The one exception to this is in the frequencies from 50Hz to 200Hz.
Because of standing waves, you may see dramatic peaks and/or dips in the
response at these frequencies. For the most accuracy possible, you should
use spatial averaging to tune the system. The next section discusses this
technique.
pcRTA - User Manual
307
Chapter 11
Car Audio Applications
11.8 Spatial Averaging
What is Spatial Averaging?
When measuring acoustic environments, a single microphone will read the
sound pressure at only one tiny point in space. Errors in measurement
occur because of standing waves and combing, which create peaks and
dips in the response curve that vary with different mic positions. Spatial
Averaging is a method of reducing the error due to this effect.
This technique is quite simple. Take measurements at several points in
space with the same stimulus and average the measurements.
The pcRTA has the built-in capability to do spatial averaging in real time.
You must have at least two microphones to take advantage of this feature,
however. If you have only one microphone, you can manually perform
spatial averaging, but it is more time-consuming.
4
M
ic
ic
M
2
3
M
ic
ic
M
1
Make your measurements in zones around the listening position(s). Small
changes in the position of the microphone will provide averaging at high
frequencies. For low frequencies, the mic must be moved several feet to
provide averaging. Also, it is best to use long averaging times when you are
striving for high accuracy in your measurements.
Spatial Averaging - driver's seat
Mic Position 1
Mic Position 2
Mic Position 3
Mic Position 4
Spatial Averaging - both front seats
308
pcRTA - User Manual
Chapter 11
Car Audio Applications
The measurements shown here were taken at four positions across the car in
the front seat as shown in the lower diagram on the previous page. The mics
were placed at head level.
The following two graphs show four curves, one from each of the four separate
mic positions. These graphs illustrate what you would see with four mics set to
measure in the Multiplex mode. Each mic is displayed separately and the data
is saved separately in the first four curve entries. This can also be done with a
single microphone, by moving it to each position to take four separate
measurements.
The first graph was taken with
the left channel of the sound
system turned on and the right
channel turned off.
The second graph was taken
with the left channel off and the
right channel on.
pcRTA - User Manual
309
Chapter 11
Car Audio Applications
These graphs illustrate what you would see with four mics set to measure
in the Average mode. The data from the four mics is averaged in real time
and displayed as a single curve.
The upper graph is the average with only the left channel of the sound
system turned on and the lower graph is the average with only the right
channel turned on.
310
pcRTA - User Manual
Chapter 11
Car Audio Applications
If you have only one microphone, you will need to average the measurements
manually.
Once you have several curves measured, go to the Process menu and select
Averaging. Click on all the curves you want to average, and select an empty
entry for the result curve.
The results will be the same as the graphs on the previous page, however with
four mics the average can be observed in real time. This is very handy when
adjusting an equalizer.
pcRTA - User Manual
311
Chapter 11
Car Audio Applications
312
pcRTA - User Manual
Chapter 11
Car Audio Applications
11.9 Measuring Impedance
There are two different types of impedance measurement available in the
pcRTA. They are 2-wire and 4-wire.
The 2-wire method uses only the Line Output of the pcRTA. It requires only one
cable with two leads connected to the device to be tested. The accuracy of
measurements taken with the 2-wire depend on the user subtracting the short
circuit impedance of the cable from the measured curve.
The 4-wire method uses the Line Output and the Line Input of the pcRTA. It
requires two cables with two leads each connected to the device to be tested.
The measurements that are taken with this method do not require any
processing. All examples in this section were measured with the 4-wire method.
The impedance measurement capability can be used on individual speakers as
shown in these graphs. The first is an 8 Ohm woofer with a Fo (resonant
frequency) of about 30Hz. The general shape of the curve is the characteristic
one seen on nearly all loudspeakers, with a narrow peak or 'hump' at the low
end and an upward slope at the high end.
pcRTA - User Manual
313
Chapter 11
Car Audio Applications
The next graph shows the impedance response of a 4 Ohm metal dome
tweeter. It has an Fo of about 2.3kHz. The resonant frequency 'hump' is
difficult to pick out because it's magnitude is only about 1/2 Ohm higher
than the nominal impedance. This is a very common type of curve seen on
tweeters.
314
pcRTA - User Manual
Chapter 11
Car Audio Applications
This graph shows the impedance response of a three way system with a passive
crossover. It was measured at the input to the passive crossover circuits. This
type of measurement is useful for determining whether the amplifier will see an
impedance at any frequency that could cause it to go into protection. It will also
alert you to possible wrong connections and short or open circuits.
The graphs on the following page show the impedance response of a 2nd order
passive lowpass circuit, first into an 8 Ohm resistor, and then into an 8 Ohm
woofer.
pcRTA - User Manual
315
Chapter 11
Car Audio Applications
316
pcRTA - User Manual
Chapter 11
Car Audio Applications
11.10 Scoring Routines
This section is a judge's guide to using the car audio competition scoring
routines. The IASCA routine will be used as an example, but you should be able
to use this guide with all of the scoring routines.
The scoring routines in the pcRTA are based on the current rules from each of
the sanctioning bodies. If the rules change, the software is changed to reflect
the new rules. Updates of the software are available on the World Wide Web
at the LinearX home page.
LinearX Web Address: http://www.linearx.com/home.htm
Figures are used extensively in this section, so that you will know what the
software should look like at each step.
Note- This section assumes that the pcRTA has been installed and the microphone calibration files (MDF) are properly assigned to the input(s) to be used.
pcRTA - User Manual
317
Chapter 11
Car Audio Applications
There are many graphic elements of the pcRTA software that can be
adjusted or manipulated by the user. To duplicate the look of a particular
graphics setup can be challenging. For this reason, we have incorporated
the Graph Display Set (GDS) files feature. GDS files keep track of all colors,
fonts, window locations and window sizes. Using these files, you can recall
the exact look that you saved previously, and there are some generic files
included with the software.
Load Graph Display Set
The first step in this section
will be to load the GDS file
called scoring.gds.To load the
GDS file, go to the File menu
and select Load Graph Display Set.
The Load Graph Display Set File dialog box opens. Select the GDS file
scoring.gds by double clicking the file name.
Double Click
318
pcRTA - User Manual
Chapter 11
Car Audio Applications
Your screen will look something
like this:
Next, hide the Curve Box and
the Tool Bar. Go to the View
menu and select Hide Curve
Box. Go to the View menu again
and select Hide Tool Bar.
Hide Tool Bar
Hide Curve Box
System Options
Data Area
Multi Mode
Now, select System Options from the Edit menu.
Set the Artwork View to Data Area and the
Window Update to Multi Mode. Click OK.
pcRTA - User Manual
319
Chapter 11
Car Audio Applications
It is important to understand that the window locations and sizes in this file were set on a VGA screen
resolution of 640x480. If your computer is running in
a SuperVGA mode (800x600, 1024x768, or higher),
the graphs will use a smaller portion of the screen. The
figures on this page illustrate the same GDS file at three
different screen resolutions.
VGA 640x480 Display
Super VGA 800x600 Display
If your screen resolution is
higher than VGA 640x480,
you will probably want to
drag the corners of the windows out to fill the screen.
Once you have the screen
set up the way you like it,
save your settings in a GDS
file so that you can recall
them any time.
Super VGA 1024x768 Display
320
pcRTA - User Manual
Chapter 11
Car Audio Applications
When running the scoring routines in pcRTA, it is critical that there are no screen
saver programs running, and that the print spooling options are disabled. These
options tie up the CPU during tests and can cause invalid readings from pcRTA.
Control Panel icon
In Windows 3.x, go to the Main window and open Control Panel. Double click
on the Desktop icon and click on the Screen Saver Name drop down list. Select
(None) and click OK. Now double click on the Printers icon. Turn off the Use
Print Manager option and click Close.
In Windows 95, use the Settings button on the Start bar to open Control Panel.
Desktop icon
Printers icon
Use Print Manager Button
Screen Saver Name
drop down list
pcRTA - User Manual
321
Chapter 11
Car Audio Applications
Double click on the Display icon. Click on the Screen Saver tab, and then
select (None) on the Screen Saver drop down list. Click OK.
Display icon
Now double click on the Printers
Screen Saver Drop Down List
folder. Double click on the printer
that you will be using. Click on
the Details tab. Select Print directly to the printer and then
click OK. Click OK again.
Details Tab
Printers
Folder
Print Directly to Printer
Button
322
pcRTA - User Manual
Chapter 11
Car Audio Applications
Go to the Utilities menu and select Scoring. A drop down menu appears. Select
IASCA.
IASCA Scoring
The IASCA Scoring dialog box opens. Click on Start Testing.
Start Testing button
IASCA Scoring Dialog Box
pcRTA - User Manual
323
Chapter 11
Car Audio Applications
Note that the Start Testing button now says Stop Testing.
Restart Sequence
Button
When starting a new competition, you will want to use the Restart
Sequence button. This button should only be used once, before anyone
has been scored. If the sequence is restarted during a competition, some
of the scores of previous competitors will be erased and replaced with new
ones.
Click the Restart Sequence button.
Yes button
A message box will pop up asking if you really want to restart the sequence.
Click the Yes button.
324
pcRTA - User Manual
Chapter 11
Car Audio Applications
Now, enter the name of the competition. To do this, click the mouse inside the
area that says Event Title. Erase the old name and type in the name of the
competition.
Event Title field
Mic-1 Input button
The pcRTA has the ability to use any of the four mic inputs or the Line Input as
sources for the scoring. This allows for multiple lanes to be measured with one
pcRTA. For single lane testing, the Mic-1 input should always be selected. Verify
that this is true.
You are now ready to start scoring. The preceding steps should only need to
be done once, at the beginning of a competition.
Click the Print Each Graph button if you want printouts of each competitor's
results.
Print Each Graph
button
pcRTA - User Manual
325
Chapter 11
Car Audio Applications
Enter the competitor's name in the area marked Contestant.
Contestant field
Press the Level Setting Test button.
Level Setting Test button
326
pcRTA - User Manual
Chapter 11
Car Audio Applications
The text inside the button changes to ...Push When Done.
Text Chart
(Set for 90dB)
At this point, the pcRTA is measuring the pink noise in the car. Have the
competitor set their system for a 90dB (+ or - 1dB) indication on the Text Chart
in the upper left corner of the screen and then press ...Push When Done.
...Push When Done
button
pcRTA - User Manual
327
Chapter 11
Car Audio Applications
Have the competitor restart the pink noise track on the CD and press the
RTA Response Test button.
RTA Response
Test button
The pcRTA now takes a 10 second average of the pink noise in the car. At
first, the Bar Graph will update quickly, and then it will freeze for 2 seconds
while the pcRTA is taking measurements. The graph will be updated 4 more
times, 2 seconds apart. After ten seconds, the test is finished. The RTA score
appears in the text box below the Contestant field. If desired, the test can
be run again by pressing the RTA Response Test button again.
Now, if you are doing Sound Q+ on this competitor, press the SPL Max Test
button.
SPL Max Test button
328
pcRTA - User Manual
Chapter 11
Car Audio Applications
The competitor now has 10 seconds to achieve the highest reading that they
can. The pcRTA will capture the loudest signal and continue to hold that level
until a louder level is measured, or 10 seconds elapses. The SPL score appears
in the text box below the Contestant field. If desired, the test can be run again
by pressing the SPL Max Test button again.
After the 10 second SPL Max test, press the button labeled Produce IASCA
Score.
Produce IASCA Score
button
This button will cause the pcRTA to score the RTA curve (and SQ+ value) and
place the score in memory. This is the last step in the procedure.
To score the next competitor, follow the procedure again starting from page 38.
If you need to print someone's score after the car has left the lane, follow the
procedure on the next page.
To retrieve a previous score, go to the Edit menu and open the Curve Library.
pcRTA - User Manual
329
Chapter 11
Car Audio Applications
The Curve Library dialog box opens. Click on the Data button on the curve
that you need.
Curve Library
Click on the Show Info button.
Data button
Show Info button
The Curve Information dialog box opens. This is the IASCA score that is
saved in memory for this competitor.
330
pcRTA - User Manual
Chapter 11
Car Audio Applications
Click on the Transfer to Notes button. Click OK. Click OK again. The
competitor's score is now displayed in the Notes and Comments field of the
graphs. To print, go to the File menu and select Print.
Transfer to Notes
button
If you need to continue scoring, simply start the scoring routine again. The
software will automatically start at the last curve entry and will not overwrite
any of the previous scores (unless the Restart Sequence button is used).
pcRTA - User Manual
331
Chapter 11
Car Audio Applications
332
pcRTA - User Manual
Appendix
Appendix
pcRTA - User Manual
Appendix
333
Appendix
334
pcRTA - User Manual
Appendix
Appendix A: pcRTA Analyzer Specifications
Note: All specifications subject to change without notice.
Physical
Format
Size
Connector Interface
ISA 8-bit PC slot card
13.2 x 4 inches
DB-15 Male
Power Requirements
DC Voltages
DC Currents
Microphone Supply
Total Power (no mics)
+12V, -12V,
+5V
200mA, 200mA, 230mA
+10Vdc @ 50mA
6 Watts
Noise Generator
Noise Spectrums
Digital Sequencer
Cycle Time
Pink Noise Filter
Maximum Output
Output Impedance
Output Attenuator
White, Pink
19-bit MLS
2.0 seconds
6-stage, ±0.5dB 10Hz-40kHz
+2.6dBm Pink, 8.6dBm White
500 Ohms
12-bit DAC
Square Wave Generator
Output Frequencies
Frequency Accuracy
Maximum Output
Output Impedance
Output Attenuator
31 @ 20Hz-20kHz, ISO centers
±0.5%
9.6dBm (RMS)
500 Ohms
12-bit DAC
Input Sources
Types
Maximum Input Level
Input Impedance
Full Band Frequency Response
Full Band Noise Floor
20Hz 1/3 oct Band Noise Floor
20kHz 1/3 oct band Noise Floor
Mic-1, Mic2-, Mic-3, Mic-4, LineIn
+20dBm
100k Ohms
-3dB @ 0.6Hz-150kHz
-91dBm (shorted input)
-130dBm (shorted input)
-110dBm (shorted input)
pcRTA - User Manual
335
Appendix
Auto Ranging Gain
Gain Blocks
Gain Range
4
0 to +80dB, in 20dB steps.
ANSI Weighting Filters
Filter Types
Design Standard Criteria
15
A, B, C, D, E
ANSI S1.42-1986
ASA 64-1986
IEC 537-1976
ASA 51, 575-601 1972
ANSI Weighting Filter Response
dB
dB
15
10
10
ANSI-E
ANSI-D
5
5
ANSI-C
0
0
ANSI-B
-5
-5
-10
-10
ANSI-A
-15
-15
-20
-20
-25
20
336
Frequency
100
500
1k
Hz
5k
10k
-25
20k
pcRTA - User Manual
Appendix
Band Filters
Fractional Band
Dynamic Range
Detection Method
Averaging Time
Filter Topology
Filter Order/Class
Design Criteria
Type and Sub-Type
+10
1/3 Octave
>120dB
Linear RMS, Exponential RMS
Selectable: 50mS to 50 seconds
Multiple Feedback Loop (MFL)
4-Pole, 2nd Order Bandpass Class II
ANSI S1.11-1986, ASA 65-1986
ANSI 1-D
1/3 Octave Filter Band Response
dB
dB
+10
+5
+5
0
0
-5
-5
-10
-10
-15
-15
-20
10
Freq
50
pcRTA - User Manual
100
500
1k
Hz
5k
10k
-20
40k
337
Appendix
338
pcRTA - User Manual
Appendix
Appendix B: pcRTA Connector Box Interface
Physical
Weight
Length, width, height
Connector Interface
2 lbs
7 x 2 x 1.75 inches
DB-15 Female
Line Output
Connector Type
Conductors, format
Output Impedance
1/4 Inch female jack
2, unbalanced
500 Ohms
Line Input
Connector Type
Conductors, format
Input Impedance
1/4 Inch female jack
2, unbalanced
100k Ohms
Mic Inputs
Connector Type
Conductors, format
Pinout
Input Impedance
3 pin XLR female
3, unbalanced
1=Shield, 2=Signal, 3=+10VDC
100k Ohms
pcRTA - User Manual
339
Appendix
340
pcRTA - User Manual
Appendix
Appendix C: M50 Series Microphone Specifications
Note: All specifications subject to change without notice.
Common Specifications:
Element Type
Preamp/Line Driver
Uncorrected Freq. Response
Corrected Freq. Response
Output Impedance, format
Temperature Range
Temp. Coefficient @1kHz
DC Supply Voltage
DC Supply Current
Electrical Connector
Construction and Finish
Weight
Length, diameter
Pinout
Electret Condensor
SMT active preamp
±5dB, 20Hz-20kHz
±1dB, 10Hz-40kHz
150 Ohms, unbalanced
0C° to +40C°
-0.01dB/C°
9-11 Vdc
50mA (Max)
Switchcraft TB3M
Aluminum, Black Anodized
1 oz (28 grams)
4.25 inches, 0.52 inch
1=Shield, 2=Signal, 3=+VDC
Model Specific Parameters:
Model
M51
M52
M53
Sensitivity
-36dBm/Pascal (12mV/94dBspl)
-56dBm/Pascal (1.2mV/94dBspl)
-15dBm/Pascal (140mV/94dBspl)
Model
M51
M52
M53
1/3 Octave Noise@1kHz
18 dBspl
38 dBspl
9 dBspl
pcRTA - User Manual
Max. Level
150 dBspl
170 dBspl
130 dBspl
ANSI-A Weighted Noise
34 dBspl
56 dBspl
18 dBspl
341
Appendix
342
pcRTA - User Manual
Appendix
Appendix D: Keyboard Shortcuts Quick Reference
Save File
Ctrl S
Print Graph
Ctrl P
Exit Program
Ctrl Q
Run/Stop Test
Delete
Gen On/Off
Insert
Curve Library
F2
Control Panel
F3
Graph Setup
F4
Graph Design
F9
System Options
F10
Zoom In
Ctrl +
Zoom Out
Ctrl -
Zoom 1X
Alt 1
Zoom 2X
Alt 2
Zoom 4X
Alt 4
Zoom 8X
Alt 8
Redraw Screen
Ctrl R
Scale Up
Ctrl −
Scale Auto
Ctrl A
Scale Down
Ctrl ↓
Show/Hide Tool Bar
Ctrl T
Show/Hide Curve Box Ctrl C
Help
pcRTA - User Manual
F1
343
Appendix
344
pcRTA - User Manual
Index
Index
pcRTA - User Manual
Index
I
Index
II
pcRTA - User Manual
Index
Index
Symbols
.DB 66
.NA 66
.RT 66
.Z 66
2-Wire 57, 313
24 bit 144
256 colors 141
3D-Perspective graphs 127
4-Wire 57, 313
80x87 3
A
A-chain alignment 245
About pcRTA 229
Absolute mode 94, 112
Accelerator key
control panel 24
curve box 27
generator on/off 24
quick reference 343
redraw screen 26
run/stop test 24, 42
save file 50
tool bar 23
Acoustic environment 298, 299
Acoustic reference level 136
Add curves 157
Address conflict 215
Adobe ATM 3
Adobe fonts 144
Adobe Illustrator 176
AI 173
Alligator clips 57
Amplifier 51
pcRTA - User Manual
Amplitude
control panel 87
graph setup 111
measurement mode 21
Analyzer calibration 215
Analyzer hardware 229
Animation 3, 141
ANSI filter array 22
ANSI weighting filters 92, 107
Artwork view 319
ASCII data 167
AUTOEXEC.BAT 4
Autoranging 109
Average detector 292
Average multiple measurements
process 161
spatial averaging 308
Averaging time
amplitude measurement 90
changing 43
impedance measurement 98
minimum 292
multimic mode 89
pink noise measurement 289
Azimuth adjustment 245, 253
B
B-chain alignment 256
Background noise 101, 304
Band display
decay time graph 121
noise analysis 128
Bandwidth 293
Bar graph display 112
Baud rate 210, 212
Black/White 75
Block diagram 22
III
Index
BMP 173
Bus clock speed 11, 216
C
C-weighting 261
Cable resistance 57
Calibration
date 229
description 215
during installation 11
microphone 14, 131, 239
process 216
running 12
with PAC unit 211
Circle data marker 46
Clipboard export 171
Clipboard viewer 171
Clock speed 11
CMYK color 176
Color buttons 115, 140
Color pad 141
Color patches 140
Color selection 115, 140, 144
COM port 208, 210
Combing 308
COMM.DRV 207
Comment lines 129
Compression 174
CONFIG.SYS 4
Connections 254
Connector box 8
Contents 227
Continuous 94
Control panel
amplitude 87
impedance 97
noise analysis 105
reverb time 101
tool bar button 24
IV
Control panel settings
a-chain alignment 248
b-chain alignment 259
description 233
loading 72
measuring the generator 41
noise criteria 269
reverb time 277
saving 71
Conversions 159
Coprocessor 3
Copy curve 84
CorelDraw 176
CPS file. See Control panel settings
Crossover 163
Cumulative distribution graph 126
Curve averaging 161
Curve box
description 27
hiding 235, 319
show/hide 224
Curve color 142
Curve legend 19, 81
Curve library
description 20
dialog 81
multimic entries 254
tool bar button 25
Curve list
curve box 28
curve library 82
Curve summation 163
Cycle limit 94
D
DAC attenuator 22
DAT file 170
Data area 319
Data cursor 31
pcRTA - User Manual
Index
Data curve 28, 82
Data curve indicators 29, 83
Data file format 168
DB15 pin interface 8
dBm
generator output 88, 102, 106
microphone sensitivity 133, 136
type of data 93, 108
Decay time 101
Decay time graph 121
Delete all 84
Delete curve 84
DELETE key 24, 79
Detector 109, 292
Directional response 55
Display modes 20
Distribution disk 4
Dithered 75
Divide curves 155
DMA 5
DOS 4
Dot matrix 75
Double click 19
Double-click zones 45
DPI 173
Dynamic range 109
E
Edit curve data 85
Edit mic data 133
EEPROM 12
Electrical noise 297, 305
EPS 173
Equalizer
graphic 306
programmable 199, 203
Example 37
Exit 76
pcRTA - User Manual
Exiting 65
Export
ASCII data 167
graphics 173
text 167
External equipment 37
Extrapolation 169
F
Fast response 292
Features 37
Film 245
Floating window
curve box 224
tool bar 223
Focused 28, 82
Font buttons
global graph design 140
text chart display 115
Font selection
global graph design 143
text chart display 115
Font style 143
Frame selection parameters 140
Full band 89
G
GDI 142
GDS file. See also Graph display set
for VGA, Super VGA 320
Gen off 80
Gen on 24, 80
Generator
amplitude mode 88
description 22
on/off 80
tool bar button 24
Generator response 37
V
Index
GIF 173
Graph bars 112
Graph design 139
Graph display settings
a-chain alignment 248
b-chain alignment 259
description 233, 318
loading 70, 318
noise criteria 269
reverb time 277
saving 69
Graph formats 20
Graph setup
amplitude 111
impedance 117
noise analysis 123
reverb time 119
tool bar button 24
Graphic equalizer 306
Graphics
accelerator card 3
display 115
export 173
Graphics file format 174
Graphing indicators 83
Graphing status 28, 82
Graphs 20
Gray halftones 75
Grid background 141
H
Harmonics 49
Help 38
Help buttons 38
Help system 227
Hide curve box 27
Hide tool bar 23
I
I/O port 5, 215
IASCA 317
IASCA scoring 177, 323
Impedance
control panel 97
graph setup 117
measurement mode 21
measuring 57, 313
Impedance test method 99
Import
ASCII data 169
text 169
Importing 170
Input source
amplitude 89
noise analysis 109
reverb time 102
Input/Output range 208
Inputs 14
INSERT key 24, 80
Installation 4
Interface cable 8
Internal generator 289
Interpolation 169
Interrupt request 208
Invert curve 151
IRQ 5, 208
ISA 7
ISA bus clock 229
J
JPG 173
Jumpers 5
K
Keyboard shortcuts 343
VI
pcRTA - User Manual
Index
L
Landscape 73
Laser printers 75
Leq response 292
Library entries 39
Library name 82
Line graph
amplitude 113
cinema applications 236
impedance 117
noise analysis 123
reverb time 119
Line graph display 113
Line input
car audio scoring 325
cinema snake 237
connector box 8
impedance measurement 97, 313
maximum input voltage 305
pink noise measurement 289
specifications 339
transfer function 303
with MDF correction 16, 133
Line output
cinema snake 237
impedance measurement 97, 313
on/off 80
output level 88, 102, 106
Linear units 149
LMS 57
Load mic data file 132
Low frequency pressurization 296
M
M50 series mic 14, 131, 341
Magnification factor 26, 219
Main screen 19
pcRTA - User Manual
Maximize 19
Maximum zoom level 219
MDF
convert 137, 242
file structure 136
installing 243
microphone setup 14, 131
Measurement data 94
Measurement microphone 291
Measurement mode
amplitude 87
description 21
impedance 97
new file 65
noise analysis 105
open file 66
reverb time 101
Measurements 37
Measuring
impedance 57, 313
reverberation 101
SPL 51, 291
system response 287
transfer function 298
Menu bar 19
Mic data files 14, 239
Mic inputs 131
Microphone
correction 239
mounting 240
placement 241, 290
power supply 254
setup 14, 131, 244
Minimize 19
Minimum output 88
Minimum zoom level 219
Move curve 84
Multi mode 265, 319
Multi-curve display 20
VII
Index
Multi-way 163
MultiMic 254
Multiple measurements 163
Multiple microphones 16, 135
Multiplex 254
Multiply curves 153
N
New file 65
New library 65
Noise analysis
control panel 105
graph setup 123
measurement mode 21
Noise criteria 266
Noise floor 266, 274
Noise generator 98
Non-correlated 163
Notes and comments 45, 129
O
Off-axis 55
On-axis 55, 240, 242
On-line help 38
Open circuit 59
Open file 66
Optical preamp 249
Optimization 201, 205
Oscillator 22
Output impedance 57
Output level 88
P
PAC interface 207, 211
PageMaker 176
Palette color 141, 144
Passive crossover 298, 302, 315
VIII
Paste 171
PC board 5
PCRTA.INI file 65, 76
PCT 173
PCX 173
Peak detector 292
Peak hold 94
Peak response 292
Persistent 223, 224
Pink noise 22, 288
Port address 5, 215
Portable analyzer chassis 207
Portrait 73
PostScript printer 142
Power response 161
Power supply 7
Preamps 16
Print 73
Print spooling 321
Printer configuration 73
Printer/port selection 75
Printing options 74
Probability distribution graph 125
Processing operations 20, 149
Production date 229
Program group 4
Programmable equalizer 199, 203, 306
Q
Quark XPress 176
R
RAM minimum 3
Random pressure field 137, 240, 242
Raster images 173
RCA plugs 8
Redraw screen 26, 221
pcRTA - User Manual
Index
Reference curve 266
reverb time 122
Reference level 151
Registration data 229
Relative measurement 289
Relative mode 94, 112, 113
Resonant frequency 314
Response errors 134
Response time 292
Restart sequence 324
Result curve 161
Reverb time
control panel 101
graph setup 119
measurement 274
Reverb time graph 120
Reverberant field 137
Reverberation 21
Revision level 229
RGB color 176
RightMouse button 24
RMS detector 22
Road noise 304
RT20 274
RT40 274
RT60 274, 284
RTA bands 91
Run test 24, 79
S
Scale
auto 25
curve 149
down 25
factor 73, 74
type 112, 113
up 25
pcRTA - User Manual
Scale control
bar graph 112
decay time 121
impedance 117
noise analysis 124-128
reverb time 120
text chart 113
Scaling a curve 149
Scaling factor unit 149
Scoring routines 317
Screen saver 210, 321
Scroll bars 19
Search 228
Selected printer 73
Serial number 15, 229
Serial port 207, 208, 210, 211
Short circuit 59
Show curve box 27
Show info 86
Show tool bar 23
Show/Hide 223, 224
Sine wave 292
Slit loss equalizer 250
Slow response 292
SMPTE 260
Snake 237
Solid color 144
Spatial averaging 241, 295, 307, 308
Speaker 52
Specifications 335
SPL 51
SPL response 37
Square graph marker 46
Square wave 48
Standing waves
in vehicles 308
in vehicles 295
small rooms 101
Starting and stopping measurements 43
IX
Index
Statistical graphs 21
Statistics / Occupational Noise 128
Stimulus time 102
Stop test 24, 79
Subdirectories 21, 66
Subtract curves 159
Sum multiple measurements 163
Super VGA 320
System options 145, 265, 319
System statistics 229
T
Terminate 76
Testing mode 94
Text chart 123
Text chart display 105, 115
TGA 173
TIF 173
Time out 103
Title bar 19
Tool bar
description 23
show/hide 223, 319
Transfer function
measuring 298
of acoustic environments 299
of passive crossovers 302
saving 301
Transfer to notes 86
Transferring graphics 173
True RMS detector 292
TrueType 3
TrueType fonts 3
Tutorial 37
Type of data 52, 93
Type of library 65
Typeface 143, 144
X
U
UART 209
Units 149
Untitled 65
USAC scoring 181, 193
V
Vector images 173
Vector type fonts 144
VGA 320
Video graphics 3
Video system resolution 223, 224
W
Weighted 91, 107
White noise 46
WIN.INI 4
Window update 265, 319
Windows help system 227
Wiring connectors 51
WMF 173
X
XLRs 8
Z
Zoom
1X / 2X / 4X / 8X 220
factor 26, 219
full 26, 220
in 26, 219
out 26, 219
pcRTA - User Manual