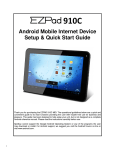
1
Chapter: 4 Modules and plugins (7.0.5) This chapter introduces you to self-contained software packages called modules, that contain the functionality of a Zenario site. You will learn how to install, initialize and run modules. You will see how modules can add core features, management facilities and how certain modules can generate plugins that add features to visitor- facing pages. You will be shown how to create a plugin which can then be saved in the plugin library. How to add a plugin to a content item, view and edit its settings and how to move a plugin on the page. You will learn about plugins and their relationship with layouts, enabling you to put plugins across multiple pages at once. This guide will also cover version-controlled plugins which can be added to the layout of a website and be used as a place-holder for content. Finally you will learn about some advanced module topics including what a framework is, how to specify a CSS class in a plugin and how to suspend and reset a module. Zenario User Manual (7.0.5) Modules Why modules are important Modules are a critical part of Zenario. While Zenario’s core software creates the environment for operating and managing a website, modules are used to deliver a considerable part of the visitor- and administratorfacing functionality. Certain modules are critical to the operation of Zenario, such as the module called Common Features which provides all of the standard core features of Zenario. Other modules are optional, and can add certain management functionality such as the Location Manager module which provides the ability to create and manage locations on your website. Certain modules can generate an output that is visible on a web page for site visitors. Modules that do this are called pluggable modules. These Modules can be used to generate plugins which can be inserted onto a web page. The Modules area in Organizer allows you to easily view each type of running module and its functionality. 2 Zenario User Manual (7.0.5) Ini3alizing and running a module Some modules will “uninitialized” be default, that is to say that they are turned off and will need to be activated (initialized) in order to provide functionality. To initialize a module in Organizer go to the modules area and click on “All modules”. You will then see some filtering options next to the quick search box. Click on “Uninitialized” to display the correct list. Once on this screen you can search for the module you are looking for in the quick search box. For this example the module “Location Manager” has been entered in the search box. Once the desired module has been found, highlight it and click “Start module” in order to initialize it. 3 Zenario User Manual (7.0.5) Tip If you are unsure about the functionality of a module, you can view a module’s description by clicking on the arrow on the left of the module column. The start module screen will appear, where you have the option to choose the permission type for the module, either: ❖ Grant yourself permissions to use the module ❖ Grant all site administrators permission ❖ Do not grant any permissions Click “Start module”. 4 Zenario User Manual (7.0.5) The module will then appear in the list of running modules. Note A module may add new icons to the left-hand admin menu, icons within existing sections, tabs or fields to existing admin boxes, or a range of other features. A Module may add any of the following: ❖ create new navigation areas in the left column of Organizer; ❖ create features in existing parts of Organizer; ❖ define new content types; ❖ create its own database tables and insert data; ❖ add to the Admin Toolbar of the visitor front-end; ❖ add tabs to floating admin boxes in the front- or Organizer; ❖ create its own Settings panels. Modules can create a well-integrated environment, with features delivered where an administrator would most intuitively expect them. Plugins As mentioned earlier in this chapter a plugin can be generated from modules that output visible content on the front-end. When a plugin is inserted onto a page, it is inserted into a slot. A slot is an area on a layout that plugins can be inserted into. Once in the slot, the plugin can display something, or provide some functionality with which a visitor can interact. 5 Zenario User Manual (7.0.5) When inserted, a plugin exists on either the single content item it is on or on the layout that the content item is using. You will learn about layouts later in this chapter. When inserted a plugin can take two forms: ❖ A plugin can be stored in the library ❖ A plugin can be version-controlled Plugins stored in the plugin library come complete with their settings. It holds its own content irrespective of the content item on which it is used. If used on multiple pages and a setting is changed, it will change on all of the pages it is used on. Version-controlled plugins are like place-holders that indicate a plugin is inserted in a given slot, they have no actual content. The content of a version-controlled plugin comes entirely from the content item on which it is used. Crea3ng a plugin This section of the user guide will talk you through how to create a banner plugin that is stored in the plugin library, adding it to a content item, viewing and editing its content and moving it on the page. When complete it will look like the below. 6 Zenario User Manual (7.0.5) To begin go to the page that you would like the banner on. Go to the Edit tab and then click the “Show empty slots” button. All of the unused slots on the page will now show. Hover your mouse over an empty slot and click on the “+” icon and choose “Insert plugin from library” 7 Zenario User Manual (7.0.5) You will then see a list of all of the running modules with library plugins. As we want to use a banner, click on the folder icon next to “Banner”. You will then see all of the banners in the library. We want to make a new one, so click on “Create a plugin” 8 Zenario User Manual (7.0.5) On the next screen, enter the plugin name, which is usually something relevant to the content of the plugin, and then to show an image click on “Show an image”. Two options will then appear: upload and select image. Upload will allow you to upload from your computer and select image will allow you to choose an image that is already in the image library of your site. Once you have chosen the image, you will then see a preview of it. Scrolling further down the admin box, you will see an area called “Destination”. It is here that you can choose a link destination to take the site user to when clicking on the banner. 9 Zenario User Manual (7.0.5) As this is a banner taking about city news, we want to link this to the existing news page on the website. Under Destination, click the “Link to a Content Item” button. More options will appear allowing you to select a content item. Once clicked you will see an Organizer screen. There you can choose the content item from the list and click “Choose”. You will then see the chosen content item in the plugin settings. You will also notice another tab at the top of this window called “Title & HTML”. It is here that you can display some text on the banner that will show to the site visitors. 10 Zenario User Manual (7.0.5) You can add a title, some sub-text in the HTML box and a link to read more if you wish. For the purpose of this banner however, just title will be used. Click save and your new banner plugin is now saved in the library. 11 Zenario User Manual (7.0.5) Click “Insert plugin” to put the banner into the empty slot on the page. Note This example only shows how to insert a banner plugin, there are many others that can be added to content items using the same process as above. Viewing and edi3ng a plugin’s se:ngs Now that the banner is on the page you can view or change any of its settings. Stay in Edit mode and hover your mouse on the banner, you will see that a multi-coloured icon appears. Click it and select “Plugin properties”. 12 Zenario User Manual (7.0.5) Moving a plugin Should you wish to move the plugin to a different slot, simply click on the multi-coloured edit icon of the plugin and then click “Move plugin”. A plus icon will then appear on all of the slots that you can move the banner to. Click the plus to move. 13 Zenario User Manual (7.0.5) Note If you click a plus on another library plugin, the two plugins will swap position. if clicking the plus on a version-controlled plugin, then the banner will be on top of that plugin on that specific page. Plugins and layouts When working and editing your website on the Edit tab, you may ave noticed that some plugins, such as the company logo, are greyed out. 14 Zenario User Manual (7.0.5) This is because these plugins are on the layout of that content item. A layout is what defines the structure of a page and the arrangement of the slots on a content item. Multiple content items can use a single layout for their appearance. The layout tab To access the plugins on a layout you need to go to the Layout tab in the admin toolbar. With this tab selected you can see that the layout and its ID number, as well as how many content items use that layout, are shown in the toolbar. You will also notice that a different set of slots will now be highlighted, such as the previously inaccessible company logo and the long masthead banner. 15 Zenario User Manual (7.0.5) Note You may notice that the City news banner made on the page earlier has been greyed out. This shows that it is not on the layout level on this content item. Inser3ng a plugin on the layout Inserting a plugin on the layout is a very similar process to adding to the content item. In this example we want to replace the company logo banner with a new banner on the layout. Firstly make your new banner, which can be done in Organizer > Modules > All modules and then click on the banner folder icon. Click “Create a plugin” and follow the same process as mentioned in the Creating a plugin section above. 16 Zenario User Manual (7.0.5) Once you have made your new banner, return to the front-end of your website, go to the Layout tab then click the multi-coloured edit icon on the company logo banner and click “Show a different plugin on this layout”. Select the new banner you made and click insert. 17 Zenario User Manual (7.0.5) Your new logo will now appear in this slot on the layout. As you can see in the admin toolbar information, 4 content items are using this layout. But how do we find out which content items this new logo has appeared on? Go to Organizer > Modules > Plugin library you can then see that the “My logo” is being used on one layout. 18 Zenario User Manual (7.0.5) You can see further information by going to view and then “Layouts using this plugin”. Highlighting the layout that appears and choosing View > Content items using this layout. 19 Zenario User Manual (7.0.5) You will then see the four content items on the layout that are using the newly inserted logo. Version-controlled plugins Version-controlled plugins are inserted into a given slot. A versioncontrolled plugin "exists" in its slot on a layout and has a given appearance (via CSS), but otherwise contains none of its own settings or content. Thus you might think of it as a window or wire frame through which content is viewed. The content of the version-controlled plugin is tied into the content item, and specifically to a given version of that content item. Each time you create a new version of a content item the version-controlled plugin data is updated and linked to that specific version. You can think of a version-controlled plugin as being a "placeholder" for content; it's a kind of window, whose position on a web page is predetermined, but what appears through the window comes from an individual content item. Pu:ng a version-‐controlled plugin on a layout To put a version-controlled plugin on a layout, you must firstly be on the layout tab in the admin toolbar, choose and empty slot and click on the “+” icon. You will now see a few different options of the types of version-controlled plugins that you can insert (highlighted in the red box). 20 Zenario User Manual (7.0.5) Click on the plugin you would like to insert, a banner will be used for this guide. After you click insert you will see that the slot has no content. In order to add content to the plugin, you must then go to the edit tab in the admin toolbar. 21 Zenario User Manual (7.0.5) You can then click on the pencil icon to add your content. Advanced module topics In this final chapter of modules and plugins you will learn about some more advanced topics such as frameworks, how to specify a CSS class in a plugin and suspending and resetting a module. Frameworks A framework is the mechanism through which a plugin's HTML output is defined, and onto which its styles are attached. The plugin in each slot generates a chunk of HTML according to its framework, and that HTML gets merged into the appropriate slot of the overall layout. If we use a banner as an example. By default if you have a title, some text and an image then your banner will looks like this (using the Duke street skin that comes with a new install): 22 Zenario User Manual (7.0.5) You are able to choose a variety of different frameworks. To do this go to the plugin options drop-down and choose “Framework & CSS”. An admin box will appear, within it there is a section called “Framework” here you can see the current framework being used and a preview of the code for that framework. 23 Zenario User Manual (7.0.5) You can choose a different framework by using the drop-down list. There are another two frameworks setup for this plugin. If choosing “title_then_image_then_text” the banner will look like this on the front-end: 24 Zenario User Manual (7.0.5) and “title_then_text_then_image” looks like this: Note If you have access to your server file system you can edit framework files, or make new ones. You may wish to make minor changes to a framework; as soon as you save your changes to a framework file they become live (if the framework is used). More advanced users may wish to create their own Frameworks. 25 Zenario User Manual (7.0.5) How to specify a CSS class in a plugin It is possible to specify a CSS class in a plugin in order to change the look and feel of the front-end output. Choose the “Framework & CSS” option for the plugin. You will then see that there is a section called “CSS classes” which will list existing classes. There is also a text box at the bottom which allows you to input your own classes. 26 Zenario User Manual (7.0.5) Suspending a module If you wish to suspend a module (and any associated plugins) go to Organizer > Modules, locate the module in the panel, select it and then click on “Suspend module”. While suspended, the following things will happen: ❖ None of the administration interfaces that the module has created will appear, and you will not be able to interact with any of the module's data. ❖ The functionality of the module will not be available to other modules. ❖ For modules that have plugins that appear on visitor-facing pages, the plugins will not appear (this will affect published web pages). The module will the appear in the suspended modules list. 27 Zenario User Manual (7.0.5) Rese:ng a module Data that is managed by the module will be retained while the module is suspended. If you wish to delete the module's data and restore the module to its factory defaults, you should reset the module. To reset a suspended module to its default settings, select the module and under Actions click “Uninitialise and delete data” WARNING Take great care when resetting a module. Modules may hold a considerable amount of data and all such data will be lost when you perform a reset. Tip You can use the “Start module” button to restore the module and its data back to your site. 28 Zenario User Manual (7.0.5) Summary This chapter has covered a lot of ground; modules are a central concept of Zenario and you have learned how to install them, administer them and work with them. You have learned about plugins, the front-end incarnation of a module. Plugins can be inserted into a slot either stored in the library or as a version-controlled plugin. Version-controlled plugins work as placeholders in which you can edit module- specific settings or content, while plugins saved in the library have self-contained content. You have been introduced to layouts, an important structural feature of Zenario that allows you to determine the configuration and styling of sections of a site. Both kinds of plugins can be installed on the layout level, and you've learned about the controls in the admin toolbar for determining those placements. You have seen how you can move a plugin from one slot to another, and how to change its styling using the framework picker. Finally you have seen the administrative tools that let you view the various styles of a module, and how to access its Frameworks, the HTML-like code that determines the layout of a plugin in its slot. 29